

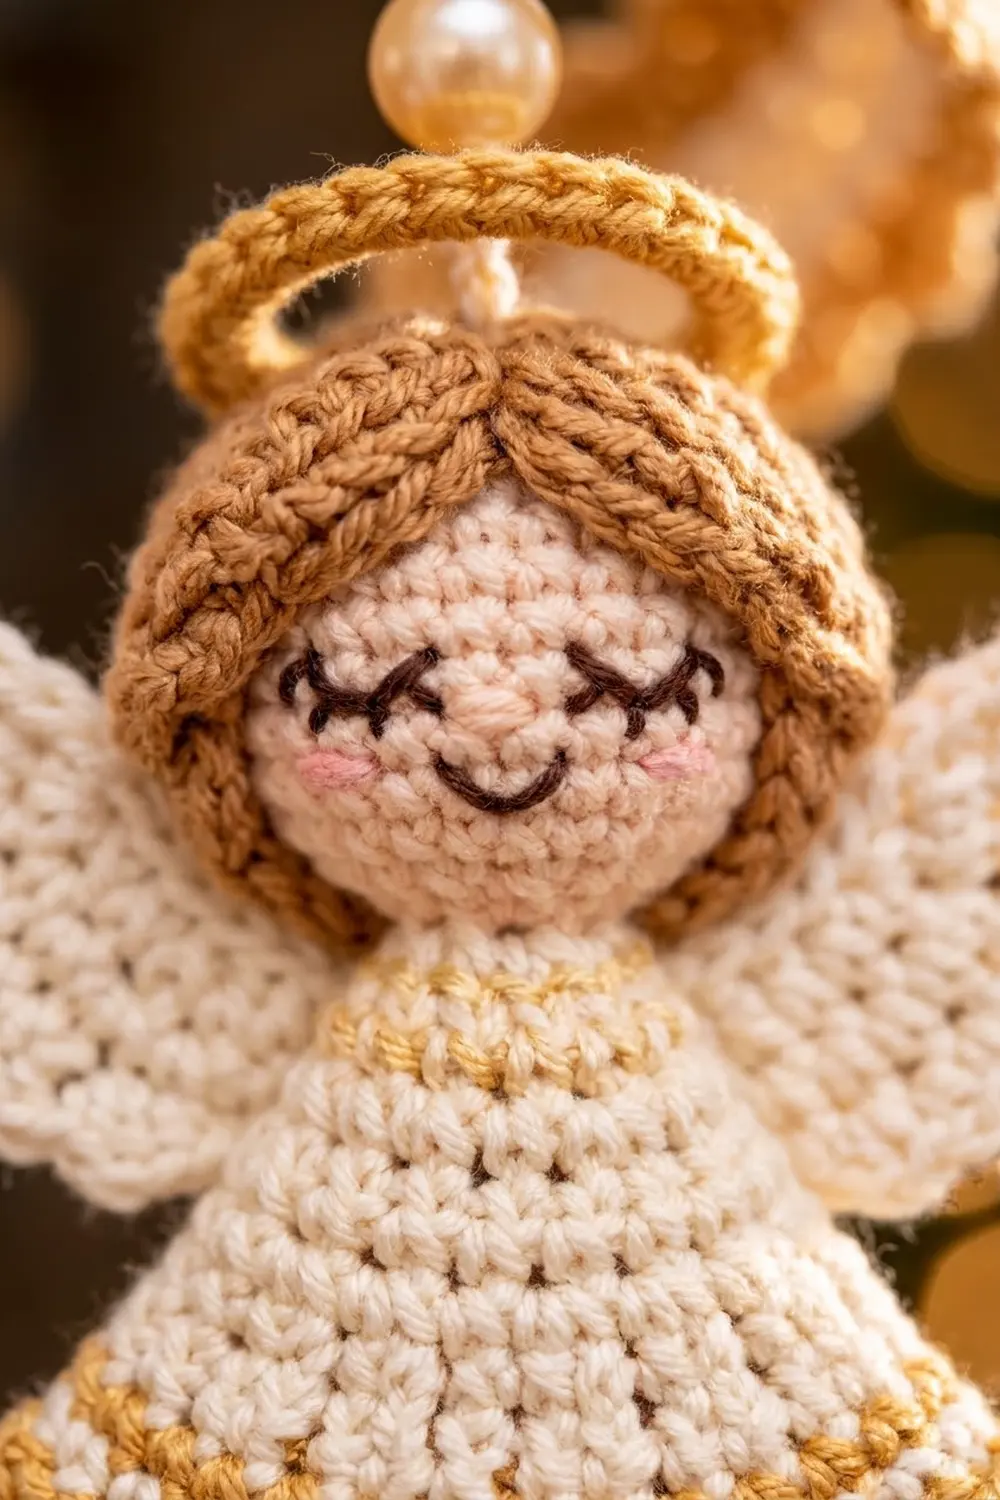
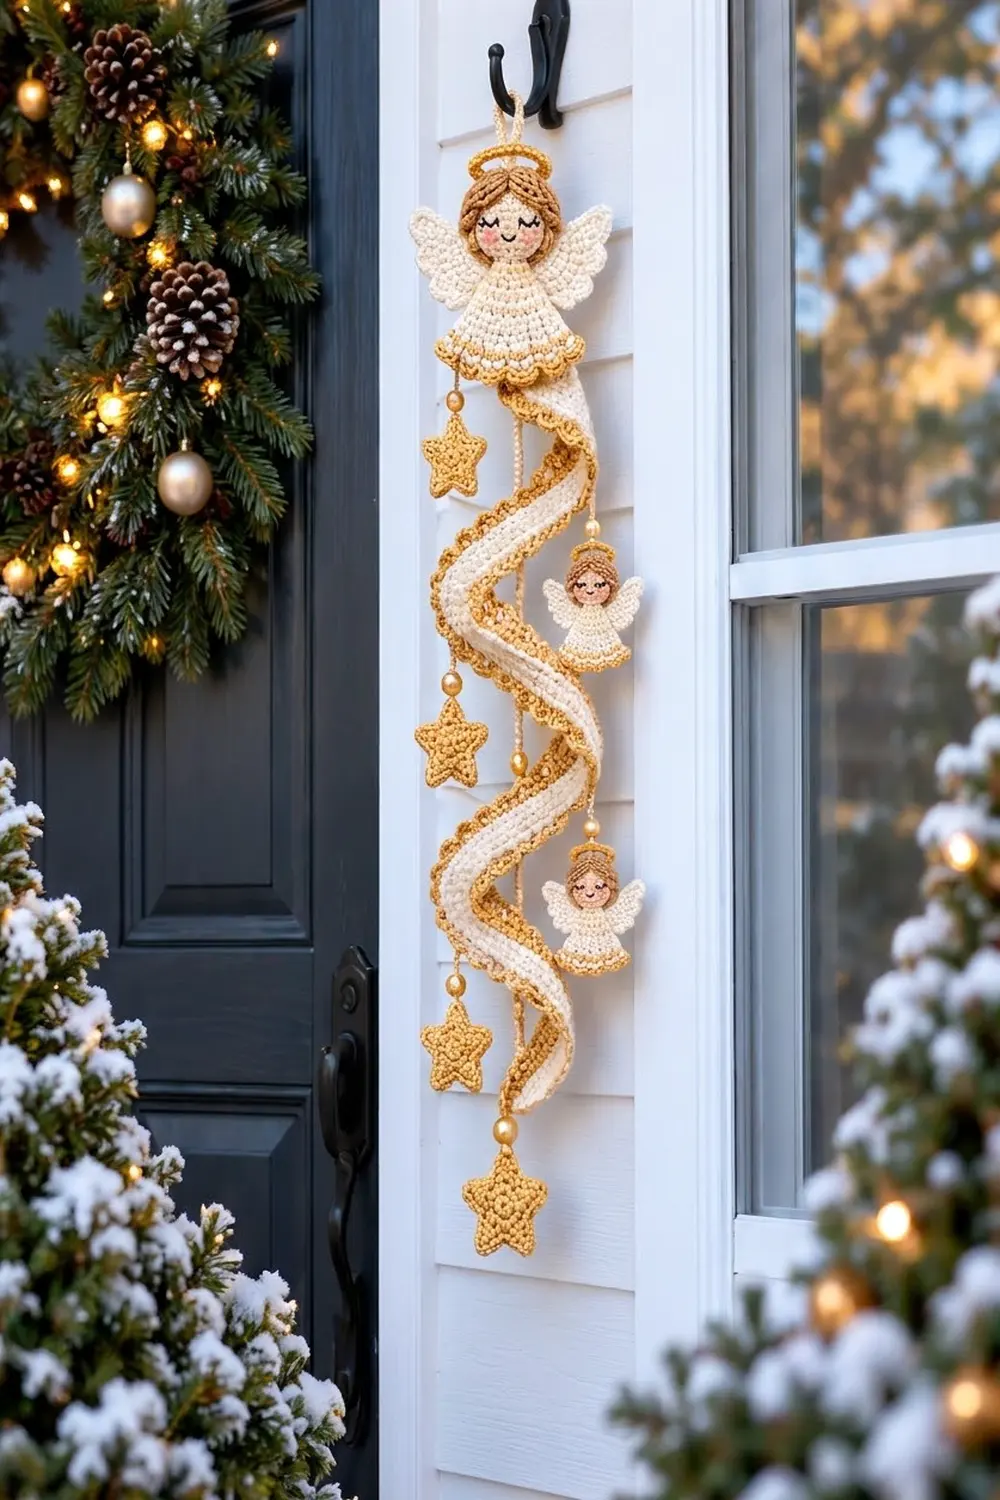
This hanging ornament pairs a sweet angel with a cascading spiral ribbon. A large angel sits at the top. Below her, a cream ribbon edged in ruffled gold twists into a corkscrew, while two small angels and gold stars drift down on beaded strands.
The colors are soft and warm: cream, honey gold, light caramel brown hair and pale peach faces, with gold pearl beads catching the light. The style is a classic Christmas heirloom. It suits a front door, a mantel or a tree branch.
The pattern uses US crochet terms. The finished ornament is about 20 in (50.8 cm) long and 4.5 in (11.4 cm) wide.
You make each piece separately: heads, halos, dresses, wings, stars, and one long curved ribbon worked in rows. Increases along the rows make the ribbon curl into a coil, and starch sets it into a hanging spiral. Then you sew and string everything together.
Finished Size and Construction
- Finished size: 20 in (50.8 cm) long x 4.5 in (11.4 cm) wide
- Skill level: Intermediate
- Terminology: US
- Yarn weight: DK (#3, light) cotton or cotton blend
- Hook: 3.0 mm
- Number of pieces: 1 spiral ribbon, 1 large angel (6 parts), 2 small angels (6 parts each), 4 stars
- Layout: large angel on top; spiral in the center; 3 stars on the left strand; 2 small angels on the right strand; 1 star at the bottom
- Large angel: 4.5 in (11.4 cm) wide x 3.75 in (9.5 cm) tall
- Small angel: 2.4 in (6.1 cm) wide x 2.25 in (5.7 cm) tall
- Star: 1.75 in (4.4 cm) point to point
- Ribbon width before border: 1.5 in (3.8 cm)
- Border depth: outer edge 0.375 in (1.0 cm), inner edge 0.25 in (0.6 cm)
- Ribbon width after border: 2.125 in (5.4 cm)
Materials
Choose a smooth, mercerized DK cotton. It shows the stitches clearly and holds starch well. Avoid fuzzy yarns, because the ribbon must stiffen cleanly and keep its shape for years.
- Honey gold: 25 g / 60 m
- Cream: 20 g / 48 m
- Light caramel brown: 5 g / 12 m
- Pale peach: 5 g / 12 m
- Dark brown and pink embroidery floss, small amounts
- Cream size 10 crochet thread, about 2 m
- 6 gold pearl beads, 8 mm (buy 8 in case)
Quantities include a margin of about 20 percent.
Tools: 3.0 mm hook, tapestry needle, beading needle, stitch markers, a pinch of fiberfill, spray starch or fabric stiffener, pins, blocking mat, and a tube or bottle 2.25 in (5.7 cm) across.
Abbreviations (US Terms)
- ch – chain
- sl st – slip stitch
- sc – single crochet
- hdc – half double crochet
- dc – double crochet
- sk – skip
- st(s) – stitch(es)
- MR – magic ring
- [ ] – repeat as directed
Picot: sc in next st, ch 2, sl st in the sc just made.
The turning ch 1 never counts as a stitch.
Gauge and Checkpoints
Gauge: 18 sc and 20 rows = 4 in (10.2 cm) in sc.
Make one star first as your test piece. If it measures 1.75 in (4.4 cm) point to point, your gauge is right for every part.
Checkpoints:
– Small head after Rnd 3: 1 in (2.5 cm) across
– Large head after Rnd 4: 1.5 in (3.8 cm) across
– Small dress after Row 4: 2 in (5.1 cm) wide at the bottom
– Large dress after Row 6: 3.3 in (8.4 cm) wide at the bottom
– Ribbon Row 1: 26.7 in (67.8 cm) long
– Ribbon after Row 7: 1.5 in (3.8 cm) wide
If your pieces are too big, go down 0.25 mm. If they are too small, go up 0.25 mm. Make the star again before you continue.
Stars (make 4)
With gold:
Rnd 1: MR, 5 sc in ring. (5 sts)
Rnd 2: 2 sc in each st. (10 sts)
Rnd 3 (points): [ch 4, sl st in 2nd ch from hook, sc in next ch, hdc in next ch, sk 1 st, sl st in next st] 5 times. (5 points; all 10 sts used)
Fasten off, leaving a 6 in (15.2 cm) tail.
Angel Heads
Large Head
Front (peach):
Rnd 1: MR, 6 sc. (6 sts)
Rnd 2: 2 sc in each st. (12 sts)
Rnd 3: [sc in next st, 2 sc in next st] 6 times. (18 sts)
Fasten off. With dark brown floss, embroider two curved closed eyes and a small smile. Add two pink cheek dots.
Back (brown): Work Rnds 1–3 the same way. (18 sts)
Rnd 4 (joining, peach): Hold the front and back wrong sides together. Sc through both layers in each st, and add a pinch of fiberfill before you close the round. (18 sts)
Hair (brown): Mark the 6 sts centered at the chin. Join brown in the first of the other 12 sts. [2 hdc in next st] 12 times, sl st in next st. (24 hdc) The 6 chin sts stay bare.
Small Head (make 2)
Front (peach): Work Rnds 1–2 as for the large head. (12 sts) Embroider the face.
Back (brown): Rnds 1–2. (12 sts)
Rnd 3 (joining, peach): Sc through both layers in each st, adding a little stuffing. (12 sts)
Hair (brown): Leave the 4 chin sts bare. Over the top 8 sts, [2 hdc in next st] 8 times, sl st in next st. (16 hdc)
Halos
With gold. Large: ch 16, sl st to form a ring, 16 sc around the ring, sl st to first sc. (16 sts) Small (make 2): ch 10, join, 10 sc. (10 sts)
Dresses
Large Dress
Row 1 (gold): Ch 6, sc in 2nd ch from hook and each ch across. (5 sts)
Row 2 (cream): Ch 1, turn, 2 hdc in first st, hdc in next 3 sts, 2 hdc in last st. (7 sts)
Rows 3–6: Ch 1, turn, 2 hdc in first st, hdc across, 2 hdc in last st. (9, 11, 13, 15 sts)
Row 7 (gold): Ch 1, turn, sc in each st. (15 sts)
Row 8 (gold): Ch 1, turn, picot in each st. (15 picots)
Small Dress (make 2)
Row 1 (gold): Ch 4, sc in 2nd ch from hook and each ch across. (3 sts)
Rows 2–4 (cream): Ch 1, turn, 2 hdc in first st, hdc across, 2 hdc in last st. (5, 7, 9 sts)
Row 5 (gold): Ch 1, turn, sc in each st. (9 sts)
Row 6 (gold): Ch 1, turn, picot in each st. (9 picots)
Wings
Large Wings (make 2)
With cream.
Row 1: MR, ch 2 (does not count), 6 dc in ring, pull closed. (6 sts)
Row 2: Ch 1, turn, 2 sc in each st. (12 sts)
Row 3: Ch 1, turn, [sc in next st, 2 sc in next st] 6 times. (18 sts)
Row 4: Ch 1, turn, [sl st in next st, 3 dc in next st, sl st in next st] 6 times. (6 feathers; all 18 sts used)
Small Wings (make 4)
Rows 1–2: Work as for the large wings. (12 sts)
Row 3: Ch 1, turn, [sl st in next st, 3 hdc in next st] 6 times. (6 feathers; all 12 sts used)
Spiral Ribbon
You work this piece in rows along its length. Each increase row makes the top edge longer, so the ribbon curls into a flat coil. That is meant to happen, so don’t try to flatten it.
Foundation (gold): Ch 121.
Row 1 (gold): Sc in 2nd ch from hook and each ch across. (120 sts) Check: 26.7 in (67.8 cm).
Row 2 (cream): Ch 1, turn, [sc in next 3 sts, 2 sc in next st] 30 times. (150 sts)
Row 3 (cream): Ch 1, turn, hdc in each st. (150 sts)
Row 4 (gold): Ch 1, turn, [sc in next 4 sts, 2 sc in next st] 30 times. (180 sts)
Row 5 (cream): Ch 1, turn, hdc in each st. (180 sts)
Row 6 (cream): Ch 1, turn, [sc in next 5 sts, 2 sc in next st] 30 times. (210 sts)
Row 7 (gold): Ch 1, turn, [sc in next 6 sts, 2 sc in next st] 30 times. (240 sts)
The ribbon is now 1.5 in (3.8 cm) wide, and its outer edge is about 53.3 in (135.4 cm) long. Do not fasten off; the border continues from here.
Make All Pieces
- Gold: 4 stars, 3 halos, dress neck and hem rows, ribbon Rows 1, 4 and 7, and both borders.
- Cream: 3 dress bodies, 6 wings, ribbon Rows 2, 3, 5 and 6.
- Brown: 3 head backs, 3 hair fringes.
- Peach: 3 head fronts, 3 joining rounds.
Layout grid:
              [hanging loop]
              [LARGE ANGEL]
 LEFT STRAND     SPIRAL      RIGHT STRAND
   bead           turn 1        bead
   STAR 1         turn 2      SMALL ANGEL 1
   bead           turn 3        bead
   STAR 2       half turn     SMALL ANGEL 2
   bead
   STAR 3
                  bead
              STAR 4 (bottom)
Joining
Angels: Center dress Row 1 under the chin, tucking the top of the dress 0.25 in (0.6 cm) behind the head. Whipstitch the neck sts (5 on the large angel, 3 on the small ones) to the back of the chin sts, one stitch to one stitch. Sew each wing behind the dress at shoulder level, ring end toward the center. Sew the halo behind the hair at a slight tilt.
Hanging loop: With cream, ch 20. Sew both ends to the top back of the large head to make a 1.5 in (3.8 cm) loop.
Ribbon: Sew the starting short end (7 row ends) to the center back of the large dress, one row end to one stitch, so the top edge sits just under dress Row 7.
Strands: Thread doubled size 10 thread onto the beading needle.
- Left strand: Anchor the thread at the left side of the large hem. String a bead, then tie on Star 1 by one point so its top sits 1 in (2.5 cm) below the hem. Add a bead and Star 2 at 5 in (12.7 cm), then a bead and Star 3 at 9 in (22.9 cm).
- Right strand: Anchor at the right side of the hem. Tie Small Angel 1 by her halo at 3 in (7.6 cm) and Small Angel 2 at 7 in (17.8 cm), with a bead above each.
Center thread and bottom star: Tie a 12.5 in (31.8 cm) cream thread from the back of the dress to the lower end of the ribbon. This keeps the spiral from stretching. Add a bead and Star 4 so the star’s top sits 13 in (33.0 cm) below the hem.
Tension: Make your sewing stitches snug but not puckered. Keep the knots firm, but don’t pull the strands tight; they should hang straight under their own weight.
Checkpoint: The hanging length is 20 in (50.8 cm).
Border
Border gauge: Each scallop spans 2 sts, or 0.44 in (1.1 cm).
Outer edge (gold, continuing from Row 7): Ch 1, turn, [sl st in next st, 4 dc in next st] 120 times. (120 scallops; all 240 sts used)
Short end: Sl st in each row end. (7 sl sts)
Inner edge (gold): Work into the 120 free loops of the foundation chain: [sl st in next loop, 3 hdc in next loop] 60 times. (60 scallops; all 120 loops used)
Fasten off and weave in the ends.
Why the math works: Both edges use a 2-st repeat. The outer edge has 240 sts, and 240 / 2 = 120 scallops. The inner edge has 120 loops, and 120 / 2 = 60 scallops. Nothing is left over, so the scallops end exactly at the corners. The longer outer edge has deeper 4 dc scallops, which adds extra ruffle.
Final Blocking
- Wet the ribbon, then squeeze out the water.
- Soak it in fabric stiffener or spray it heavily with starch.
- Wrap the inner edge around the 2.25 in (5.7 cm) tube in 3.5 turns spaced 3.5 in (8.9 cm) apart. This gives a 12.5 in (31.8 cm) drop.
- Pin both ends and fluff the outer scallops.
- Lay the angels and stars flat, pin out the wing feathers and star points, and spritz them with starch.
- Let everything dry completely, 12–24 hours.
- Slide the ribbon off the tube and assemble the ornament.
Final Quality-Control Checklist
- Every star is 1.75 in (4.4 cm) point to point.
- Faces are centered, and both cheeks match.
- Hair covers the top of each head, and the chins stay bare.
- Dress hems show the full picot count: 15 on the large dress, 9 on each small one.
- Ribbon counts are 120, 150, 150, 180, 180, 210 and 240.
- Scallops run evenly to both corners.
- The spiral holds 3.5 turns and a 12.5 in (31.8 cm) drop.
- The ornament hangs straight at 20 in (50.8 cm).
Troubleshooting
Ribbon won’t curl: Your gauge is loose. Go down a hook size.
Ribbon ruffles instead of coiling: Extra increases have crept in. Recount Rows 2, 4, 6 and 7.
Spiral sags: Add more stiffener and dry it on the tube again.
Head looks flat: Add a little more fiberfill before closing the joining round.
Ornament tilts: Move the strand anchors closer to the center of the hem.
Strands twist: Hang the ornament overnight so the bottom star weights it straight.
Care
Spot clean with a damp cloth. Store the ornament flat or loosely coiled, and re-starch it if the spiral relaxes.
Final Notes
All the sizes follow from your gauge. At 18 sc per 4 in (10.2 cm), you get a 1.75 in (4.4 cm) star, a 26.7 in (67.8 cm) Row 1, and a ribbon 1.5 in (3.8 cm) wide. The border brings the ribbon to 2.125 in (5.4 cm). Blocking sets a 12.5 in (31.8 cm) spiral, and the strands finish the ornament at 20 in (50.8 cm) long.
Happy crocheting!