
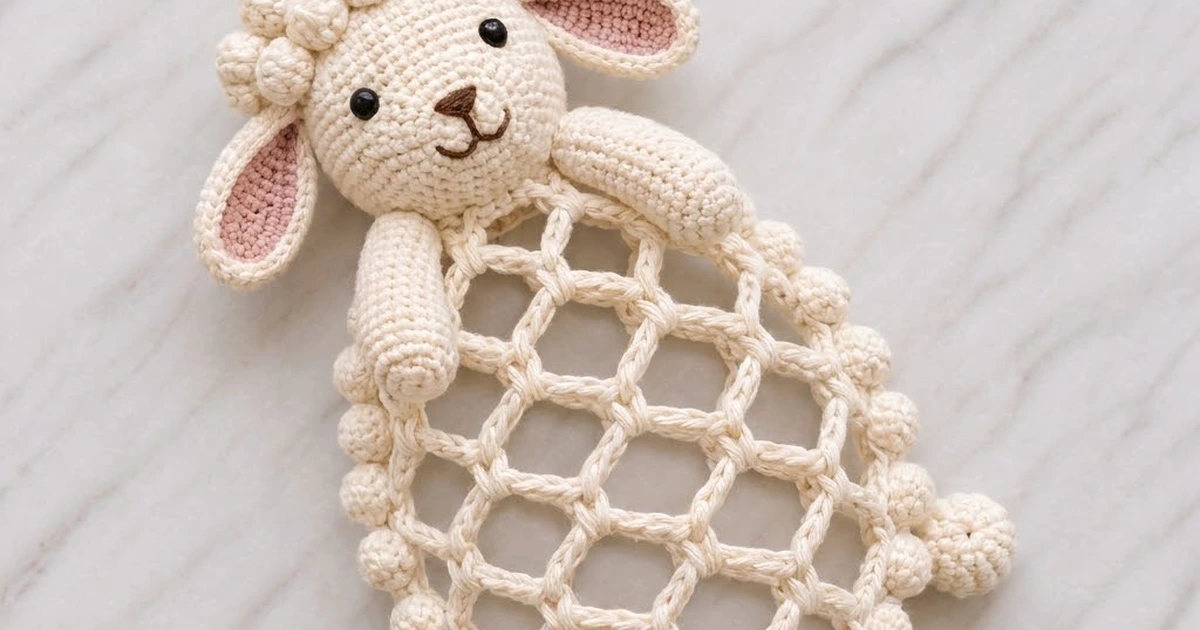
This sheep is a hanging plastic bag holder. A round amigurumi head sits on an open diamond-mesh body. Two stuffed arms drape over the front, and a line of bobble “wool” runs down each side. You push bags in through the stretchy mesh and pull them out one at a time through the solid cuff at the bottom.
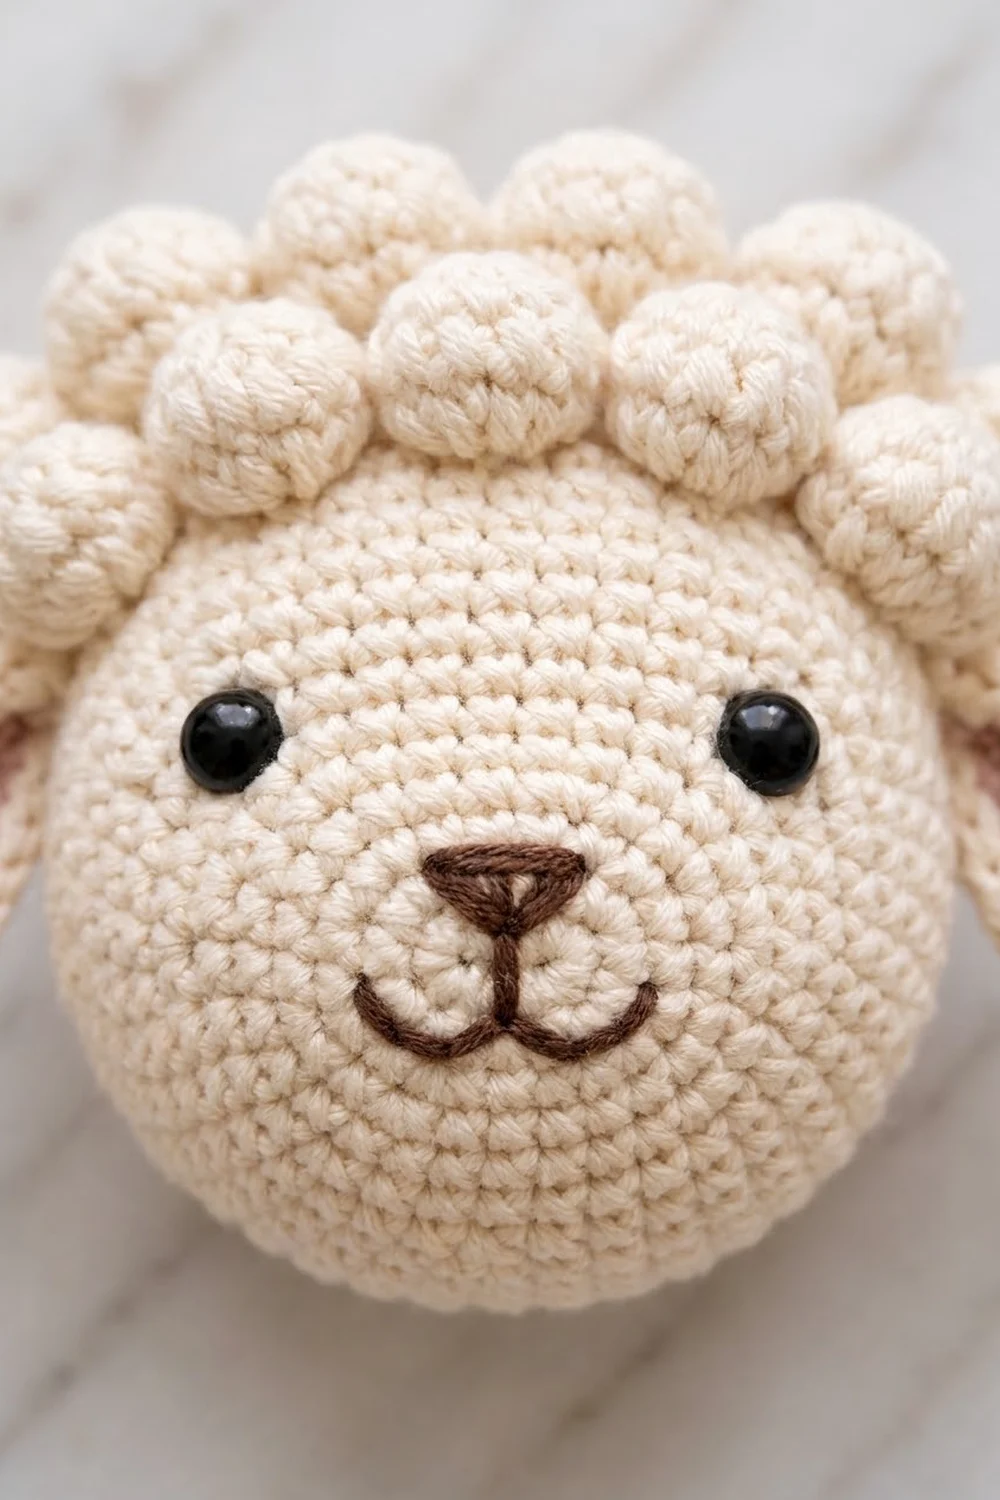
The sample uses soft cream cotton with dusty pink inner ears, black safety eyes, and a dark brown embroidered nose and smile. A stepped crown of bobbles sits on top of the head, and a small bobble tail sits low on one side. The holder also works well made entirely in dusty rose, keeping pink for the inner ears.
The pattern uses US crochet terms. The finished holder is about 17 in (43.2 cm) tall from cuff to crown and 8 in (20.3 cm) wide across the flattened body. The hanging loop adds about 8 in (20.3 cm).
You work the cuff, mesh body, and neck ring as one continuous piece from the bottom up. The head, crown, ears, arms, tail, side bobble trims, and hanging cord are made separately and sewn on.
Finished Size and Construction
- Finished size: 17 in (43.2 cm) tall x 8 in (20.3 cm) wide, plus an 8 in (20.3 cm) hanging loop
- Skill level: Intermediate
- Terminology: US crochet terms
- Yarn weight: Worsted (#4) cotton
- Hook: 4.5 mm (US 7)
- Number of pieces: 10 (1 body, 1 head, 1 crown, 2 ears, 2 arms, 1 tail, 2 side bobble trims), plus 1 hanging cord
- Layout: One upright figure: head on top, mesh body below, cuff at the bottom
- Body size: 8 in (20.3 cm) wide x 13.25 in (33.7 cm) tall, including cuff and neck ring
- Size before trim: Same as the body; the side trims add about 0.5 in (1.3 cm) per side
- Trim depth: One bobble, about 0.5 in (1.3 cm)
Materials
Use a smooth, mercerized or combed cotton in worsted weight. Cotton keeps the mesh open and won’t sag under the weight of bags the way acrylic can.
- Cream (main color): 150 g, about 255 m (279 yd)
- Dusty pink (inner ears): 10 g, about 17 m (19 yd)
- Dark brown (embroidery): 2 g, about 3 m (3 yd)
All amounts include a margin of about 15%.
Tools:
- 4.5 mm (US 7) crochet hook
- One pair of 9 mm black safety eyes
- Polyester fiberfill, about 30 g
- Stitch markers
- Tapestry needle
- Scissors
- Rust-proof pins and a blocking mat
Abbreviations (US Terms)
- ch – chain
- sl st – slip stitch
- sc – single crochet
- hdc – half double crochet
- dc – double crochet
- sc2tog – single crochet 2 together
- inc – 2 sc in the same stitch
- MR – magic ring
- sp – space
- st(s) – stitch(es)
- RS / WS – right side / wrong side
Special stitches:
- Bobble: (Yarn over, insert hook in stitch, yarn over and pull up a loop, yarn over and pull through 2 loops) 5 times in the same stitch, then yarn over and pull through all 6 loops on the hook.
- Space-join sc: Insert hook in next ch-sp, yarn over and pull up a loop. Insert hook in the following ch-sp, yarn over and pull up a loop. Yarn over and pull through all 3 loops. This counts as 1 anchor.
Gauge and Checkpoints
Gauge: 16 sc and 16 rounds = 4 in (10.2 cm) in sc worked in the round.
Make the cuff (the first 8 rounds of the body) as your test piece, and measure it before you go on.
- Cuff checkpoint: 8 in (20.3 cm) around, 4 in (10.2 cm) wide flat, 2 in (5.1 cm) tall.
- Mesh checkpoint 1: After Mesh Round 4, the mesh is about 3.25 in (8.3 cm) tall above the cuff.
- Mesh checkpoint 2: After Mesh Round 10, the body is 8 in (20.3 cm) wide flat and the mesh is about 9.25 in (23.5 cm) tall.
- Head checkpoint: After head Round 8, the flat circle is 3.75 in (9.5 cm) across.
If the cuff is too big, go down one hook size. If it is too small, go up one size. The mesh has more leeway. If it comes out too long, work Rounds 5–10 with ch 8 instead of ch 9. If it is too short, use ch 10.
Body (Cuff, Mesh, and Neck Ring)
Use cream. Work from the bottom up in joined rounds.
Cuff
Foundation: Ch 32 and sl st to the first ch to form a ring, without twisting the chain.
Round 1: Ch 1, sc in each ch around, sl st to first sc. (32 sc)
Rounds 2–8: Ch 1, sc in each st around, sl st to first sc. (32 sc)
The foundation edge is the opening that bags come out of.
Mesh
End each mesh round with a sl st in its first anchor sc, and mark that anchor.
Mesh Round 1: Ch 7, skip 3 sts, sc in next st 8 times. (8 ch-7 loops)
Mesh Round 2 (increase): Sl st to the middle of the first loop. Ch 7, sc in next ch-7 sp; ch 7, sc in next ch-7 sp, ch 7, sc in same sp 4 times. (12 ch-7 loops)
Mesh Rounds 3–4: Sl st to the middle of the first loop. Ch 8, sc in next sp 12 times. (12 ch-8 loops)
Mesh Rounds 5–10: Sl st to the middle of the first loop. Ch 9, sc in next sp 12 times. (12 ch-9 loops)
Mesh Round 11: Sl st to the middle of the first loop. Ch 8, sc in next sp 12 times. (12 ch-8 loops)
Mesh Round 12 (decrease): Sl st to the middle of the first loop. Ch 7, sc in next sp; ch 7, space-join sc over the next 2 sps 4 times. (8 ch-7 loops)
In Round 2, each repeat turns 2 old loops into 3 new ones (8 becomes 12). In Round 12, each repeat turns 3 old loops into 2 (12 becomes 8). Every anchor sits in the middle of a loop from the round below, which gives the even diamond grid.
Neck Ring
Neck Round 1 (conversion): Ch 1, 4 sc in each ch-7 sp around, sl st to first sc. (8 loops x 4 sc = 32 sc)
Neck Round 2: Ch 1, sc in each st around, sl st to first sc. (32 sc)
Fasten off and leave a 30 in (76.2 cm) tail for sewing on the head.
Head
Use cream. Work in a continuous spiral and move the marker up each round.
Round 1: 6 sc in MR. (6)
Round 2: Inc in each st. (12)
Round 3: Sc 1, inc 6 times. (18)
Round 4: Sc 2, inc 6 times. (24)
Round 5: Sc 3, inc 6 times. (30)
Round 6: Sc 4, inc 6 times. (36)
Round 7: Sc 5, inc 6 times. (42)
Round 8: Sc 6, inc 6 times. (48)
Rounds 9–18: Sc in each st. (48)
Fit the safety eyes between Rounds 12 and 13, 7 sts apart and centered on the front.
Round 19: Sc 4, sc2tog 8 times. (40)
Round 20: Sc 3, sc2tog 8 times. (32)
Run a contrasting thread through every stitch of Round 20 to mark the neck line. Start stuffing firmly.
Round 21: Sc 2, sc2tog 8 times. (24)
Round 22: Sc 1, sc2tog 8 times. (16)
Round 23: Sc2tog 8 times. (8)
Finish stuffing, fasten off, and close the hole.
Face: With dark brown, satin-stitch a small rounded triangle for the nose over Rounds 15–16, centered below the eyes. Stitch a short vertical line down from the nose, then a shallow curve out to each side for the smile.
Wool Crown
Use cream. Bobbles pop out on the side facing away from you, so they are worked on WS rows.
Foundation: Ch 16.
Row 1 (RS): Sc in 2nd ch from hook and in each ch across, turn. (15 sc)
Row 2 (WS): Ch 1, sc 1, bobble, sc 1 7 times, turn. (7 bobbles + 8 sc = 15 sts)
Row 3 (RS): Sl st in first 2 sts, ch 1, sc in next 11 sts, turn. Leave the last 2 sts unworked. (11 sc)
Row 4 (WS): Ch 1, sc 1, bobble, sc 1 5 times, turn. (5 bobbles + 6 sc = 11 sts)
Row 5 (RS): Sl st in first 2 sts, ch 1, sc in next 7 sts, turn. Leave the last 2 sts unworked. (7 sc)
Row 6 (WS): Ch 1, sc 1, bobble, sc 1 3 times. (3 bobbles + 4 sc = 7 sts)
Fasten off and leave a long tail. The crown is a stepped arch of 7, 5, and 3 bobbles, about 3.75 in (9.5 cm) wide and 1.5 in (3.8 cm) tall.
Ears (Make 2)
Inner ear (dusty pink): Ch 6. Starting in 2nd ch from hook: sc 1, hdc 1, dc 2, 6 dc in last ch. Working along the other side of the chain: dc 2, hdc 1, sc 1. (14 sts) Fasten off pink.
Rim (cream, trim round): Join cream in the first st. Sc in each of the first 4 sts, 2 sc in each of the 6 tip dc, sc in each of the last 4 sts. (14 sts worked once + 6 extra = 20 sc) Fasten off and leave a long tail.
Each ear is a pink teardrop with a cream rim, about 2.5 in (6.4 cm) long and 1.5 in (3.8 cm) wide. Pinch the straight base a little before sewing so the ear cups forward.
Arms (Make 2)
Use cream.
Round 1: 6 sc in MR. (6)
Round 2: Inc in each st. (12)
Rounds 3–14: Sc in each st. (12)
Lightly stuff the lower half only. Flatten the opening and work 6 sc through both layers to close it. Each arm is about 3.5 in (8.9 cm) long and 1.5 in (3.8 cm) wide.
Tail
Use cream.
Round 1: 6 sc in MR. (6)
Round 2: Inc in each st. (12)
Rounds 3–4: Sc in each st. (12)
Round 5: Sc2tog 6 times. (6)
Stuff firmly and close. The tail is about 1.25 in (3.2 cm) across.
Hanging Cord
Use cream. Ch 71. Sl st in the back bump of the 2nd ch from hook and in each ch across. (70 sl st) The cord is about 18 in (45.7 cm) long.
Make All Pieces
- Cream: 1 body, 1 head, 1 crown, 2 ear rims, 2 arms, 1 tail, 2 side trims, 1 cord
- Dusty pink: 2 inner ears
- Dark brown: face embroidery
Assembly map (front view):
            [ cord loop ]
         ( o o o crown o o o )
  [ear]  (       HEAD        )  [ear]
         [=== neck ring ===]
        [arm] \  mesh  / [arm]
     o   <> <> <> <> <> <>   o
     o   <> <> <> <> <> <>   o
     o   <> <> <> <> <> <>   o
     o    <> <> <> <> <>     o (tail)
             [   cuff   ]
Joining
Head to body: Line up the 32 sts of Neck Round 2 with the 32 sts of head Round 20. Whipstitch each neck stitch to one head stitch all the way around, so the counts match 32 to 32. Keep the tension snug but not tight, so the head sits level without puckering.
Crown: Center the crown over head Rounds 1–8, with the 7-bobble row toward the face. Sew down all edges.
Ears: Sew one ear to each side over Rounds 9–10, about 1.5 in (3.8 cm) out from each eye.
Arms: Sew the closed top of each arm just below the neck ring, one on each side of center front. Let them drape diagonally over Mesh Rounds 11–12 and tack each tip in place.
Cord: Fold the cord in half. Sew both ends to the back of the head over Rounds 4–6, about 1 in (2.5 cm) apart. The loop hangs about 8 in (20.3 cm).
Size checkpoint: Before adding the trims, the holder should measure about 17 in (43.2 cm) from cuff to crown, and the body should still lie 8 in (20.3 cm) wide.
Border (Side Bobble Trims)
On this holder, the border is the line of bobble “wool” down each side fold of the mesh.
Border gauge: Each bobble is about 0.5 in (1.3 cm) across, and the bobbles are about 1 in (2.5 cm) apart.
Side Trim (Make 2)
Use cream.
Row 1: Ch 4, bobble in 4th ch from hook. Ch 6, bobble in 4th ch from hook 9 times. (10 bobbles)
Fasten off and leave a 24 in (61.0 cm) tail.
Attaching
Flatten the body so 6 loops are on the front and 6 on the back. The fold on each side is the side edge.
- Left side: 10 bobbles, one on each of Mesh Rounds 2–11.
- Right side: 10 bobbles, one on each of Mesh Rounds 2–11.
Why the math works: Each mesh round crosses each side fold exactly once, either at an anchor sc or at the middle of a loop. Mesh Rounds 2–11 make 10 rounds, so each side takes exactly 10 bobbles. Round 1 sits right at the cuff edge and Round 12 is under the arms, so neither gets a bobble.
Sew the tail onto the right-side trim just above the cuff, over Mesh Round 2.
Final Blocking
- Mist the body lightly until it is damp but not soaked.
- Slide a rolled towel inside the mesh so the body holds an 8 in (20.3 cm) width.
- Gently ease each diamond into an even shape.
- Pin the cuff flat at 4 in (10.2 cm) wide.
- Shape each ear into a neat teardrop.
- Let everything dry completely, then remove the towel and pins.
Final Quality-Control Checklist
- Cuff is 32 sc around and 2 in (5.1 cm) tall.
- Mesh Rounds 2–11 each have 12 loops; Rounds 1 and 12 each have 8.
- Neck ring has 32 sc and matches head Round 20 stitch for stitch.
- Head is firmly stuffed and about 4 in (10.2 cm) across.
- Crown shows rows of 7, 5, and 3 bobbles.
- Each ear rim has 20 sc.
- Each side has 10 bobbles.
- Face is centered, and both ears sit at the same height.
- All ends are woven in securely.
Troubleshooting
- Mesh twists: Make sure every anchor goes in the middle of a loop, not near its end.
- Diamonds are uneven: Count the chains in every loop; a single extra chain is easy to see.
- Head wobbles: Add stuffing above Round 20 and pull the whipstitches snug.
- Crown bobbles face inward: Work the bobbles on WS rows.
- Bags fall out of the cuff: Add one more sc round to the cuff, or work the cuff one hook size smaller.
- Ears curl backward: Pinch the base forward and tack the fold in place.
Care
Hand wash in cool water and lay flat to dry, reshaping the mesh while it is damp. Do not wring the stuffed head.

Final Notes
Each measurement leads to the next. The 32-stitch cuff is 8 in (20.3 cm) around. The mesh grows from 8 loops to 12, reaches 8 in (20.3 cm) wide flat, and goes back to 8 loops. Those 8 loops convert to 32 neck stitches, which match head Round 20 stitch for stitch. Ten mesh rounds on each side carry 10 bobbles on each side. Check each stage as you go, and your sheep will hang straight and hold plenty of bags.
Happy crocheting!