

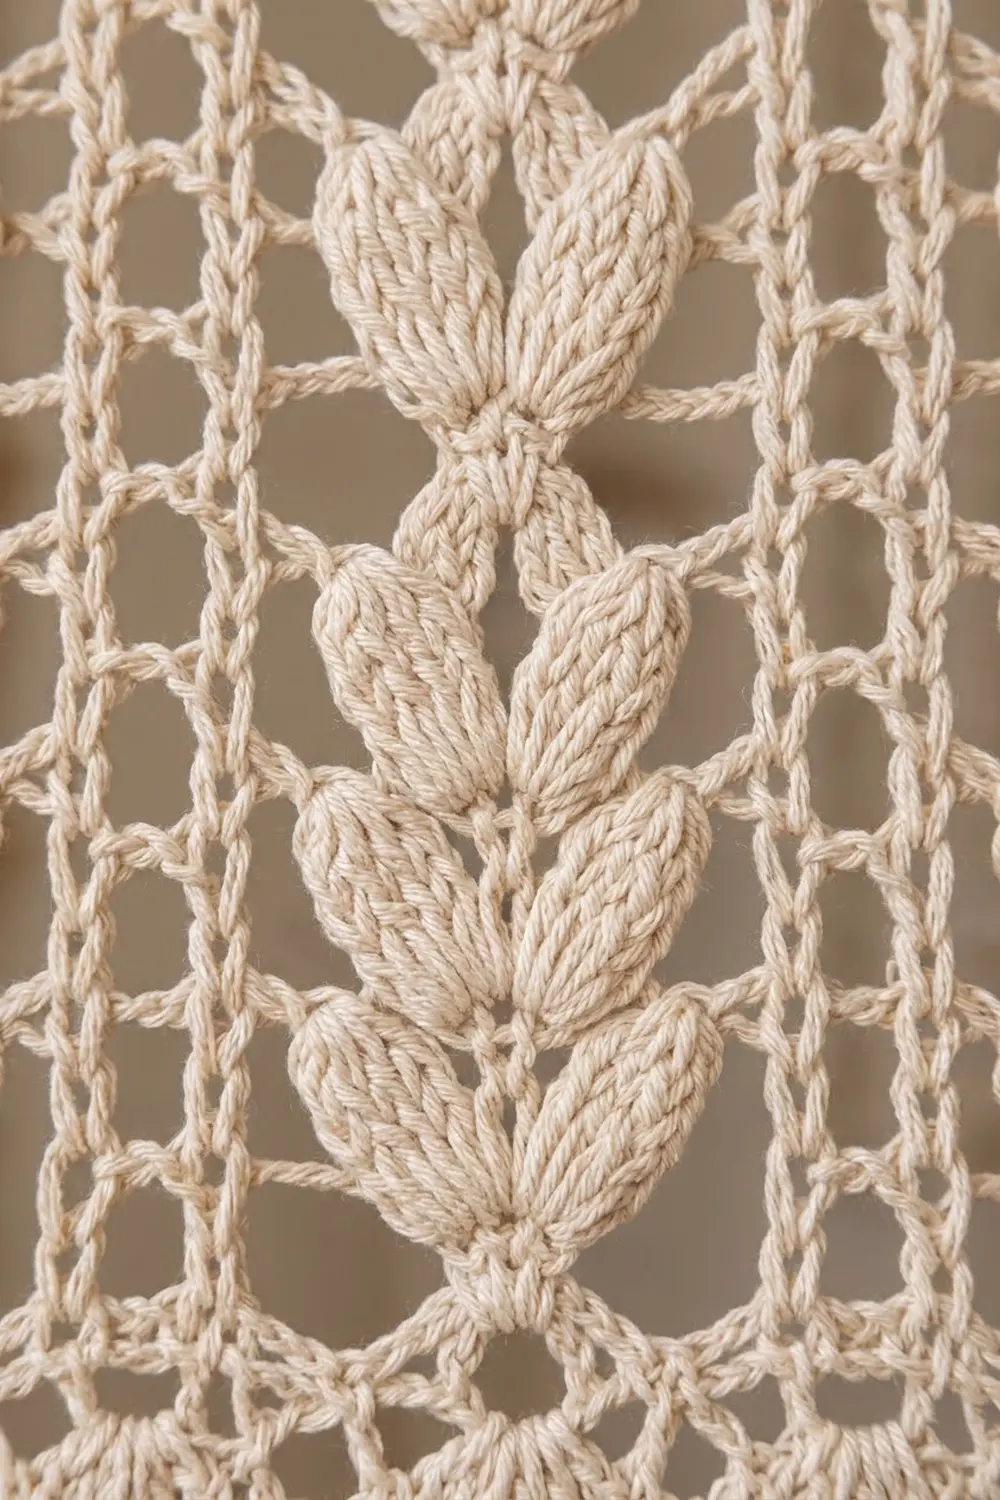
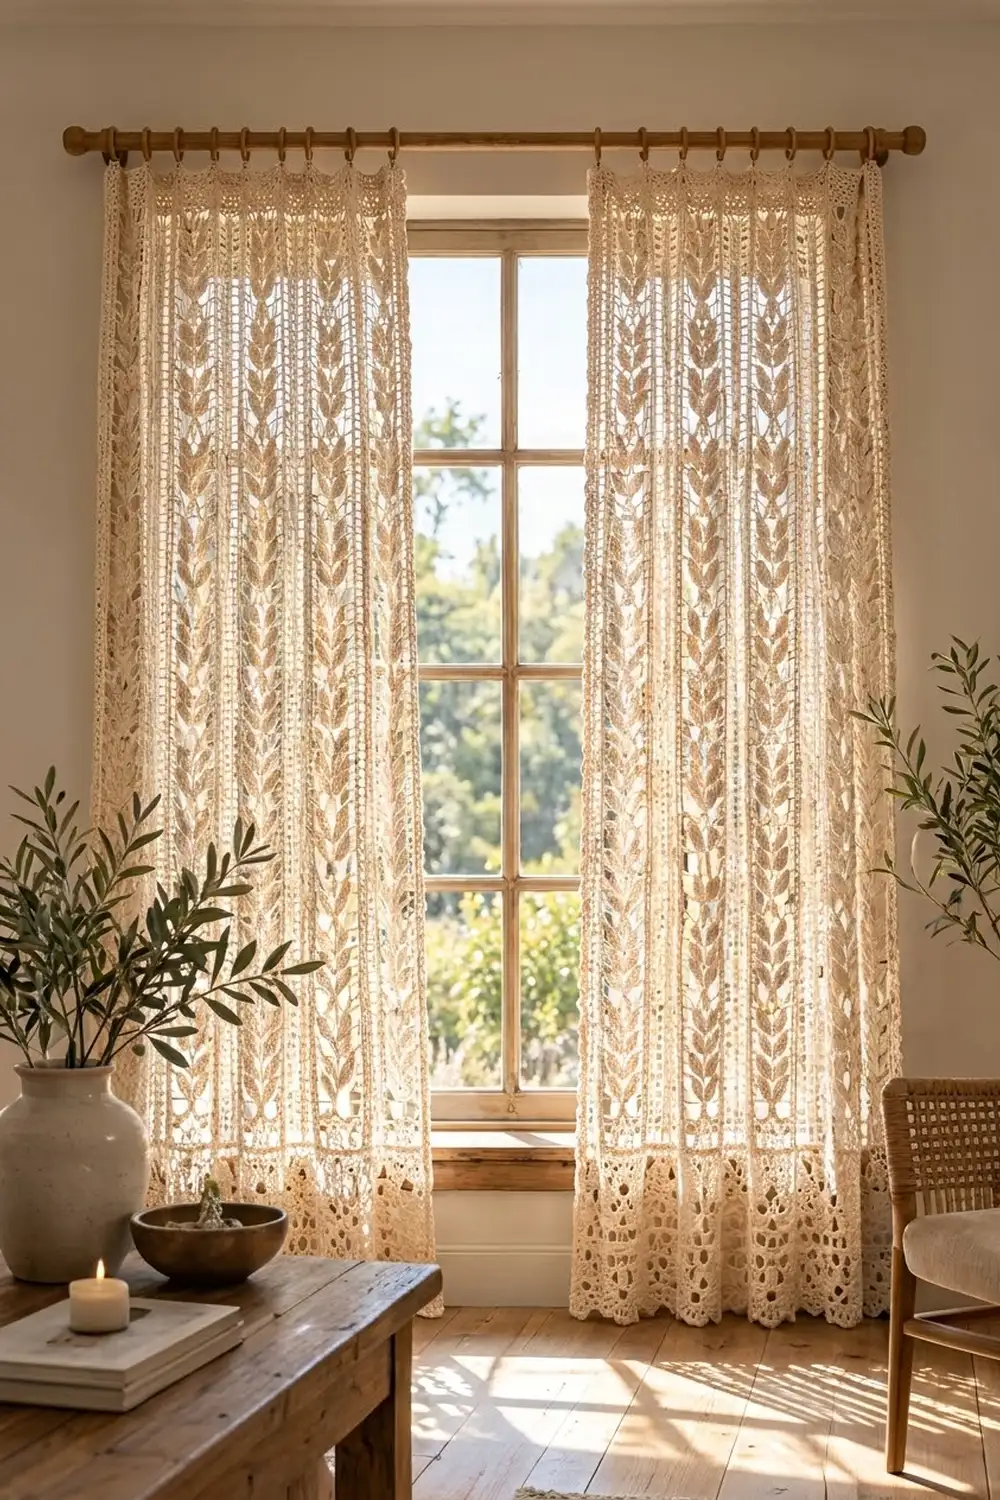
This curtain panel is made from five long lace strips. Each strip has a column of puff-stitch leaves stacked up a short stem, so every strip looks like a stalk of wheat. Light comes through the open ladder columns and the chain spaces around the leaves, while the textured leaves catch soft side light.
The panel is worked in one natural cream cotton. That keeps it calm and timeless, and it suits farmhouse, boho, and Scandinavian rooms. All instructions use US crochet terms.
The finished panel measures 30.5 in wide x 82.25 in long (77.5 cm x 208.9 cm) after blocking, scalloped hem included. For a pair like the one in the photo, make two panels.
Construction is simple. You crochet five identical strips from the bottom up in short rows. Then you join them side by side with a single crochet seam, work one round of single crochet around the whole panel, and add a three-row scalloped hem along the bottom edge.
Finished Size and Construction
- Finished size: 30.5 in x 82.25 in (77.5 cm x 208.9 cm)
- Skill level: Intermediate
- Terminology: US crochet terms
- Yarn weight: DK (weight 3) cotton
- Hook: 4.0 mm (US G-6)
- Number of pieces: 5 strips per panel
- Layout: 5 strips side by side, in 1 row
- Piece size: 6 in x 80 in (15.2 cm x 203.2 cm) per strip
- Size before border: 30 in x 80 in (76.2 cm x 203.2 cm)
- Border depth: 0.25 in (0.6 cm) on the sides and top; 2 in (5.1 cm) along the bottom hem
Materials
Yarn: Use a smooth, mercerized or combed 100% cotton DK, about 230 m per 100 g. Cotton hangs straight, shows the puff leaves clearly, and handles sunlight and washing well. Avoid acrylic, which tends to stretch along a long vertical drop.
- Natural cream: 1,000 g (about 2,300 m) per panel. Double this for a pair.
Quantities include a margin of about 10% for gauge swatches and small differences in tension.
Tools:
– 4.0 mm (US G-6) crochet hook
– Tapestry needle
– Locking stitch markers
– Measuring tape
– Rust-proof pins and blocking mats, or a clean carpet and towels
– 11 curtain clip rings per panel
Abbreviations (US Terms)
- ch – chain
- sl st – slip stitch
- sc – single crochet
- dc – double crochet
- sk – skip
- st(s) – stitch(es)
- sp – space
- RS / WS – right side / wrong side
Special stitch – Puff: (Yarn over, insert hook in the indicated stitch, yarn over, pull up a loop to the height of a dc) 3 times; you now have 7 loops on the hook. Yarn over and pull through all 7 loops. Do not chain to close. The puff counts as 1 stitch.
Stitch counting: In this pattern, every chain inside a chain space counts as 1 stitch. The turning ch-3 counts as 1 dc.
Gauge and Checkpoints
Gauge: 27 sts x 8 rows in strip pattern = 6 in wide x 4 in tall (15.2 cm x 10.2 cm), measured after a light steam.
Test one strip before you commit to all five. Work Rows 1–9, then measure.
- After Row 9: the strip should be 6 in (15.2 cm) wide and about 4.5 in (11.4 cm) tall.
- After Row 40: 20 in (50.8 cm) tall.
- After Row 120: 60 in (152.4 cm) tall.
- Finished strip: 6 in x 80 in (15.2 cm x 203.2 cm).
Strip too wide: Change to a 3.75 mm hook. Too narrow: Change to a 4.5 mm hook. Do not change the stitch count, because the border math depends on 27 stitches per strip.
Rows too short or too tall: Keep the stitch gauge correct, and simply work more or fewer 2-row repeats until you reach 80 in (203.2 cm). Make all five strips with the same number of rows.
Strip Pattern (Make 5)
Each row has 27 stitches. Because each row is symmetrical, the stitch positions are the same whichever end you start from:
- Sts 1–5: outer ladder (dc, ch 1, dc, ch 1, dc)
- Sts 6–7: ch-2 space
- St 8: frame dc
- Sts 9–19: wheat leaf center
- St 20: frame dc
- Sts 21–22: ch-2 space
- Sts 23–27: outer ladder
Foundation: Ch 29.
Row 1 (RS): Dc in the 4th ch from the hook (the skipped 3 ch count as the first dc) and in each ch across. Turn. (27 dc)
Row 2 (WS, stem row): Ch 3 (counts as dc, st 1). [Ch 1, sk 1, dc in next st] twice (sts 2–5). Ch 2, sk 2 (sts 6–7). Dc in st 8. Ch 4, sk 4 (sts 9–12). Dc in each of the next 3 sts (sts 13–15); these 3 dc are the stem. Ch 4, sk 4 (sts 16–19). Dc in st 20. Ch 2, sk 2 (sts 21–22). [Dc in next st, ch 1, sk 1] twice (sts 23–26). Dc in top of turning ch (st 27). Turn. (27 sts: 9 dc, 18 ch)
Row 3 (RS, leaf row): Ch 3 (st 1). [Ch 1, sk 1, dc in next st] twice. Ch 2, sk 2. Dc in st 8. Ch 3, sk 5 (sts 9–13: the ch-4 and the first stem dc). (Puff, ch 3, puff) all in st 14, the center stem dc. Ch 3, sk 5 (sts 15–19). Dc in st 20. Ch 2, sk 2. [Dc in next st, ch 1, sk 1] twice. Dc in top of turning ch. Turn. (27 sts: 6 dc, 2 puffs, 19 ch)
This makes the first V pair of leaves. The puffs lean outward from the stem dc beneath them.
Row 4 (WS, stem row): Work as Row 2, but in the center work ch 4, sk the ch-3 space and the puff (sts 9–12), then work 3 dc in the center ch-3 space between the puffs (these count as sts 13–15). Ch 4, sk the puff and the ch-3 space (sts 16–19), and finish as Row 2. (27 sts)
Row 5 (RS, leaf row): Work as Row 3. (27 sts)
Rows 6–159: Repeat Rows 4–5 another 77 times. Each repeat adds a new V of leaves directly above the last one, which creates the wheat stalk. You will have 79 leaf rows in total.
Row 160 (WS, top row): Ch 3. Dc in each dc and each puff, dc in each ch-1 space, 2 dc in each ch-2 space, and 3 dc in each ch-3 space, ending with a dc in the top of the turning ch. (27 dc)
Check: Row 160 must have 27 dc, which is 1 per stitch of Row 159. The strip measures 6 in x 80 in (15.2 cm x 203.2 cm). Fasten off, leaving a 6 in (15.2 cm) tail, and weave in the ends.
Make All Pieces
- Natural cream: 5 strips per panel (10 strips for a pair)
Lay the strips out in this order, with the RS facing up and every foundation chain at the bottom:
Top
| Strip 1 | Strip 2 | Strip 3 | Strip 4 | Strip 5 |
Bottom (foundation chains, hem edge)
Before joining, check that all five strips are the same length to within 0.5 in (1.3 cm). If one is longer or shorter, block them all together to even them out.
Joining
Method: A single crochet seam, worked from the RS so that the ridge sits on the WS (the side facing the window).
- Place Strip 1 and Strip 2 with their WS together and the RS facing out, matching the foundation corners.
- Join the yarn at the bottom corner through both layers.
- Work 2 sc into each row end of both strips at once, going through the turning ch or end dc of each row. That gives 160 rows x 2 = 320 sc.
- At the top corner, finish by matching Row 160 of both strips. Fasten off.
Stitch-to-stitch logic: Row 1 meets Row 1, Row 80 meets Row 80, and Row 160 meets Row 160. Every 20 rows, check that the leaf rows line up across the seam; this keeps the wheat stalks level.
Tension: Keep the seam slightly loose, since it must stretch exactly as much as the strips. If the seam pulls the panel into a curve, go up to a 4.5 mm hook for the seams only.
Join Strip 3 to Strip 2, then Strip 4, then Strip 5, the same way. That makes 4 seams with 320 sc each.
Size checkpoint: The joined panel measures 30 in x 80 in (76.2 cm x 203.2 cm). The seams sit between the strips and do not add any border stitches.
Border
Border gauge: 18 sc = 4 in (10.2 cm), worked into the top of the stitches, and 2 sc per dc row end.
Round 1 (RS, all four sides): Join the yarn at the bottom right corner. Ch 1.
– Bottom edge: 1 sc in each foundation stitch across all 5 strips, which is 5 x 27 = 135 sc. Work 3 sc in each corner stitch. Do not work into the seams.
– Left side: 2 sc per row end, which is 160 x 2 = 320 sc.
– Top edge: 1 sc in each Row 160 stitch, which is 5 x 27 = 135 sc, with 3 sc in each corner stitch.
– Right side: 320 sc.
Sl st to the first sc. (Round total = 270 sc worked 1 per top/bottom stitch + 640 sc in the row ends + 8 extra corner sc = 918 sc)
Counts per side, including both corner center sc: bottom 137, top 137, each side 324. Check: 137 + 137 + 324 + 324 − 4 shared corners = 918.
Fasten off at the sides and top. Rejoin at the bottom right corner center sc with the WS facing you to work the hem.
Hem Row S1 (WS, bottom only, 137 sts): Ch 1. Sc in the corner center sc. Ch 3, sk 3, sc in next sc; repeat from * 33 more times, ending in the opposite corner center sc. Turn. (35 sc + 34 ch-3 loops = 137 sts)
Hem Row S2 (RS): Ch 1. Sc in the first sc. (3 dc, ch 1, puff, ch 1, 3 dc) in next ch-3 loop, sc in next sc, ch 3, sc in next sc; repeat from * 16 more times. Turn. (17 fans, 17 ch-3 spaces, 35 sc)
Hem Row S3 (WS): Ch 1. Sc in the first sc. Sc in each of next 3 dc, sc in ch-1 sp, (sc, ch 3, sc) in puff, sc in ch-1 sp, sc in each of next 3 dc, sc in next sc, 3 sc in next ch-3 sp, sc in next sc; repeat from * 16 more times. Fasten off. (1 + 17 x 15 = 256 sc + 17 picots)
Why the math works: The bottom edge has 137 stitches. After the first sc, 136 stitches remain, and 136 ÷ 4 = 34 loops. The fans use the loops in pairs, so 34 ÷ 2 = 17 scallops, and both ends land on a corner sc. Round 1 adds 0.25 in (0.6 cm) on every side, and the hem rows add 1.75 in (4.4 cm). The finished panel is therefore 30.5 in x 82.25 in (77.5 cm x 208.9 cm).
Final Blocking
- Weave in all the ends along the seams, inside the dc columns.
- Soak the panel in cool water with a little wool wash for 15 minutes.
- Press out the water gently. Roll the panel in towels, and do not wring it.
- Lay it flat, RS up, on mats or a clean carpet.
- Pin the side edges straight to 82.25 in (208.9 cm) long, then pin the width to 30.5 in (77.5 cm) at the top, the middle, and above the hem.
- Pin out each scallop point at its picot so that the hem forms 17 even curves.
- Line up the leaf rows and the ladder columns with a long ruler.
- Let the panel dry completely, for 24–48 hours.
- Clip on 11 rings along the top: one at each outer corner, one at each seam, and one centered on each strip. They will sit about 3 in (7.6 cm) apart.
Final Quality-Control Checklist
- Each strip has 27 stitches in every row and is 6 in (15.2 cm) wide.
- Each strip has 160 rows and 79 leaf rows.
- Every V of leaves sits directly over its stem.
- The seams have 320 sc each, and the leaf rows match across all seams.
- The panel measures 30 in x 80 in (76.2 cm x 203.2 cm) before the border.
- Border Round 1 totals 918 sc.
- The hem has 17 fans and 17 picots, with symmetrical ends.
- The blocked panel measures 30.5 in x 82.25 in (77.5 cm x 208.9 cm).
- All ends are hidden and secure.
Troubleshooting
The leaves lean or drift sideways. You probably worked the puffs into the wrong stem dc. Always work them into the middle one of the 3 stem dc (st 14).
The puffs look flat. Pull each loop up to full dc height before closing the puff.
The strip narrows over time. Count to 27 every 10 rows. The usual cause is a missed dc in the turning chain.
The panel waves at the seams. The seam is too loose. Rework it with fewer than 2 sc per row end only if the strip edges were worked tightly, and adjust the border to match.
The hem flares. Your S2 fans are too loose. Go down to a 3.75 mm hook for Rows S2–S3.
The strips are different lengths. Block them together, or add or remove a 2-row repeat before you start the seams.
Care
Hand wash or machine wash on a gentle cool cycle in a mesh bag, then reshape and dry flat. Re-block after washing so the panel hangs straight.
Final Notes
The measurement chain for this panel runs like this. You start at 27 stitches = 6 in (15.2 cm) per strip, with 160 rows = 80 in (203.2 cm). Five strips give 135 stitches = 30 in (76.2 cm). The border’s first round brings the panel to 30.5 in x 80.5 in (77.5 cm x 204.5 cm), and the hem adds the final length for 30.5 in x 82.25 in (77.5 cm x 208.9 cm). If each step in the chain is right, the panel will hang straight and evenly. Check your gauge early and count at each checkpoint.
Happy crocheting!