

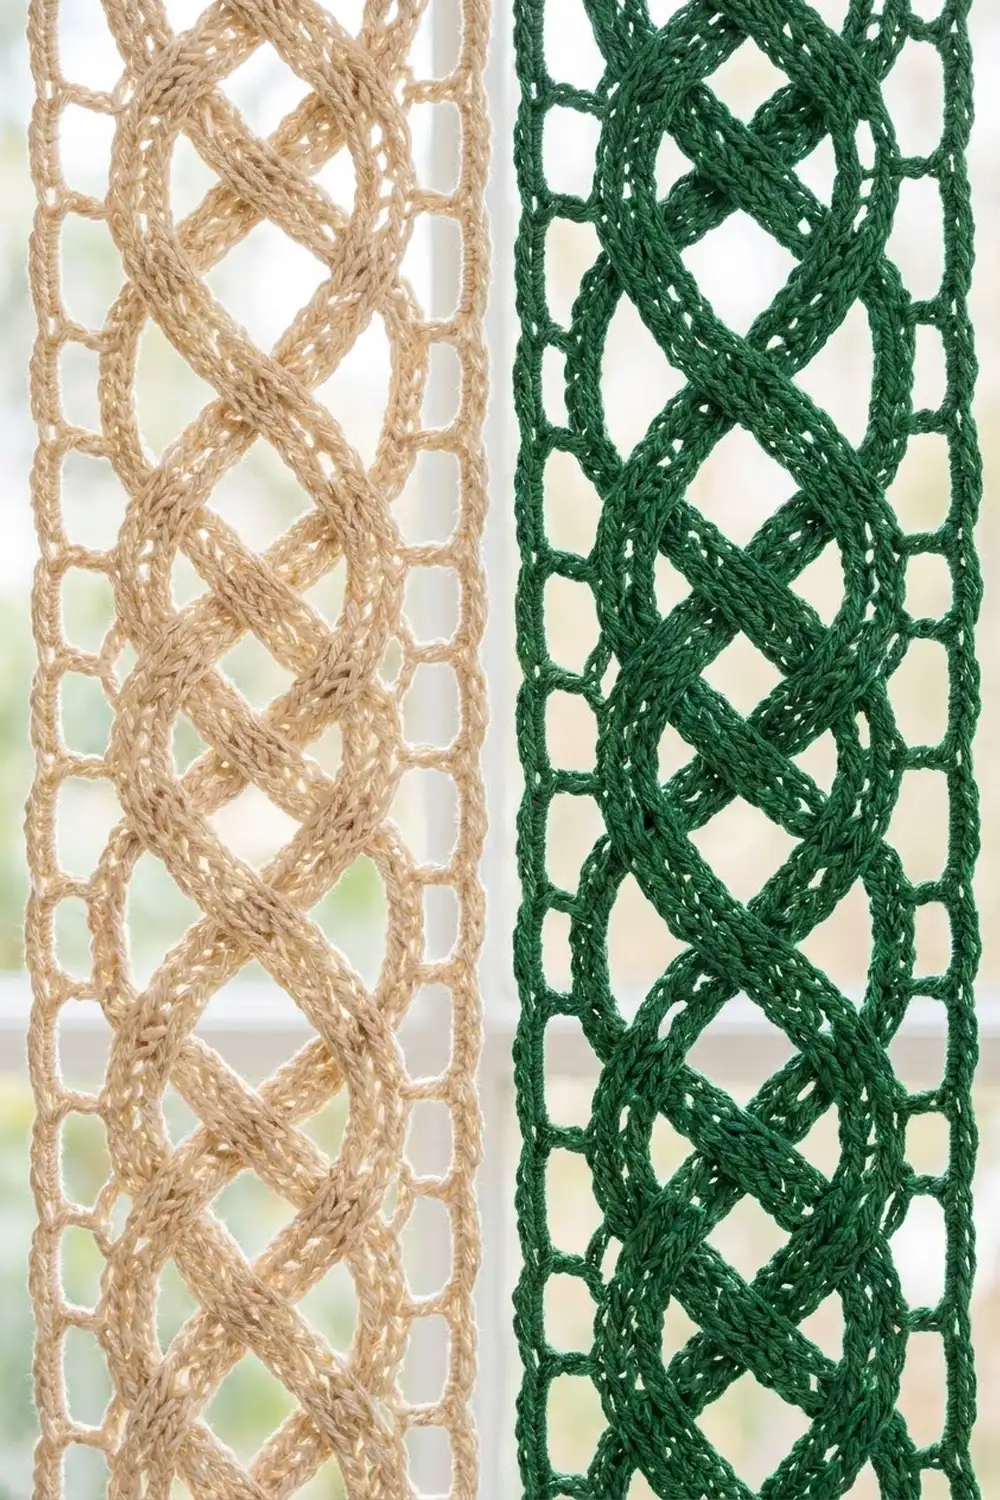
This curtain is made of narrow lace strips that hang side by side from a rod. Each strip has ladder-style edges and two flat bands that plait down the center. Where the bands cross, they leave long oval openings, so light comes through and each strip sways on its own.
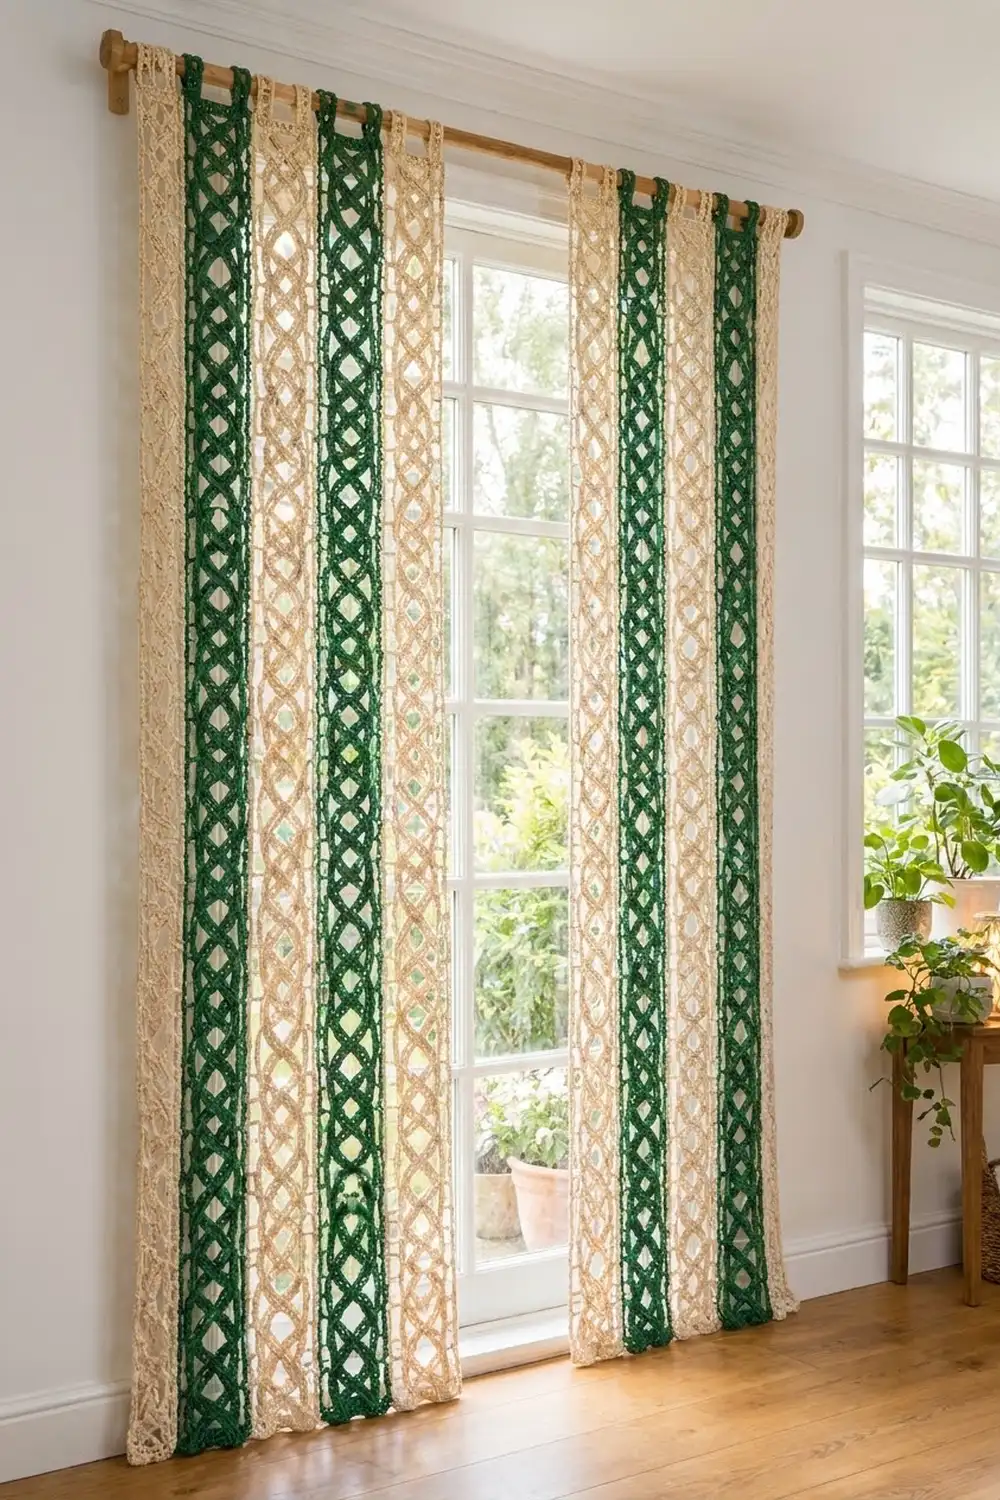
The sample alternates cream and forest green. Each panel has three cream strips and two green strips in this order: cream, green, cream, green, cream. The look is calm and botanical, and it suits a sunny window, a doorway or a room divider. All instructions use US crochet terms.
Each finished strip is 6.25 in (15.9 cm) wide and 82.25 in (208.9 cm) long, not counting the tab loops. One panel of five unjoined strips is 31.25 in (79.4 cm) wide on the rod. The window in the photo has two matching panels.
Each strip is built from parts. You crochet two ladder rails and two long bands and weave the bands between the rails. Then you close the ends with solid crossbars, tack the crossings, add a two-round border and sew on two tabs. The strips are never sewn to each other.
Finished Size and Construction
- Finished strip size: 6.25 in (15.9 cm) x 82.25 in (208.9 cm), plus tab loops
- Skill level: Intermediate
- Terminology: US
- Yarn weight: Worsted (#4) cotton
- Hook: 5.0 mm (H-8)
- Number of pieces: 5 strips per panel (3 cream, 2 green); 2 panels for the pair shown
- Layout: 5 strips in one row, hung unjoined; 31.25 in (79.4 cm) per panel
- Strip size before border: 5.5 in (14.0 cm) x 81.5 in (207.0 cm)
- Border depth: 0.375 in (1.0 cm) on each side
Materials
Choose a smooth worsted cotton with about 160 m per 100 g (175 yd per 100 g). Cotton hangs straight, holds the plait shape and stretches very little over the length of a curtain. Avoid fuzzy or very elastic yarns.
Quantities for one panel of five strips:
- Cream: 750 g, about 1,200 m (1,312 yd), for 3 strips
- Forest green: 500 g, about 800 m (875 yd), for 2 strips
Double these amounts for a pair of panels. Each strip uses about 226 g. These quantities include a margin of about 10% for swatching and differences in tension.
Tools:
- 5.0 mm (H-8) crochet hook
- Tapestry needle
- About 60 locking stitch markers, in two colors
- Rustproof pins and a long, flat surface
- Measuring tape and spray bottle
- Curtain rod up to 1 in (2.5 cm) in diameter
Abbreviations (US Terms)
- ch – chain
- sc – single crochet
- hdc – half double crochet
- dc – double crochet
- sl st – slip stitch
- st(s) – stitch(es)
- sp – space
- BLO – back loop only
- RS / WS – right side / wrong side
- rev sc – reverse single crochet (crab stitch)
Special stitch – rev sc: Work from left to right (if you crochet right-handed). Insert the hook into the next stitch to the right, yarn over and pull up a loop. Yarn over again and draw through both loops. This makes a firm, twisted edge.
Gauge and Checkpoints
Gauge: 16 sc and 16 rows = 4 in (10.2 cm) in sc.
Finish one full strip before you start the others. Check these points as you go:
- Rail width: After 3 rows, a rail measures 1 in (2.5 cm) across.
- Rail length: Any 32 sts of the rail measure 8 in (20.3 cm).
- Band width: After 2 rows, a band measures 0.75 in (1.9 cm) across.
- Band length: Every 20 sts of a band measure 5 in (12.7 cm).
- Before border: The strip measures 5.5 in (14.0 cm) x 81.5 in (207.0 cm).
- After border: The strip measures 6.25 in (15.9 cm) x 82.25 in (208.9 cm).
If 32 rail sts measure more than 8 in (20.3 cm), go down half a hook size. If they measure less, go up half a size. Small errors add up over 320 sts, so fix your gauge before you make the next part.
Rails (make 2 per strip)
Each rail is worked lengthwise. Rows 1 and 3 are solid lines, and Row 2 makes the square ladder holes between them. The foundation edge becomes the outer edge of the strip, and Row 3 becomes the inner edge.
Ch 321.
Row 1 (RS): Sc in the 2nd ch from the hook and in each ch across, turn. (320 sc)
Row 2: Ch 3 (counts as dc), dc in next st, *ch 2, sk 2 sts, dc in next st; repeat from * 105 more times, turn. (108 dc, 106 ch-2 sps)
Each repeat covers 3 sts, so the row covers 2 + (106 x 3) = 320 sts.
Row 3 (conversion row): Ch 1, sc in each dc and 2 sc in each ch-2 sp across, ending with sc in the top of the turning ch. (108 sc worked one per dc + 212 sc worked in the spaces = 320 sc)
Fasten off. The rail measures 1 in (2.5 cm) x 80 in (203.2 cm).
Mark the rail: Count along Row 3 and place a marker in every 16th st: sts 16, 32, 48 and so on, up to st 304. That gives 19 markers, one every 4 in (10.2 cm).
Plait Bands (make 2 per strip)
Ch 401.
Row 1 (RS): Sc in the 2nd ch from the hook and in each ch across, turn. (400 sc)
Row 2: Ch 2 (does not count as a st), hdc in BLO of each st across. (400 hdc)
Fasten off, leaving a 12 in (30.5 cm) tail. The band measures 0.75 in (1.9 cm) x 100 in (254.0 cm). The ridge left by the BLO stitches gives the band its braided texture.
Mark the band:
- Rail points: sts 20, 40, 60 and so on, up to st 380 (19 markers)
- Crossing points: sts 10, 30, 50 and so on, up to st 390 (20 markers in a second color)
The band is longer than the rails because it curves from side to side. Each 5 in (12.7 cm) of band (20 sts) covers 4 in (10.2 cm) of curtain length while moving 2.75 in (7.0 cm) sideways.
Assembling One Strip
Lay out: Place both rails RS up with their Row 3 edges facing each other, 3.5 in (8.9 cm) apart. Call the left rail Rail L and the right rail Rail R. Line up the st 1 ends at the bottom.
Start Band A beside Rail L and Band B beside Rail R, with each band’s st 1 at the bottom.
Weave: The bands meet on the center line at each crossing marker. At crossings 1, 3, 5 and so on, Band A lies over Band B. At crossings 2, 4, 6 and so on, Band B lies over Band A. This alternation creates the interlaced plait.
At each band rail point, the band edge touches a rail marker on the same level. Band A touches Rail R at its odd-numbered rail points and Rail L at its even-numbered ones. Band B does the opposite. Pin everything, then check that each band’s st 400 ends beside the same rail where it started.
Bottom crossbar: With RS facing, join yarn at the outer corner of the bottom end of Rail R.
Row 1: Ch 1, work 4 sc across the row ends of Rail R (1 sc in the sc row, 2 sc in the dc row, 1 sc in the sc row). Work 3 sc across the row ends of Band B (1 in the sc row, 2 in the hdc row), then ch 8. Work 3 sc across the row ends of Band A and 4 sc across the row ends of Rail L, turn. (14 sc + 8 ch = 22 sts)
Rows 2–3: Ch 1, sc in each st across, turn. (22 sc)
Fasten off. The crossbar is 5.5 in (14.0 cm) wide and 0.75 in (1.9 cm) deep. The 8 ch span the 2 in (5.1 cm) gap between the band ends.
Tack: Use the band tails or matching yarn and a tapestry needle. At each of the 38 rail points, work 2 small whipstitches to join the band edge to the marked Row 3 sc. At each of the 20 crossings, work 2 stitches through both bands at the center. Keep the stitches small so they disappear into the texture.
Top crossbar: Work this the same way as the bottom crossbar, across the other end. (22 sts in each row)
The strip now measures 5.5 in (14.0 cm) x 81.5 in (207.0 cm): 0.75 in + 80 in + 0.75 in.
Make All Pieces
For one panel:
- Cream: 3 strips = 6 rails, 6 bands, 6 tabs
- Forest green: 2 strips = 4 rails, 4 bands, 4 tabs
Make a second identical set for the second panel. Layout for each panel, left to right on the rod:
| Cream | Green | Cream | Green | Cream |
|  S1   |  S2   |  S3   |  S4   |  S5   |
Joining: Hanging the Strips
The strips are hung but not joined. There are no seams between them, so each strip moves freely and the edges stay crisp.
Slide the strips onto the rod by their tabs, in layout order. The border edges should just touch, with no gap and no overlap. Don’t crowd the strips, or the plaits will twist.
Checkpoint: 5 strips x 6.25 in (15.9 cm) = 31.25 in (79.4 cm) per panel. If one strip hangs longer than the others, block it again instead of pulling it.
Border
Work the border around each strip separately, before adding the tabs. The border gauge is the same as the body: 4 sc per 1 in (2.5 cm) along stitches, and 1 sc per row end of a sc row.
Round 1: With RS facing, join yarn at the bottom right corner.
- Bottom edge: 22 sc, 1 in each crossbar st
- Corner: ch 1
- Long side: 3 sc in the bottom crossbar row ends, 320 sc in the free loops of the rail foundation chain, 3 sc in the top crossbar row ends (326 sc)
- Corner: ch 1
- Top edge: 22 sc
- Corner: ch 1
- Second long side: 326 sc, worked the same way
- Corner: ch 1; join with sl st to the first sc
Total: 22 + 326 + 22 + 326 = 696 sc, plus 4 corner ch-1 sps. The corner chains are not included in any side count.
Round 2: Ch 1, rev sc in each sc and 1 rev sc in each corner ch-1 sp; join. (696 + 4 = 700 sts)
Fasten off and weave in the ends.
Why the math works: At 4 sts per inch, 326 sts is 81.5 in (207.0 cm), which is exactly the strip length. Likewise, 22 sts is 5.5 in (14.0 cm), exactly the strip width. Because the counts match, the border lies flat. It adds 0.375 in (1.0 cm) per side, for a finished strip of 6.25 in (15.9 cm) x 82.25 in (208.9 cm).
Tabs (make 2 per strip)
Ch 5.
Row 1: Sc in the 2nd ch from the hook and in each ch across, turn. (4 sc)
Rows 2–20: Ch 1, sc in each st, turn. (4 sc)
Fasten off, leaving a 10 in (25.4 cm) tail. The tab measures 1 in (2.5 cm) x 5 in (12.7 cm).
Fold each tab in half. Sew 0.75 in (1.9 cm) of both ends to the WS of the top crossbar, with one tab directly above each rail. The loop rises about 1.75 in (4.4 cm) above the top edge and fits a rod up to 1 in (2.5 cm) in diameter.
Final Blocking
- Lay the strip RS up on a long, flat surface.
- Spray it lightly until damp. Don’t soak it.
- Pin the long edges straight and 6.25 in (15.9 cm) apart.
- Pin the length to 82.25 in (208.9 cm).
- Use your fingers to shape each oval so the bands curve smoothly from rail to rail.
- Pin each crossing on the center line.
- Let the strip dry completely, about 24 hours.
- Hang it by the tabs for a day before trimming any tails.
Final Quality-Control Checklist
- Each rail has 320 sts and 106 square holes.
- Each band has 400 sts.
- Each strip has 38 rail tacks and 20 crossing tacks.
- The crossings alternate: A over B, then B over A.
- Both crossbars have 22 sts.
- The border has 326 sts on each long side and 22 sts on each short side.
- The strip measures 6.25 in (15.9 cm) x 82.25 in (208.9 cm).
- The tabs sit directly above the rails.
- All strips in a panel hang to the same length.
Troubleshooting
Bands bunch between rail points: The band is too long. Check that 20 sts measure 5 in (12.7 cm). If they don’t, remake the band with a smaller hook.
Rails pucker at the tacks: The tacks are too tight or in the wrong place. Sew them again more loosely, at the exact marked sts.
Strip leans to one side: One rail is longer than the other. Count both rails; each needs 320 sts.
Crossbar flares: There are too many sts in the row ends. Use exactly 4 sc per rail and 3 sc per band.
Border ripples: Check that each long side has 326 sts, and keep an even, medium tension.
Care
Hand wash in cool water with mild soap. Press out the water in a towel and dry flat at the blocked measurements, because a tumble dryer can stretch or twist the strips.
Final Notes
Each measurement builds on the one before. Gauge gives a 320-st rail that is 80 in (203.2 cm) long and 1 in (2.5 cm) wide. Two rails with a 3.5 in (8.9 cm) opening between them make a 5.5 in (14.0 cm) strip. Bands of 400 sts, each 100 in (254.0 cm) long, form the plait. The crossbars bring the strip to 81.5 in (207.0 cm), and the border brings it to 6.25 in (15.9 cm) x 82.25 in (208.9 cm). Five strips side by side make one 31.25 in (79.4 cm) panel.
If you check each stage as you go, the strips will hang straight and even.
Happy crocheting!