

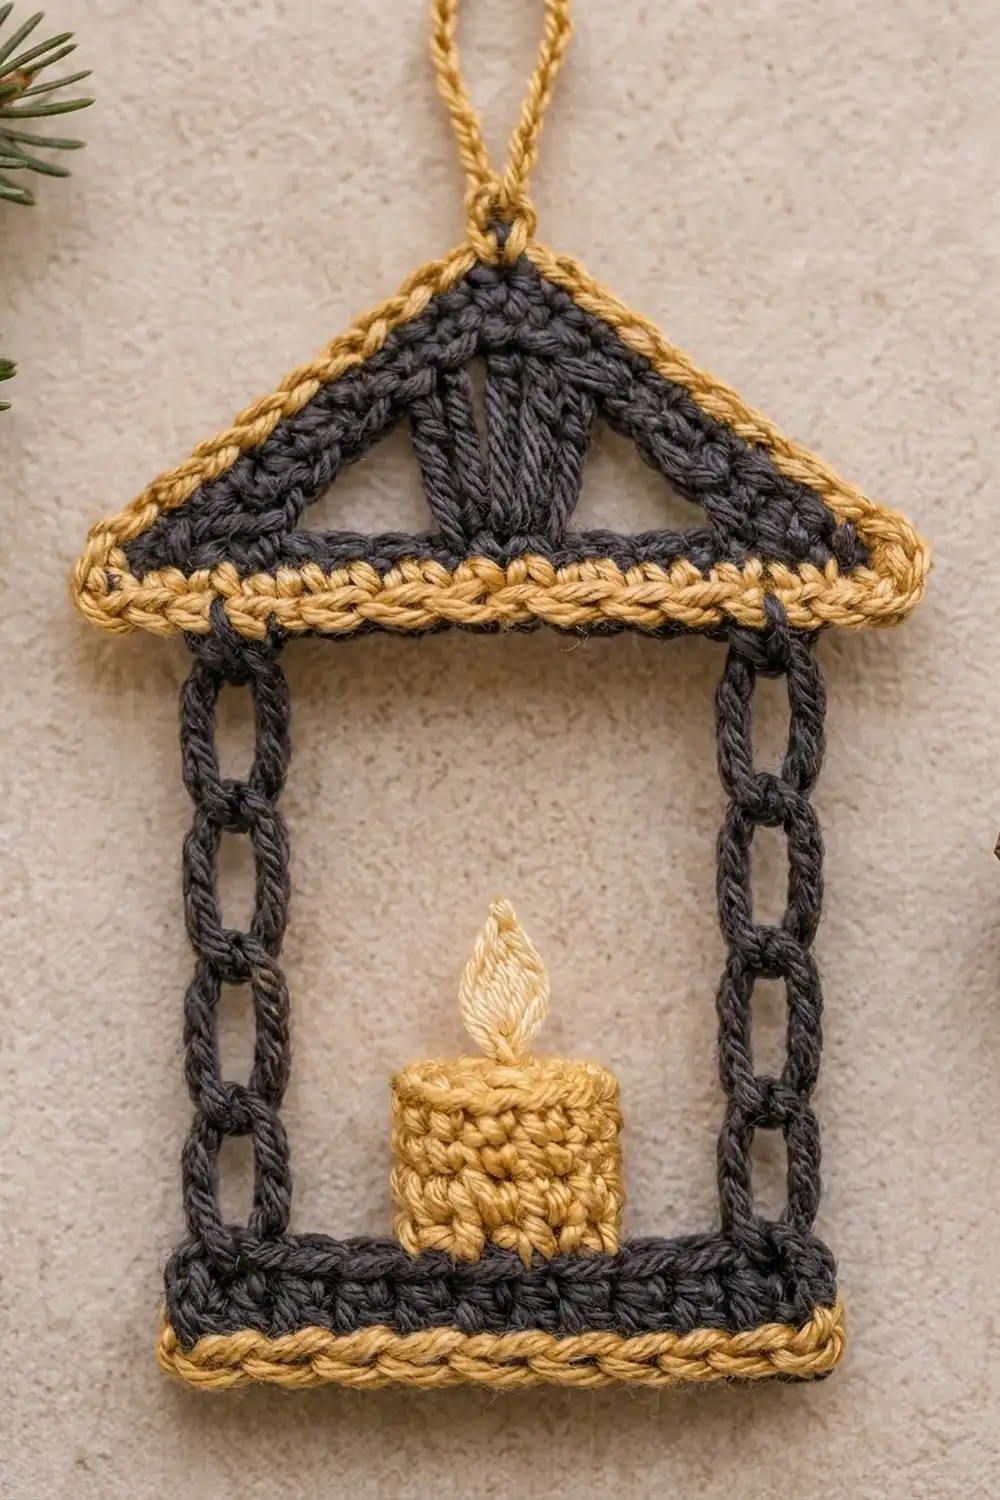
The Hearthglow Lantern is a small, graphic Christmas ornament: a charcoal lantern frame with chain-link side posts, a pointed roof with a fan of tall stitches at the center, and a little gold candle glowing in the open window. Warm gold edging outlines the roof and base, and a gold loop at the peak makes it ready to hang.
The palette is charcoal gray, warm gold and pale cream. The dark frame makes the gold details and the candle stand out, especially against green branches and twinkle lights.
This pattern uses US crochet terms. The finished ornament measures about 3.4 in (8.6 cm) wide and 4.7 in (11.9 cm) tall, or 6 in (15.2 cm) tall including the hanging loop.
You start with a solid single crochet base. Then one long chain forms both posts and the top bar at the same time, and you reinforce it with slip stitches and single crochet. Next come a gold eave stripe, a roof made of stitches that get taller toward the center, and gold edging on the roof and base. Last, you sew in a tiny candle and flame.
Finished Size and Construction
- Finished size: 3.4 in × 4.7 in (8.6 cm × 11.9 cm), or 6 in (15.2 cm) tall with the loop
- Skill level: Easy to intermediate
- Terminology: US crochet terms
- Yarn weight: DK (light worsted), cotton or cotton blend
- Hook: 3.5 mm (E-4)
- Number of pieces: 1 lantern frame, plus 2 tiny appliqués (candle and flame)
- Layout: Single ornament, no joining of motifs
- Base before border: 3 in × 0.5 in (7.6 cm × 1.3 cm)
- Frame before roof (base border not yet added): 3 in wide × 3.4 in tall (7.6 cm × 8.6 cm)
- Border depth: about 0.2 in (0.5 cm) of gold on each edged side
Materials
Use a smooth, firm DK cotton or cotton blend. Cotton keeps the chain links crisp and helps the roof hold its triangle shape. Avoid fuzzy or very soft acrylics, because they blur the chain-link texture.
- Charcoal gray: 8 g (about 20 m)
- Warm gold: 5 g (about 12 m)
- Pale cream: 1 g (about 3 m)
These quantities include a margin for your gauge swatch and weaving in ends.
Tools:
– 3.5 mm (E-4) crochet hook
– Tapestry needle
– 2 locking stitch markers
– Scissors
– Rustproof pins and a blocking mat or folded towel
– Optional: spray starch or fabric stiffener
Abbreviations (US Terms)
- ch – chain
- sl st – slip stitch
- sc – single crochet
- hdc – half double crochet
- dc – double crochet
- tr – treble crochet (yarn over twice)
- dtr – double treble crochet
- BLO – back loop only
- st(s) – stitch(es)
Special techniques:
- Double treble (dtr): Yarn over 3 times and insert the hook in the stitch. Yarn over and pull up a loop (5 loops on hook). Then [yarn over, pull through 2 loops] 4 times.
- Back bump: The horizontal bar on the back of a chain. When you work into back bumps, the neat V of each chain stays on the front. That is what gives the posts their chain-link look.
Gauge and Checkpoints
Gauge: 20 sc and 22 rows = 4 in (10.2 cm). A 10-sc × 11-row swatch should measure 2 in (5.1 cm) square.
Gauge matters more here than in most ornaments because the posts are a fixed chain length. Make the base first and measure it before you move on.
Checkpoints:
1. After base Row 3: 3 in × 0.5 in (7.6 cm × 1.3 cm).
2. After the posts and top bar: each post measures 2.5 in (6.4 cm) from the top of the base to the underside of the top bar. The window opening is 2.6 in (6.6 cm) wide.
3. After the gold eave stripe: the stripe measures 3.4 in (8.6 cm) across.
4. After the roof edging: the roof is about 1.1 in (2.8 cm) tall from the eave stripe to the peak.
5. Finished: 3.4 in × 4.7 in (8.6 cm × 11.9 cm), not counting the loop.
If your piece is too big, go down to a 3.25 mm (D-3) hook. If it’s too small, go up to a 3.75 mm (F-5) hook. If only the posts are off, keep the 45-chain count and change your chain tension. Loose chains make tall, wobbly posts. Tight chains pull the top bar narrower than the base.
Base
Use charcoal.
Row 1: Ch 16. Sc in the 2nd ch from the hook and in each ch across. (15 sc)
Row 2: Ch 1, turn. Sc in each st across. (15 sc)
Row 3: Ch 1, turn. Sc in each st across. (15 sc) Do not turn and do not fasten off.
Your yarn is now at one top corner of the base. Call it Corner A. The opposite top corner, at the first sc of Row 3, is Corner B. Place a marker in that first sc.
Checkpoint: 3 in × 0.5 in (7.6 cm × 1.3 cm).
Posts and Top Bar
This section turns one chain into both posts and the top bar, all in the same piece.
Foundation chain: Ch 45. Make sure the chain isn’t twisted, then sl st into the marked first sc of Row 3 (Corner B). Remove the marker.
Count the chains from Corner A as follows:
– Chains 1–16: Post A
– Chains 17–29: the middle of the top bar
– Chains 30–45: Post B
Reinforcing round:
– Post B: Sl st in the back bump of chains 45 through 31, working upward. (15 sl st)
– Top bar: Sc in the back bump of chain 30 (corner), chains 29 through 17, and chain 16 (corner). (15 sc)
– Post A: Sl st in the back bump of chains 15 through 1, working downward. (15 sl st)
– Sl st in the top of the last sc of Row 3 at Corner A.
Total: 15 sl st + 15 sc + 15 sl st = 45 sts, one for each foundation chain, plus the two joining sl sts. Fasten off charcoal.
The sl sts firm up each post into a cord and leave the chain Vs facing forward as large links. The top bar has the same 15 sc as the base, so the frame stays square.
Checkpoint: each post is 2.5 in (6.4 cm) tall, and the opening is 2.6 in (6.6 cm) wide. If a post bows outward, your sl sts are too loose. If it puckers, they’re too tight.
Gold Eave Stripe
Row 1: With the front of the lantern facing you, join gold with a sl st in the first sc of the top bar at the right end. Ch 1. Work 2 sc in the same st, sc in each of the next 13 sts, then 2 sc in the last st. (17 sc: 15 worked one per existing stitch + 2 extra)
Fasten off gold. The 2 extra stitches make the eaves stick out slightly past each post.
Checkpoint: the stripe measures 3.4 in (8.6 cm) across.
Roof
This roof is a single row of charcoal stitches that get taller toward the center. The rising stitch heights create the triangle, and the dtr fan fills the peak.
Roof Row: With the front facing, join charcoal with a sl st in the first gold sc (this sl st is stitch 1). Then work:
– Sc in next st (stitch 2)
– Hdc in each of the next 2 sts (stitches 3–4)
– Dc in each of the next 2 sts (stitches 5–6)
– Tr in each of the next 2 sts (stitches 7–8)
– 5 dtr in the next st (stitch 9, the center fan)
– Tr in each of the next 2 sts (stitches 10–11)
– Dc in each of the next 2 sts (stitches 12–13)
– Hdc in each of the next 2 sts (stitches 14–15)
– Sc in the next st (stitch 16)
– Sl st in the last st (stitch 17)
Count: 1 sl st + 1 sc + 2 hdc + 2 dc + 2 tr + 5 dtr + 2 tr + 2 dc + 2 hdc + 1 sc + 1 sl st = 21 sts, worked into 17 gold sc. Fasten off charcoal.
Spread the 5 dtr into an even fan with your fingers. The 3rd dtr is the peak.
Border
The border is gold throughout: the roof edging with the hanging loop, plus the base edging. The eave stripe you already made completes the outline.
Border gauge: 1 sc per stitch top along the roof, and 1 sc per row end along the base sides. At 5 sc per inch, the 0.2 in (0.5 cm) of gold depth stays flat without ruffling.
Roof Edging
With the front facing, join gold with a sl st in the first stitch of the Roof Row (the sl st at the right end). Then work:
– Right slope: Ch 1. Sc in the same st and in each of the next 9 sts, ending in the 2nd dtr. (10 sc)
– Peak and loop: In the 3rd dtr, work (sc, ch 20, sc). The ch-20 is the hanging loop.
– Left slope: Sc in each of the remaining 10 sts. (10 sc)
Total: 10 + 2 + 10 = 22 sc + 1 ch-20 loop.
Fasten off gold and weave the end into the gold eave stripe.
Why the math works: the Roof Row has 21 stitches. Ten sit on each side of the center dtr, and each gets 1 sc. The center dtr takes the 2 sc that hold the loop. Because the stitch tops already climb in height, one sc per stitch follows the slope without stretching it.
Checkpoint: the roof is 1.1 in (2.8 cm) tall. Laid flat, the loop is 1.3 in (3.3 cm) tall.
Base Edging
Turn the lantern so the bottom of the base is easy to reach, with the front facing you. Join gold with a sl st at the top of the left short end of the base, just below where the post sits. Then work:
– Left end: Ch 1. Work 1 sc in each of the 3 row ends. (3 sc)
– Bottom:
– 3 sc in the free loop of the first foundation ch (corner)
– 1 sc in each of the next 13 free loops
– 3 sc in the last free loop (corner)
– Bottom total, corner to corner: 3 + 13 + 3 = 19 sc
– Right end: Work 1 sc in each of the 3 row ends. (3 sc)
Total: 3 + 19 + 3 = 25 sc. Fasten off.
Why the math works: the base has 15 foundation loops (13 middle loops + 2 corner loops) and 3 rows per end. Each loop and row end gets 1 sc. The 2 corners each get 2 extra stitches so the bottom corners lie flat: 15 + 2 + 2 = 19 along the bottom.
Checkpoint: the base with its edging measures 3.4 in × 0.7 in (8.6 cm × 1.8 cm). The full lantern now measures 3.4 in × 4.7 in (8.6 cm × 11.9 cm).
Candle and Flame
Candle
Use gold. The candle is worked sideways so the back-loop ridges run vertically.
Row 1: Ch 5. Sc in the 2nd ch from the hook and in each ch across. (4 sc)
Rows 2–5: Ch 1, turn. Sc in the BLO of each st across. (4 sc)
Fasten off and leave a 6 in (15.2 cm) tail.
Checkpoint: 0.9 in wide × 0.8 in tall (2.3 cm × 2.0 cm).
Flame
Use cream.
Ch 4. Sl st in the 2nd ch from the hook, sc in the next ch, then (hdc, sl st) in the last ch.
Fasten off and leave a 6 in (15.2 cm) tail. The flame is about 0.5 in (1.3 cm) tall, with the point at the sl st end.
Placing the Appliqués
- Sew the rounded end of the flame to the center of the candle’s top edge.
- Center the candle on base Row 3, over sts 6–10, so there are equal gaps of about 0.85 in (2.2 cm) on each side between the candle and the posts.
- Whipstitch the bottom edge of the candle to the base with the gold tail.
- Tack each lower corner once more so the candle stands straight.
Final Blocking
- Weave in all remaining ends. Hide charcoal ends in charcoal stitches and gold ends in gold stitches.
- Lightly mist the ornament with water, or spray it with starch for a stiffer hanging piece.
- Lay the ornament face up on the blocking mat.
- Pin the base edging straight at 3.4 in (8.6 cm) wide.
- Pin both posts so they are parallel and 2.6 in (6.6 cm) apart on the inside.
- Pin the eaves level, and pin the roof peak 1.1 in (2.8 cm) above the eave stripe so both slopes are straight.
- Smooth the dtr fan into an even spread.
- Lay the hanging loop flat so it dries open.
- Let it dry completely, usually 4–6 hours, before removing the pins.
Final Quality-Control Checklist
- [ ] The base has 15 sc in each of its 3 rows.
- [ ] Both posts measure 2.5 in (6.4 cm) and show clear chain-link Vs on the front.
- [ ] The top bar has 15 sc, and the gold eave stripe has 17 sc.
- [ ] The Roof Row has 21 sts, with 5 dtr centered at the peak.
- [ ] The roof edging has 22 sc and the ch-20 loop sits exactly at the peak.
- [ ] The base edging has 25 sc and flat corners.
- [ ] The candle is centered, upright and secure, and the flame points straight up.
- [ ] Finished size is 3.4 in × 4.7 in (8.6 cm × 11.9 cm).
- [ ] All ends are hidden in matching colors.
Troubleshooting
Posts lean inward or the top bar is narrower than the base. Your 45 chains are too tight. Rework them more loosely, or chain with a 4.0 mm (G-6) hook and then switch back to 3.5 mm.
Posts bow or wobble. The reinforcing sl sts are too loose. Work them snugly, but don’t let them pull.
The chain was twisted after the join. Rip back to Corner B and join again, checking that the back bumps all face the same way.
The roof looks rounded instead of pointed. Check that the tr and dtr are the full height, with the right number of yarn overs. Then block the slopes straight with pins.
The dtr fan curls forward. Spread it by hand and block it flat. Spray starch helps it stay put.
Base corners cup. Make sure each corner got all 3 sc.
The candle tilts. Add one more tacking stitch at each lower corner.
Care
Spot clean with cool water and mild soap, and dry flat. Store the ornament flat between tissue paper so the roof and posts keep their shape.

Final Notes
Here is the full measurement chain:
1. A 15-sc base measures 3 in (7.6 cm).
2. 2.5 in (6.4 cm) chain-link posts lead to a 15-sc top bar that matches the base.
3. A 17-sc gold eave stripe widens the frame to 3.4 in (8.6 cm).
4. A 21-st roof in rising stitch heights adds 1.1 in (2.8 cm) with its 22-sc gold edging.
5. A 25-sc base edging finishes the bottom.
The result is a 3.4 in × 4.7 in (8.6 cm × 11.9 cm) lantern with a glowing candle in the window. If every checkpoint matches, the finished ornament will too.
Happy crocheting!