

The Hearthside Curtain is a hanging Christmas window curtain made from twelve ivory crochet cords. Each cord carries eight tiny red stockings and eight pairs of soft green leaves. With window light coming through, it looks like rows of garlands hung by the fireplace.
The colors are classic and calm: deep cranberry red for the stockings, creamy ivory for the cords and the pebbly stocking cuffs, and muted sage green for the leaves. Each stocking is a flat piece of solid single crochet. Its ribbed cuff sits slightly wider than the leg.
This pattern uses US crochet terms. Each strand hangs 60 in (152.4 cm) below a 3 in (7.6 cm) rod loop, for a total drop of 63 in (160.0 cm). With twelve strands spaced 3 in (7.6 cm) apart, the curtain is 33 in (83.8 cm) wide between the outer cords.
You make the curtain in separate parts: slip-stitch cords, flat stockings worked top-down in rows, ribbed cuffs, and small leaves. You sew the cuffs to the stockings, then sew the stockings and leaves to the cords at counted stitches. The loops slide onto a curtain rod. An optional ribbed red tieback finishes the look.
Finished Size and Construction
- Finished size: 33 in (83.8 cm) wide between outer cords x 63 in (160.0 cm) total drop
- Skill level: Easy, but repetitive
- Terminology: US
- Yarn weight: Worsted (#4)
- Hook: 4.0 mm (G-6)
- Number of pieces: 12 cords, 96 stockings, 96 cuffs, 192 leaves, plus 1 optional tieback
- Layout: 12 strands across, each with 8 stockings and 8 leaf pairs, alternating
- Stocking size: 2.4 in (6.1 cm) wide x 2.9 in (7.4 cm) tall with cuff
- Stocking body before cuff: 2.4 in (6.1 cm) wide at the foot x 2.4 in (6.1 cm) tall
- “Border” (top edge of hanging loops): a 3 in (7.6 cm) loop at the top of every cord
Materials
Choose a smooth, firm worsted cotton or cotton-acrylic blend. Firm yarn keeps the stockings flat and stops the long cords from stretching under their weight. Avoid fuzzy yarns, because clear stitches matter at this small scale.
- Cranberry red: 350 g / 650 m (stockings and tieback)
- Ivory: 220 g / 400 m (cords and cuffs)
- Sage green: 175 g / 320 m (leaves)
All quantities include about a 10% margin for swatching, tails, and sewing.
Tools:
- 4.0 mm (G-6) crochet hook
- Tapestry needle
- Scissors
- Removable stitch markers (at least 16 per cord)
- Measuring tape
- Pins and a blocking mat or folded towel
- Curtain rod, 36 in (91.4 cm) or wider, up to 1.5 in (3.8 cm) in diameter
Abbreviations (US Terms)
- ch: chain
- sl st: slip stitch
- sc: single crochet
- hdc: half double crochet
- dc: double crochet
- sc2tog: single crochet 2 together
- BLO: back loop only
- st(s): stitch(es)
Special stitch: back-bump slip stitch. Insert the hook into the back bump of the chain (the ridge on the underside). Yarn over and pull through both the chain and the loop on the hook. This makes a firm, rounded cord that looks braided on the front.
Gauge and Checkpoints
Fabric gauge: 9 sc and 10 rows = 2 in (5.1 cm), which is 4.5 sc and 5 rows per 1 in (2.5 cm).
Cord gauge: 4 back-bump sl sts = 1 in (2.5 cm).
Before anything else, make one complete stocking with its cuff and one 40-stitch test cord.
Checkpoints:
- After Row 7 of the stocking, the leg measures 1.6 in (4.1 cm) wide x 1.4 in (3.6 cm) tall.
- After Row 12, the body measures 2.4 in (6.1 cm) at its widest x 2.4 in (6.1 cm) tall.
- The finished cuff measures 1.8 in (4.6 cm) wide x 0.9 in (2.3 cm) tall.
- The 40-stitch test cord measures 10 in (25.4 cm).
Too big? Go down 0.5 mm. Too small? Go up 0.5 mm. If only the cord is off, change the hook size for the cords alone. Cord length controls all the spacing, so it matters more than stocking size.
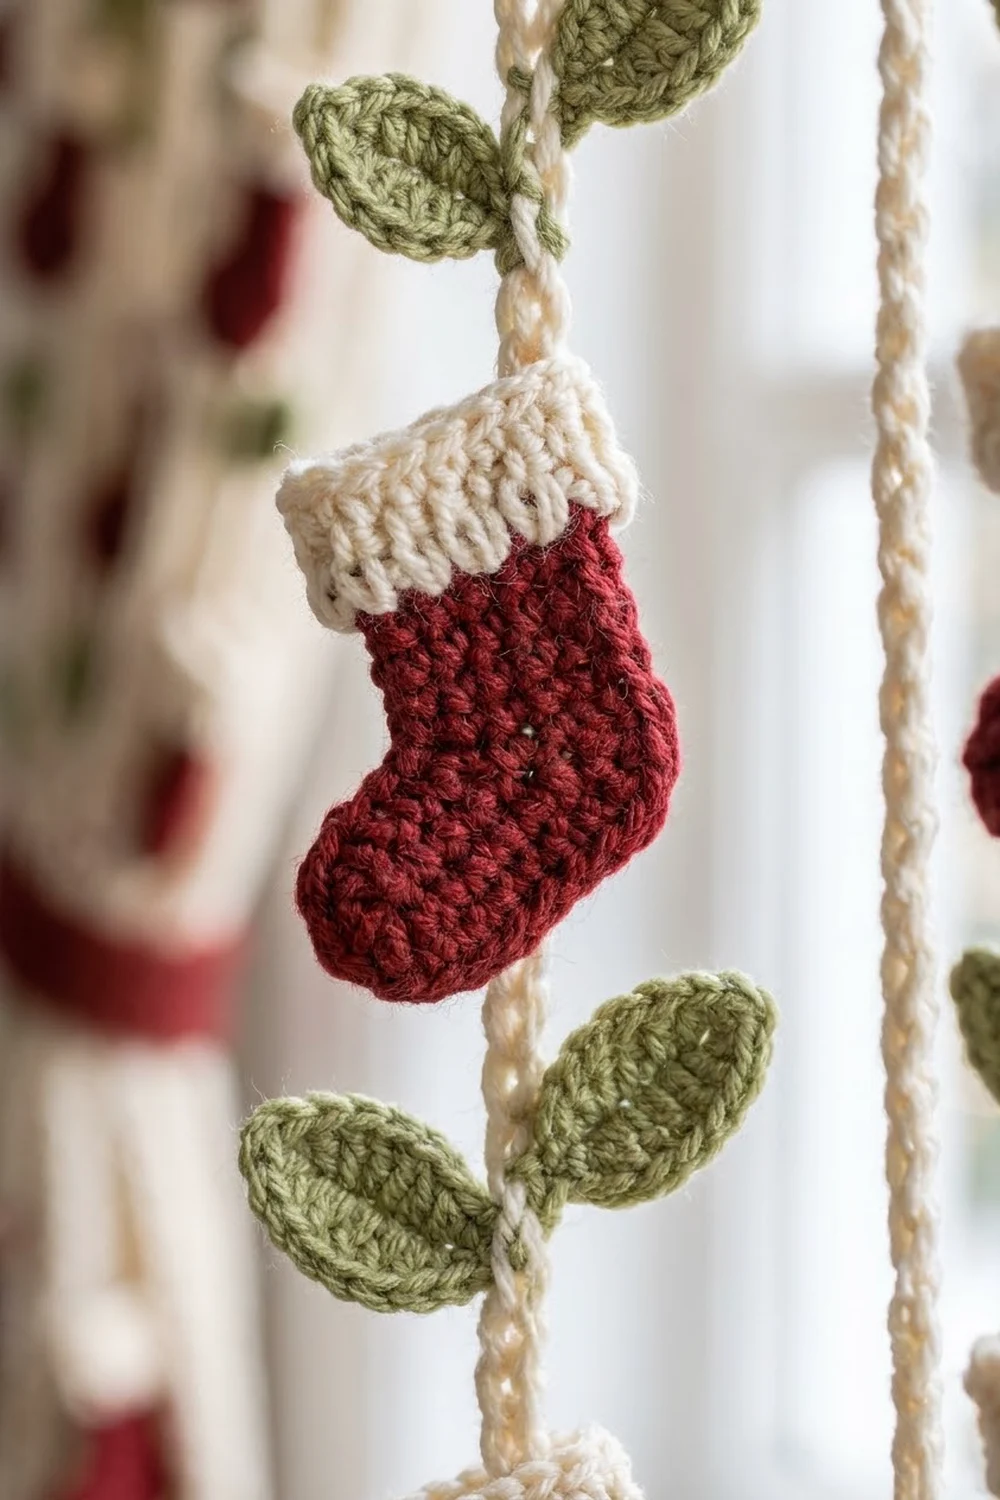
Pattern: Cord (Make 12, Ivory)
Ch 265.
Row 1: Sl st in the back bump of the 2nd ch from the hook and in the back bump of each ch across. (264 sl sts) Fasten off, leaving a 10 in (25.4 cm) tail at the starting end.
The cord measures 66 in (167.6 cm). Sts 1–24 become the hanging loop. Sts 25–264 (240 sts) make up the 60 in (152.4 cm) hanging length.
Mark positions: Count from st 1 at the tail end and place markers at:
- Leaf pairs: sts 32, 60, 88, 116, 144, 172, 200, 228
- Stockings: sts 46, 74, 102, 130, 158, 186, 214, 242
Each attachment point is 14 sts (3.5 in / 8.9 cm) from the next. Stockings are 28 sts (7 in / 17.8 cm) apart. The first leaf pair sits 2 in (5.1 cm) below the loop. After the last stocking marker, 22 sts (5.5 in / 14.0 cm) of cord remain.
Pattern: Stocking (Make 96, Red)
Work flat, top-down, in rows. Turn at the end of every row.
Ch 8.
Row 1: Sc in the 2nd ch from the hook and in each ch across. (7 sc)
Rows 2–7: Ch 1, sc in each st across. (7 sc)
At the end of Row 7, ch 4 for the toe, then turn.
Row 8 (conversion row): Sc in the 2nd ch from the hook and in the next 2 ch, then sc in each of the 7 sts. (7 sc in existing sts + 3 sc on the toe chain = 10 sc)
Row 9 (heel growth row): Ch 1, 2 sc in the first st, sc in the next 9 sts. (11 sc)
Row 10: Ch 1, sc in each st across. (11 sc)
Row 11: Ch 1, sc2tog, sc in the next 7 sts, sc2tog. (9 sc)
Row 12: Ch 1, sc2tog, sc in the next 5 sts, sc2tog. (7 sc)
Fasten off and weave in the ends. The toe points toward the side where you added the Row 8 chain, and the heel bulges on the opposite side. The body is 12 rows, or 2.4 in (6.1 cm), tall.
Tip: To have half the stockings point left and half point right, flip the finished pieces. Single crochet looks almost the same on both sides, so one set of instructions covers both.
Pattern: Cuff (Make 96, Ivory)
You work the cuff sideways, so the back-loop rows form vertical ribs with a pebbly texture.
Ch 5.
Row 1: Sc in the 2nd ch from the hook and in each ch across. (4 sc)
Rows 2–9: Ch 1, sc in the BLO of each st across. (4 sc)
Fasten off, leaving a 12 in (30.5 cm) tail. The cuff’s 9 rows make it 1.8 in (4.6 cm) wide, and its 4 sts make it 0.9 in (2.3 cm) tall.
Attach: Center the cuff over the top of the leg so its lower edge covers Rows 1–2, an overlap of 0.4 in (1.0 cm). The cuff rises 0.5 in (1.3 cm) above the leg. It is wider than the 1.6 in (4.1 cm) leg by 0.1 in (0.3 cm) on each side. Whipstitch all four edges of the cuff to the stocking.
Pattern: Leaf (Make 192, Green)
Ch 8.
Side 1: Sc in the 2nd ch from the hook, hdc in the next ch, dc in the next 2 ch, hdc in the next ch, sc in the next ch, sl st in the last ch. (7 sts)
Tip: Ch 2, then sl st in the same last ch. (picot point)
Side 2: Working along the underside of the foundation chain, sc in the next ch, hdc in the next ch, dc in the next 2 ch, hdc in the next ch, sc in the next ch. (6 sts) Sl st into the base ch.
Fasten off, leaving an 8 in (20.3 cm) tail at the base. Each leaf measures about 1.5 in (3.8 cm) long x 0.75 in (1.9 cm) wide.
Make All Pieces
Each strand needs 1 cord, 8 stockings, 8 cuffs, and 16 leaves.
- Red: 96 stockings, plus 1 tieback
- Ivory: 12 cords and 96 cuffs
- Green: 192 leaves
Layout (top to bottom). L = leaf pair, S = stocking:
Rod:  O  O  O  O  O  O  O  O  O  O  O  O   (12 loops, 3 in / 7.6 cm apart)
      L  L  L  L  L  L  L  L  L  L  L  L   st 32
      S  S  S  S  S  S  S  S  S  S  S  S   st 46
      L  L  L  L  L  L  L  L  L  L  L  L   st 60
      S  S  S  S  S  S  S  S  S  S  S  S   st 74
      ... repeat ...
      L  L  L  L  L  L  L  L  L  L  L  L   st 228
      S  S  S  S  S  S  S  S  S  S  S  S   st 242
Joining
Leaves: At each leaf marker, place two leaves base to base, one on each side of the cord, angled slightly upward. Sew each leaf base through the center of the marked sl st and the stitch just above it, so the pair looks like a small sprig.
Stockings: At each stocking marker, lay the cord behind the stocking. Center the cuff on the cord with the top edge of the cuff at the marked stitch. Sew through the back of the cuff into the marked st and the 2 sts below it, 3 sts in all. The stocking body hangs free below the cuff.
Stitch-to-stitch logic: Attach pieces only at marked stitches. That keeps the spacing exact even if your sewing is loose. Don’t place pieces by eye.
Tension: Sew firmly enough that the pieces don’t twist, but don’t pull so hard that the cord puckers. When you finish each strand, lay it flat and check that it still measures 60 in (152.4 cm) from st 25 to the end.
Size checkpoint: A finished strand hangs straight, with stockings 7 in (17.8 cm) apart and each leaf pair exactly halfway between two stockings.
Border: Top Hanging Loops
This curtain has no worked border. Its top edge is the row of hanging loops.
Border gauge: The same as the cord: 4 sl sts = 1 in (2.5 cm).
Each loop: Fold sts 1–24 into a ring and use the starting tail to sew st 1 to st 24. Each loop uses exactly 24 sts.
Count across the top: 12 loops x 24 sts = 288 sts in loops.
Why the math works: 24 sts measure 6 in (15.2 cm) around, so the folded loop hangs 3 in (7.6 cm) deep. A 1.5 in (3.8 cm) rod has a circumference of about 4.7 in (11.9 cm), so it fits with room to slide. The loop uses only sts 1–24, which leaves 240 sts, or 60 in (152.4 cm), of hanging length below every loop. Space the loops 3 in (7.6 cm) apart: 11 gaps x 3 in = 33 in (83.8 cm).
Hanging: Slide all twelve loops onto the rod in strand order. Measure the gaps at the rod, not lower down, because the stockings swing.
Optional tieback (red): Ch 9. Row 1: Sc in the 2nd ch from the hook and in each ch across. (8 sc) Rows 2–80: Ch 1, sc in the BLO of each st. (8 sc) The band measures 16 in (40.6 cm) x 1.8 in (4.6 cm). At each short end, sl st into one corner, ch 12, and sl st into the other corner. This makes a 3 in (7.6 cm) loop to hang on a wall hook.
Final Blocking
- Lightly mist each stocking and cuff with water.
- Pin each stocking flat on a towel, shaping the toe and heel into smooth curves.
- Pin the leaves with their tips pointing out and slightly up.
- Lay each cord out straight, 60 in (152.4 cm) below the loop, and mist it. Don’t stretch it.
- Let everything dry completely, at least 12 hours.
- Hang the strands for a day before final trimming so the cords can settle.
Final Quality-Control Checklist
- [ ] Every cord has 264 sl sts and a 24-stitch loop.
- [ ] Every stocking body has 7 sc in Rows 1–7, then 10, 11, 11, 9, and 7 sc in Rows 8–12.
- [ ] Every cuff has 9 rows of 4 sc.
- [ ] Every leaf has a picot point at its tip.
- [ ] Leaf pairs are at sts 32, 60, 88, 116, 144, 172, 200, and 228.
- [ ] Stockings are at sts 46, 74, 102, 130, 158, 186, 214, and 242.
- [ ] Every loop is 3 in (7.6 cm) deep, and every strand hangs at the same height.
- [ ] Strands are 3 in (7.6 cm) apart, 33 in (83.8 cm) overall.
- [ ] All ends are woven in securely.
Troubleshooting
Cord is too long or stretches. Make your slip stitches tighter or go down a hook size. Cotton holds its length better than acrylic.
Stocking curls. Your rows are too tight. Go up 0.5 mm and block flat.
Toe looks square. Check Row 11. Each sc2tog must use the very first or very last two sts.
Cuff is narrower than the leg. Check your row gauge, or add a 10th row.
Stockings spin on the cord. Sew through 3 sts, not 1, and catch both side edges of the cuff.
Leaves droop. Sew 2 sts at each base, and angle the leaves upward before you secure them.
Strands hang unevenly. Recount the loop. Each extra stitch in a loop changes the drop by 0.125 in (0.3 cm).
Cords tangle while you work. Wind finished sections loosely around a piece of cardboard as you go.
Care
Spot clean or hand wash in cool water, then reshape and lay flat to dry. Store the curtain loosely rolled around a cardboard tube so the cords don’t tangle.

Final Notes
The measurements build on each other. At 4 sl sts = 1 in (2.5 cm), 264 sts make a 66 in (167.6 cm) cord. Of those, 24 sts fold into a 3 in (7.6 cm) loop, and 240 sts make the 60 in (152.4 cm) drop. Attachments sit every 14 sts, or 3.5 in (8.9 cm). Each stocking is 11 sc, or 2.4 in (6.1 cm), at its widest, and 12 rows plus the cuff, or 2.9 in (7.4 cm), tall. Twelve strands spaced 3 in (7.6 cm) apart make a 33 in (83.8 cm) curtain. Check your gauge first and count your markers; after that, it’s relaxing repetition.
Happy crocheting!