

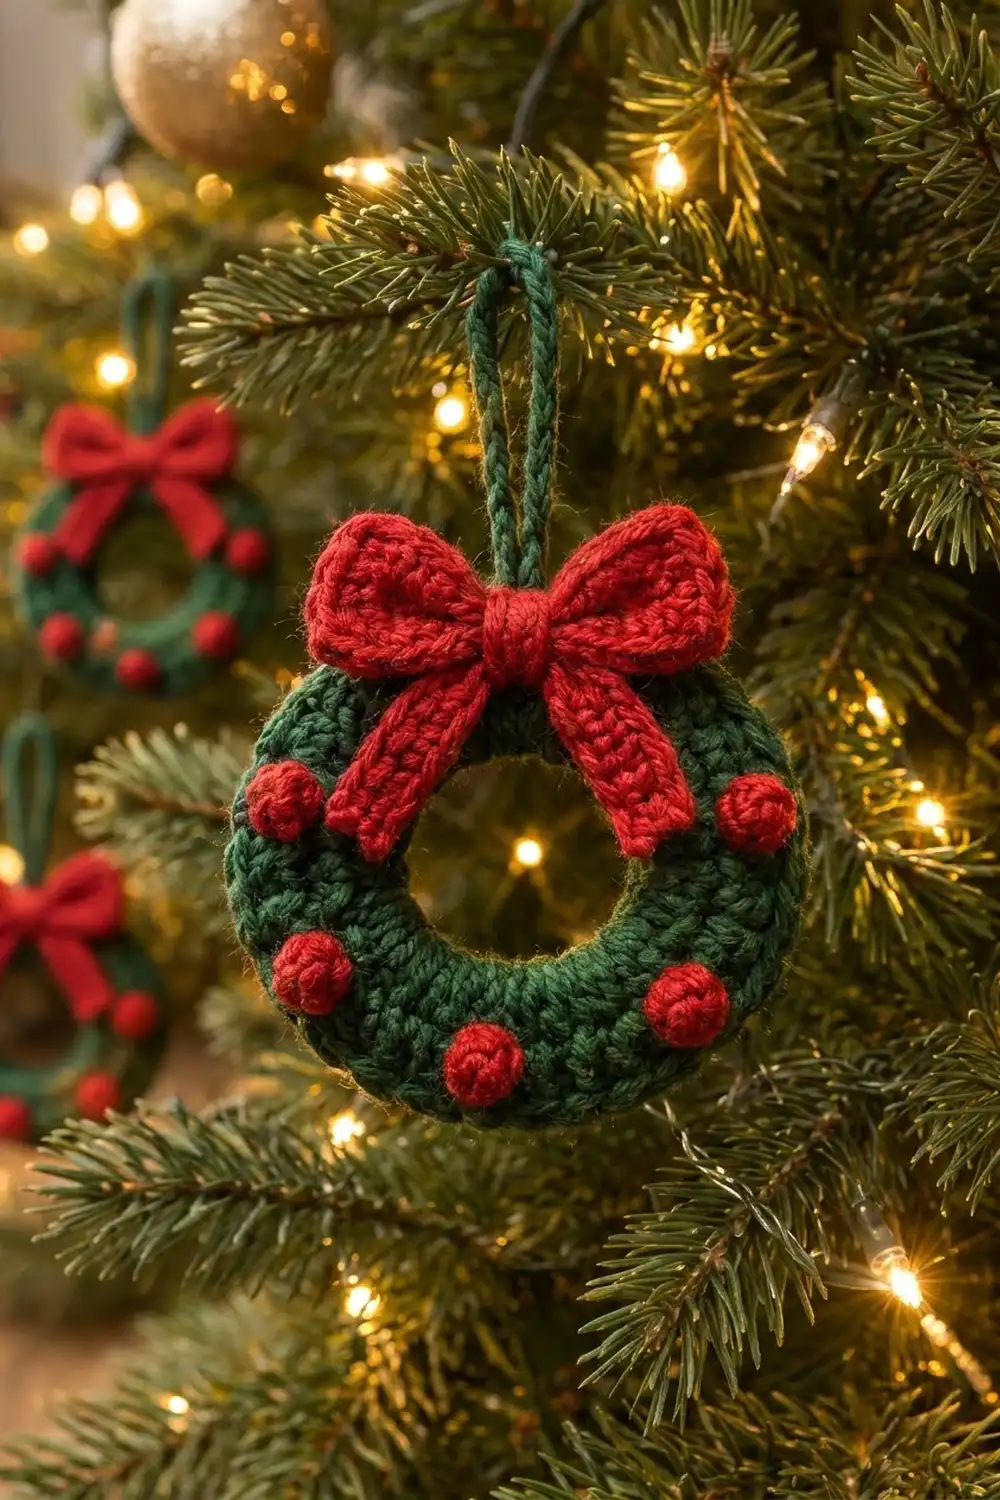
This little wreath ornament is a quick, cheerful make for the tree. It is a plump forest-green ring with six round red berries and a bright red bow at the top. A sturdy green cord loop lets it hang straight from a branch.
The look is classic and cozy: deep green, true Christmas red and dense single crochet texture throughout. The wreath body is worked over a wooden ring, so it keeps a crisp round shape without any stuffing or stiffener.
This pattern uses US crochet terms. The finished wreath measures 3 in (7.6 cm) across. With the hanging loop it is about 4.5 in (11.4 cm) tall.
Construction is simple. You cover a wooden ring with single crochet, then work outward in two more rounds and finish with a slip-stitch edge. The berries, the bow pieces and the hanging cord are made separately and sewn on.
Finished Size and Construction
- Finished size: 3 in (7.6 cm) diameter; 4.5 in (11.4 cm) tall including the loop
- Center opening: about 1.25 in (3.2 cm)
- Skill level: Easy
- Terminology: US crochet terms
- Yarn weight: DK (light worsted, #3)
- Hook: 3.5 mm (E-4)
- Number of pieces: 1 wreath body, 6 berries, 3 bow parts, 1 hanging cord, all sewn into one ornament
- Layout: single ornament; no joining of motifs
- Wreath body size (Rnds 1–2): 2.6 in (6.6 cm) diameter
- Size before border: 2.6 in (6.6 cm)
- Border depth: 0.2 in (0.5 cm) on each side, adding 0.4 in (1.0 cm) to the diameter
Materials
Choose a smooth DK yarn so the stitches are crisp and the berries come out round. Cotton or a cotton blend gives the clearest stitch definition. Soft acrylic also works well and is a little lighter on the branch.
- Green (forest green): 10 g / 25 m (wreath body, border, hanging cord)
- Red (bright Christmas red): 6 g / 15 m (berries, bow loops, tails, center wrap)
These quantities include a margin of about 20% for gauge differences and a test swatch.
Tools:
- 3.5 mm (E-4) crochet hook
- 1 wooden ring, 2 in (5.1 cm) outer diameter, about 1.5 in (3.8 cm) inner diameter
- Tapestry needle
- Sharp sewing needle and red thread (optional, for an invisible bow attachment)
- Scissors
- Stitch markers (at least 2)
- Pins
Abbreviations (US Terms)
- ch – chain
- sc – single crochet
- sl st – slip stitch
- sc2tog – single crochet 2 together
- MR – magic ring
- st(s) – stitch(es)
- rnd(s) – round(s)
- inc – 2 sc in the same stitch
- ( ) x N – repeat the bracketed sequence N times
Special technique – sc over ring: Insert the hook through the center of the wooden ring, yarn over and pull up a loop to the front, then yarn over and pull through both loops on the hook. The stitch wraps around the ring, and its top lies along the outer edge.
Gauge and Checkpoints
Gauge: 5 sc and 5.5 rows = 1 in (2.5 cm) in sc worked flat with a 3.5 mm hook.
This ornament is one piece, so make the wreath body (Rnds 1–2) first and use it as your test piece. Measure before you make any of the red parts.
Checkpoints:
- After Rnd 1: the covered ring measures 2.3 in (5.8 cm) across, and the wood should not show between stitches.
- After Rnd 2: 2.6 in (6.6 cm) across, lying flat or with a very gentle dome.
- After the border (Rnds 3–4): 3 in (7.6 cm) across.
- Bow strip: 4.8 in (12.2 cm) long before folding.
If the piece is too big (the edge ruffles or is wider than 2.7 in / 6.9 cm after Rnd 2), switch to a 3.25 mm (D-3) hook or tighten your tension.
If the piece is too small (it cups strongly or is under 2.5 in / 6.4 cm after Rnd 2), switch to a 3.75 mm (F-5) hook.
Rnd 1 is set by the ring, so if you change hooks, frog only Rnd 2 and work it again.
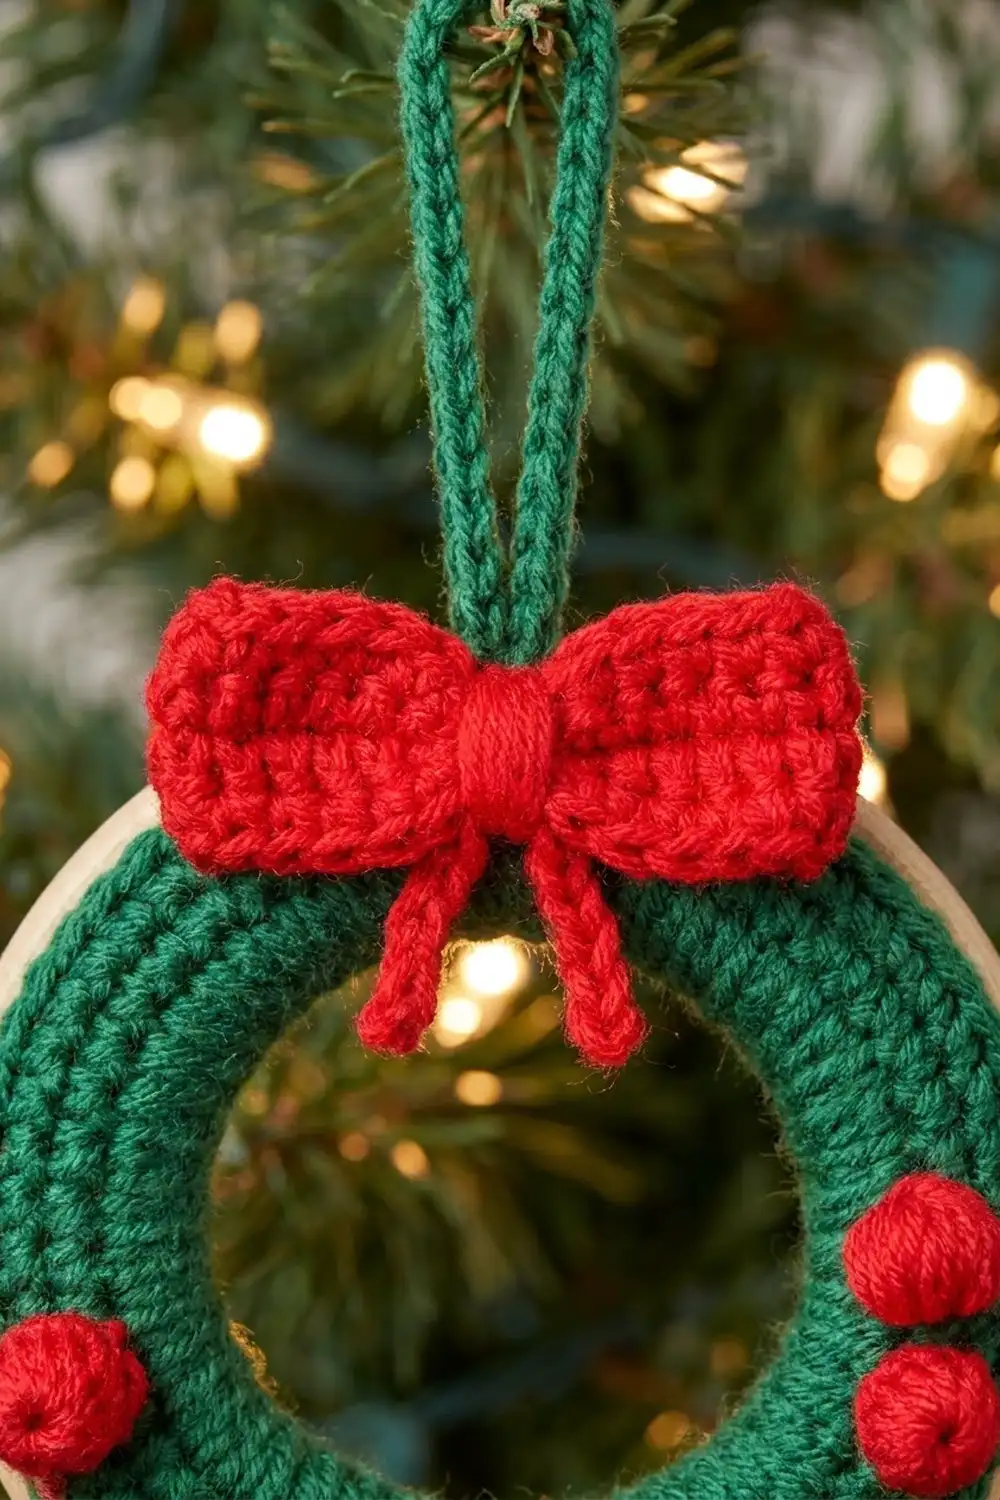
Wreath Body
Worked in joined rounds with the right side facing. The ring stays inside the work permanently.
Rnd 1 (covering round): With green, make a slip knot on the hook. Work 40 sc over the ring (see Special Technique), pushing the stitches together so they cover the wood completely. Join with a sl st to the first sc. (40 sts)
Pack the stitches tightly. On the inside of the ring they bunch up, and the tops fan out along the outer edge to give you a firm base to work into.
Rnd 2: Ch 1. Working into the tops of the Rnd 1 stitches along the outer edge: (sc in each of next 9 sts, inc in next st) x 4. Join with a sl st to the first sc. (44 sts)
This is a growth round: 40 stitches worked once each, plus 4 increases, for 44 total. The piece now measures 2.6 in (6.6 cm). Do not fasten off.
Border
The border has two rounds. A final sc growth round widens the wreath, and a slip-stitch round firms and rounds the outer edge so it looks plump.
Border gauge: the border rounds use the same 5 sc per 1 in (2.5 cm). Each round adds about 0.15 in (0.4 cm) for the sc round and 0.05 in (0.1 cm) for the slip-stitch round to each side of the wreath. That totals 0.2 in (0.5 cm) per side.
Rnd 3: Ch 1. (Sc in each of next 10 sts, inc in next st) x 4. Join with a sl st to the first sc. (48 sts)
This is a growth round: 44 stitches worked once each, plus 4 increases, for 48 total.
Rnd 4 (edge): Working loosely, sl st in each of the 48 sts around. Join to the first sl st. (48 sl sts)
This is a trim round: 48 slip stitches worked one per existing stitch, plus 0 added. Fasten off and leave a 6 in (15.2 cm) tail for attaching the cord.
Why the math works: a flat circle grows by about 0.94 in (2.4 cm) of circumference for every 0.15 in (0.4 cm) of radius. Four increases per round add 4 stitches, or 0.8 in (2.0 cm) at gauge. That is slightly less than a fully flat circle needs, so the outer edge pulls in a little and the wreath domes gently into the rounded shape shown. The slip-stitch round adds no stitches, so it firms the edge without flaring it.
Marking berry positions: count around Rnd 3 with the join as stitch 1. Rotate the wreath so that the join sits at top center, where the bow will cover it. Place a removable marker in Rnd 3 at stitches 8, 16, 20, 28, 32 and 40. These positions sit at roughly 2, 4, 5, 7, 8 and 10 o’clock. Stitch 24 (bottom center) stays empty.
Berries (Make 6)
With red:
Rnd 1: Work 6 sc into the MR. Pull the ring closed. Do not join. (6 sts)
Rnd 2: (Sc2tog) x 3. (3 sts)
Fasten off and leave an 8 in (20.3 cm) tail. Tuck the starting tail inside to fill the berry. Thread the long tail through the 3 remaining stitches and pull tight to close the berry into a firm ball about 0.3 in (0.8 cm) across.
Attaching: sew each berry over a marked position, centered on Rnd 2 and Rnd 3. Make 3–4 small stitches through the base of the berry and into the wreath fabric. Bring the needle out on the back, knot, and weave the tail into the green stitches on the back.
Bow
The bow has three red parts: the loop strip, the tail strip and the center wrap.
Bow Loop Strip
Foundation: Ch 25.
Row 1: Sc in the 2nd ch from the hook and in each ch across. Ch 1, turn. (24 sts)
Rows 2–6: Sc in each st across. Ch 1, turn. (24 sts)
Fasten off after Row 6 (do not ch 1) and leave a 10 in (25.4 cm) tail.
The strip measures 4.8 in (12.2 cm) long and 1.1 in (2.8 cm) tall. Fold both short ends to the center back so they overlap by about 0.2 in (0.5 cm), and tack them together. The folded bow is 2.4 in (6.1 cm) wide.
Bow Tail Strip
Foundation: Ch 15.
Row 1: Sc in the 2nd ch from the hook and in each ch across. Ch 1, turn. (14 sts)
Rows 2–3: Sc in each st across. Ch 1, turn. (14 sts)
Fasten off after Row 3. The strip measures 2.8 in (7.1 cm) by 0.5 in (1.3 cm). Fold it at the middle into an upside-down V so the two tails point down and slightly outward. Tack the fold.
Center Wrap
Foundation: Ch 7.
Row 1: Sc in the 2nd ch from the hook and in each ch across. Ch 1, turn. (6 sts)
Rows 2–4: Sc in each st across. Ch 1, turn. (6 sts)
Fasten off after Row 4 and leave an 8 in (20.3 cm) tail. The wrap measures 1.2 in (3.0 cm) by 0.75 in (1.9 cm).
Assembling the Bow
- Place the folded loop strip on top of the V-fold of the tail strip, with the centers lined up.
- Pinch the loop strip at the center to gather it into two loops.
- Wrap the center wrap snugly around the pinched middle and both strips, with the 6-stitch width running vertically.
- Sew the short ends of the wrap together at the back, pulling firmly so the knot looks rounded.
Hanging Cord
With green, ch 21. Sl st in the back bump of the 2nd ch from the hook and in each ch across. (20 sl sts)
Fasten off. The cord measures about 3.3 in (8.4 cm). Fold it in half and sew both ends to the back of the wreath at top center, over the join, using the body tail. The loop rises about 1.5 in (3.8 cm) above the wreath.
Attaching the Bow
Center the bow at the top of the wreath. The center knot should sit over Rnds 2–3, and the loops should reach about 0.2 in (0.5 cm) past the outer edge on each side. Pin it in place. Sew through the back of the center wrap into the wreath, then tack the underside of each loop and the top of each tail with 1–2 small stitches so the bow lies flat. Red thread on a sharp needle gives invisible stitches.
Final Blocking
- Lightly mist the wreath and bow with water, or hold a steam iron 1 in (2.5 cm) above the ornament without touching it. If you used acrylic, steam very lightly.
- Lay the ornament face up on a towel or blocking mat.
- Gently round the outer edge with your fingertips and check that it measures 3 in (7.6 cm) across.
- Shape the bow loops open and smooth the tails downward at a slight outward angle.
- Roll each berry between your fingers to round it.
- Let the ornament dry completely, at least 2 hours, before hanging.
Final Quality-Control Checklist
- No wood shows through Rnd 1, front or back.
- Rnd 2 has 44 sts, Rnd 3 has 48 sts and Rnd 4 has 48 sl sts.
- The wreath measures 3 in (7.6 cm) across, with an even, slightly domed profile.
- There are six berries at 2, 4, 5, 7, 8 and 10 o’clock, all firm and round.
- The bow is centered over the join, with loops of equal size.
- The tails mirror each other.
- The cord loop is centered and securely attached, and the ornament hangs straight.
- All tails are woven into the back.
Troubleshooting
Wood shows between stitches in Rnd 1: add 2–4 more sc to Rnd 1. Then add the same number of stitches to Rnds 2 and 3, worked plain without increases, so the increase layout stays the same.
The edge ruffles: your tension has loosened in the outer rounds. Go down a hook size for Rnds 3–4, or work the slip-stitch round more tightly.
The wreath cups too much: go up a hook size for Rnds 2–3.
Berries look flat: pull the closing tail tighter, and tuck a small scrap of red yarn inside before closing.
The bow droops: add tacking stitches under each loop. A short sc strip curls less if you also steam it lightly.
The ornament hangs crooked: re-center the cord directly over stitch 1 and check that the berries are spaced symmetrically.
Care
Spot clean with cool water and mild soap, then reshape and lay flat to dry. Store flat in a box between seasons so the bow keeps its shape.
Final Notes
The measurement chain is short and easy to check. A 2 in (5.1 cm) ring covered with 40 sc gives 2.3 in (5.8 cm). Rnd 2 (44 sts) brings the wreath to 2.6 in (6.6 cm). The border, Rnd 3 (48 sts) and Rnd 4 (48 sl sts), finishes it at 3 in (7.6 cm). A 4.8 in (12.2 cm) strip folds into a 2.4 in (6.1 cm) bow, and a 20-stitch cord gives a 1.5 in (3.8 cm) hanging loop. If you check each stage as you go, every wreath you make will match the last. They work well as a set of tree ornaments or as gift toppers.
Happy crocheting!