

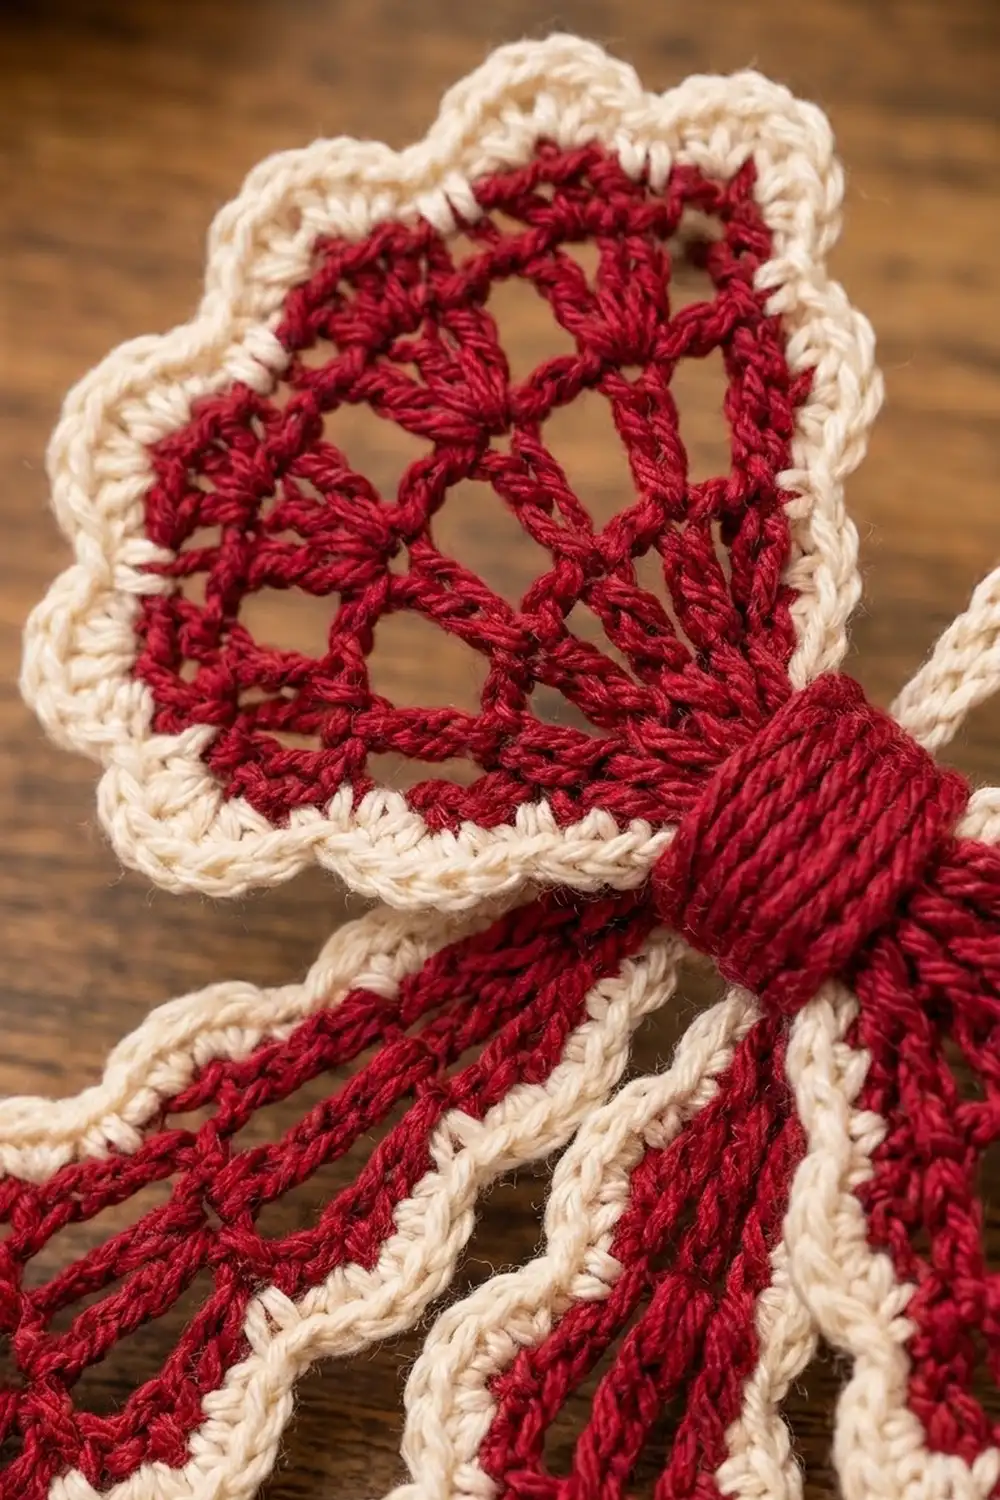
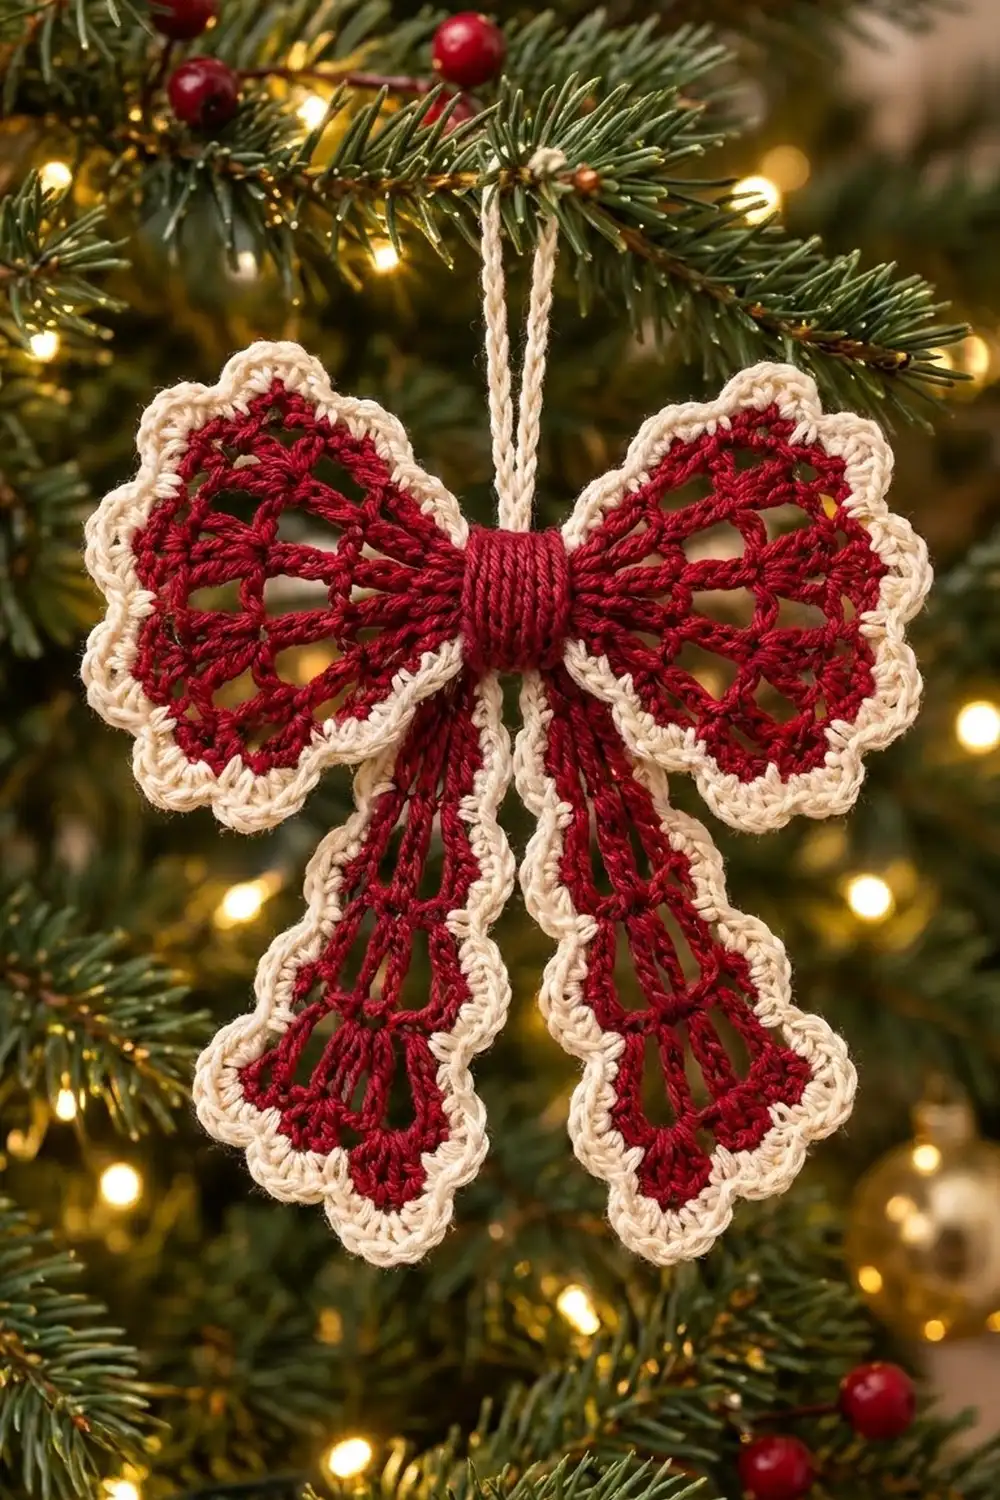
This lacy bow ornament has two fan-shaped wings, two long scalloped tails, and a snug wrapped center. The open lace bodies are deep cranberry red. A crisp cream scalloped edge outlines every piece, and a cream crocheted cord forms the hanging loop.
The style is classic and a little vintage, like a ribbon bow worked in thread. Light shows through the open double and treble crochet spokes on the tree, and the cream edging keeps the shape easy to see from across the room.
The pattern uses US crochet terms. The finished bow is about 4.5 in (11.4 cm) wide and 5.25 in (13.3 cm) tall. The hanging loop adds about 2.5 in (6.4 cm).
Each wing is a small fan worked in rows from a magic ring, and each tail is a narrow fan worked top-down. Every shaped piece gets a two-round cream border. Then you stack the pieces, wrap them with a small red band, and attach the loop to make one finished ornament.
Finished Size and Construction
- Finished size: 4.5 in (11.4 cm) wide x 5.25 in (13.3 cm) tall, plus a 2.5 in (6.4 cm) loop
- Skill level: Intermediate
- Terminology: US crochet terms
- Yarn weight: Sport weight (2) mercerized cotton
- Hook: 2.75 mm (C-2)
- Number of pieces: 6 (2 wings, 2 tails, 1 center band, 1 hanging cord)
- Layout: wings side by side with their points meeting at the center, tails hanging below in a soft V, band wrapped over the middle
- Wing size: 2.25 in (5.7 cm) from point to edge x 3.25 in (8.3 cm) across
- Tail size: 4 in (10.2 cm) long x 2.25 in (5.7 cm) across the bottom
- Size before border: wing 1.75 in (4.4 cm) x 2.25 in (5.7 cm); tail 3.5 in (8.9 cm) x 1.25 in (3.2 cm)
- Border depth: 0.5 in (1.3 cm) at the scallop peaks
Materials
Choose a smooth, tightly plied cotton. Mercerized cotton gives the clear stitches and slight sheen shown here, and it blocks crisply. Avoid fuzzy or very stretchy yarns, because they blur the lace spokes and make the wings droop.
- Color A, cranberry red: 12 g, about 36 m (39 yd)
- Color B, cream: 8 g, about 24 m (26 yd)
These amounts include about 25 percent extra for your test piece and for weaving in ends.
Tools:
- 2.75 mm (C-2) crochet hook
- Tapestry needle
- Scissors
- 2 stitch markers
- Rustproof pins and a foam blocking mat
- Spray bottle with water
- Optional: fabric stiffener or starch spray
Abbreviations (US Terms)
- ch chain
- sl st slip stitch
- sc single crochet
- dc double crochet
- tr treble crochet
- sk skip
- sp(s) space(s)
- st(s) stitch(es)
- tch turning chain
- RS right side
Special stitches:
- V-st: (dc, ch 1, dc) in the same stitch.
- Scallop: sk 1 st, 5 dc in next st, sk 1 st, sc in next st. Each scallop uses 4 stitches of the previous round.
Gauge and Checkpoints
Gauge: 14 sc and 16 rows = 2 in (5.1 cm) with Color A and a 2.75 mm hook. That works out to 7 sc and 8 rows per 1 in (2.5 cm). One dc row is about 0.4 in (1.0 cm) tall, and one tr row is about 0.55 in (1.4 cm) tall.
Test one piece first. Make one tail through Row 8 before you start anything else. It uses both dc and tr rows, so it tells you more than a plain swatch.
Checkpoints:
- Tail after Row 3: about 1.25 in (3.2 cm) long.
- Tail after Row 8: 3.5 in (8.9 cm) long and 1.25 in (3.2 cm) wide at the bottom.
- Wing after Row 4: 1.75 in (4.4 cm) from ring to edge and 2.25 in (5.7 cm) across.
- Any piece after Border Round 2: 0.5 in (1.3 cm) larger at each scalloped edge.
If your piece is too big, switch to a 2.5 mm hook. If it is too small, switch to a 3.0 mm hook. Make the test tail again and measure before you continue.
Wings (Make 2)
With Color A, make a magic ring. Work the rows back and forth, starting in the ring and building outward into a fan. Turn at the end of every row.
Row 1: Ch 4 (counts as dc + ch 1), [dc, ch 1] in ring 5 times, dc in ring. Pull the ring tight. Turn. (7 dc, 6 ch-1 sps)
Row 2: Ch 4 (counts as dc + ch 1), dc in first dc (first V-st made), [ch 1, dc in next dc, ch 1, V-st in next dc] 3 times, working the last V-st in the 3rd ch of the tch. Turn. (11 dc, 10 ch-1 sps)
This row puts a V-st in dc 1, 3, 5, and 7 and a single dc in dc 2, 4, and 6, so the fan widens evenly: 4 V-sts (8 dc) + 3 single dc = 11 dc.
Row 3: Ch 5 (counts as tr + ch 1), [tr in next dc, ch 1] 9 times, tr in 3rd ch of tch. Turn. (11 tr, 10 ch-1 sps)
These tall treble spokes make the open windows that radiate out across the wing.
Row 4 (conversion row): Ch 1, sc in first tr, [sc in next ch-1 sp, sc in next tr] 10 times. (21 sc = 11 sc worked into the tr + 10 sc worked into the spaces)
Fasten off Color A. Checkpoint: 1.75 in (4.4 cm) from ring to edge and 2.25 in (5.7 cm) across the curved edge from tip to tip.
Tails (Make 2)
With Color A, work the tail top-down from a short chain. It starts narrow, widens in Row 2, and then gets its length from treble rows. Turn at the end of every row.
Foundation: Ch 5.
Row 1: Dc in 4th ch from hook (the skipped 3 ch count as a dc), dc in last ch. Turn. (3 dc)
Row 2: Ch 4 (counts as dc + ch 1), dc in first dc (V-st made), ch 1, dc in next dc, ch 1, V-st in top of tch. Turn. (5 dc, 4 ch-1 sps)
Row 3: Ch 4 (counts as dc + ch 1), [dc in next dc, ch 1] 3 times, dc in 3rd ch of tch. Turn. (5 dc, 4 ch-1 sps)
Rows 4–7: Ch 5 (counts as tr + ch 1), [tr in next st, ch 1] 3 times, tr in top of tch. Turn. (5 tr, 4 ch-1 sps in each row)
These four rows make the long vertical spokes. The ch-1 spaces stack directly on top of each other, which creates the ladder-like openings.
Row 8 (conversion row): Ch 1, sc in first tr, [sc in next ch-1 sp, sc in next tr] 4 times. (9 sc = 5 sc worked into the tr + 4 sc worked into the spaces)
Fasten off Color A. Checkpoint: 3.5 in (8.9 cm) long, 1.25 in (3.2 cm) wide at Row 8, and about 0.5 in (1.3 cm) wide at the top.
Center Band (Make 1)
With Color A:
Foundation: Ch 6.
Row 1: Sc in 2nd ch from hook and in each ch across. Turn. (5 sc)
Rows 2–12: Ch 1, sc in each sc across. Turn. (5 sc in each row)
Fasten off and leave a 10 in (25.4 cm) tail for sewing. Checkpoint: 0.7 in (1.8 cm) wide x 1.5 in (3.8 cm) long.
Hanging Cord (Make 1)
With Color B, ch 46. Sl st in the back bump of the 2nd ch from hook and in each ch across. (45 sl st)
Fasten off and leave 6 in (15.2 cm) tails at both ends. Checkpoint: about 5 in (12.7 cm) long, which folds into a 2.5 in (6.4 cm) loop.
Make All Pieces
Work in this order to make the border and assembly go smoothly:
- Wings: make 2 in Color A, then add the Border (below) in Color B.
- Tails: make 2 in Color A, then add the Border in Color B.
- Center band: make 1 in Color A. It has no border.
- Hanging cord: make 1 in Color B.
Color totals: Color A makes 2 wings, 2 tails, and 1 band. Color B makes 4 borders and 1 cord.
Layout (front view):
[ Wing ][ Band ][ Wing ]
      [Tail]  [Tail]
The tails sit behind the wings. Their tops meet under the band, and they spread into a soft V at the bottom.
Joining
Finish the Border on all four shaped pieces before you join anything. Sew all the seams with a tapestry needle and Color A.
Step 1, wings: Lay both wings RS up with their points touching. Whipstitch the point sc of each wing’s Border Round 2 together, then catch the stitch on each side of each point. That joins 3 sts to 3 sts. Pull gently so the wings lie flat with no gap between them.
Step 2, tails: Lay both tails RS up with their top ends overlapping by about 0.25 in (0.6 cm). Angle them outward so the bottoms are about 1 in (2.5 cm) apart. Sew the 3 top sc of one tail’s Border Round 2 to the 3 top sc of the other, stitch for stitch.
Step 3, stack: Place the joined tails behind the joined wings, with the tail tops centered behind the wing points. Tack through all layers with 2–3 small stitches.
Step 4, band: Wrap the center band around the middle, RS out, so its 5-st width runs vertically over the joint. Pull it snug enough to pinch the wings slightly. At the back, sew the 5 foundation loops to the 5 sts of Row 12, stitch for stitch, catching the tail layer underneath.
Step 5, cord: Fold the cord in half. Tuck both ends behind the top of the band and sew them firmly to the back of the band. Weave in all ends.
Tension advice: Sew firmly but don’t cinch. Stitches that are too tight pucker the lace and bend the wings forward.
Size checkpoint: 4.5 in (11.4 cm) from wing edge to wing edge and 5.25 in (13.3 cm) from wing top to tail bottom.
Border
Work this border on each wing and each tail separately with Color B. You never work it around the assembled bow, so no seam stitches need counting. Each piece’s counts come only from its own edges.
Border gauge: Round 1 sc should match the main gauge of 7 sc per 1 in (2.5 cm). If the edge ruffles, you have too many sts. If it cups, you have too few.
Wing Border
Round 1: With RS facing, join Color B in the first sc of Row 4. Ch 1, 3 sc in same st, sc in next 19 sc, 3 sc in last sc. Work 8 sc down the row ends (3 in Row 3, 3 in Row 2, 2 in Row 1), 1 sc in the ring at the point, then 8 sc up the other side the same way. Sl st to first sc. Fasten off. (42 sc)
Count by section: the curved edge has 3 + 19 + 3 = 25 sc, including both corners. Each straight side has 8 sc, and the point has 1 sc. Check: 25 + 8 + 8 + 1 = 42.
Round 2: Join Color B in the first sc after the point sc. Ch 1, sc in same st, work 10 scallops, sc in point sc. Sl st to first sc. Fasten off. (62 sts: 50 dc + 12 sc)
Why the math works: The scallops cover every st except the point, so they use 42 − 1 = 41 sts. Ten scallops at 4 sts each, plus the starting sc, is 4 x 10 + 1 = 41. The scallops are also symmetric: the center st of the curved edge gets an sc, with a scallop on each side of it.
Tail Border
Round 1: With RS facing, join Color B in the first sc of Row 8. Ch 1, 3 sc in same st, sc in next 7 sc, 3 sc in last sc. Work 18 sc up the row ends (3 in each tr row end, 2 in each dc row end), 3 sc across the foundation edge, then 18 sc down the other side the same way. Sl st to first sc. Fasten off. (52 sc)
Count by section: the bottom has 3 + 7 + 3 = 13 sc, including both corners. Each long side has 18 sc (4 tr rows x 3 + 3 dc rows x 2 = 18), and the top has 3 sc. Check: 13 + 18 + 18 + 3 = 52.
Round 2: Join Color B in the first sc after the 3 top sc. Ch 1, sc in same st, work 12 scallops, sc in each of the 3 top sc. Sl st to first sc. Fasten off. (76 sts: 60 dc + 16 sc)
Why the math works: The scalloped stretch is 18 + 13 + 18 = 49 sts. Twelve scallops at 4 sts each, plus the starting sc, is 4 x 12 + 1 = 49. The top 3 sts stay plain because the band hides them. The bottom center st gets an sc, so the scallops mirror evenly on both sides.
Final Blocking
- Weave in any remaining ends, but don’t trim them yet.
- Mist the whole bow lightly with water until it’s damp but not soaked.
- Pin it RS up on the mat at 4.5 in (11.4 cm) wide and 5.25 in (13.3 cm) tall.
- Pin each wing at the tip of every scallop so the curve is smooth and round.
- Pin each tail straight, then pin each bottom scallop so the edge forms an even wave.
- Gently press each lace space open with a fingertip.
- For a firmer ornament, spray lightly with starch or stiffener now.
- Let it dry completely, for at least 8 hours. Then unpin it and trim the ends.
Final Quality-Control Checklist
- Each wing has 21 sc in Row 4, 42 sc in Round 1, and 10 scallops.
- Each tail has 9 sc in Row 8, 52 sc in Round 1, and 12 scallops.
- The two wings match in size within 0.15 in (0.4 cm).
- The two tails match in length within 0.15 in (0.4 cm).
- The band covers the joint completely, and no seam shows from the front.
- The loop is centered and sewn securely through the band.
- The bow measures 4.5 in (11.4 cm) x 5.25 in (13.3 cm).
- All ends are woven in and trimmed.
Troubleshooting
Wings curl into a cone. Row 2 or Row 3 is short on stitches. Recount for 11 dc and 11 tr.
Wings ruffle. Your hook may be too large, or Row 4 has extra sc. Recount for 21.
Border waves or flares. Recount Round 1. Extra sts along the row ends are the usual cause.
Scallops are uneven or one is missing. Confirm the Round 1 total (42 or 52) before you start Round 2.
Tails twist. Block them flat while damp and pin along both long sides.
Band slides. Add 2 tacking stitches at the back through the band and the wing points.
Bow tilts on the tree. The loop is off-center. Re-sew the ends behind the exact middle of the band.
Care
Spot clean with cool water and mild soap, then reshape and dry flat. Store it wrapped in tissue so the scallops and loop don’t get crushed.
Final Notes
Every size in this pattern follows from the gauge. At 7 sc and 8 rows per 1 in (2.5 cm), you get a wing of 1.75 in (4.4 cm) x 2.25 in (5.7 cm) and a tail of 3.5 in (8.9 cm) x 1.25 in (3.2 cm). The 0.5 in (1.3 cm) border brings the wing to 2.25 in (5.7 cm) x 3.25 in (8.3 cm) and the tail to 4 in (10.2 cm) x 2.25 in (5.7 cm). Assembled, they make a bow 4.5 in (11.4 cm) x 5.25 in (13.3 cm). Check each measurement as you go, and the finished ornament will come out right.
Happy crocheting!