

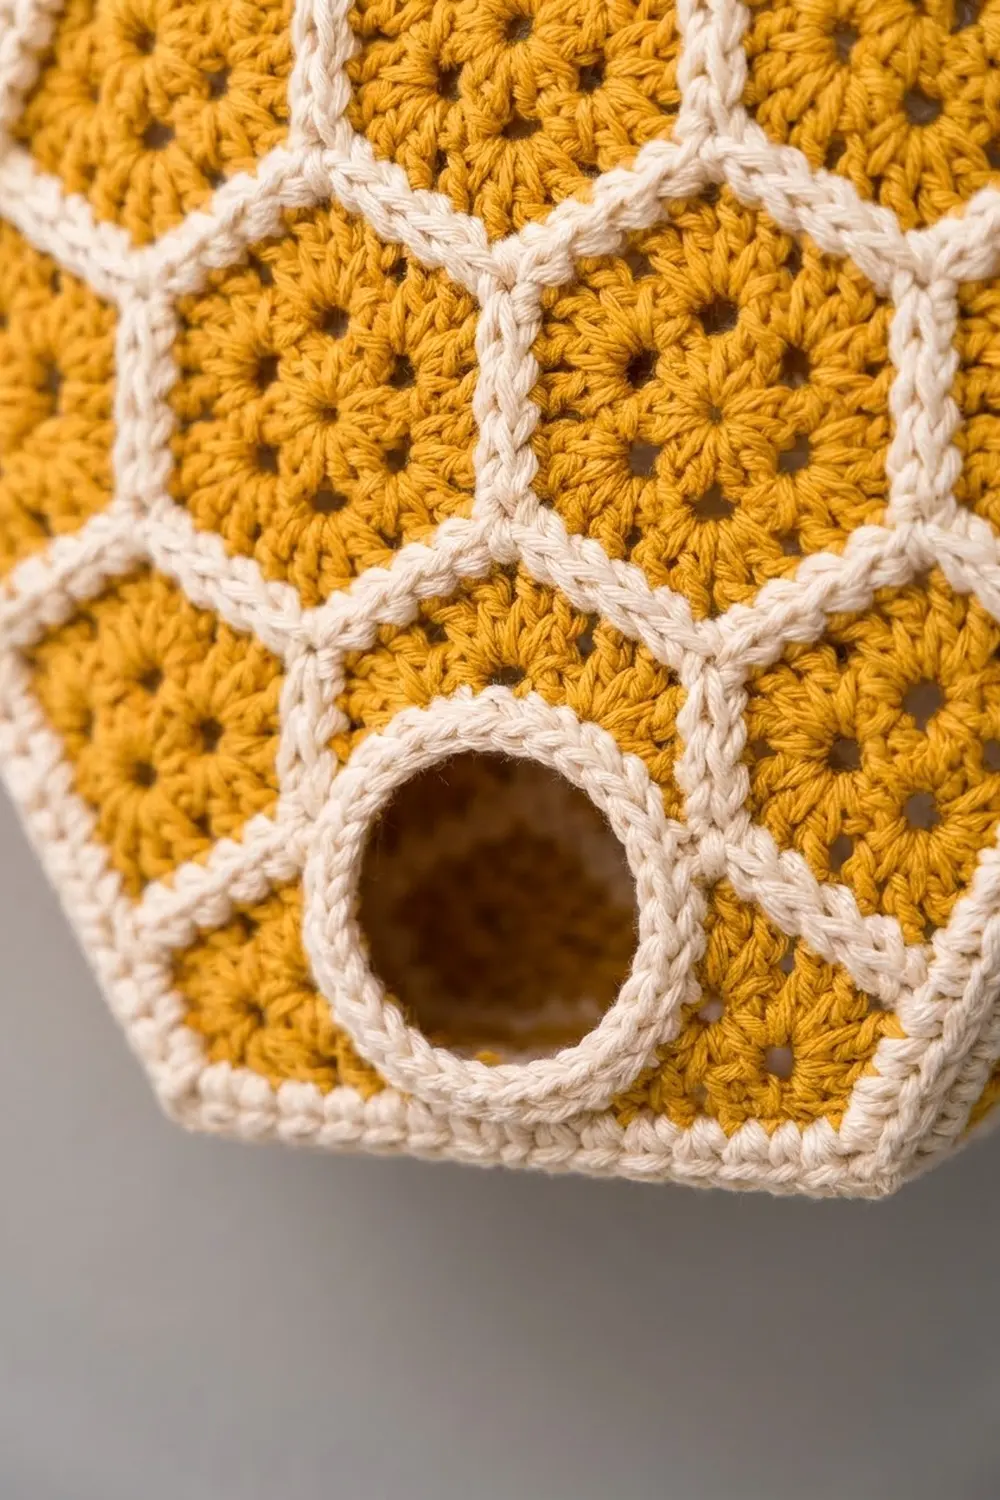
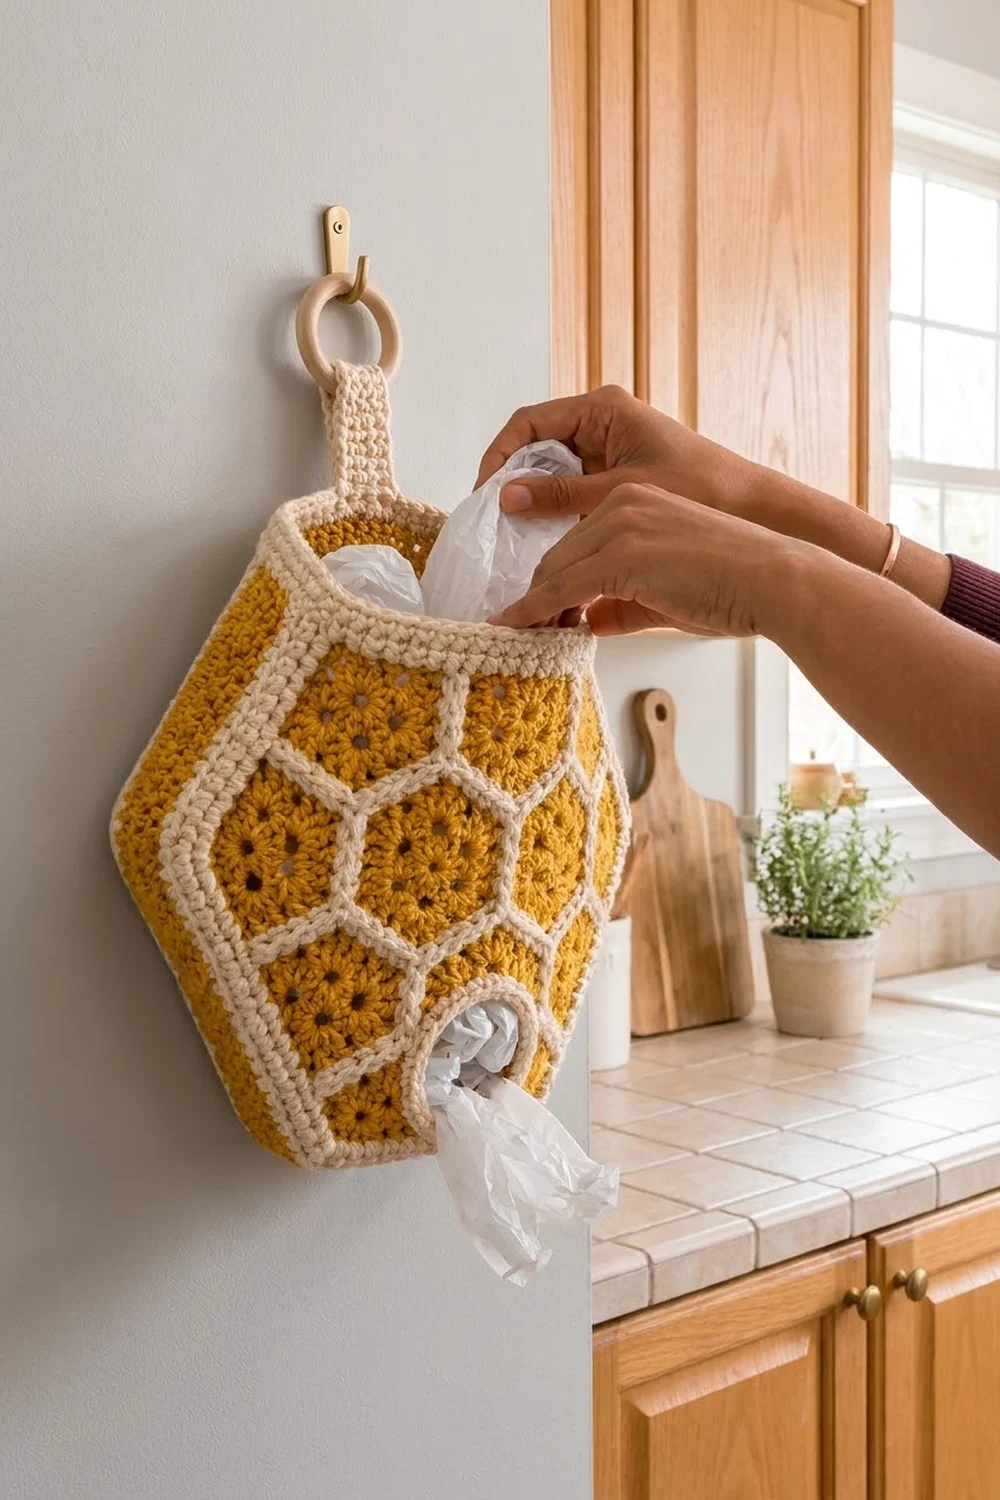
This hanging bag holder looks like a slice of honeycomb. Mustard hexagon cells, each with a small open center and spoke-like double crochets, sit inside cream outlines. A wide cream border finishes the edge, and a cream tab loops over a wooden ring. You stuff bags in through the open top and pull them out one at a time through a cream-ringed hole near the bottom.
The palette is just warm mustard and natural cream. The style is clean and modern, so it works on a kitchen, pantry or laundry wall. All instructions use US crochet terms.
The finished holder measures about 13.5 in (34.3 cm) wide and 10.2 in (25.9 cm) tall, not counting the tab. It has a flat top and bottom, slanted shoulders and short vertical sides.
Here is how it comes together. You make small hexagon cells and whipstitch them into two honeycomb panels. A mustard leveling round straightens each panel’s outline, and three cream rounds frame it. Then you join the front and back on every side except the top and sew on the hanging tab.
Finished Size and Construction
- Finished size: 13.5 in (34.3 cm) wide x 10.2 in (25.9 cm) tall
- Skill level: Intermediate
- Terminology: US
- Yarn weight: Worsted (#4) cotton
- Hook: 4.5 mm (US 7)
- Number of pieces: 20 hexagon cells (19 regular, 1 hole cell) + 1 hanging tab
- Layout: two panels, each 10 cells in rows of 3-4-3
- Cell size: 3 in (7.6 cm) flat side to flat side, about 3.5 in (8.9 cm) point to point
- Panel size before border: 12 in (30.5 cm) x 8.7 in (22.1 cm)
- Border depth: 0.75 in (1.9 cm), 3 rounds of sc
Materials
Choose a smooth worsted-weight cotton or cotton blend, about 170 m per 100 g. Cotton holds the hexagon shape well and won’t stretch out under the weight of the bags.
- Mustard: 80 g (about 136 m)
- Cream: 100 g (about 170 m)
These quantities include a margin for a gauge swatch and tails.
Tools:
– 4.5 mm (US 7) crochet hook
– Wooden ring, 2 in (5.1 cm) across
– Tapestry needle
– Stitch markers
– Blocking mat, pins and a spray bottle
Abbreviations (US Terms)
- ch: chain
- sl st: slip stitch
- sc: single crochet
- sc2tog: single crochet 2 stitches together
- hdc: half double crochet
- dc: double crochet
- tr: treble crochet
- dtr: double treble crochet
- BLO: back loop only
- sp: space
- st(s): stitch(es)
- RS / WS: right side / wrong side
- MR: magic ring
- cc: corner center (the middle sc of a 3-sc corner)
Special stitch: dtr. Yarn over 3 times and insert the hook in the stitch. Yarn over and pull up a loop (5 loops on hook). Then [yarn over, pull through 2 loops] 4 times.
Gauge and Checkpoints
Gauge: 18 sc and 20 rows = 4 in (10.2 cm) in cream.
Make one regular cell first and check it before you go on.
- After Rnd 2 of a cell: about 2.5 in (6.4 cm) across, lying flat.
- After Rnd 3 of a cell: 3 in (7.6 cm) flat side to flat side.
- Joined panel: 12 in (30.5 cm) wide x 8.7 in (22.1 cm) tall.
- After border: 13.5 in (34.3 cm) x 10.2 in (25.9 cm).
If your cell is too big, go down 0.5 mm in hook size. If it’s too small, go up 0.5 mm. If it ruffles, check that Rnd 2 has exactly 24 dc. If it cups, check that every corner has a ch-2 sp.
Regular Cell (Make 19)
Rnd 1 (mustard): Make a MR, ch 3 (counts as dc), work 11 dc in the ring and join with a sl st to the top of the ch-3. Pull the ring snug but leave a small open center. (12 dc)
Rnd 2: Ch 3 (counts as dc), ch 2, dc in the same st as the join, then 2 dc in the next st. (Dc, ch 2, dc) in the next st, 2 dc in the next st. Repeat from * 5 times. Join to the 3rd ch of the beginning ch-3. (24 dc, 6 ch-2 sps) Fasten off.
Rnd 3 (cream): Join cream in any ch-2 sp. Ch 1, work 3 sc in the same sp, then sc in the next 4 dc. 3 sc in the next ch-2 sp, sc in the next 4 dc. Repeat from * 5 times. Join to the first sc. (42 sc)
Each side now has 8 sc, counting both corner centers (cc + 6 sc + cc). Fasten off and leave a 12 in (30.5 cm) tail for seaming.
Hole Cell (Make 1)
This cell has the same outline as a regular cell, but a cream-ringed opening replaces the small center.
Rnd 1 (cream): Ch 18 and sl st to the first ch to form a ring, taking care not to twist it. Ch 1, sc in each ch around and join. (18 sc) Fasten off.
Rnd 2 (mustard): Join in any sc. Ch 3 (counts as dc), ch 2, dc in the same st, then dc in the next 2 sts. (Dc, ch 2, dc) in the next st, dc in the next 2 sts. Repeat from * 5 times. Join. (24 dc, 6 ch-2 sps) Fasten off.
Rnd 3 (cream): Work as Rnd 3 of the regular cell. (42 sc)
The opening is about 1.5 in (3.8 cm) across and stretches enough to dispense bags.
Make All Pieces
- Regular cells: 19 (Rnds 1–2 mustard, Rnd 3 cream)
- Hole cell: 1 (Rnd 1 cream, Rnd 2 mustard, Rnd 3 cream)
- Hanging tab: 1 (cream, see Assembly)
Front panel layout (R = regular cell, H = hole cell), with the rows offset like a honeycomb:
Row A:    R   R   R
Row B:  R   R   R   R
Row C:    R   H   R
The back panel uses the same layout, but all 10 cells are regular.
Joining the Cells
Lay the cells RS up in the layout. Use the cream tails to whipstitch neighboring sides together through the BLO, one stitch to one stitch. Work from corner center to corner center, which is 8 sts per side. Where three cells meet, pass the needle through all three corner centers once.
Join each row first. Then join the rows to each other in a zigzag, because each Row A cell sits on two Row B cells.
Keep the tension firm but flat, so each seam lies level with the cells and doesn’t pucker.
Checkpoint: Each panel measures 12 in (30.5 cm) wide and 8.7 in (22.1 cm) from top point to bottom point.
Leveling Round (Both Panels)
The honeycomb outline has points, valleys and notches. This mustard round fills them with graduated stitches, so each panel becomes an eight-sided shape:
- a flat top 9 in (22.9 cm) wide
- two upper shoulders, about 3.75 in (9.5 cm) long
- two vertical sides, about 1.75 in (4.4 cm) long
- two lower shoulders
- a flat bottom
End corners (4): the outer top corner of each end cell in Row A, and the outer bottom corner of each end cell in Row C.
Side corners (4): the outer top and bottom corners of each end cell in Row B.
Work 1 st in each edge sc and in each cc.
Peak unit (13 sts, over one cell’s two outer slanted sides and its point): tr, tr, dc, dc, hdc, sc, sc in the point cc, sc, hdc, dc, dc, tr, tr.
Shoulder sequence (14 sts, worked from an end corner toward a side corner):
– Along the vertical side of the end cell: dc, dc, tr, tr, tr, tr.
– In each of the 2 notch cc’s: dtr.
– Along the slanted side of the Row B end cell: tr, tr, dc, hdc, sc, sc.
Rnd L: With RS facing, join mustard in the cc at the top-right end corner. Ch 4 (counts as tr), ch 2, tr in the same st. Then work around the panel:
- Top: Peak unit, tr in each of the 2 valley cc’s, peak unit, tr in each of the 2 valley cc’s, peak unit. Work (tr, ch 2, tr) in the end-corner cc.
- Upper-left shoulder: Shoulder sequence. Work (sc, ch 2, sc) in the side-corner cc.
- Left side: Sc in the next 6 sts. Work (sc, ch 2, sc) in the side-corner cc.
- Lower-left shoulder: Shoulder sequence in reverse. Work (tr, ch 2, tr) in the end-corner cc.
- Bottom: Work as the top.
- Lower-right shoulder: Shoulder sequence. Work (sc, ch 2, sc) in the side-corner cc.
- Right side: Sc in the next 6 sts. Work (sc, ch 2, sc) in the side-corner cc.
- Upper-right shoulder: Shoulder sequence in reverse. Join to the top of the beginning ch-4 and fasten off.
Counts between ch-2 sps:
– Top and bottom: 1 + 13 + 2 + 13 + 2 + 13 + 1 = 45 sts each.
– Shoulders: 1 + 14 + 1 = 16 sts each.
– Vertical sides: 1 + 6 + 1 = 8 sts each.
– Total: 170 sts and 8 ch-2 sps.
These counts come straight from the cells. Each top cell gives 13 sts, each valley gives its 2 cc’s, and each corner gives 1 st to each side it touches.
Border (Both Panels)
Border gauge: 18 sc = 4 in (10.2 cm).
Rnd 1 (cream): Join in any ch-2 sp. Work (sc, ch 1, sc) in each ch-2 sp and sc in each st. On the top and bottom, sc2tog over the 2 valley tr’s at each valley (2 per side). Join.
– Top and bottom: 2 + (45 − 2) = 45 sc each.
– Shoulders: 2 + 16 = 18 sc each.
– Vertical sides: 2 + 8 = 10 sc each.
– Total: 182 sc and 8 ch-1 sps.
Rnd 2: Sl st into the ch-1 sp. Work (sc, ch 1, sc) in each ch-1 sp and sc in each sc. Join.
– Top and bottom: 47 sc each.
– Shoulders: 20 sc each.
– Vertical sides: 12 sc each.
– Total: 198 sc.
Rnd 3: Repeat Rnd 2.
– Top and bottom: 49 sc each.
– Shoulders: 22 sc each.
– Vertical sides: 14 sc each.
– Total: 214 sc.
Fasten off.
Why the math works: The tall leveling stitches crowd the top and bottom edges, with 45 sts over 9 in, or 5 per inch. The two sc2tog bring each edge down to 43 sc. That matches the border gauge of 4.5 per inch over the slightly longer outer edge, about 9.5 in (24.1 cm). The shoulders (16 sts over 3.75 in) and vertical sides (8 sts over 1.75 in) are already close to gauge. Every corner is obtuse, so adding 2 sc per corner each round keeps the border flat.
Assembly
Join the panels: Hold the panels WS together with the front facing you. With cream, sc through both layers the whole way:
- Join in the top-left corner ch-1 sp and work 1 sc in that sp.
- Sc in each st down the left shoulder (22), the left side (14) and the lower-left shoulder (22).
- Sc across the bottom (49).
- Sc up the lower-right shoulder (22), the right side (14) and the upper-right shoulder (22).
- Work 1 sc in each of the 6 corner sps along the way, and finish with 1 sc in the top-right corner sp. (173 sc)
Fasten off. Leave the top unjoined: the two cream top borders form the rim.
Hanging tab: With cream, ch 7.
– Row 1: Sc in the 2nd ch from the hook and in each ch across. (6 sc)
– Rows 2–24: Ch 1, turn, sc across. (6 sc)
Fasten off. The tab is 1.3 in (3.3 cm) wide and 4.8 in (12.2 cm) long.
Fold 1 in (2.5 cm) at one end around the wooden ring and sew it down. Center the other end on the inside of the back panel’s top border, overlapping by 1 in (2.5 cm). Sew it securely through the back layer only.
Final Blocking
- Weave in all ends along the cream seams so they stay hidden.
- Lay the holder flat and pin it to 13.5 in (34.3 cm) x 10.2 in (25.9 cm).
- Pin the top and bottom edges straight, and make the shoulders match on both sides.
- Put a 1.5 in (3.8 cm) jar lid or cardboard circle inside the hole to hold it round.
- Spray until damp but not soaked.
- Let it dry completely before you unpin it.
Final Quality-Control Checklist
- Every cell has 42 sc in Rnd 3, with 8 sts per side.
- The hole cell is in the center of Row C, on the front panel only.
- Rnd L has 170 sts, and every edge is straight.
- Border Rnd 3 has 214 sc: 49 / 22 / 14 per side.
- The joining round has 173 sc, and the top is open.
- The tab is centered and secure, and the ring hangs level.
- The holder measures 13.5 in (34.3 cm) x 10.2 in (25.9 cm).
Troubleshooting
- Cells curl: Rnd 2 is too tight. Go up a hook size for the mustard rounds.
- Seams pucker: Whipstitch more loosely, still one stitch to one stitch.
- Edge dips at the notches: Your dtr are too short. Pull each loop up fully.
- Border ruffles at the corners: Work (sc, sc) without the ch-1 in Rnds 2–3.
- Top rim flares: Add one more sc2tog at the center of the top in Rnd 1.
- Hole is too tight: In Rnd 1, start with ch 24 instead. Work Rnd 2 as (dc, ch 2, dc) in the next st, dc in the next st, skip the next st, dc in the next st 6 times.
Care
Hand wash in cool water with mild soap. Press out the water in a towel and dry flat, reshaping the hexagons while the holder is damp.
Final Notes
Each stage builds on the one before. Each cell is 3 in (7.6 cm) flat side to flat side. Ten cells make a 12 in x 8.7 in (30.5 cm x 22.1 cm) panel. The leveling round straightens the outline, and three cream rounds bring the panel to 13.5 in x 10.2 in (34.3 cm x 25.9 cm). If you check your size at every stage, the holder will hang flat and dispense smoothly.
Happy crocheting!