

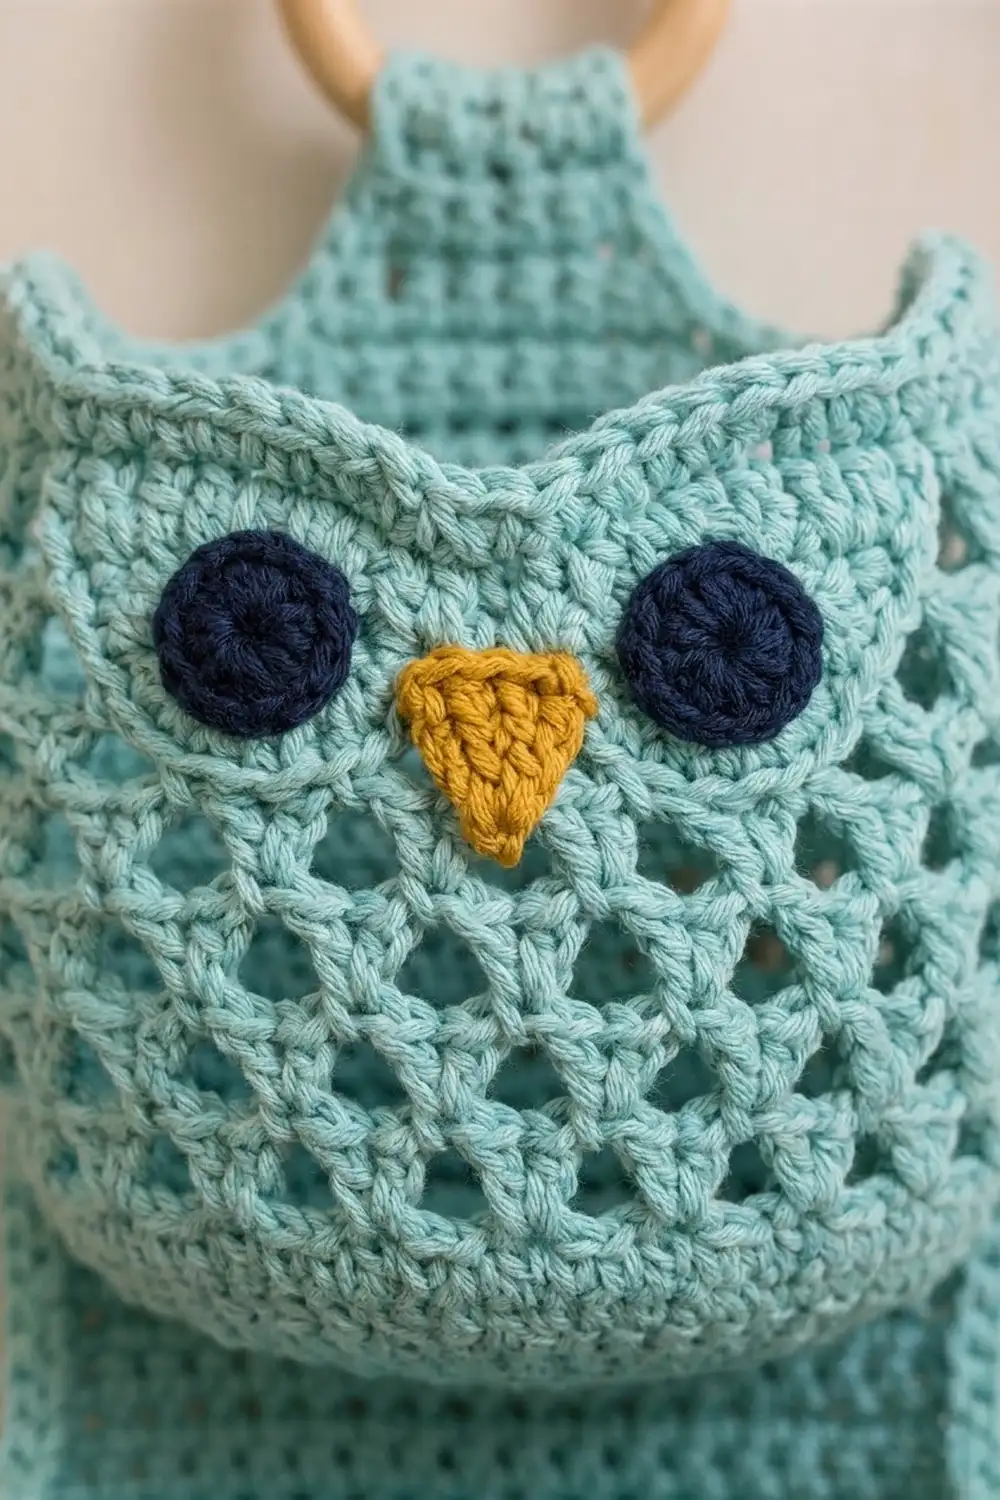
This hanging toilet paper holder is three owls stacked on top of each other, each holding a spare roll. It is worked in soft aqua cotton. Each owl has round navy eyes and a mustard beak, and the whole holder hangs from a natural wooden ring.
Each owl is an open basket. The lower half is an airy V-stitch mesh and the upper half is a solid band. The rim rises into a pointed ear at each front corner and dips into a shallow V at the center. All three baskets are sewn to a long, solid back panel, and a narrow tab at the top of the panel folds over the ring.
This pattern uses US crochet terms. The bordered panel is 6.9 in (17.5 cm) wide and 18.9 in (48.0 cm) long without the tab. Each pocket is 6 in (15.2 cm) wide across the front, 4.4 in (11.2 cm) deep and 4.9 in (12.4 cm) tall at the back.
Order of work: the panel and tab in rows, then the border, then three pockets worked in the round from a flat base, then the eyes and beaks, and finally the joining. Each pocket’s back rim has 24 stitches and the panel is 24 stitches wide, so the seams line up stitch for stitch.
Finished Size and Construction
- Finished size: 6.9 x 18.9 in (17.5 x 48.0 cm) panel; about 21 in (53.3 cm) long when hanging
- Skill level: Easy–Intermediate
- Terminology: US
- Yarn weight: Worsted (#4) cotton
- Hook: 5.0 mm (H-8)
- Number of pieces: 13 (1 panel, 3 pockets, 6 eyes, 3 beaks)
- Layout: 1 column of 3 pockets
- Pocket size: 6 x 4.4 in (15.2 x 11.2 cm) base; 4.9 in (12.4 cm) back wall
- Panel size before border: 6 x 18 in (15.2 x 45.7 cm)
- Border depth: 0.45 in (1.1 cm), 2 rounds
Materials
Use a smooth worsted-weight cotton or cotton blend. Cotton keeps its shape, copes with bathroom humidity and stays firm under the weight of three rolls. Acrylic also works, but the pockets will sag a little more.
- Color A, aqua: 260 g / 450 m (panel, tab, border, pockets)
- Color B, navy: 10 g / 17 m (eyes)
- Color C, mustard: 5 g / 9 m (beaks)
These quantities include a margin of about 15%.
Tools:
– 5.0 mm (H-8) crochet hook
– Wooden ring, 3.5 in (8.9 cm) outside diameter, with an opening of at least 2.5 in (6.4 cm)
– Tapestry needle
– 4 locking stitch markers
– Rust-proof pins and a blocking mat
– Measuring tape
– One standard toilet roll for test-fitting
Abbreviations (US Terms)
- ch – chain
- sl st – slip stitch
- sc – single crochet
- hdc – half double crochet
- dc – double crochet
- tr – treble crochet
- sc2tog – single crochet 2 together
- BLO – back loop only
- MR – magic ring
- sp – space
- RS / WS – right side / wrong side
- st(s) – stitch(es)
V-st (special stitch): (dc, ch 2, dc) in the same stitch or space.
Gauge and Checkpoints
Gauge: 16 sc and 18 rows = 4 in (10.2 cm). In the pocket, 6 mesh rounds measure 2.75 in (7.0 cm) tall and 4 hdc rounds measure 1.5 in (3.8 cm) tall.
Make one pocket first. It is a better test than a flat swatch because it checks the sc, the mesh and the hdc together.
Checkpoints:
– Pocket base after Row 20: 6 x 4.4 in (15.2 x 11.2 cm)
– Pocket circumference after Rnd 9: 22 in (55.9 cm)
– Pocket back wall after Rnd 14: 4.9 in (12.4 cm)
– Panel after Row 81: 6 x 18 in (15.2 x 45.7 cm)
Too big? Go down half a hook size. Too small? Go up half a hook size. Row gauge matters: if your back wall is not 4.9 in (12.4 cm), move the panel seam rows (see Joining) so each pocket spans its own height.
Back Panel and Tab
Work in rows with Color A. The ch 1 at the start of each row does not count as a stitch.
Row 1: Ch 25, sc in 2nd ch from hook and in each ch across. (24 sc)
Rows 2–81: Ch 1, turn, sc in each st across. (24 sc)
Checkpoint: 6 x 18 in (15.2 x 45.7 cm). Mark the RS. Fasten off.
Tab, Row 82: Skip the first 9 sts of Row 81. Join A in the 10th st, ch 1, then sc in the same st and in the next 5 sts. (6 sc) The 9 unworked stitches on each side form the shoulders.
Rows 83–101: Ch 1, turn, sc in each st across. (6 sc)
Fasten off. The tab measures 1.5 x 4.4 in (3.8 x 11.2 cm).
Owl Pocket
Base
Work in rows with Color A.
Row 1: Ch 25, sc in 2nd ch from hook and in each ch across. (24 sc)
Rows 2–20: Ch 1, turn, sc in each st across. (24 sc)
Checkpoint: 6 x 4.4 in (15.2 x 11.2 cm). Do not fasten off. The foundation-chain edge will be the front of the pocket and the Row 20 edge will be the back.
Walls
Join each round with a sl st to the first stitch. Turning chains do not count unless the instructions say they do.
Rnd 1: Ch 1. Sc in each st across Row 20 (24), sc in each row end down the side (20), sc in each free loop of the foundation chain (24), and sc in each row end up the other side (20). (88 sc) Place markers in the first and last sc along the foundation edge: these are the front corners. There are no corner increases, so the walls turn upward.
Rnd 2: Ch 1, sc in BLO of each st around. (88 sc) The unused front loops of Rnd 1 form a ridge around the base. This ridge is the base seam line.
Rnd 3: Ch 5 (counts as dc + ch 2), dc in same st. Skip 3 sts, V-st in next st; repeat from * around, skip the last 3 sts and join to the 3rd ch of the beginning ch-5. (22 V-sts; 22 x 4 = 88 sts’ worth of width)
Rnd 4: Sl st in next ch-2 sp, sl st in next dc, then sl st in the gap between this V-st and the next one. Ch 5 (counts as dc + ch 2), dc in same gap. V-st in next gap between V-sts; repeat from * around and join. (22 V-sts) Working into the gaps shifts each round half a repeat, which makes the diamond lattice.
Rnds 5–8: Repeat Rnd 4. (22 V-sts in each round) Checkpoint: the mesh measures 2.75 in (7.0 cm) tall.
Rnd 9 (conversion): Ch 1. Sc in next dc, 2 sc in ch-2 sp, sc in next dc; repeat from * around. (44 sc worked 1 per dc + 44 sc added in the ch-2 spaces = 88 sc)
Checkpoint: the circumference is 22 in (55.9 cm). Move both markers straight up into the Rnd 9 stitches above the front corners. Including the marked stitches, there should be 24 stitches from marker to marker. Count and adjust if needed.
Rnds 10–13: Ch 2 (does not count), hdc in each st around. (88 hdc) This solid band is the owl’s face. Fasten off after Rnd 13 and keep the markers in line.
Ear Rim
Rnd 14: With RS out, join A in the first marked front corner. Ch 4 (counts as tr), ch 2, tr in same st to make the first ear tip. Then work dc in next 2 sts, hdc in next 3, sc in next 4, sl st in next 4, sc in next 4, hdc in next 3, dc in next 2. In the second marked st, work (tr, ch 2, tr) for the second ear tip. Sc in each of the remaining 64 sts and join.
That is 24 front stitches worked into (1+2+3+4+4+4+3+2+1), plus 64 sc. The count is 88 stitches worked one per stitch + 2 extra tr = 90 sts, plus 2 ch-2 ear tips.
The stitch heights fall from tr down to sl st, which gives the V dip at center front. The rim is about 4.7 in (11.9 cm) tall at the center and 5.4 in (13.7 cm) at the ear tips.
Count past the second ear tip and place markers in the 21st and 44th sc. The 24 stitches from the 21st to the 44th, inclusive, are the back rim. Fasten off and weave in the ends.
Eye (make 6)
With Color B:
Rnd 1: 6 sc in MR. (6)
Rnd 2: 2 sc in each st. (12)
Rnd 3: Sc in next st, 2 sc in next st; repeat 6 times. (18)
Join with a sl st and fasten off, leaving a 12 in (30.5 cm) tail. Each eye is 1.25 in (3.2 cm) across.
Beak (make 3)
With Color C:
Row 1: Ch 5, sc in 2nd ch from hook and in each ch across. (4)
Row 2: Ch 1, turn, sc2tog twice. (2)
Row 3: Ch 1, turn, sc2tog. (1)
Fasten off, leaving a 10 in (25.4 cm) tail. Each beak is 1 x 0.75 in (2.5 x 1.9 cm), with the point facing down.
Face Placement
Number the 24 front stitches from ear to ear. Center the eyes over stitches 6–7 and 18–19, inside Rnds 10–13. Their centers sit 3 in (7.6 cm) apart, leaving 1.75 in (4.4 cm) between them. Sew the beak’s Row 1 edge across stitches 11–14 at Rnd 12, so the point reaches down to Rnd 9. Whipstitch around each piece through its outer loops only.
Make All Pieces
- Color A: 1 panel with tab and 3 pockets
- Color B: 6 eyes
- Color C: 3 beaks
Panel layout with the RS facing you, read from top to bottom:
Rows 82–101  tab (folds over ring)
Rows 78–81   plain
Rows 56–77   TOP POCKET     base seam Row 56, rim seam Row 77
Rows 51–55   gap
Rows 29–50   MIDDLE POCKET  base seam Row 29, rim seam Row 50
Rows 24–28   gap
Rows 2–23    BOTTOM POCKET  base seam Row 2, rim seam Row 23
Row 1        plain
Each pocket covers 22 rows. At 4.5 rows per inch, that equals the 4.9 in (12.4 cm) back wall. The 5-row gaps are 1.1 in (2.8 cm); the ears of the pocket below partly fill each gap.
Joining
Work the Border (next section) before you join the pockets.
Method: Whipstitch with Color A and the tapestry needle, catching only the top strand of each panel stitch so the seams don’t show on the WS.
Base seam: Lay the panel RS up. Set a pocket against it with its back facing the panel, and line up the Rnd 1 front-loop ridge along the back of the base with its seam row. Sew each of the 24 ridge loops to one of the 24 panel stitches in that row: stitch 1 to stitch 1, through stitch 24 to stitch 24.
Rim seam: Stand the pocket upright. Sew the 24 marked back-rim stitches of Rnd 14 to the 24 stitches of the rim seam row, again one to one. The pocket’s 20-stitch side walls stay free and bulge forward to hold the roll.
Tension: Pull each whipstitch snug but not tight. The panel should stay flat under the seam. If you see ripples, loosen the seam and sew it again.
Size checkpoint: Each sewn pocket is 6 in (15.2 cm) wide at the back, sits inside the 6.9 in (17.5 cm) bordered panel, and measures 4.9 in (12.4 cm) from base seam to rim seam. Put a roll in the pocket and check that it slides in easily.
Ring: Pass the tab through the ring from front to back and fold it down onto the WS. Whipstitch the tab’s top edge across Rows 78–81 on the WS.
Border
Border gauge: 16 sc = 4 in (10.2 cm). Each sc round adds 0.22 in (0.6 cm) at every edge.
Rnd 1: With RS facing, join A in the bottom-left corner. Ch 1, then work around the whole outline, joining with a sl st at the end:
- Bottom: 3 sc in corner st, sc in next 22, 3 sc in corner st (28)
- Right side: 72 sc along the 81 row ends, working (8 sc over the next 9 row ends) 9 times (72)
- Right shoulder: 3 sc in the outer corner of Row 81, sc in next 8 sts (11)
- Tab side: 18 sc over the 20 row ends, skipping every 10th row end (18)
- Tab top: 3 sc in corner, sc in next 4, 3 sc in corner (10)
- Tab side: 18 sc (18)
- Left shoulder: sc in next 8 sts, 3 sc in outer corner (11)
- Left side: 72 sc (72)
Total: 240 sc. Do not add stitches at the two inner corners where the tab meets the shoulders.
Rnd 2: Ch 1. Sc in each st around, working 3 sc in the center sc of each of the 6 corner groups. Join. The counts are bottom 32, sides 72 each, shoulders 13 each, tab sides 18 each and tab top 14. (252 sc)
Why the math works: 72 stitches over 81 rows is a ratio of 8 to 9, which matches the 16-stitch to 18-row gauge, so the long sides neither ruffle nor pull in. The bottom has 1 stitch per foundation stitch plus 2 extra at each corner. Each corner center gains 2 stitches per round, which keeps the corners square and flat. Two rounds add 0.45 in (1.1 cm) per edge: 6 in + 0.9 in = 6.9 in (17.5 cm) wide, and 18 in + 0.9 in = 18.9 in (48.0 cm) long. The tab becomes 2.4 in (6.1 cm) wide, which fits through the ring’s opening.
Final Blocking
- Spray the assembled holder lightly with water until it is damp all over.
- Lay it RS up on the blocking mat and pin the panel to 6.9 x 18.9 in (17.5 x 48.0 cm). Pin the edges straight.
- Fill each pocket with a roll, or with a rolled towel wrapped in plastic, to shape the round walls.
- Pin each ear tip upward to 5.4 in (13.7 cm) above the base, and pinch the center dip into a crisp V.
- Press the eyes and beaks flat with your fingertips.
- Let it dry completely, then remove the fillers and pins.
Final Quality-Control Checklist
- Panel is 6.9 x 18.9 in (17.5 x 48.0 cm) with straight, flat sides
- Every pocket has 22 V-sts in each mesh round and 88 sts in Rnds 9–13
- Both ear tips are the same height and the V dip is centered
- Eyes and beak are centered on the front 24 stitches
- Pockets are evenly spaced on Rows 2–23, 29–50 and 56–77
- All 24 stitches of each base and rim seam are sewn one to one
- Tab is sewn securely and the ring turns freely in the fold
- All ends are woven in at least 2 in (5.1 cm)
Troubleshooting
Mesh slants or loses V-sts: You missed a gap. Count 22 V-sts at the end of every round.
Pocket is too tight for a roll: Base is under 4.4 in (11.2 cm). Go up a hook size, or add 2 rows to the base and 2 stitches to each side wall count.
Ears flop: Block them with pins, or work Rnd 14 with a firmer tension.
Panel sides wave: You worked too many border stitches. Keep strictly to 8 sc per 9 row ends.
Pockets overlap: Your row gauge is short. Recount the rows and move the seam rows so each pocket spans its measured height.
Eyes cup: Sew around them more loosely and block them flat.
Care
Hand wash in cool water with mild soap, press out the water in a towel, and dry flat. Reshape the pockets while damp.

Final Notes
Here is the measurement chain. The gauge of 16 sc and 18 rows per 4 in (10.2 cm) gives a 6 x 4.4 in (15.2 x 11.2 cm) pocket base and an 88-stitch, 22 in (55.9 cm) wall. The back wall is 4.9 in (12.4 cm) tall, which is 22 panel rows. Three pockets plus two gaps fit on an 81-row panel that is 6 x 18 in (15.2 x 45.7 cm), and the border brings it to 6.9 x 18.9 in (17.5 x 48.0 cm). Check each link as you go and the owls will line up neatly.
Happy crocheting!