

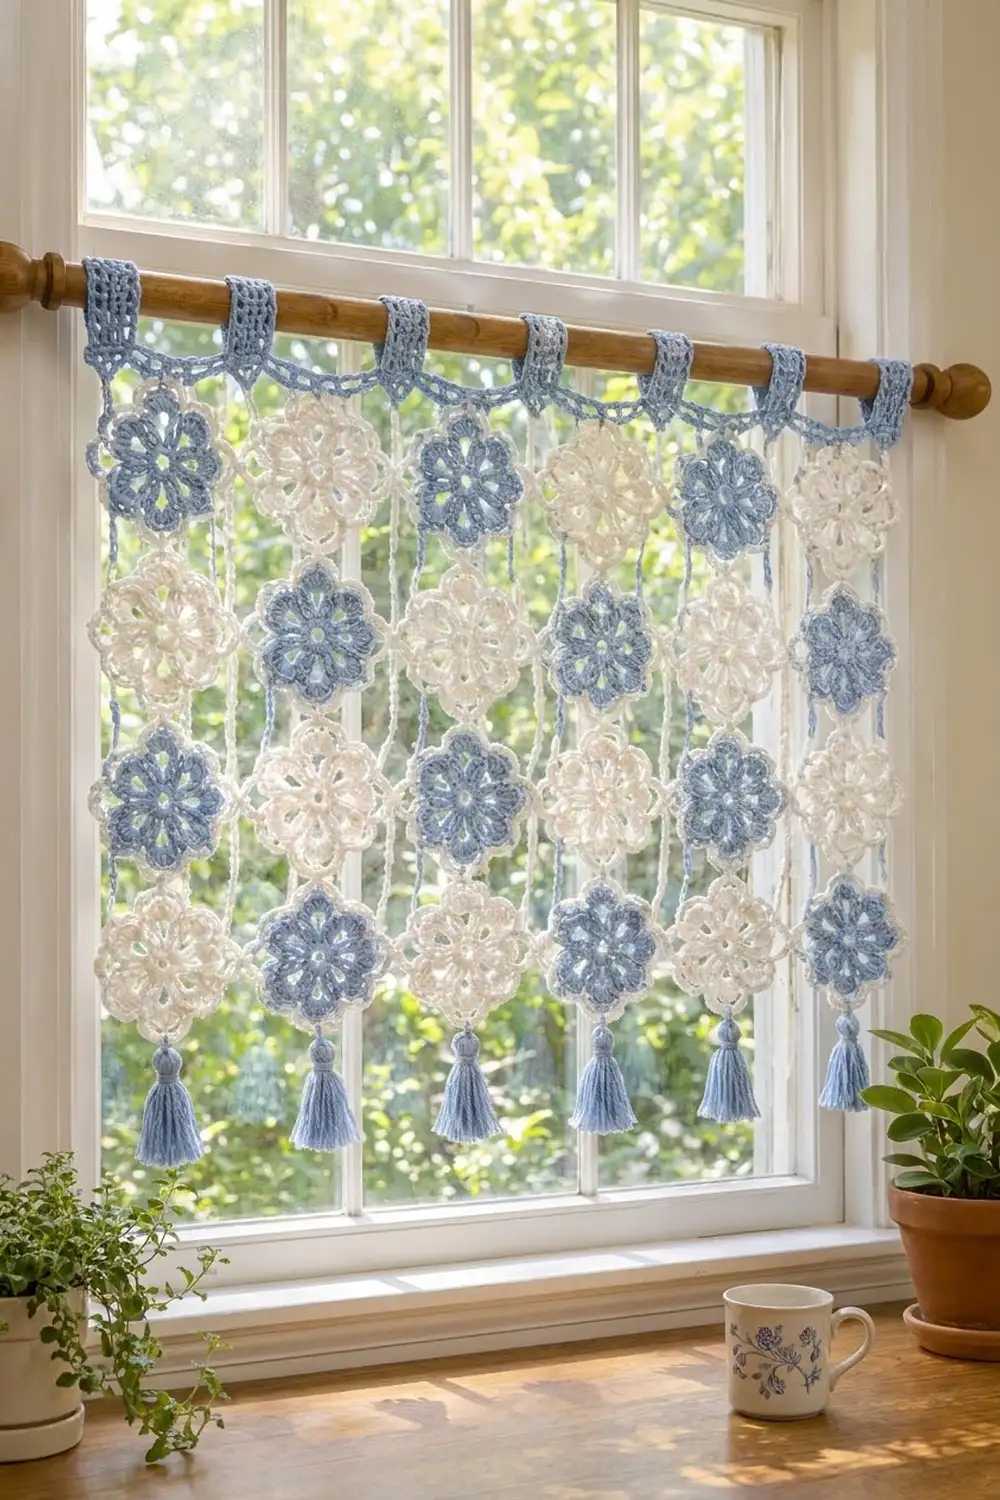
This café curtain is made of airy flower medallions in powder blue and soft white, set in a checkerboard so light comes through every gap. It looks like a window box of hydrangeas and suits a kitchen, bathroom, or cottage-style breakfast nook.
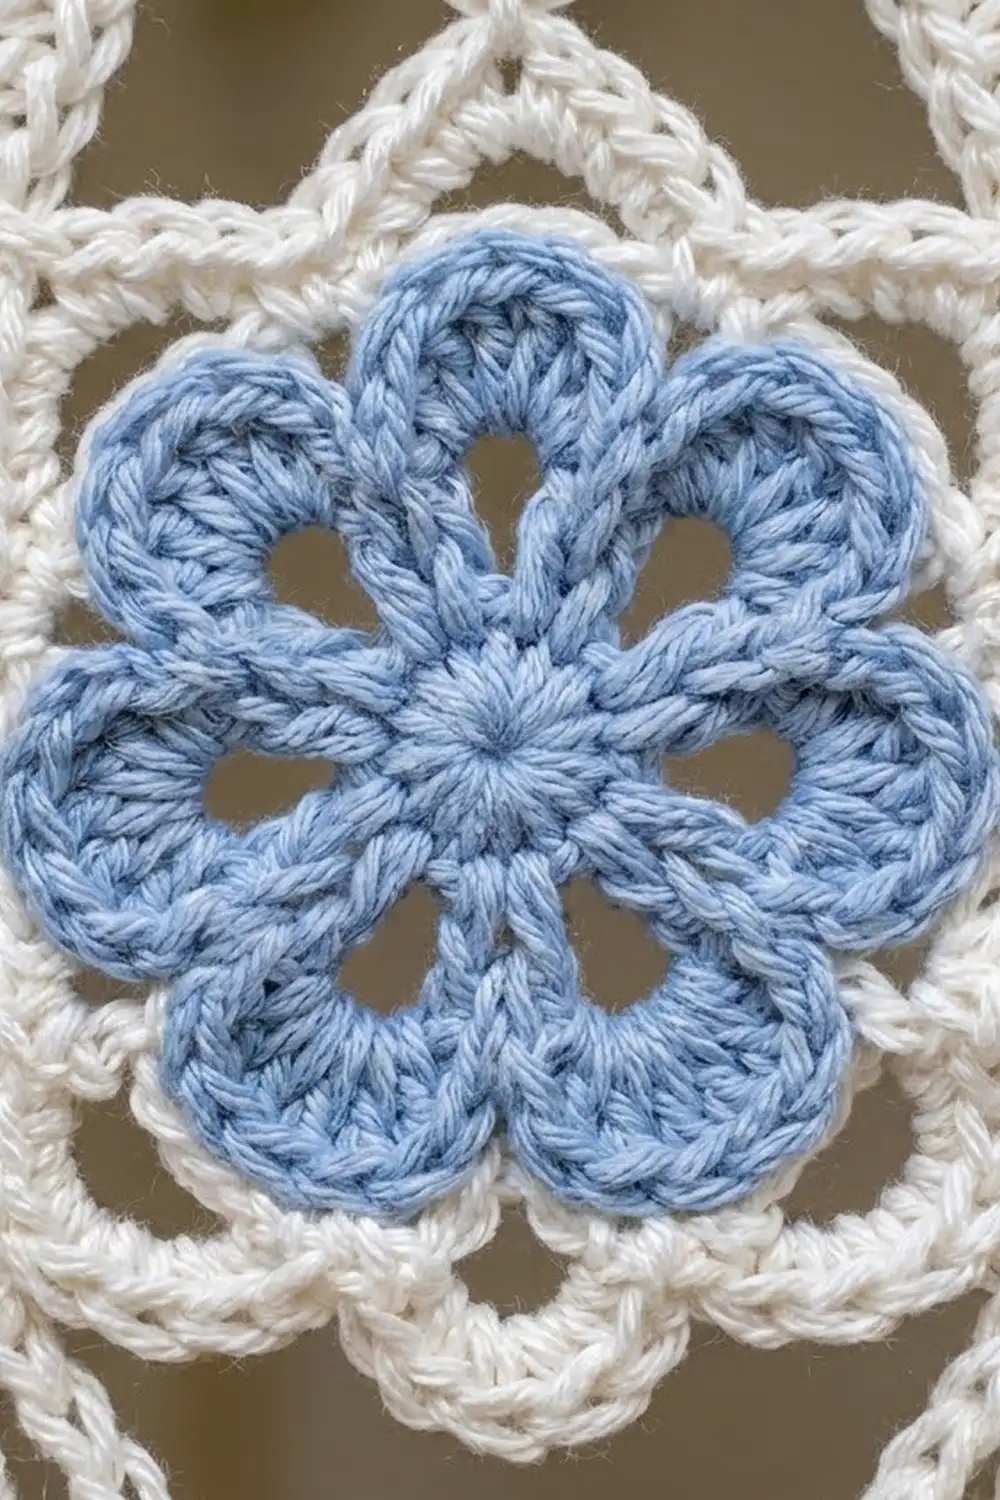
Each motif has a raised six-petal flower inside a lacy white frame of chain loops and tiny picots. Blue-center and white-center motifs alternate across the panel. The motifs touch at only one point per side, which leaves open diamonds between them. A blue mesh header with folded tabs slips over a café rod, and a blue tassel hangs from each motif along the bottom.
This pattern uses US crochet terms. The finished panel is 31½ in (80.0 cm) wide and 18 in (45.7 cm) tall before the header. Total hanging length, including tabs and tassels, is about 25 in (63.5 cm).
Construction is simple. You make one full motif first, then join every other motif to its neighbors as you work its last round. When all 28 are joined, you work a 3-row header across the top, add 8 tabs, and tie on 7 tassels.
Finished Size and Construction
- Finished panel (motifs only): 31½ in × 18 in (80.0 cm × 45.7 cm)
- Overall hanging length: about 25 in (63.5 cm)
- Skill level: Intermediate
- Terminology: US crochet terms
- Yarn weight: DK (light worsted, weight 3) cotton
- Hook: 4.0 mm (G-6)
- Number of pieces: 28 motifs (14 blue-center, 14 all-white)
- Layout: 7 columns × 4 rows, checkerboard
- Motif size: 4½ in (11.4 cm) across, picot to picot
- Size before border: 31½ in × 18 in (80.0 cm × 45.7 cm)
- Border (header) depth: 1½ in (3.8 cm), plus tabs about 1⅝ in (4.1 cm) tall when folded
Materials
Choose a smooth mercerized or matte cotton in DK weight, around 120 m per 50 g. Cotton keeps the picots crisp, holds its shape in sunlight, and washes well. Avoid fuzzy yarns, because they blur the lace.
- Color A – Powder Blue: 100 g / 240 m (flower centers, header, tabs, tassels)
- Color B – Soft White: 150 g / 360 m (all-white motifs and all motif borders)
These quantities include a margin of roughly 15–20% for gauge swatches and tassel trimming.
Tools:
– 4.0 mm (G-6) crochet hook
– Tapestry needle
– Stitch markers
– Stiff card 3½ in (8.9 cm) long, for tassels
– Scissors and a tape measure
– Blocking mats and rust-proof pins
– Spray bottle
Abbreviations (US Terms)
- ch – chain
- sl st – slip stitch
- sc – single crochet
- hdc – half double crochet
- dc – double crochet
- sk – skip
- sp – space
- st(s) – stitch(es)
- FLO / BLO – front / back loop only
Special stitches:
– Picot: ch 3. In this pattern, the picot sits between sc groups and is not closed with a sl st.
– Joining picot: ch 1, sl st into the matching picot of the neighbor motif, ch 1. This replaces the ch 3 of a picot.
– Sc around post: insert the hook from back to front to back around the post of the stated stitch, then complete a sc.
Gauge and Checkpoints
Make one complete blue-center motif before anything else and block it lightly. It acts as your gauge swatch.
- After Round 1: 1¼ in (3.2 cm) across
- After Round 3: 3 in (7.6 cm) across, petal tip to petal tip
- After Round 4: 3¾ in (9.5 cm) across
- After Round 5: 4½ in (11.4 cm) across, picot to picot
Header gauge: 18 sc and 20 sc rows = 4 in (10.2 cm).
If your motif is larger than 4½ in (11.4 cm), go down one hook size. If it is smaller, go up one size. Even ¼ in (0.6 cm) per motif adds up to 1¾ in (4.4 cm) across seven columns, so fix it now.
Motif Pattern
All motifs follow the same round structure. For a blue-center motif, work Rounds 1–3 in Color A and Rounds 4–5 in Color B. For an all-white motif, work every round in Color B.
Round 1: With the center color, make a magic ring. Ch 3 (counts as dc), then 11 dc in the ring. Pull the ring closed and sl st to the top of the ch-3. (12 dc)
Round 2: Ch 1, sc in the same st, ch 3, sk 1. Sc in the next st, ch 3, sk 1; repeat from * 4 more times. Sl st to the first sc. (6 sc, 6 ch-3 sps)*
Round 3 (petals): Sl st into the first ch-3 sp. In each ch-3 sp, work (sc, hdc, 3 dc, hdc, sc). Sl st to the first sc. (6 petals, 7 sts each = 42 sts)
The 3 dc make a rounded, raised petal. For blue-center motifs, fasten off Color A here.
Round 4 (frame loops): Work from the back and join Color B with a sc around the post of any Round 2 sc. Ch 5, then sc in the center dc of the next petal (from the front, through both loops). Ch 5, sc around the post of the next Round 2 sc, ch 5, sc in the center dc of the next petal; repeat from * 4 more times. Ch 5 and sl st to the first sc. (12 sc, 12 ch-5 loops)*
This round sits behind the petals between them and comes forward at each petal tip, so the flower stays raised against the frame.
Round 5 (picot edge): Sl st into the first ch-5 loop. In each ch-5 loop, work (2 sc, picot, 2 sc). Sl st to the first sc and fasten off. (48 sc, 12 picots)
Numbering the picots: Lay the motif flat and treat it like a clock face. Number the picots 1 to 12, with picot 1 at the top. Picots 1, 4, 7, and 10 are the joining points (top, right, bottom, left). The two picots between each pair stay free, and those free picots frame the open diamonds.
Weave in all ends securely now. The lace is open, so loose tails will show against the window.
Make All Pieces
You need 28 motifs:
- 14 blue-center motifs: each uses about 3 g of Color A and 3 g of Color B
- 14 all-white motifs: each uses about 6 g of Color B
Make the first motif (top left, blue) complete. Make every other motif through Round 4, then join it during Round 5 as described below.
Layout grid (B = blue-center, W = all-white):
Row 1:  B  W  B  W  B  W  B
Row 2:  W  B  W  B  W  B  W
Row 3:  B  W  B  W  B  W  B
Row 4:  W  B  W  B  W  B  W
That gives 4 + 3 + 4 + 3 = 14 blue-center and 3 + 4 + 3 + 4 = 14 all-white motifs.
Joining
Use the join-as-you-go method on Round 5. Work left to right along Row 1, then join each later row to the row above and to the motif on its left.
Stitch-to-stitch logic: Work Round 5 as normal until you reach a loop that holds a joining picot. Work 2 sc, then a joining picot into the matching picot of the neighbor, then 2 sc. Use these pairs:
- Your picot 10 (left) joins the left neighbor’s picot 4 (right).
- Your picot 1 (top) joins the upper neighbor’s picot 7 (bottom).
Each join replaces a ch 3 with ch 1, sl st, ch 1. That keeps the same length, so the stitch count stays at 48 sc and 12 picots per motif. Motifs meet at single points, and the four free picots around each gap form an open diamond.
Tension: Keep the joining sl st as loose as your normal chains. A tight join pulls the motifs together and closes up the diamonds.
Size checkpoint: Two joined motifs should measure 9 in (22.9 cm) across. A complete row of seven should measure 31½ in (80.0 cm). After all four rows, the panel should measure 31½ in × 18 in (80.0 cm × 45.7 cm).
Border: Header Band, Tabs, and Tassels
The border is worked along the top edge only, in Color A, with the right side facing. Header gauge is 18 sc = 4 in (10.2 cm).
Row 1 (arch row): Join Color A in picot 12 of the top-left motif. For that motif, work: sc in picot 12, ch 5, sc in picot 1, ch 5, sc in picot 2. That is 13 sts for the motif.
*Ch 7, then for the next motif: sc in picot 12, ch 5, sc in picot 1, ch 5, sc in picot 2; repeat from * across all remaining top motifs. Turn.
Count: 7 motifs × 13 sts + 6 gaps × 7 ch = 91 + 42 = 133 sts.
Row 2 (mesh row): Ch 1, then work 1 sc into each sc and 1 sc into each ch across. (133 sc) Turn.
Row 3 (openwork mesh): Ch 4 (counts as dc + ch 1), sk 1. Dc in the next st, ch 1, sk 1; repeat from * to the last st, dc in the last st. Turn. (67 dc + 66 ch-1 sps = 133 sts)*
Row 4: Ch 1, then sc in each dc and each ch-1 sp across. (133 sc) Do not fasten off yet. Work the tab layout below.
Tab layout: Number the Row 4 sts 1 to 133. There are 8 tabs, each 7 sts wide, with 11-st gaps between them: 8 × 7 + 7 × 11 = 56 + 77 = 133 ✓. Tab k starts at st 1 + 18(k − 1), so the tabs start at sts 1, 19, 37, 55, 73, 91, 109, and 127. The last tab ends exactly on st 133.
Tabs (make 8): Join Color A at the first st of a tab position. Work 7 sc across, then turn.
Tab Rows 2–16: Ch 1, 7 sc, turn. (7 sc per row, 16 rows total)
Each tab is 3.2 in (8.1 cm) long and about 1⅝ in (4.1 cm) wide. Fold the tab to the wrong side and whipstitch its last row to the back of Header Row 2. The loop fits café rods up to ⅞ in (2.2 cm) in diameter.
Why the math works: Row 1 starts at picot 12 of the first motif and ends at picot 2 of the last. That leaves about 1 in (2.5 cm) uncovered at each outer edge, so the header spans about 29½ in (74.9 cm). At 4½ sc per inch, 133 sts ÷ 4.5 = 29.6 in, which matches that span. The header therefore lies flat without ruffling or pulling the motifs in.
Tassels (make 7): Wrap Color A 30 times around the 3½ in (8.9 cm) card. Tie the top tightly with a 12 in (30.5 cm) strand, cut the bottom loops, and wrap the neck ½ in below the top. Trim the tassel to 3 in (7.6 cm).
Join Color A at picot 7 of a bottom-row motif and ch 6 (about 1 in, 2.5 cm). Tie the tassel’s top strand through the last chain, knot it, and hide the tails inside the tassel. Repeat for each bottom motif.
Final Blocking
- Weave in any remaining ends along the sc rows and inside the motif loops.
- Lay the panel face up on blocking mats and smooth it into a 31½ in × 18 in (80.0 cm × 45.7 cm) rectangle.
- Pin each joining point first. Check that the columns run straight and each row stays 4½ in (11.4 cm) tall.
- Pin free picots outward so every diamond opens evenly.
- Pin the header straight and pin each tab flat.
- Mist the panel thoroughly with water until it is damp but not dripping.
- Lift each flower gently with your fingertips so the petals stand above the frame.
- Let it dry completely, then unpin. Comb the tassels and trim any uneven strands.
Final Quality-Control Checklist
- 28 motifs, set out in the correct B/W checkerboard
- Every motif has 48 sc and 12 picots in Round 5
- All interior joins are at picots 1, 4, 7, and 10 only
- Panel measures 31½ in × 18 in (80.0 cm × 45.7 cm)
- Header Rows 1–4 count 133 sts each
- 8 tabs, evenly spaced, each 7 sts wide and 16 rows long
- 7 tassels, each 3 in (7.6 cm) long on a ch-6 hanger
- No loose ends visible from either side
Troubleshooting
The petals lie flat. Round 4 was probably worked through the front of the petals between tips. Rework it around the Round 2 posts from the back.
Motifs cup. The Round 4 chains are too short for your tension. Try ch 6 instead of ch 5 and keep it consistent across all motifs.
Motifs ruffle. The chains are too long, or the hook is too large. Go down a hook size.
The panel slants. Joins were made at the wrong picot. Count from picot 1 at the top every time.
The header ruffles. Your sc gauge is too tight. Rework Row 1 with ch 8 between motifs, which gives 139 sts. Then adjust the tab gaps to 12 sts (8 × 7 + 7 × 12 = 140) by adding 1 sc at the end of Row 2.
The tabs are too tight on the rod. Add 2 more rows per tab.
Care
Hand wash in cool water with mild soap, roll it in a towel, and dry it flat. Re-block after washing to restore the shape of the diamonds and petals.
Final Notes
Here is the measurement chain. Each motif measures 4½ in (11.4 cm). Seven across make 31½ in (80.0 cm), and four rows make 18 in (45.7 cm). The 133-st header covers the 29½ in (74.9 cm) span between the outer picots, the 8 tabs of 7 sts and 7 gaps of 11 sts add up to exactly 133, and 7 tassels finish the bottom edge. If your first motif matches the gauge, everything after it should fit.
Happy crocheting!