

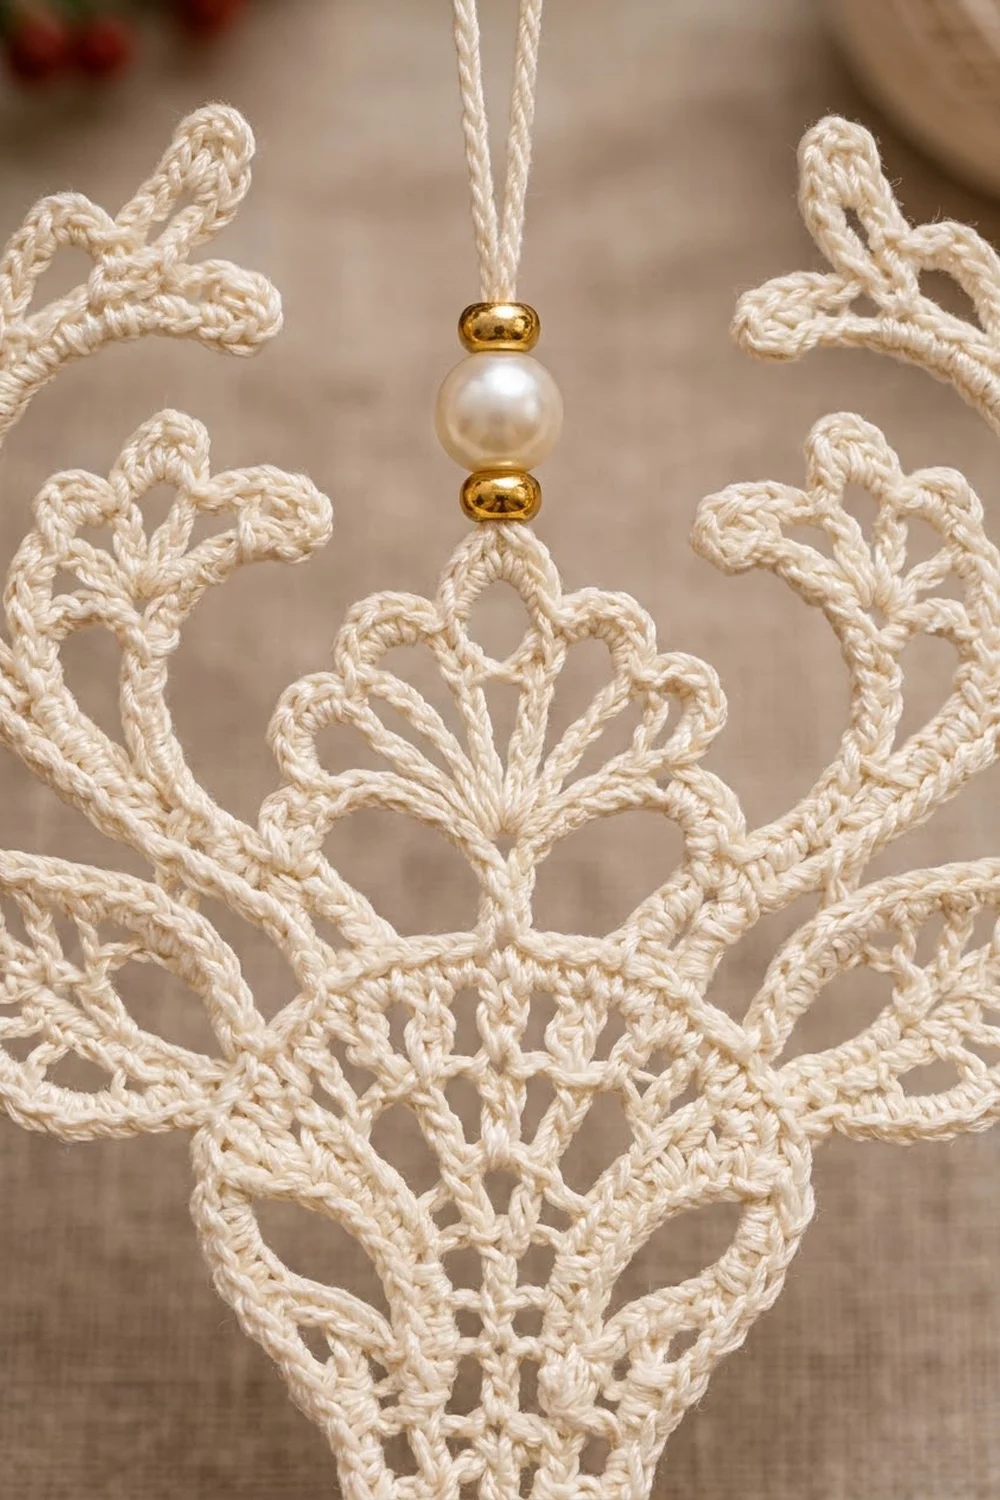
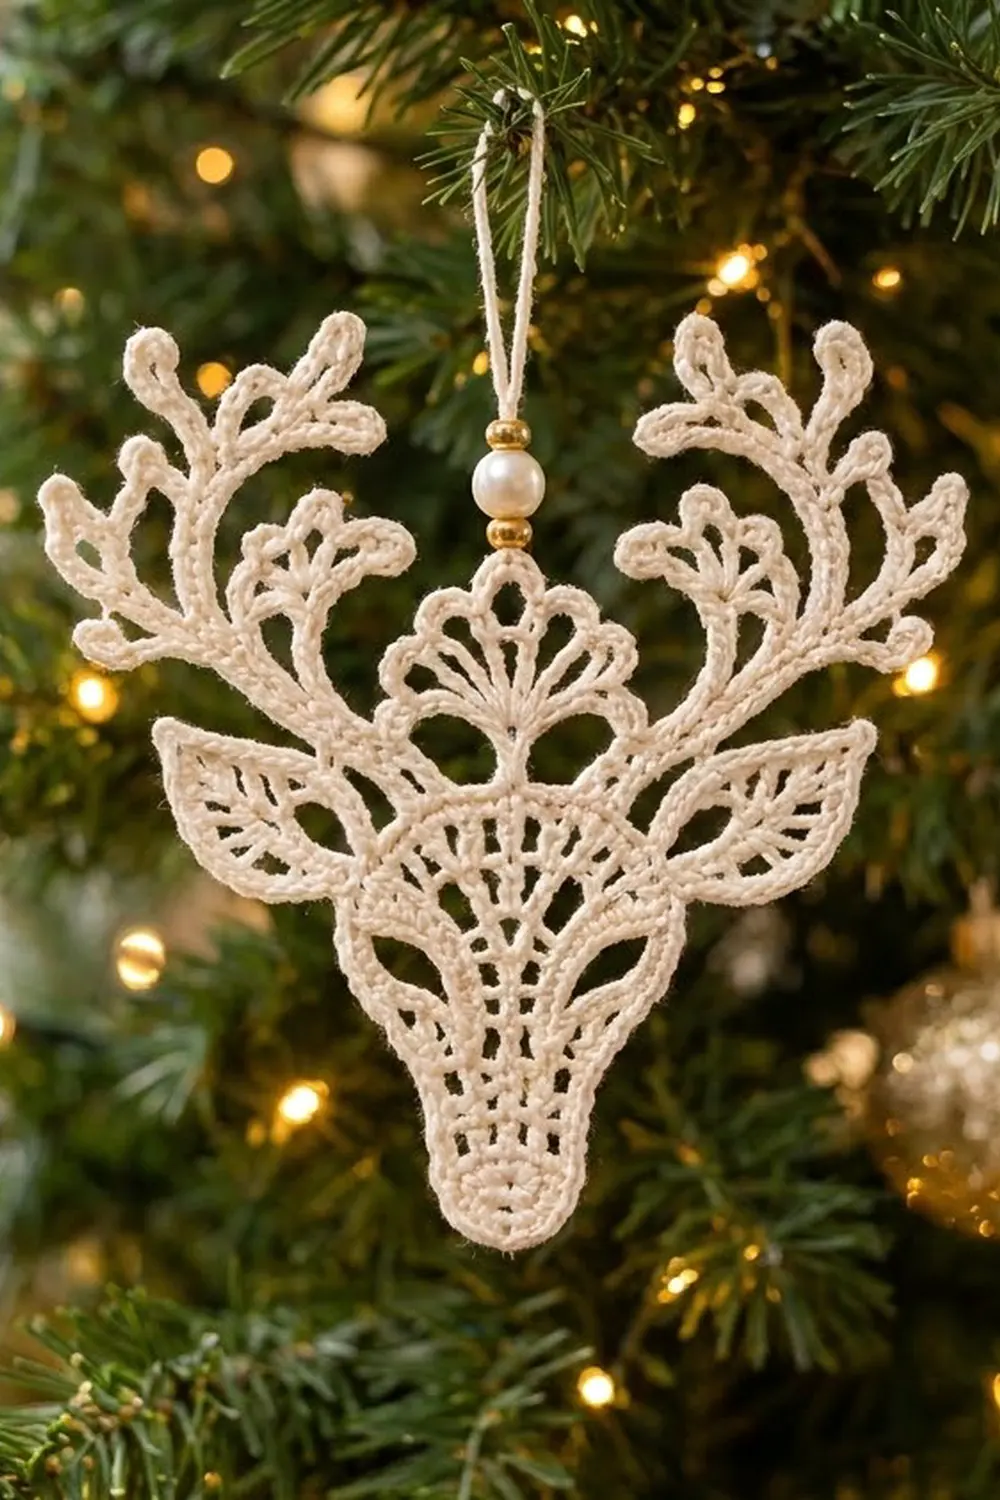
This lace reindeer head is a small heirloom-style ornament. It has branching antlers, leaf-shaped ears, almond eyes and a fan-shaped crown, all worked in one ivory thread. Once starched it holds its shape and looks good on a tree, on a gift package or in a window.
The look is classic thread lace: dc mesh, open eye windows, shell-style crown details and a neat corded edge. A pearl bead with two gold spacers on the hanging loop adds a little shine without hiding the lace.
This pattern uses US crochet terms. The finished ornament measures 4.75 in (12.1 cm) wide across the antlers and 5 in (12.7 cm) tall, not counting the hanging loop.
The ornament is a single piece. You crochet the face from the muzzle upward in rows, add the ears and antlers directly onto the head, finish with a two-row corded edging, then starch and block.
Finished Size and Construction
- Finished size: 4.75 in (12.1 cm) wide × 5 in (12.7 cm) tall
- Skill level: Intermediate (thread crochet)
- Terminology: US
- Yarn weight: Size 10 crochet cotton (Lace / 0)
- Hook: 1.5 mm steel hook (US steel 7)
- Number of pieces: 1
- Layout: Single motif, no assembly
- Face size (with edging): 2.5 in (6.4 cm) wide × 3 in (7.6 cm) tall
- Face width before edging: 2.3 in (5.8 cm)
- Edging depth: 0.125 in (0.3 cm)
Materials
Thread: Use a mercerized size 10 cotton. Its firm twist gives crisp stitch definition and takes starch well. Avoid fuzzy or very soft threads, because the eye openings and antler tines will blur.
- Cream / ivory: 10 g, about 35 m (38 yd)
This amount includes a margin for swatching and weaving in. One ornament uses roughly 6 g.
Tools and notions:
– 1.5 mm steel crochet hook
– Fine tapestry needle (size 24 or 26)
– Small sharp scissors
– 1 white pearl bead, 6 mm, with a hole at least 1 mm wide
– 2 gold spacer beads, 3 mm
– Fabric stiffener or heavy spray starch
– Foam blocking board and about 20 rustproof pins
– Plastic wrap to protect the board
Abbreviations (US Terms)
- ch – chain
- sl st – slip stitch
- sc – single crochet
- hdc – half double crochet
- dc – double crochet
- tr – treble crochet
- rsc – reverse single crochet (crab stitch)
- sk – skip
- sp – space
- st(s) – stitch(es)
- RS – right side
Special stitch – Trefoil Tip (TT): Ch 4, sl st in 4th ch from hook to form a small ring. [Ch 2, 2 dc in ring, ch 2, sl st in ring] 3 times. This makes three small petals.
Stitch counting note: In mesh rows, each ch-1 counts as 1 stitch, and each turning ch-3 counts as 1 dc.
Gauge and Checkpoints
Gauge: 10 sc = 1 in (2.5 cm), and 4 dc rows = 1 in (2.5 cm).
Since the ornament is a single piece, the first six rows work as your test swatch. Make them, measure flat without stretching, and compare:
- After Round 1: the muzzle circle is 0.6 in (1.5 cm) across.
- After Row 6: the head is 2.1 in (5.3 cm) wide.
- After Row 9: the head is 2.3 in (5.8 cm) wide, and it measures 2.6 in (6.6 cm) from the bottom of the muzzle to the top of the row.
- After Row 12: the head is 3 in (7.6 cm) tall to the crown tip.
If your piece is too big, change to a 1.4 mm hook or tighten your dc. If it is too small, change to a 1.65 mm hook. A difference of 0.1 in (0.3 cm) at Row 6 grows to about 0.25 in (0.6 cm) across the finished ornament, so adjust early.
Pattern: Face
Each mesh row increases by 4 stitches and each solid row increases by 2. That makes the face widen evenly from muzzle to brow.
Round 1 (muzzle): Make a magic ring. Ch 3 (counts as dc), 11 dc in ring. Join with sl st to top of ch-3. Pull the ring snug, but leave a tiny center eyelet for the nose. (12 dc)
Row 2 (solid): Do not turn. Ch 3 (counts as dc), dc in same st, dc in next 5 sts, 2 dc in next st. (9 dc)
You have now worked into 7 of the 12 muzzle stitches. The remaining 5 stitches are left unworked and form the rounded bottom of the muzzle.
Row 3 (mesh): Ch 4 and turn (the ch-4 counts as dc + ch 1). Dc in first st. [Ch 1, sk next st, dc in next st] 4 times. Ch 1, dc in same st as last dc. (13 sts: 7 dc + 6 ch-1 sps)
Row 4 (solid): Ch 3 and turn (counts as dc). Dc in first st. Dc in each st and ch-1 sp across to the last st. 2 dc in last st. (15 dc)
Row 5 (mesh): Ch 4 and turn (counts as dc + ch 1). Dc in first st. [Ch 1, sk next st, dc in next st] 7 times. Ch 1, dc in same st as last dc. (19 sts: 10 dc + 9 ch-1 sps)
Row 6 (solid): Repeat Row 4. (21 dc)
Checkpoint: width 2.1 in (5.3 cm).
Row 7 (eye row): Ch 3 and turn (counts as dc). Dc in next 3 sts, ch 5, sk 4 sts, dc in next 5 sts, ch 5, sk 4 sts, dc in last 4 sts. (13 dc + 2 ch-5 sps, spanning the 21 base sts)
Each ch-5 stretched over 4 skipped stitches forms one almond-shaped eye.
Row 8 (solid): Ch 3 and turn (counts as dc). Dc in first st, dc in next 3 dc, 4 dc in ch-5 sp, dc in next 5 dc, 4 dc in ch-5 sp, dc in next 3 dc, 2 dc in last st. (23 dc)
Check the math: 2 + 3 + 4 + 5 + 4 + 3 + 2 = 23.
Row 9 (mesh, no increase): Ch 4 and turn (counts as dc + ch 1). Sk next st, dc in next st. [Ch 1, sk next st, dc in next st] 10 times. (23 sts: 12 dc + 11 ch-1 sps)
Checkpoint: width 2.3 in (5.8 cm), height 2.6 in (6.6 cm).
Row 10 (crown fan): Ch 1 and turn. Sc in first 5 sts, hdc in next st, sk 5 sts. In the next st (the center ch-1 sp) work [dc, ch 1] 5 times, then dc once more. Sk 5 sts, hdc in next st, sc in last 5 sts. (23 sts: 10 sc + 2 hdc + 6 dc + 5 ch-1 sps)
Row 11 (crown loops): Ch 1 and turn. Sc in first 6 sts, sc in first fan dc. [Ch 3, sk ch-1 sp, sc in next dc] 5 times. Sc in last 6 sts. (18 sc + 5 ch-3 loops)
Row 12 (crown point): Ch 1 and turn. Sl st in first 6 sc, then sl st in next sc. Work 3 sc in first loop and 4 sc in next loop. In the center loop work (2 sc, ch 3, 2 sc). Work 4 sc in next loop and 3 sc in last loop. Sl st in next sc, then sl st in last 6 sc. Fasten off. (14 sl sts + 18 sc + 1 ch-3 tip)
Checkpoint: height 3 in (7.6 cm) to the crown tip.
Pattern: Ears (make 2)
Each ear is a leaf worked on both sides of one chain. The chain becomes the center vein, and the ch-1 gaps beside the tr stitches look like side veins.
Join the thread with a sl st in the side edge at the top of Row 9. Ch 13.
Side A (tip to base): Starting in the 2nd ch from hook, work: sl st, sc, hdc, dc in next 2 ch, (tr, ch 1) in each of next 2 ch, tr, dc in next 2 ch, hdc, sc. Sl st into the side edge of Row 8. (12 sts + 2 ch-1 sps)
Side B (base to tip): Work into the free loops on the other side of the chain: sc, hdc, dc in next 2 ch, (tr, ch 1) in each of next 2 ch, tr, dc in next 2 ch, hdc, sc, sl st. (12 sts + 2 ch-1 sps)
Tip: Work (sc, ch 2, sc) in the tip ch. Fasten off.
Checkpoint: each ear is 1.25 in (3.2 cm) long and 0.6 in (1.5 cm) wide.
Pattern: Antlers (make 2)
Join the thread with a sl st in the 3rd sl st from the outer edge of Row 12, on the head’s shoulder.
Beam: Ch 18. Work TT for the top tip.
Work back down the beam, using only the 18 beam chains (the TT has its own chains):
- Sc in next 3 ch.
- Short tine: Ch 6, work TT, sc in each of the 6 tine ch back to the beam.
- Sc in next 4 ch.
- Short tine.
- Sc in next 4 ch.
- Long tine: Ch 8, work TT, sc in each of the 8 tine ch back to the beam.
- Sc in last 7 ch.
- Sl st in the base st. Fasten off.
Count: 18 beam sc (3 + 4 + 4 + 7) and 4 trefoil tips per antler.
Checkpoint: the beam is 1.75 in (4.4 cm) long before blocking.
Border: Corded Edging
The edging runs from one shoulder, down the side of the face, around the muzzle and up the other side. It does not go across the crown or around the antlers.
Border gauge:
– 2 sc in the edge of each dc row (including mesh rows)
– 1 sc in the edge of each sc row
– 2 sc in each free muzzle dc
Edging Row 1: With RS facing, join the thread at the top of the right edge of Row 11 and ch 1.
- Right side: 1 sc in the edge of Row 11, 1 sc in Row 10, then 2 sc in the edge of each of Rows 9 to 2. (18 sc)
- Muzzle: 2 sc in each of the 5 free dc of Round 1. (10 sc)
- Left side: 2 sc in the edge of each of Rows 2 to 9, then 1 sc in Row 10 and 1 sc in Row 11. (18 sc)
Total: 46 sc. Where an ear base sits on the edge, work the sc around the ear’s anchoring sl st.
Edging Row 2: Do not turn. Ch 1, then work rsc in each sc back along the edge. Fasten off. (46 rsc)
Why the math works: A dc row is about 0.25 in (0.6 cm) tall, and two sc fill that height with slight ease. This keeps the slanted sides firm without ruffling. Each side has 8 dc-height rows (8 × 2 = 16) plus 2 sc-height rows (2 × 1 = 2), so 18 per side. The muzzle has 5 dc × 2 = 10. That gives 18 + 10 + 18 = 46. Two sc per muzzle stitch is the usual increase rate for an outer curve, so the nose stays round. The rsc row repeats the same 46 and adds about 0.125 in (0.3 cm) of corded edge on each side, bringing the face from 2.3 in (5.8 cm) to 2.5 in (6.4 cm).
Final Blocking
- Weave in all ends along the back of solid stitches, never through the mesh.
- Mix the stiffener according to the bottle, or use full-strength fabric stiffener for a firm ornament.
- Soak the ornament fully, then press out the excess between towels. Do not wring it.
- Lay it face up on a covered blocking board.
- Pin the muzzle tip first, then the center crown tip, 3 in (7.6 cm) apart in a straight vertical line.
- Pin the face sides so the brow measures 2.5 in (6.4 cm) across.
- Pin each ear tip angled out and slightly up, so ear tip to ear tip is about 4.5 in (11.4 cm).
- Pin each antler’s top TT so the two tips are 4.75 in (12.1 cm) apart and the top of the antlers is 5 in (12.7 cm) above the muzzle.
- Fan each tine outward and open every trefoil with your fingertip or a pin.
- Use a pin to open each eye and every mesh space.
- Let it dry completely, at least 12 hours, before unpinning.
Hanging loop: Cut a 14 in (35.6 cm) strand. Pass it through the ch-3 crown tip and even out the ends. Thread both ends through a gold spacer, the pearl and a second gold spacer, then slide the beads down to the crown. Knot the ends together 2.5 in (6.4 cm) above the beads and trim to 0.5 in (1.3 cm).
Final Quality-Control Checklist
- [ ] Muzzle is round and the nose eyelet is small and centered
- [ ] Both eye openings are the same size and level
- [ ] Mesh rows show even, square ch-1 spaces
- [ ] Crown has 5 loops with a centered ch-3 point
- [ ] Ears are mirror images with visible veins
- [ ] Each antler has 4 open trefoil tips
- [ ] Edging has 46 stitches and lies flat
- [ ] Finished size is 4.75 in (12.1 cm) × 5 in (12.7 cm)
- [ ] Beads sit snugly at the crown tip
- [ ] All ends are hidden and trimmed
Troubleshooting
The face is lopsided. You probably missed an increase in a mesh row. Recount: Rows 3 and 5 should each gain 4 stitches.
The eyes look like slits instead of almonds. Your ch-5 is too tight. Chain a little looser, or block the eyes open with a pin.
The edging ruffles. Use 2 sc per dc row end, not 3, and go down 0.1 mm in hook size for the edging only.
The edging pulls the sides inward. Your sc are too tight. Relax your tension or use a 1.65 mm hook for Edging Row 1.
The antlers droop. Use more stiffener on the antlers and let them dry flat for longer.
The trefoils are lumpy. Pull the ch-4 ring firm before making the petals.
The ears curl. Pin the tip and both sides while wet, then dry fully.
Care
Hand wash in cool water only if needed, then re-starch and re-block to the original measurements. Store flat in tissue paper, away from heat and humidity.
Final Notes
The measurement chain is:
- A 0.6 in (1.5 cm) muzzle.
- A face 2.1 in (5.3 cm) wide at Row 6 and 2.3 in (5.8 cm) wide at Row 9.
- A crown point 3 in (7.6 cm) up.
- A 46-stitch corded edging that brings the face to 2.5 in (6.4 cm) wide.
- Ears 1.25 in (3.2 cm) long and antlers with a 1.75 in (4.4 cm) beam, which block out to the full 4.75 in (12.1 cm) × 5 in (12.7 cm).
Check your size at each stage, block it carefully, and you’ll have a matching set of reindeer ready for the tree.
Happy crocheting!