

This hanging toilet paper holder has a calm, classic look. A tall ivory back panel hangs from a wooden ring, and three round lace pockets hold one roll each. The pockets have solid bases, open fan lace on the sides, and a scalloped top edge. That keeps them light and pretty while still holding the rolls firmly.
The whole piece uses one color of cream worsted-weight cotton, so it suits almost any bathroom. The panel is plain single crochet for strength. All the decoration is in the pockets.
This pattern uses US crochet terms. The finished holder measures about 7 in (17.8 cm) wide and about 26.5 in (67.3 cm) from the bottom edge to the top of the folded tab, not counting the ring.
Construction is simple. You crochet one back panel in rows: it tapers at the top and ends in a narrow tab. Then you make three pockets in the round, sew them onto the panel, add a two-row corded border, and fold the tab around the ring.
Finished Size and Construction
- Finished size: 7 in (17.8 cm) wide x 26.5 in (67.3 cm) long, without the ring
- Skill level: Intermediate
- Terminology: US
- Yarn weight: Worsted (#4) cotton
- Hook: 5.0 mm (H-8)
- Number of pieces: 4 (1 back panel, 3 pockets)
- Layout: 3 pockets stacked vertically on 1 panel
- Pocket size: 4.75 in (12.1 cm) base diameter x 4.25 in (10.8 cm) tall
- Panel size before border: 6 in (15.2 cm) wide x 24 in (61.0 cm) long, body plus taper, without the tab
- Border depth: about 0.5 in (1.3 cm) on each edge
Materials
Yarn: Use a smooth, firm 100% cotton or cotton blend in worsted weight. Cotton holds its shape, shows the stitch detail clearly, and copes well with bathroom humidity.
- Cream/ivory: 140 g, about 260 m (284 yd)
The quantities include a generous safety margin. The holder itself uses about 98 g (183 m).
Tools:
– 5.0 mm (H-8) crochet hook
– Wooden ring, 2.5 in (6.4 cm) outer diameter
– Tapestry needle
– 6 locking stitch markers
– Scissors
– Measuring tape
– Blocking mats and rust-proof pins
Abbreviations (US Terms)
- ch – chain
- sl st – slip stitch
- sc – single crochet
- dc – double crochet
- sc2tog – single crochet 2 together
- blo – back loop only
- rev sc – reverse single crochet (crab stitch)
- st(s) – stitch(es)
- sp – space
- sk – skip
- RS – right side
Special stitches:
– V-st: (dc, ch 1, dc) in the same stitch or space.
– Shell: 5 dc in the same stitch or space.
– Rev sc: Work single crochet from left to right (right-handed). Insert the hook into the next stitch to the right, yarn over, pull up a loop, then yarn over and pull through both loops.
Gauge and Checkpoints
Gauge: 14 sc x 16 rows = 4 in (10.2 cm). In double crochet, 14 dc x 7 rows = 4 in (10.2 cm).
That gives 3.5 sc per inch and 4 sc rows per inch, and every measurement in this pattern depends on those numbers. Make one pocket first. It is the quickest real gauge test, and it shows whether a roll fits.
Checkpoints:
– Pocket base after Rnd 5: about 2.6 in (6.6 cm) across
– Pocket base after Rnd 9: about 4.75 in (12.1 cm) across, 15.4 in (39.1 cm) around
– Finished pocket: about 4.25 in (10.8 cm) tall; a roll should drop in easily
– Panel after Row 1: 6 in (15.2 cm) wide
– Panel after Row 88: 22 in (55.9 cm) long
Too big? Go down half a hook size. Too small? Go up half a hook size. If the base is the right size but the pocket is too short, your dc is too tight: loosen your yarn-overs rather than changing hooks.
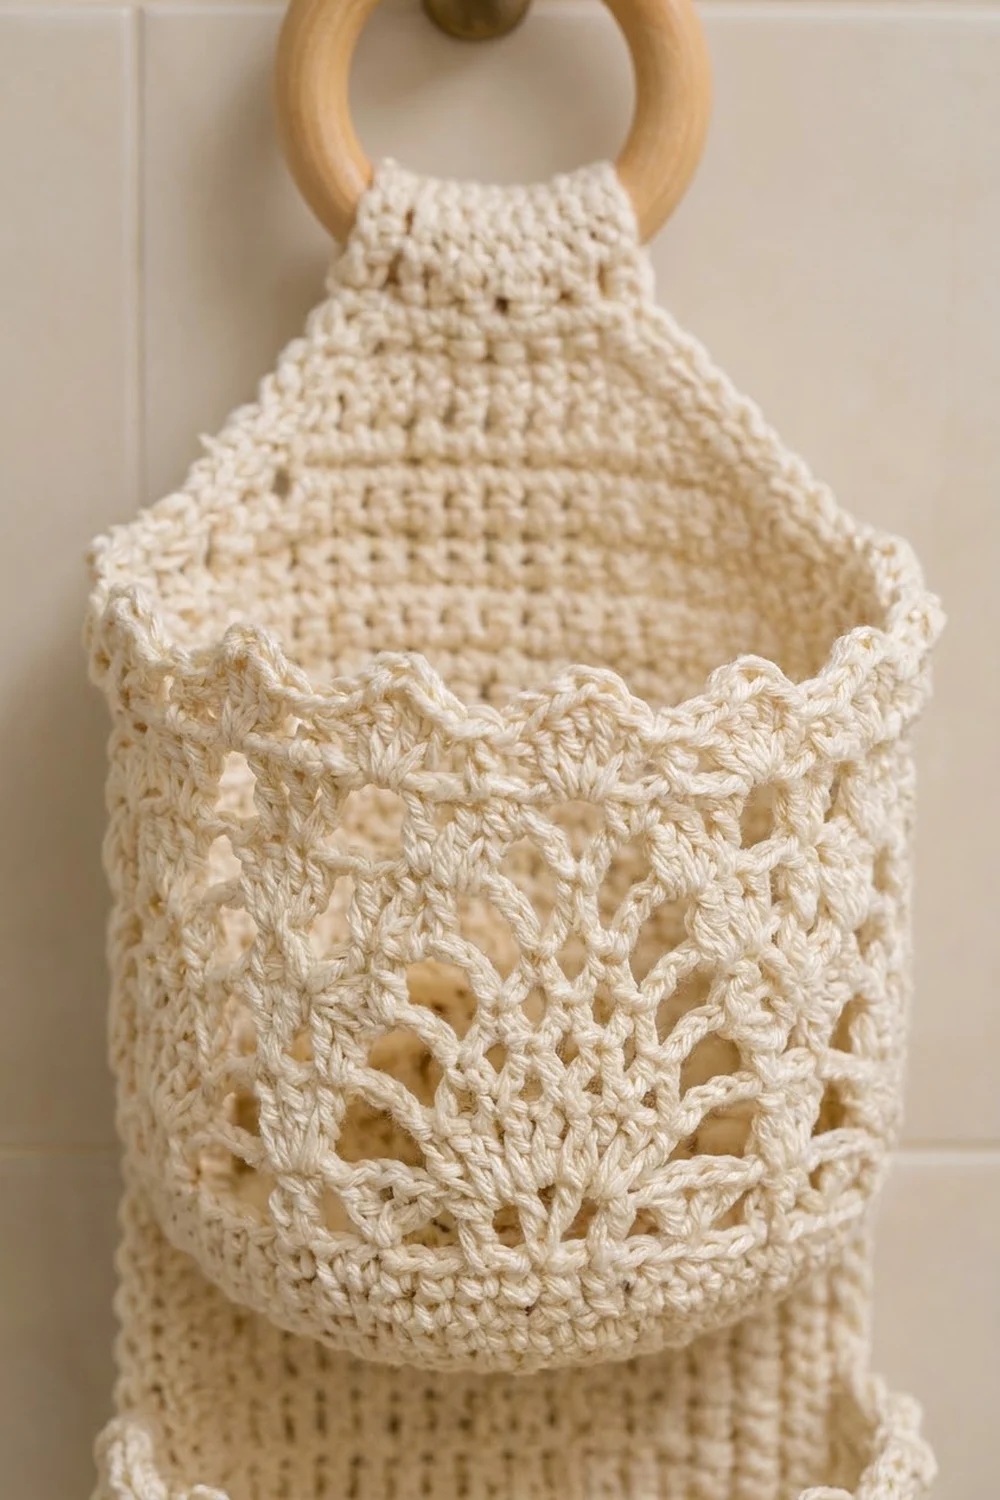
Pocket (Make 3)
Base
Work in continuous joined rounds. Join each round with a sl st to the first sc.
Rnd 1: Magic ring, ch 1, 6 sc in ring, join. (6 sts)
Rnd 2: Ch 1, 2 sc in each st around, join. (12 sts)
Rnd 3: Ch 1, sc in next st, 2 sc in next st; repeat around, join. (18 sts)
Rnd 4: Ch 1, sc in next 2 sts, 2 sc in next st; repeat around, join. (24 sts)
Rnd 5: Ch 1, sc in next 3 sts, 2 sc in next st; repeat around, join. (30 sts)
Rnd 6: Ch 1, sc in next 4 sts, 2 sc in next st; repeat around, join. (36 sts)
Rnd 7: Ch 1, sc in next 5 sts, 2 sc in next st; repeat around, join. (42 sts)
Rnd 8: Ch 1, sc in next 6 sts, 2 sc in next st; repeat around, join. (48 sts)
Rnd 9: Ch 1, sc in next 7 sts, 2 sc in next st; repeat around, join. (54 sts)
The base should lie flat and measure 4.75 in (12.1 cm) across.
Solid Lower Wall
Rnd 10: Ch 1, sc blo in each st around, join. (54 sts) The unused front loops form the ridge line where the base turns up into the sides.
Rnds 11–12: Ch 1, sc in each st around, join. (54 sts)
The wall is now 0.75 in (1.9 cm) tall.
Fan Lace Sides
Rnd 13: Ch 4 (counts as dc + ch 1), dc in the same st (first V-st), sk 2 sts, V-st in next st; repeat around, sk the last 2 sts, sl st to the 3rd ch of the beginning ch-4. (18 V-sts)
Rnd 14: Sl st into the first ch-1 sp, ch 3 (counts as dc), 4 dc in the same sp (first shell), sc in the next V-st ch-1 sp, shell in the next V-st ch-1 sp; repeat around, ending with sc in the last ch-1 sp, sl st to the top of ch-3. (9 shells, 9 sc)
Rnd 15: Sl st in the next 2 dc to reach the center dc of the first shell. Ch 1, sc in the center dc, ch 2, V-st in the next sc, ch 2, sc in the center dc of the next shell; repeat around, ending with ch 2, V-st in the last sc, ch 2, sl st to the first sc. (9 sc, 9 V-sts, 18 ch-2 sps)
Rnd 16: Ch 1, sc in the same sc, ch 1, shell in the ch-1 sp of the next V-st, ch 1, sc in the next sc; repeat around, but replace the final sc with a sl st to the first sc. (9 shells, 9 sc, 18 ch-1 sps)
Rnd 17: Ch 4 (counts as dc + ch 1), dc in the same sc (first V-st), ch 2, sc in the center dc of the next shell, ch 2, V-st in the next sc; repeat around, ending with ch 2, sc in the center dc of the last shell, ch 2, sl st to the 3rd ch of the beginning ch-4. (9 V-sts, 9 sc, 18 ch-2 sps)
Rnd 18 (scallops): Sl st into the first ch-1 sp, ch 3 (counts as dc), 4 dc in the same sp, sc in the next sc, shell in the next V-st ch-1 sp; repeat around, ending with sc in the last sc, sl st to the top of ch-3. (45 dc + 9 sc = 54 sts)
Rnd 19 (firm edge): Ch 1, sl st loosely in each st around. (54 sl sts) Fasten off and leave a 24 in (61.0 cm) tail for sewing.
This finishing round keeps the 9 scallops neat and stops the rim from stretching. The pocket now measures about 4.25 in (10.8 cm) tall.
Back Panel
Work in rows. Turn at the end of each row. The ch 1 at the start of a row does not count as a stitch.
Foundation: Ch 22.
Row 1: Sc in the 2nd ch from the hook and in each ch across, turn. (21 sts, 6 in / 15.2 cm)
Rows 2–88: Ch 1, sc in each st across, turn. (21 sts)
The body now measures 22 in (55.9 cm).
Taper
Row 89: Ch 1, sc2tog, sc to the last 2 sts, sc2tog, turn. (19 sts)
Rows 90–96: Repeat Row 89. The counts are 17, 15, 13, 11, 9, 7 and 5 sts.
The taper adds 2 in (5.1 cm). The panel before the border measures 6 in x 24 in (15.2 cm x 61.0 cm).
Hanging Tab
Rows 97–112: Ch 1, sc in each of the 5 sts, turn. (5 sts)
The tab measures 1.4 in (3.6 cm) wide x 4 in (10.2 cm) long. Fasten off and leave a 12 in (30.5 cm) tail.
Make All Pieces
- Back panel: make 1, cream, about 47 g (87 m) including the border
- Pockets: make 3, cream, about 17 g (32 m) each
Layout grid (panel seen from the RS, top to bottom):
[  tab + ring   ]   Rows 97–112
[   taper       ]   Rows 89–96
[   plain       ]   Rows 78–88
[  POCKET 3     ]   Rows 60–77
[   gap         ]   Rows 50–59
[  POCKET 2     ]   Rows 32–49
[   gap         ]   Rows 22–31
[  POCKET 1     ]   Rows 4–21
[   plain       ]   Rows 1–3
Joining
Method: Whipstitch with the yarn tail through matching stitches.
Mark the placements: Each pocket’s base ridge sits on one panel row and its rim sits 17 rows higher. 17 rows at 4 rows per inch is 4.25 in (10.8 cm), which matches the pocket height.
- Pocket 1: base ridge on Row 4, which is 1 in (2.5 cm) above the bottom edge; rim on Row 21
- Pocket 2: base ridge on Row 32, which is 8 in (20.3 cm) up; rim on Row 49
- Pocket 3: base ridge on Row 60, which is 15 in (38.1 cm) up; rim on Row 77, which is 19.25 in (48.9 cm) up
Each gap between pockets is 10 rows, or 2.5 in (6.4 cm). That leaves room to tilt in a fresh roll.
Stitch-to-stitch logic: On each pocket, mark the 19 consecutive stitches centered on the joining seam. This is the back span, 5.4 in (13.7 cm) wide. On the panel, mark stitches 2 through 20 of the placement row, which is also 19 stitches. That leaves 1 panel stitch free at each edge for the border.
- Whipstitch the 19 free front loops of Rnd 10 to panel sts 2–20 of the base row, one to one.
- Whipstitch the 19 matching Rnd 19 stitches to panel sts 2–20 of the rim row, one to one.
- Tack each side of the back span straight up the panel between those two rows.
Tension: Pull each stitch snug but not tight. The panel should stay flat behind the pocket, with no puckers. The front of the pocket curves outward and is not sewn.
Checkpoint: Lay the piece flat. The panel should still measure 6 in (15.2 cm) wide at every pocket.
Border
Border gauge: Same as the main gauge, 3.5 sc per inch along straight edges.
Row 1: With the RS facing, join the yarn at the left side where the tab meets Row 96. Sc in that row end. You will work counterclockwise around the panel, but not across the tab.
- Left taper (Rows 96–89): Starting with the joining sc, sc in each of the next 3 row ends, 2 sc in the next row end; repeat once. (10 sts)
- Left side (Rows 88–1): Sc in each of the next 7 row ends, sk 1 row end; repeat 11 times. (77 sts)
- Bottom edge (free loops of the foundation chain): 3 sc in the first loop, sc in each of the next 19 loops, 3 sc in the last loop. (25 sts, including both corner groups)
- Right side (Rows 1–88): Work as for the left side. (77 sts)
- Right taper (Rows 89–96): Work as for the left taper. (10 sts)
Row 1 total: 10 + 77 + 25 + 77 + 10 = 199 sts.
The corner stitches are counted only in the bottom-edge 25. The side counts of 77 do not include corners.
Row 2: Do not turn. Ch 1, rev sc in each st back along the edge. (199 sts) Fasten off.
Why the math works:
– Sides: 77 sc over 22 in (55.9 cm) is exactly 3.5 sts per inch, the gauge. Skipping 1 row end in 8 matches 4 rows per inch to 3.5 sts per inch.
– Bottom edge: 21 foundation stitches give 6 in (15.2 cm). The 3-sc corners turn cleanly without cupping.
– Tapers: 10 sc spread over a diagonal of about 3 in (7.6 cm) gives roughly 3.3 sts per inch, close enough to lie flat.
– Result: The two border rows add about 0.5 in (1.3 cm) on each edge. The width becomes 6 + 0.5 + 0.5 = 7 in (17.8 cm).
Attaching the Ring
Thread the tab through the wooden ring from front to back. Fold it down 2 in (5.1 cm) behind the panel, so the fold sits 2 in (5.1 cm) above the taper. Whipstitch the end of the tab to the back of Row 97. The total length is 22 + 2 + 2 + 0.5 = 26.5 in (67.3 cm).
Final Blocking
- Mist the whole holder lightly with water until it is damp, not soaked.
- Lay it flat with the pockets facing up. Pin the panel to 7 in x 24.5 in (17.8 cm x 62.2 cm), measured from the bottom edge to the top of the taper.
- Stuff each pocket with a toilet roll wrapped in a plastic bag so it dries round.
- Pin the 9 scallops on each pocket rim into even points.
- Let it dry completely, usually 24 hours, before unpinning.
Final Quality-Control Checklist
- [ ] The panel is 7 in (17.8 cm) wide along its full length
- [ ] Each pocket holds a roll, and the pocket is 4.25 in (10.8 cm) tall
- [ ] Each pocket has 9 even scallops
- [ ] Each pocket is centered over panel sts 2–20 with no puckers
- [ ] Each gap between pockets is 2.5 in (6.4 cm)
- [ ] The border has 199 sts per row and lies flat
- [ ] The tab is sewn securely and the ring turns freely
- [ ] All ends are woven in at least 2 in (5.1 cm)
Troubleshooting
- The pocket base cups: Your sc is tight. Go up half a hook size for Rnds 1–9.
- The pocket rim ruffles: Your shells are too loose. Make the dc shorter, or use 4 dc shells in Rnd 18 only.
- The roll won’t fit: Check the Rnd 9 count of 54 sts and the base diameter.
- The panel edges wave: Skip 1 row end in every 6 instead of every 8 in Border Row 1. Keep the counts matching on both sides.
- The panel edges pull in: Skip 1 row end in every 10 instead of every 8.
- The holder twists on the hook: The tab was sewn off-center. Unpick it and re-center it on Row 97.
Care
Hand wash in cool water with mild soap, press out the water in a towel, and dry flat, reshaping the pockets around rolls. Do not tumble dry.
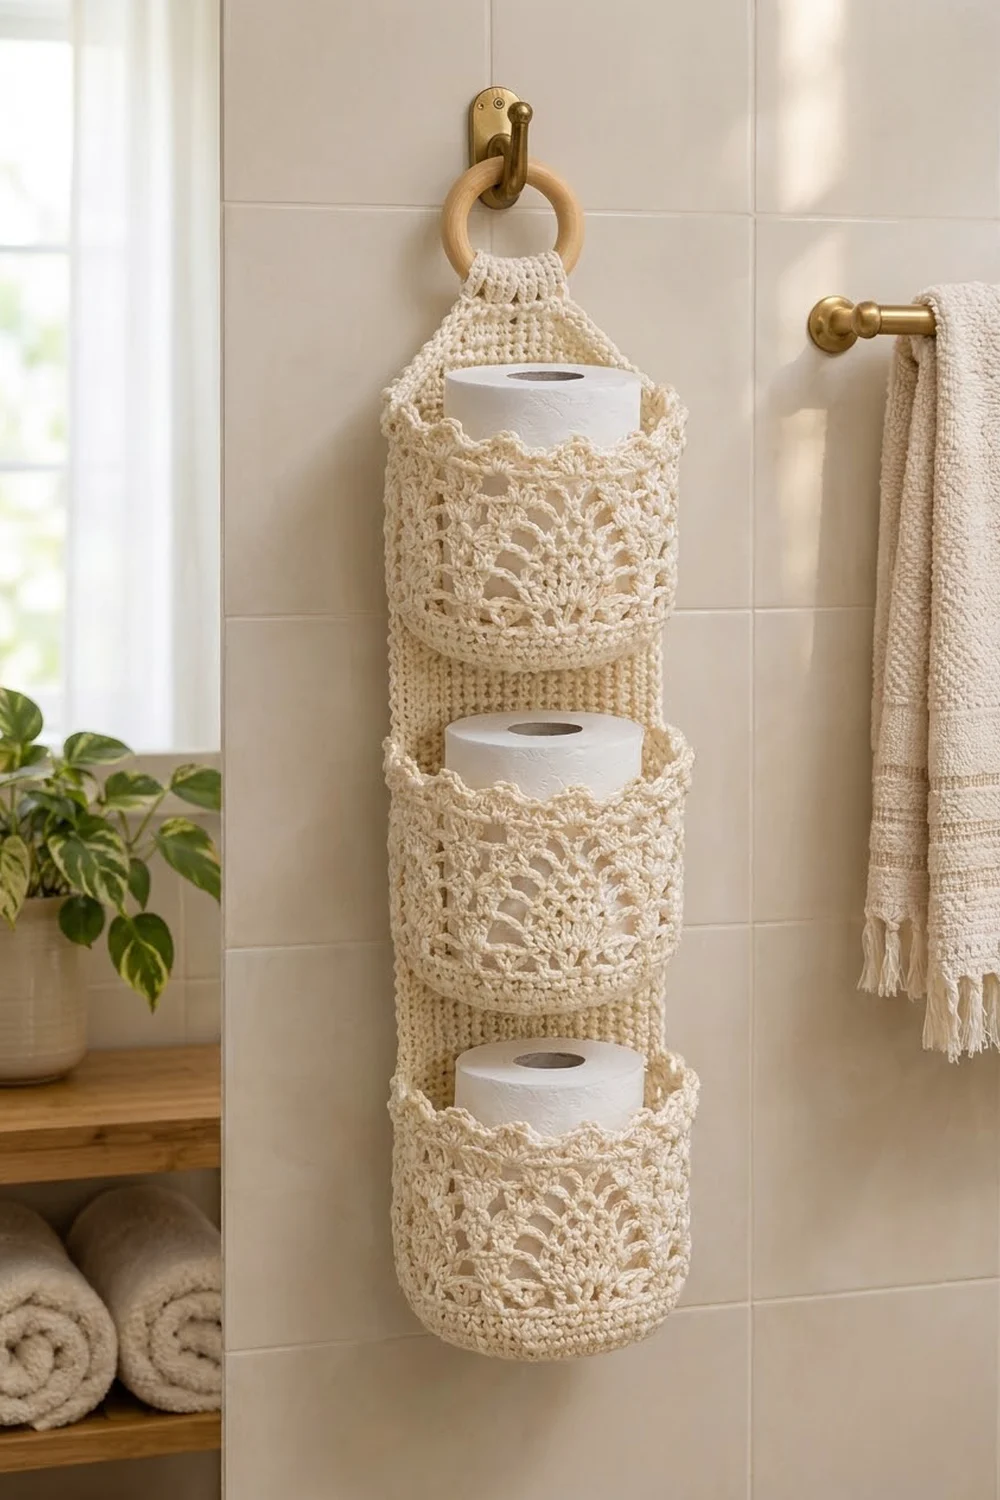
Final Notes
Everything rests on one measurement chain. The gauge of 3.5 sc and 4 rows per inch gives a 54-stitch pocket base of 4.75 in (12.1 cm). Seventeen rows of wall make a 4.25 in (10.8 cm) pocket. The 21-stitch panel is 6 in (15.2 cm) wide, and 88 rows make a 22 in (55.9 cm) body. A 199-stitch border brings the panel to 7 in (17.8 cm) wide, and the folded tab finishes the holder at 26.5 in (67.3 cm). Check each stage as you go and the holder will hang straight and hold every roll neatly.
Happy crocheting!