

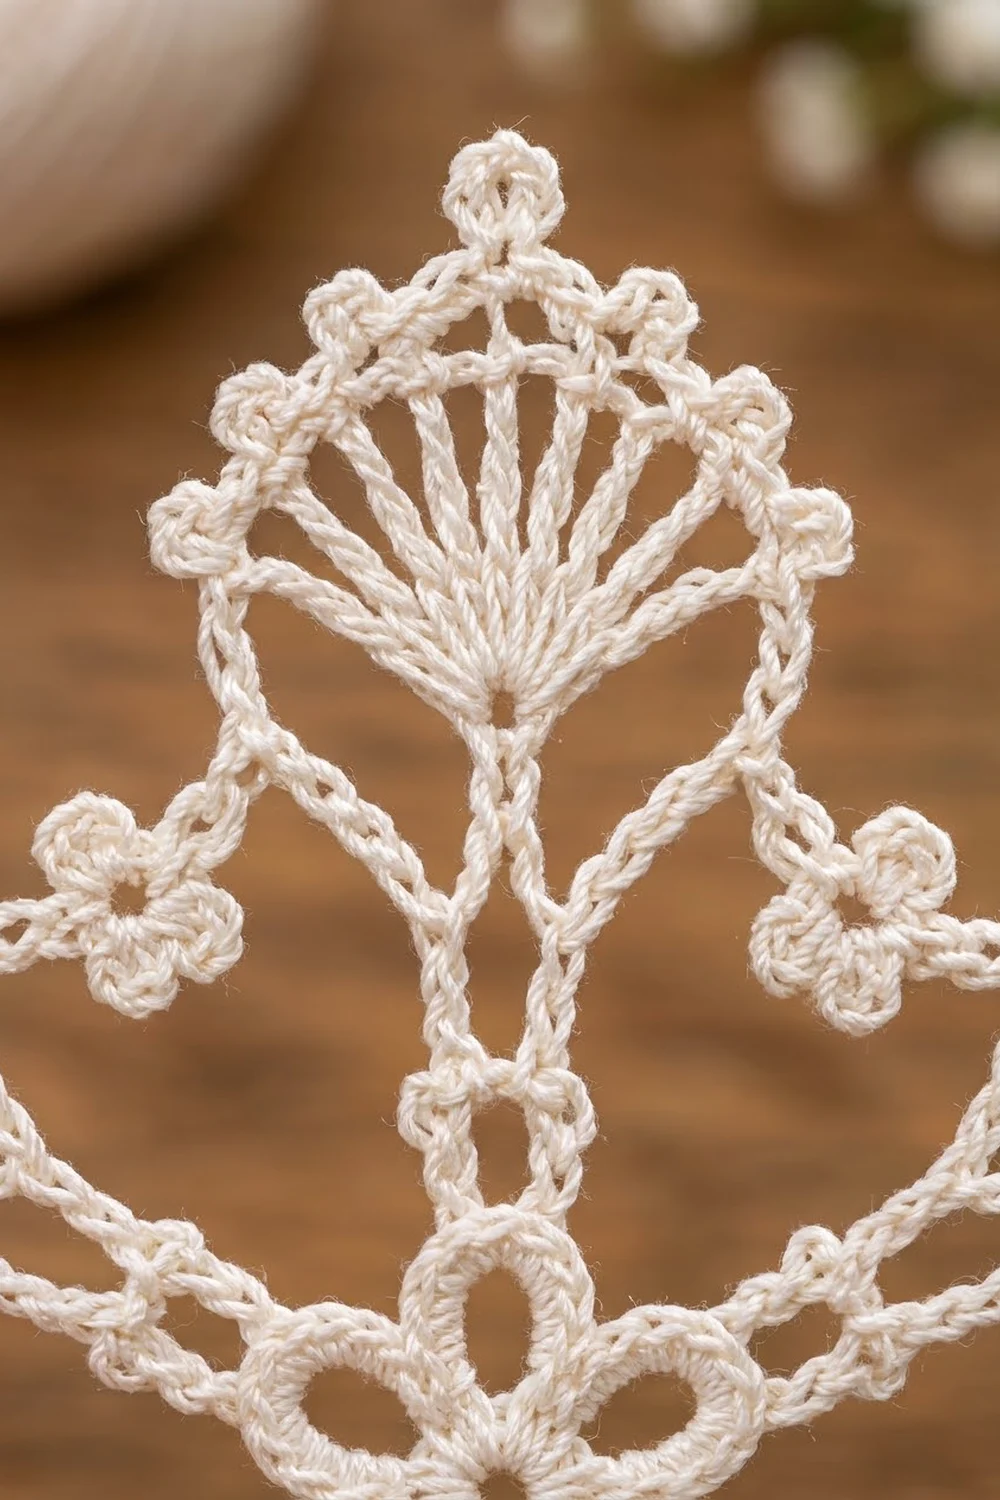
The Ivory Frost Snowflake is a delicate thread-lace ornament with six fan-tipped arms, a little flower at its heart, and tiny trefoil picots tucked between the arms. Hung on a tree, the open chain frames catch the light, and the radiating fans look like frosted seashells.
The design uses one color: soft ivory cotton thread. Its classic, heirloom style suits tree ornaments, gift toppers, and window decorations. All instructions use US crochet terms.
The finished snowflake measures 4.5 in (11.4 cm) from fan tip to fan tip after blocking, not counting the hanging loop. The loop adds about 1.5 in (3.8 cm).
You work the whole snowflake in the round as one piece. A flower center grows into a solid ring of single crochet. Valley trefoils come next, then the six spines and fans. A final edging round adds the teardrop frames and the picot rims. Starching and pinning give the crisp shape.
Finished Size and Construction
- Finished size: 4.5 in (11.4 cm) tip to tip
- Skill level: Intermediate (thread crochet experience helpful)
- Terminology: US crochet terms
- Yarn weight: Size 10 cotton crochet thread (lace weight)
- Hook: 1.5 mm steel hook (US steel size 8)
- Number of pieces: 1
- Layout: Single six-armed snowflake, worked in the round
- Piece size: 4.5 in (11.4 cm) tip to tip
- Size before border (after Round 7): 4.0 in (10.2 cm) tip to tip
- Border depth (Round 8): 0.25 in (0.6 cm) beyond each fan
Materials
Yarn: Use mercerized size 10 cotton crochet thread. It holds starch well, shows stitch definition, and won’t fuzz. Avoid acrylic thread, which resists stiffening.
- Ivory / off-white: about 5 g (about 32 m)
This amount includes a generous margin. The snowflake itself uses about 3 g (about 20 m), and the rest covers your gauge swatch and the hanging loop.
Tools:
– 1.5 mm steel crochet hook (US steel size 8)
– Fine tapestry needle
– Small sharp scissors
– Fabric stiffener, or a starch solution (equal parts white glue and water also works)
– Foam blocking board, at least 6 in (15.2 cm) square
– Rustproof pins
– Plastic wrap to cover the board
Abbreviations (US Terms)
- ch – chain
- sl st – slip stitch
- sc – single crochet
- hdc – half double crochet
- dc – double crochet
- tr – treble crochet (yarn over twice)
- sp – space
- st(s) – stitch(es)
Special stitches:
- Picot: Ch 3, sl st in 3rd ch from hook.
- Trefoil (tref): Ch 4, sl st in 4th ch from hook; ch 4, sl st in the same ch; ch 4, sl st in the same ch. This makes three small loops clustered at one point.
Gauge and Checkpoints
Gauge matters less here than for a garment, but it controls the final size and whether the frames lie flat. Before you commit, make one complete snowflake as your test piece. Measure it at each checkpoint below, gently flattened but not stretched.
- After Round 3 (flower): 0.9 in (2.3 cm) across, petal tip to petal tip
- After Round 5 (solid ring): 1.6 in (4.1 cm) across
- After Round 6 (with trefoils): 2.0 in (5.1 cm) across, trefoil to trefoil
- After Round 7 (spines and fans): 4.0 in (10.2 cm) fan tip to fan tip
- After Round 8 and blocking: 4.5 in (11.4 cm) tip to tip
Border gauge: Across one fan, 9 sc and 8 picots span 1.4 in (3.6 cm).
If your piece is too big: Change to a 1.25 mm hook, or tighten your chains. Chains that are too loose are the most common cause of floppy frames.
If your piece is too small: Change to a 1.75 mm hook. If only the frames pull tight, add 1 ch to each ch-15 frame in Round 8 (making it a ch-16 frame) and keep everything else the same.
Pattern
Center Flower
Round 1: Ch 6, sl st in first ch to form a ring. Ch 1, work 12 sc in the ring, sl st in first sc to join. (12 sc)
Round 2: Ch 1, sc in the same st as the join. Ch 5, skip next sc, sc in next sc. Repeat from * 4 more times, then ch 5, skip last sc, and sl st in first sc to join. (6 sc, 6 ch-5 loops)
Round 3: Sl st into the first ch-5 loop. Ch 1, then in the same loop work (sc, hdc, 3 dc, hdc, sc). In each remaining ch-5 loop work (sc, hdc, 3 dc, hdc, sc). Sl st in first sc to join. (6 petals of 7 sts = 42 sts)
Checkpoint: 0.9 in (2.3 cm) across. The center ring stays open.
Solid Ring
Round 4: Sl st in the next 3 sts (hdc, dc, center dc) so you are in the center dc of the first petal. Ch 1, sc in the same center dc. Ch 7, sc in the center dc of the next petal. Repeat from * 4 more times, then ch 7 and sl st in first sc to join. (6 sc, 6 ch-7 sps; 48 sts total)
The 6 sc in this round sit directly above the petal tips. These are the arm points, and every arm grows from one of them.
Round 5 (conversion round): Ch 1. Sc in the next sc (arm point), 9 sc in the next ch-7 sp. Repeat from * 5 more times. Sl st in first sc to join. (6 sc worked 1-per-existing-sc + 54 sc worked into spaces = 60 sc)
Each of the 6 sections now has 10 sc: 1 arm-point sc followed by 9 sc.
Checkpoint: 1.6 in (4.1 cm) across and flat. If it cups, your ch-7 spaces are too tight; if it ruffles, they are too loose.
Valley Trefoils
Round 6: Ch 1, sc in the same st (arm point). Ch 6, skip 4 sc, sc in the next sc (the middle sc of the 9 — this is the valley sc), tref, ch 6, skip 4 sc, sc in the next arm-point sc. Repeat from * 5 more times, but on the final repeat skip the last sc and sl st in the first sc to join instead. (12 sc, 12 ch-6 sps, 6 trefoils)
Check the stitches used per section: 1 + 4 skipped + 1 + 4 skipped = 10, which matches Round 5.
Checkpoint: 2.0 in (5.1 cm) across, trefoil to trefoil.
Spines and Fans
You work the arms in this round. Each arm is a chain spine that ends in a small ring, with a tr fan worked into that ring.
Round 7: Ch 1, sc in the same st (arm point).
Arm: Ch 16, sl st in the 4th ch from hook to form a small tip ring. Ch 4 (counts as first tr), then (ch 1, tr) 8 times into the ring. Fan the stitches around the outer half of the ring so they open away from the center. Sl st in the ring. Sl st in each of the 12 spine ch back toward the center, then sl st in the arm-point sc. (1 fan of 9 tr and 8 ch-1 sps)
Valley: 6 sc in the next ch-6 sp, sc in the valley sc (push the trefoil forward so it stays on the right side), 6 sc in the next ch-6 sp.
Sc in the next arm-point sc, then work Arm and Valley. Repeat from * 4 more times. Sl st in first sc to join. (84 sc: 14 per section; 6 arms, 54 tr in fans)
Count each section: 1 arm-point sc + 6 + 1 valley sc + 6 = 14 sc.
Checkpoint: 4.0 in (10.2 cm) from fan tip to opposite fan tip, with each spine about 0.75 in (1.9 cm) long. This is your size before the border.
Border
The border is Round 8. It adds the curved teardrop frames and the picot rim on every fan, and it carries the snowflake to its final size.
Border gauge: 9 sc and 8 picots across one fan = 1.4 in (3.6 cm).
Setup: Sl st in the next 6 sc, then sl st in the valley sc. You are now at the first valley.
Round 8: Ch 1, sc in the same valley sc. Ch 15 for the right-hand frame. Sc in the top of the first tr of the next fan. (Picot, sc in the next tr) 8 times. Ch 15 for the left-hand frame. Sc in the next valley sc. Repeat from * 5 more times. On the final repeat, replace the last sc with a sl st in the first sc. Fasten off.
Counts per arm:
– Frames: 15 ch + 15 ch = 30 ch
– Fan rim: 9 sc (1 per tr) + 8 picots (1 per ch-1 sp)
– Valley: 1 sc
Round totals: 6 valley sc + 54 fan sc = 60 sc; 48 picots; 12 frames of 15 ch (180 ch).
Why the math works: Each fan has exactly 9 tr and 8 ch-1 spaces from Round 7. The rim places 1 sc on every tr and 1 picot over every space, so the stitches match the fan one-for-one. Nothing is added or skipped, and the rim neither ruffles nor pulls.
Fan tr are about 0.35 in (0.9 cm) tall, so the rim’s outer arc is about 1.4 in (3.6 cm), which equals the border gauge. Each ch-15 frame covers the distance from the valley to the corner of the fan with a slight curve, which gives the teardrop outline. The picots add 0.25 in (0.6 cm) beyond each fan, so 4.0 in + 0.25 in + 0.25 in = 4.5 in (10.2 cm + 0.6 cm + 0.6 cm = 11.4 cm).
Hanging Loop
Join thread with a sl st in the center sc of any fan rim (the 5th sc). Ch 25, then sl st in the same sc. Work 30 sc over the loop and sl st in the base. Fasten off. The loop stands about 1.5 in (3.8 cm) tall.
Weave in all ends along the chain spines, where they disappear. Trim them closely only after blocking.
Final Blocking
- Cover the blocking board with plastic wrap. Draw or place a guide of six lines meeting at the center 60 degrees apart, if you like.
- Soak the snowflake in stiffener for 1 minute and work it in gently with your fingers.
- Squeeze it out in a towel. Don’t wring or twist it.
- Pin the center ring first so it is round and about 0.2 in (0.5 cm) across.
- Pin each spine straight along a guide line, so the fan tips sit 4.5 in (11.4 cm) apart across the snowflake.
- Open each fan into a half circle and pin each picot to a point.
- Pull each ch-15 frame into a smooth outward curve and pin it at its midpoint.
- Pin each trefoil so its three loops spread evenly.
- Leave it to dry completely, usually 12 to 24 hours.
- Unpin it, check the measurements, and trim the ends.
Final Quality-Control Checklist
- The snowflake measures 4.5 in (11.4 cm) tip to tip.
- All 6 arms are the same length, each spine about 0.75 in (1.9 cm).
- Each fan has 9 tr and 8 picots.
- There are 6 trefoils, one centered in each valley.
- All 12 frames are 15 ch and curve evenly.
- The center ring is open and round.
- The piece lies flat with no cupping or ruffling.
- No ends show from the front.
- The hanging loop is centered above one fan.
Troubleshooting
The piece cups after Round 5: Your ch-7 spaces are too short. Redo Round 4 with looser chains, or with ch 8.
The fans curl forward: The tip ring is too tight. Make it with looser chains, and work each tr fully into the ring.
The frames sag after blocking: The chains are too loose. Use ch 14, or apply more stiffener.
The frames pull the fans inward: The chains are too tight. Use ch 16.
A trefoil ends up behind the work: In Round 7, make sure the trefoil lies on the front before you work the valley sc.
An arm is a different length: Count the spine ch again. Each spine should have 12 ch plus the tip ring.
Care
Dust gently, or hand wash in cool water. Then re-stiffen and re-pin to restore the shape. Store flat between tissue paper so the arms don’t crush.

Final Notes
The measurement chain is simple to track. The flower measures 0.9 in (2.3 cm), and the solid ring grows that to 1.6 in (4.1 cm). The trefoils bring it to 2.0 in (5.1 cm), and the spines and fans reach 4.0 in (10.2 cm). The picot border finishes it at 4.5 in (11.4 cm). Check each stage, keep your chains even, and block with care for a crisp heirloom snowflake.
Happy crocheting!