

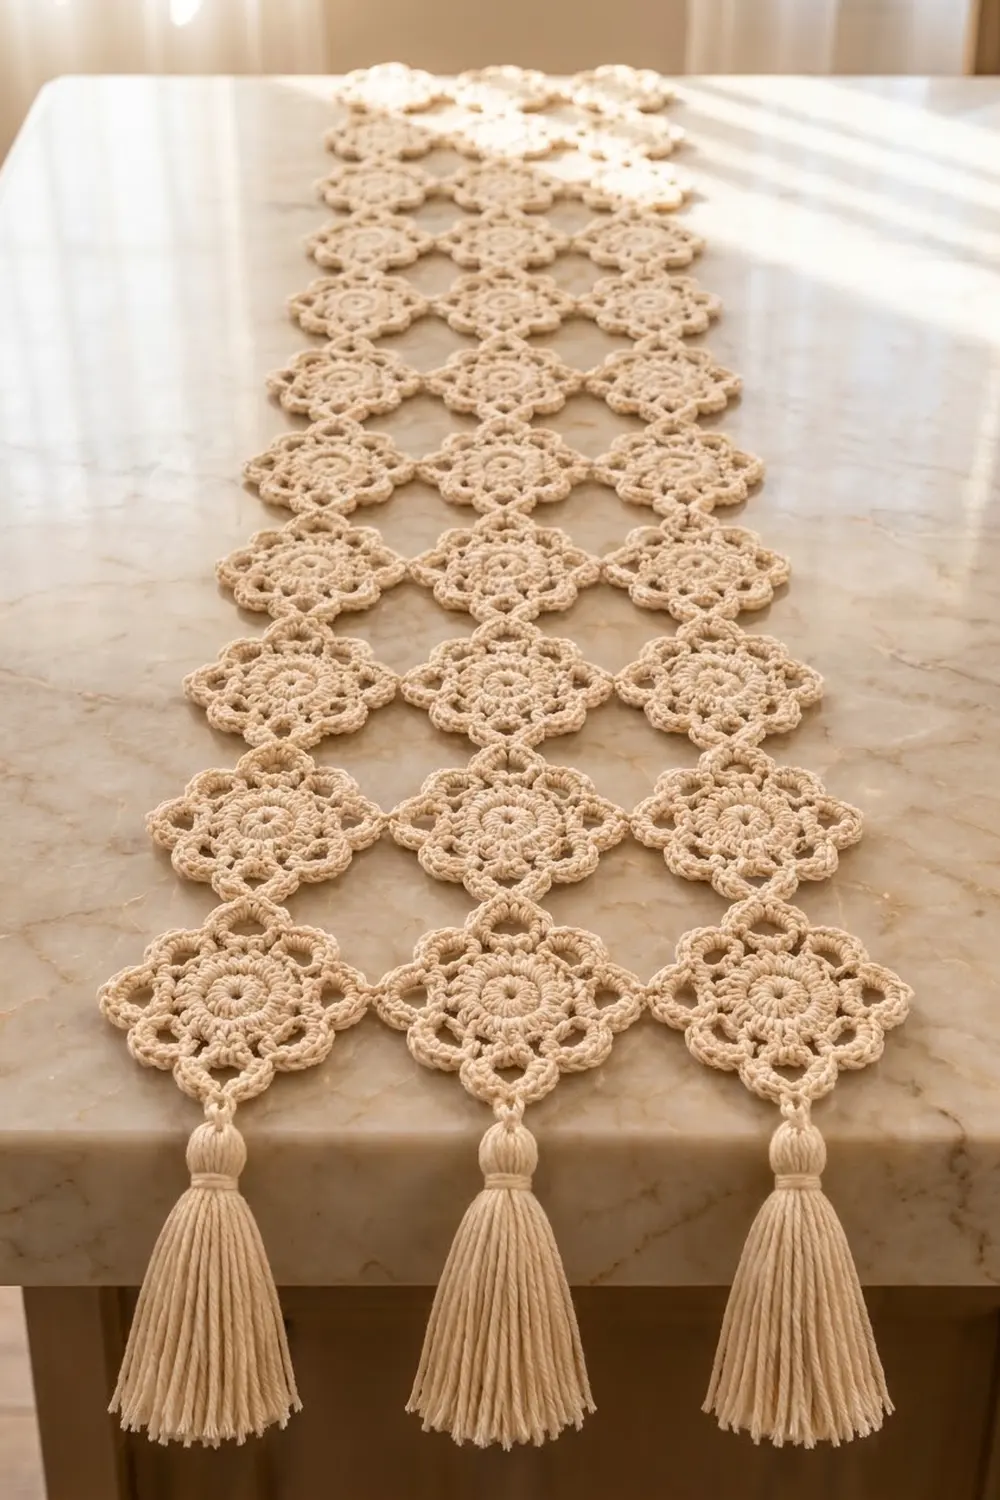
The Ivory Frost Table Runner is a lacy holiday runner made from small diamond-shaped motifs. Each motif has a solid double crochet center, then a round of single-crochet-covered chain loops that forms soft scallops. The motifs touch only at their points, which leaves a regular pattern of open diamonds down the length of the table.
The whole runner is one warm ivory color, so it works for Christmas, winter, weddings or everyday use. Three tassels at each end make it look finished and add some weight to the ends when they hang over the table edge.
This pattern uses US crochet terms. The finished runner is 13.5 in (34.3 cm) wide and 54 in (137.2 cm) long, not counting the tassels. With the 4 in (10.2 cm) tassels at both ends, the total length is 62 in (157.5 cm).
You make 36 identical motifs in five rounds each. Each motif after the first is joined to its neighbors during its last round, at the corner tips only. There is no stitched border; the scalloped edges of the motifs form the edge of the runner. Six tassels finish the piece.
Finished Size and Construction
- Finished size: 13.5 in x 54 in (34.3 cm x 137.2 cm), not counting tassels
- Length with tassels: 62 in (157.5 cm)
- Skill level: Easy-intermediate
- Terminology: US crochet terms
- Yarn weight: Worsted (#4) cotton
- Hook: 4.5 mm (US 7)
- Number of pieces: 36 motifs plus 6 tassels
- Layout: 3 motifs wide x 12 motifs long, set on point
- Motif size: 4.5 in (11.4 cm) from point to point
- Size before border: 13.5 in x 54 in (34.3 cm x 137.2 cm)
- Border depth: 0 in (0 cm); the scalloped motif edges are the finished edge
Materials
Yarn: Use a smooth worsted-weight cotton or cotton blend with a soft twist. Cotton shows the stitches clearly, blocks flat and holds up to washing. Avoid fuzzy yarn, because it blurs the open loops.
- Ivory/cream: about 240 g, 475 m (520 yd)
- Motifs: about 11.0 m (12 yd) each x 36
- Tassels: about 6.4 m (7 yd) each x 6
These amounts include about a 10% margin for swatching, tails and tension differences.
Tools:
- 4.5 mm (US 7) crochet hook
- Tapestry needle
- Scissors
- Stitch markers
- A piece of stiff cardboard 4.5 in (11.4 cm) tall, for the tassels
- Blocking mats and rustproof pins
- Spray bottle
- Measuring tape
Abbreviations (US Terms)
- ch – chain
- sl st – slip stitch
- sc – single crochet
- dc – double crochet
- sk – skip
- st(s) – stitch(es)
- sp – space
- MR – magic ring
- rep – repeat
Special stitch – joining tip (JT): Ch 1, sl st into the ch-3 tip of the neighboring motif, ch 1. This replaces the ch-3 tip of the motif you are working on and links the two points.
Gauge and Checkpoints
Make one complete motif before you start the runner, and block it lightly. Your gauge is good if the motif matches these checkpoints:
- After Round 1: 1.5 in (3.8 cm) across
- After Round 2: 2.5 in (6.4 cm) across
- After Round 3: 3.25 in (8.3 cm) across
- After Round 4: 4 in (10.2 cm) from point to point
- After Round 5: 4.5 in (11.4 cm) from point to point
If your motif is too big: Change to a 4.0 mm (US G-6) hook. Being 0.25 in (0.6 cm) too large on each motif adds 3 in (7.6 cm) to the length of the runner.
If your motif is too small: Change to a 5.0 mm (US H-8) hook.
If the center ruffles: Your tension is loose on the dc rounds. Tighten slightly or go down a hook size for Rounds 1–3 only.
If the center cups: Your tension is tight. Relax your grip or go up a hook size for Rounds 1–3.
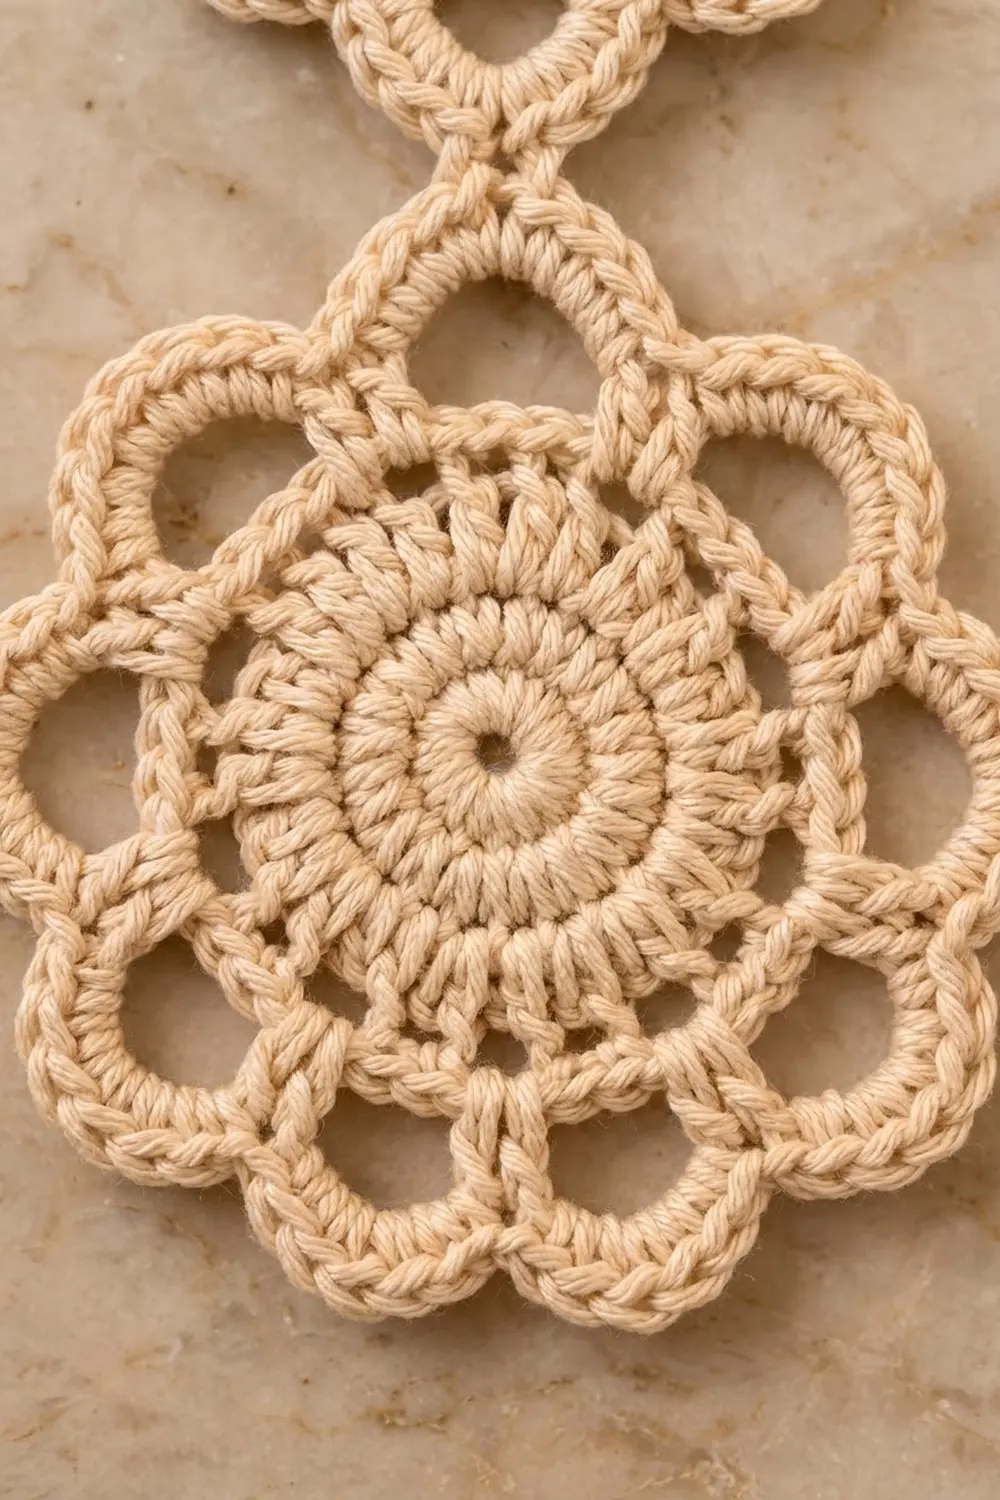
Motif Pattern
Make 1 motif with the instructions below. Starting with motif 2, work Rounds 1–4 the same way and use the joining version of Round 5 (see Joining).
Round 1: Make an MR. Ch 3 (counts as dc), work 11 dc into the ring. Sl st to the top of the beginning ch-3. Pull the ring closed, leaving a small center hole. (12 dc)
Round 2: Ch 3 (counts as dc), dc in the same st. 2 dc in each st around. Sl st to the top of the beginning ch-3. (24 dc)
Round 3: Ch 3 (counts as dc). 2 dc in the next st, dc in the next st, 2 dc in the next st. Rep from * to * around. Sl st to the top of the beginning ch-3. (36 dc)
Check that the solid center lies flat and measures 3.25 in (8.3 cm) across.
Round 4 (loop round): In this round you split the 36 sts into 4 sections of 9 sts. Each section gets 2 small loops and 1 large corner loop.
Ch 1, sc in the same st. Ch 5, sk 2 sts, sc in the next st, ch 5, sk 2 sts, sc in the next st, ch 9, sk 2 sts, sc in the next st. Rep from * to * 3 more times. On the last repeat, leave out the final sc and sl st to the first sc instead.
Count for Round 4: 12 sc, 8 ch-5 loops and 4 ch-9 corner loops. Each section uses exactly 9 sts: 3 sc plus 6 skipped sts. That is 4 x 9 = 36, which matches Round 3.
The ch-9 loops become the four points of the diamond.
Round 5 (cover round): Sl st into the first ch-5 loop, ch 1. 7 sc in this ch-5 loop, 7 sc in the next ch-5 loop, then (6 sc, ch 3, 6 sc) in the ch-9 corner loop. Rep from * to * 3 more times, working the first 7 sc of the repeat into the next ch-5 loop. Sl st to the first sc. Fasten off.
Count for Round 5: 104 sc and 4 ch-3 tips. Each section has 7 + 7 + 12 = 26 sc, and 4 x 26 = 104.
Side count: Each straight side of the diamond, from one ch-3 tip to the next, has 26 sc. That is 6 sc from the first corner loop, 7 + 7 from the two side loops, and 6 sc from the next corner loop. This count of 26 does not include the ch-3 tips.
Weave in the tails on the wrong side, through the dc of the center rounds, where they won’t show.
Make All Pieces
- Ivory motifs: 36 total
- First motif: 1, made with the standard Round 5
- Joined motifs: 35, made with the joining Round 5
- Tassels: 6, added after blocking
Layout grid (3 wide x 12 long, motifs set on point):
Row 1:   M1   M2   M3     <- tassel end
Row 2:   M4   M5   M6
Row 3:   M7   M8   M9
Row 4:   M10  M11  M12
Row 5:   M13  M14  M15
Row 6:   M16  M17  M18
Row 7:   M19  M20  M21
Row 8:   M22  M23  M24
Row 9:   M25  M26  M27
Row 10:  M28  M29  M30
Row 11:  M31  M32  M33
Row 12:  M34  M35  M36    <- tassel end
Turn each motif so its points face up, down, left and right. Side-by-side motifs join at their left and right points. Motifs above and below each other join at their top and bottom points.
Joining
Method: Join-as-you-go in Round 5, at the corner tips only.
How it works: Every motif has 4 ch-3 tips. When you reach a tip that should meet a motif already in place, work a JT (ch 1, sl st into that motif’s ch-3 tip, ch 1) instead of ch 3. The sc counts on each side stay at 26, so the motif keeps its size and shape.
Order:
- Join M2 to M1 at M2’s left tip, then M3 to M2 at M3’s left tip.
- Join M4 to M1 at M4’s top tip.
- Join M5 to M4 at its left tip and to M2 at its top tip.
- Keep going row by row. Every motif after the first row joins at its top tip, and also at its left tip if it is not in the left column.
Total joins: There are 24 side-to-side joins (12 rows x 2) and 33 top-to-bottom joins (11 gaps between rows x 3), for 57 joins in all.
Tension advice: Keep the JT chains as loose as a normal ch-3. If you pull the joins tight, the points bunch up and the diamond gaps pucker. If they are too loose, the runner sags. Lay the work flat every few rows and check that each open diamond between four motifs is even.
Size checkpoints:
- After Row 1: 13.5 in (34.3 cm) wide
- After Row 4: 18 in (45.7 cm) long
- After Row 12: 54 in (137.2 cm) long
Border (Edge Finish and Tassels)
Why there is no stitched border: Because the motifs sit on point, the long edges of the runner form a zigzag of motif sides and outer points. A straight border would have to bridge the gaps and would hide the scallops. Instead, the cover round of each motif works as the edging.
Edge gauge: One motif side is 26 sc and measures about 3.2 in (8.1 cm) in a straight line from tip to tip.
Exact edge counts per side:
- Each long side: 12 edge motifs x 2 outer sides x 26 sc = 624 sc, plus 12 free outer tips
- Each short end: 3 motifs x 2 outer sides x 26 sc = 156 sc, plus 3 free bottom tips for the tassels
Why the math works: The joins use only the ch-3 tips, and no sc are added or removed. Every outer edge is therefore an exact multiple of 26 sc. The width is 3 x 4.5 in = 13.5 in (34.3 cm), and the length is 12 x 4.5 in = 54 in (137.2 cm).
Tassels (make 6):
- Wrap yarn 25 times around the 4.5 in (11.4 cm) cardboard.
- Slide a 12 in (30.5 cm) strand under the top of the wraps and tie it tightly.
- Cut the wraps open along the bottom edge.
- Wrap a 24 in (61.0 cm) strand around the tassel 0.75 in (1.9 cm) below the top, about 6 times, and knot it securely. Thread the ends into the tassel head.
- Trim the tassel to 4 in (10.2 cm).
- Use the top tie to attach the tassel to the free bottom ch-3 tip of each end motif. Knot it and hide the ends inside the tassel head.
Final Blocking
- Weave in any loose tails, but don’t trim them yet.
- Pin the runner out on mats to 13.5 in x 54 in (34.3 cm x 137.2 cm).
- Pin every outer tip first, then the inner joining points, keeping the rows straight.
- Pin each ch-9 corner loop into a clean point, and gently open the ch-5 scallops.
- Mist the runner until it is damp all over, but not soaking wet.
- Leave it to dry completely, which usually takes 12–24 hours.
- Unpin it, then trim the tails close.
- Smooth the tassels with damp fingers and trim them evenly to 4 in (10.2 cm).
Final Quality-Control Checklist
- 36 motifs, each 4.5 in (11.4 cm) from point to point
- Every motif has 104 sc in Round 5 and 26 sc per side
- 57 joins, all at tips, with no skipped connections
- Open diamond gaps that are even all along the runner
- Runner measures 13.5 in x 54 in (34.3 cm x 137.2 cm)
- 6 tassels, each 4 in (10.2 cm) long, 3 at each end
- No tails visible on the right side
Troubleshooting
Motif center ruffles: Your Round 3 tension is too loose. Redo it with a smaller hook.
Points look rounded rather than pointed: Check that you worked 12 sc plus a ch-3 into each ch-9 loop, then pin the points firmly when blocking.
Runner bends into a curve: Some motifs are larger than others. Measure them and remake any that are more than 0.25 in (0.6 cm) off.
Diamond gaps pucker: The joins are too tight. Redo them with looser ch-1s.
Tassels splay apart: Tighten the neck wrap and dampen the tassel to set it.
Care
Hand wash in cool water with mild detergent, press out the water in a towel, and dry flat, pinning to size if needed. Don’t hang the runner to dry, because the open lace will stretch.
Final Notes
Everything in this runner depends on one measurement chain. Rounds 1–3 make a 3.25 in (8.3 cm) center. Round 4 adds 12 loops. Round 5 brings each motif to 4.5 in (11.4 cm) from point to point, with 26 sc per side. Twelve rows of three motifs give you 13.5 in x 54 in (34.3 cm x 137.2 cm), and six 4 in (10.2 cm) tassels finish the ends. If your first motif matches the checkpoints, the rest of the runner will come out to size.
Happy crocheting!