

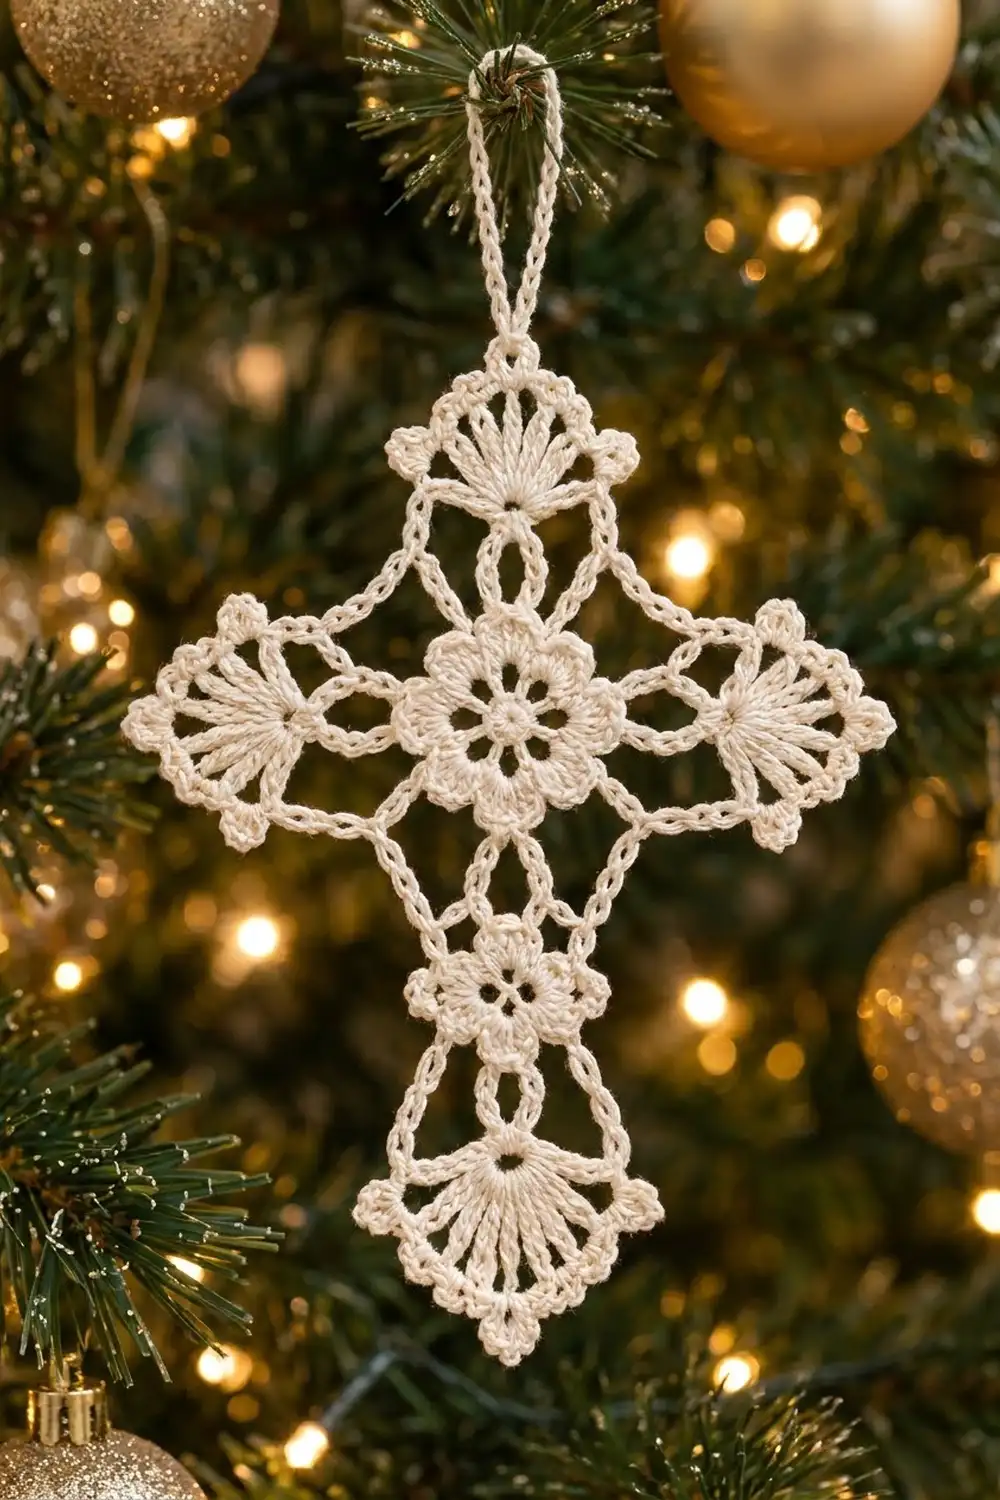
This delicate lace cross is made in fine ivory cotton thread. It has an eight-petal flower at the center, open chain rails along each arm, and picot-edged fans at all four tips. A small four-petal flower sits in the longer lower arm, which gives the cross its classic Latin shape.
Ivory thread fits Christmas trees, christening gifts, Easter baskets, and bookmarks. The style is traditional thread lace: airy, symmetrical, and crisp once it’s stiffened. The pattern uses US crochet terms throughout.
The finished cross measures 4.25 in (10.8 cm) wide and 5.75 in (14.6 cm) tall, not counting the hanging loop. The loop adds about 0.75 in (1.9 cm).
The cross is made in one piece. First you crochet the center flower in rounds. Then you work each arm outward in short rows straight off the center’s chain loops, with an inline flower on the lower arm. Picot rims go on the fans last, followed by the hanging loop. Nothing is sewn together.
Finished Size and Construction
- Finished size: 4.25 in (10.8 cm) wide × 5.75 in (14.6 cm) tall
- Hanging loop: about 0.75 in (1.9 cm) above the top fan
- Skill level: Intermediate (thread lace)
- Terminology: US crochet terms
- Yarn weight: Size 10 cotton crochet thread (lace weight)
- Hook: 1.5 mm (US steel 8)
- Number of pieces: 1
- Layout: Single motif (no grid)
- Center flower: 1.75 in (4.4 cm) across after Round 4
- Size before border: 4 in (10.2 cm) × 5.5 in (14.0 cm)
- Border depth: about 0.125 in (0.3 cm) at each fan tip
Materials
Thread: Use a mercerized size 10 cotton crochet thread. Mercerized cotton gives sharp stitch definition and holds its shape well after stiffening. Avoid acrylic and fuzzy blends, because they blur the lace and don’t take starch well.
- Ivory / cream: 8 g, about 26 m (28 yd)
The quantity includes a generous margin for a gauge swatch and for weaving in ends. One cross uses roughly 5 to 6 g. If you plan to make a set of tree ornaments, one standard 100 g ball makes about 15 crosses.
Tools:
- 1.5 mm (US steel 8) crochet hook
- Fine tapestry needle or thread needle
- Small sharp scissors
- Rustproof pins and a foam blocking board
- Fabric stiffener, or a starch solution (cornstarch or sugar starch both work)
- Plastic wrap to cover the board
- Ruler marked in inches and cm
Abbreviations (US Terms)
- ch: chain
- sl st: slip stitch
- sc: single crochet
- hdc: half double crochet
- dc: double crochet
- sp(s): space(s)
- st(s): stitch(es)
- standing sc: with a slipknot on the hook, insert the hook in the stated stitch, pull up a loop, yarn over, and pull through both loops on the hook
- [ ] × N: repeat the bracketed instructions N times
Special stitch: picot. Ch 3, then sl st in the 3rd ch from the hook (the first chain made).
Gauge and Checkpoints
Thread lace gauge is easiest to check at specific stages rather than with a flat swatch. Make the center flower first, measure it, and adjust your hook before going on.
- Center flower, Rounds 1–3: 1.25 in (3.2 cm) across, petal tip to petal tip
- Center flower, Round 4: 1.75 in (4.4 cm) across
- One side arm, Rows 1–5: 1.125 in (2.9 cm) from the center’s chain-loop edge to the fan edge, and 1.25 in (3.2 cm) across the fan
- Lower small flower: 0.75 in (1.9 cm) across
- Lower fan, Row L5: 1.5 in (3.8 cm) across
- Before border: 4 in (10.2 cm) × 5.5 in (14.0 cm), lightly pinned flat
If your piece is too big: go down to a 1.4 mm or 1.25 mm hook, or snug up your chains. Loose chains are the most common cause of oversized lace.
If your piece is too small: go up to a 1.65 mm or 1.75 mm hook.
Lace relaxes when it’s blocked. Measure while the piece is pinned gently flat, not stretched.
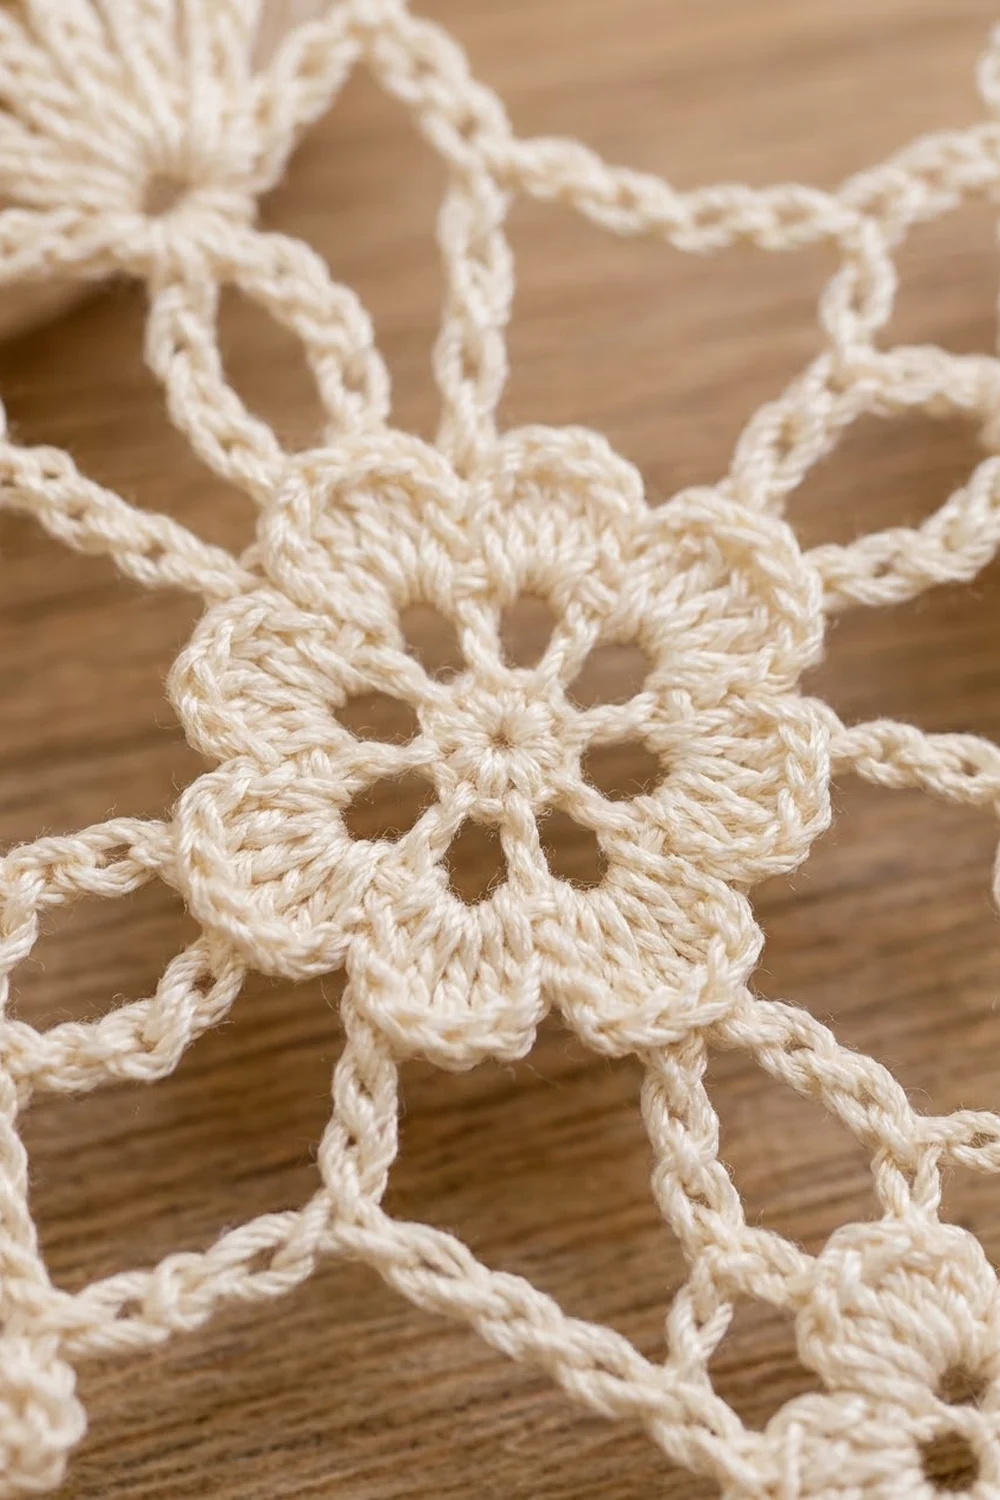
Center Flower
Round 1: Ch 6 and sl st in the first ch to form a ring. Ch 1, then work 16 sc in the ring. Join with a sl st to the first sc. (16 sc)
Round 2: Ch 1. Sc in the same st as the join, then ch 3 and skip 1 st. Sc in next st, ch 3, skip 1 st. Repeat from * to * 6 more times. Join to the first sc. (8 sc, 8 ch-3 loops)
Round 3: Sl st into the first ch-3 loop. Ch 1. In each ch-3 loop around, work (sc, hdc, 3 dc, hdc, sc). Join to the first sc. (8 petals, 7 sts each = 56 sts)
Checkpoint: the flower should measure 1.25 in (3.2 cm) across.
Round 4: Sl st in the next hdc and next dc, so you are at the center dc of the first petal. Ch 1 and sc in the same dc. Ch 5, sc in the center dc of the next petal. Repeat from * to * 6 more times. Ch 5 and join to the first sc. (8 sc, 8 ch-5 loops = 48 sts) Fasten off.
Checkpoint: the flower should measure 1.75 in (4.4 cm) across.
Lay the flower flat and number the ch-5 loops 1 to 8 going clockwise. Each arm grows from a pair of neighboring loops:
- Top arm: loops 1 and 2
- Right arm: loops 3 and 4
- Lower arm: loops 5 and 6
- Left arm: loops 7 and 8
All 8 loops are used, so the cross comes out symmetrical.
Short Arms (Top, Right, Left – make 3)
Work these rows once for each short arm, starting on the loop pair listed above.
Row 1: Join the thread in loop A, the first loop of the pair. Ch 1. Work (sc, ch 5, sc) in loop A, then ch 5. Work (sc, ch 5, sc) in loop B. Turn. (4 sc, 3 ch-5 loops)
Row 2: Sl st in the next 3 ch to reach the center of the first loop. Ch 1 and sc in the same loop. [Ch 5, sc in next loop] × 2. Turn. (3 sc, 2 ch-5 loops)
Row 3: Sl st in the next 3 ch. Ch 1 and sc in the same loop. Ch 3, then sc in the next loop. Turn. (2 sc, 1 ch-3 sp)
The arm now pinches into a narrow neck. This is the waist you see just before each fan.
Row 4: Sl st in the ch-3 sp. Ch 3 (this counts as a dc), then work 8 dc in the same sp. Turn. (9 dc)
Row 5: Ch 4 (this counts as a dc plus ch 1). [Dc in next dc, ch 1] × 7. Dc in the top of the turning ch. (9 dc, 8 ch-1 sps) Fasten off.
Checkpoint: the fan should be 1.25 in (3.2 cm) across. The arm should reach 1.125 in (2.9 cm) out from the center loops.
Lower Arm
Join the thread in loop 5.
Rows 1–2: Work these exactly as for the short arms. (3 sc, 2 ch-5 loops after Row 2)
Row 3B: Sl st in the next 3 ch. Ch 1 and sc in the same loop. Ch 5, then sc in the next loop. Turn. (2 sc, 1 ch-5 loop)
Row 4B (stem): Sl st in the next 3 ch. Ch 1 and sc in the loop. Ch 10, then sl st in the 6th ch from the hook to form a ring. This leaves a stem of 4 ch.
Small Flower (worked in place)
Round 1: Ch 1 and work 12 sc in the ring. Join to the first sc. (12 sc)
Round 2: Ch 1, then sc in the 2nd sc from the stem. This offsets the petals so the stem sits between two of them. Ch 4 and skip 2 sts. [Sc in next st, ch 4, skip 2 sts] × 3. Join. (4 sc, 4 ch-4 loops)
Round 3: Sl st into the first loop. Ch 1. In each ch-4 loop, work (sc, hdc, 5 dc, hdc, sc). Join. (4 petals, 9 sts each = 36 sts) Fasten off.
Checkpoint: the small flower should be 0.75 in (1.9 cm) across. Petals 1 and 4 sit on either side of the stem, and petals 2 and 3 point down.
Lower Fan
Row L1: Make a standing sc in the center dc of petal 2. Ch 7, then sc in the center dc of petal 3. Turn. (2 sc, 1 ch-7 loop)
Row L2: Ch 1 and sc in the first sc. Ch 5, then sc in the 4th ch of the ch-7 (its center). Ch 5, then sc in the last sc. Turn. (3 sc, 2 ch-5 loops)
Row L3: Sl st in the next 3 ch. Ch 1 and sc in the same loop. Ch 3, then sc in the next loop. Turn. (2 sc, 1 ch-3 sp)
Row L4: Sl st in the sp. Ch 3 (counts as a dc), then work 10 dc in the same sp. Turn. (11 dc)
Row L5: Ch 4 (counts as a dc plus ch 1). [Dc in next dc, ch 1] × 9. Dc in the top of the turning ch. (11 dc, 10 ch-1 sps) Fasten off.
Checkpoint: the lower fan should be 1.5 in (3.8 cm) across. The lower arm should measure 2.625 in (6.7 cm) from the center loops to the fan edge.
Size before border: the cross should measure 4 in (10.2 cm) wide and 5.5 in (14.0 cm) tall. The width is 1.75 in (4.4 cm) for the center plus 1.125 in (2.9 cm) for each side arm. The height is 1.125 in (2.9 cm) + 1.75 in (4.4 cm) + 2.625 in (6.7 cm).
Border (Picot Fan Rims)
The border is a picot rim worked along the curved edge of each of the four fans. The rims add about 0.125 in (0.3 cm) at every tip. Border gauge: 3 sc plus 1 picot covers one spoke-and-space unit of the fan.
Short-arm rims (top, right, left): Join the thread in the first dc of Row 5. Ch 1 and sc in the same dc. Work (sc, picot, sc) in the next ch-1 sp, then sc in the next dc. Repeat from * to * 7 more times. (25 sc, 8 picots) Fasten off.
Lower-fan rim: Work the same rim on Row L5, repeating from * to * a total of 10 times. (31 sc, 10 picots) Fasten off.
Why the math works:
- On a short fan, there is 1 sc on the first dc, then 3 sc for each of the 8 ch-1 sps (2 in the space, 1 in the dc after it). That gives 1 + 24 = 25 sc.
- On the lower fan, the same logic gives 1 + 30 = 31 sc.
- Each picot sits over a ch-1 sp, centered between two spokes, so the scallops line up evenly with the dc spokes.
- Each spoke-and-space unit is about three sc wide, so 3 sc per unit lets the rim lie flat without ruffling or cupping.
Hanging loop: On the top fan, join the thread in the sc above the 5th (center) dc. Ch 20 and sl st in the same sc. Work 26 sc over the ch-20 loop, then sl st in the base sc. Fasten off.
Final Blocking
- Weave in all ends along the chain rails, then trim them close.
- Soak the cross in stiffener, or in starch solution if you prefer a softer hold. Squeeze out the excess, but don’t wring it.
- Cover the blocking board with plastic wrap.
- Pin the center flower first. Put a pin in each of the 8 ch-5 loops so the flower makes a 1.75 in (4.4 cm) circle.
- Pin the side fans so the tips are 4.25 in (10.8 cm) apart.
- Pin the top and bottom fans so the tips are 5.75 in (14.6 cm) apart.
- Pin out every picot, then open each chain rail into a smooth curve.
- Lay the hanging loop straight up.
- Let the piece dry completely, for 12 to 24 hours, before you unpin it.
Final Quality-Control Checklist
- [ ] Center flower has 8 even petals and 8 ch-5 loops
- [ ] Each short fan has 9 dc spokes and 8 picots
- [ ] Lower fan has 11 dc spokes and 10 picots
- [ ] Small flower has 4 petals, with the stem sitting between two of them
- [ ] Left and right arms are the same length
- [ ] Finished size is 4.25 in (10.8 cm) × 5.75 in (14.6 cm)
- [ ] Hanging loop is centered over the top fan
- [ ] No ends show on the right side
- [ ] Cross is fully dry and holds its shape when lifted
Troubleshooting
Fans ruffle: Your dc are taller than the rim can hold. Use a smaller hook for Row 5 only, or work the rim more firmly.
Fans cup: Your ch-1 spaces are too tight. Relax your tension, or change the ch 1 to a loose ch 2 if the problem continues.
Cross leans to one side: The arm rows were started on the wrong loops. Check that each arm uses its own pair of loops (1–2, 3–4, 5–6, 7–8).
Small flower sits crooked: Round 2 started in the wrong sc. Redo Round 2 starting in the 2nd sc from the stem.
Center flower waves: Round 3 petals are crowded. Try working the 3 dc a little shorter.
Cross is limp after drying: Use more stiffener, or a second coat, then re-block.
Care
Hand wash gently in cool water if the cross gets dusty, then re-stiffen and re-block it. Store it flat in tissue paper so the picots don’t crush.
Final Notes
The measurements build on each other. The center flower is 1.25 in (3.2 cm) across after Round 3 and 1.75 in (4.4 cm) after Round 4. Each short arm adds 1.125 in (2.9 cm), and the lower arm adds 2.625 in (6.7 cm), which brings the cross to 4 in (10.2 cm) × 5.5 in (14.0 cm) before the border. The picot rims add 0.125 in (0.3 cm) at each tip, for a finished size of 4.25 in (10.8 cm) × 5.75 in (14.6 cm). If you check each stage as you go, the cross will come out symmetrical.
Happy crocheting!