

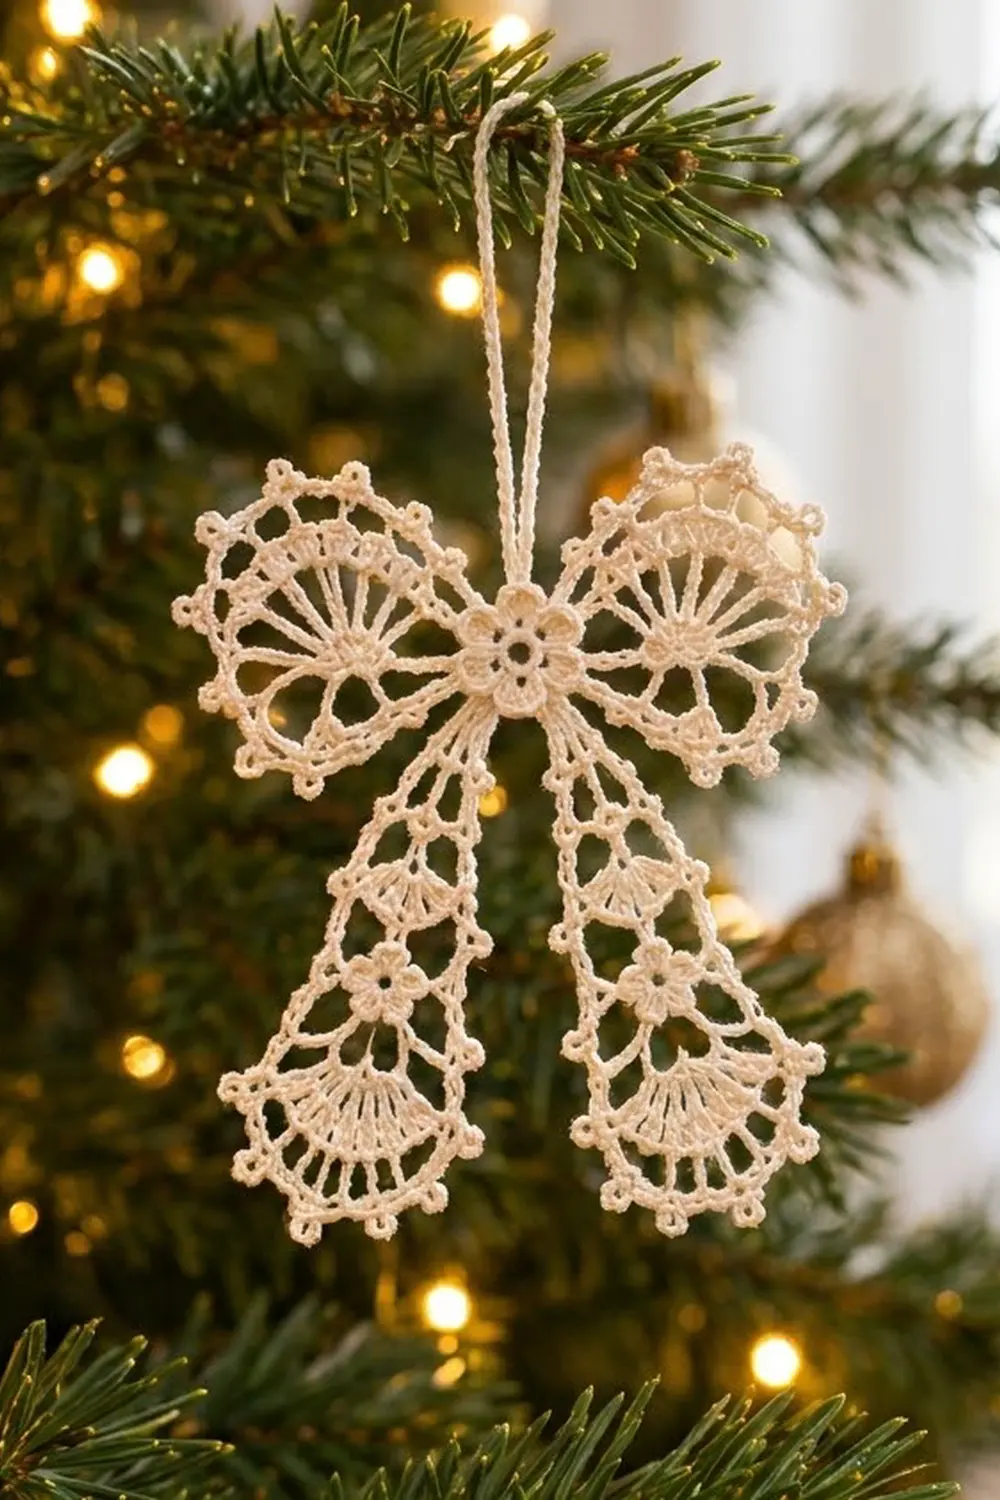
This little bow is pure heirloom lace. It has a five-petal flower at the center, two rounded fan-shaped loops, and two flared tails with a small flower set into the mesh. A picot edge finishes every outer curve, and a corded hanging loop at the top makes it ready for the tree.
The sample uses one color: cream (ivory) size 10 cotton thread. A single shade keeps the focus on the texture: radiating spokes, open arches and tiny picot beads. The look is vintage and quiet, and it suits natural, gold or white trees.
The pattern uses US crochet terms. The finished bow is 4 in (10.2 cm) wide and 4.5 in (11.4 cm) tall without the hanging loop. The loop adds about 1.5 in (3.8 cm).
The bow is one continuous piece. You crochet the center flower in the round and finish it with a ring of five chain spaces. Then you work everything else from those spaces in rows: two fan wings, two tails and the hanging loop. There is no sewing and no joining.
Finished Size and Construction
- Finished size: 4 in (10.2 cm) wide × 4.5 in (11.4 cm) tall, plus a 1.5 in (3.8 cm) hanging loop
- Skill level: Intermediate (you should be comfortable with thread and steel hooks)
- Terminology: US crochet terms
- Thread weight: Size 10 crochet cotton (lace weight)
- Hook: 1.5 mm steel hook (US steel 7 or 8, depending on brand)
- Number of pieces: 1
- Layout: Single motif with no joining. The flower is in the center, the wings go left and right, the tails angle down and out, and the loop is on top.
- Piece size (center flower): 0.8 in (2.0 cm) across after Round 3
- Size before border (picot edging): 3.75 in (9.5 cm) wide × 4.25 in (10.8 cm) tall
- Border depth: 1/8 in (0.3 cm) on each outer edge
Materials
Choose a mercerized size 10 cotton. Its crisp twist holds a starched shape and shows off the picots. Softer, matte threads also work, but the result is less sharp.
- Cream / ivory size 10 cotton: 8 g, about 45 m (49 yd)
Tools:
- 1.5 mm steel crochet hook
- Fine tapestry needle
- Small sharp scissors
- 1 locking stitch marker
- Blocking board or foam, plus rustproof pins
- Fabric stiffener or spray starch
The thread amount includes a margin of about 30 percent for a test flower and for weaving in ends.
Abbreviations (US Terms)
- ch – chain
- sl st – slip stitch
- sc – single crochet
- hdc – half double crochet
- dc – double crochet
- tr – treble crochet
- sp(s) – space(s)
- st(s) – stitch(es)
Special stitch – Picot: Ch 3, sl st in the 3rd ch from the hook.
Arch: A ch-5 space.
Gauge and Checkpoints
With thread lace, the first motif is your swatch. Crochet the center flower (Rounds 1–4) and measure it before you go on.
- After Round 1: 0.5 in (1.3 cm) across
- After Round 3: 0.8 in (2.0 cm) across, from petal tip to petal tip
- After Round 4: 1.1 in (2.8 cm) across
- Each wing after Row 3: 0.75 in (1.9 cm) long from the flower edge
- Each wing after Row 6: 1.5 in (3.8 cm) long, relaxed
- Each tail after Row 3: 0.75 in (1.9 cm) long, 0.9 in (2.3 cm) wide
- Each tail after Row 7: 1.75 in (4.4 cm) long
- Each tail after Row 9: 2.4 in (6.1 cm) long, 1.6 in (4.1 cm) wide at the hem
If the flower is too big, try a 1.25 mm hook or tighten your chains. If it is too small, go up to a 1.75 mm hook. Blocking can correct about 1/8 in (0.3 cm) either way. A bigger difference changes the overall size, but the stitch counts and shape stay the same.
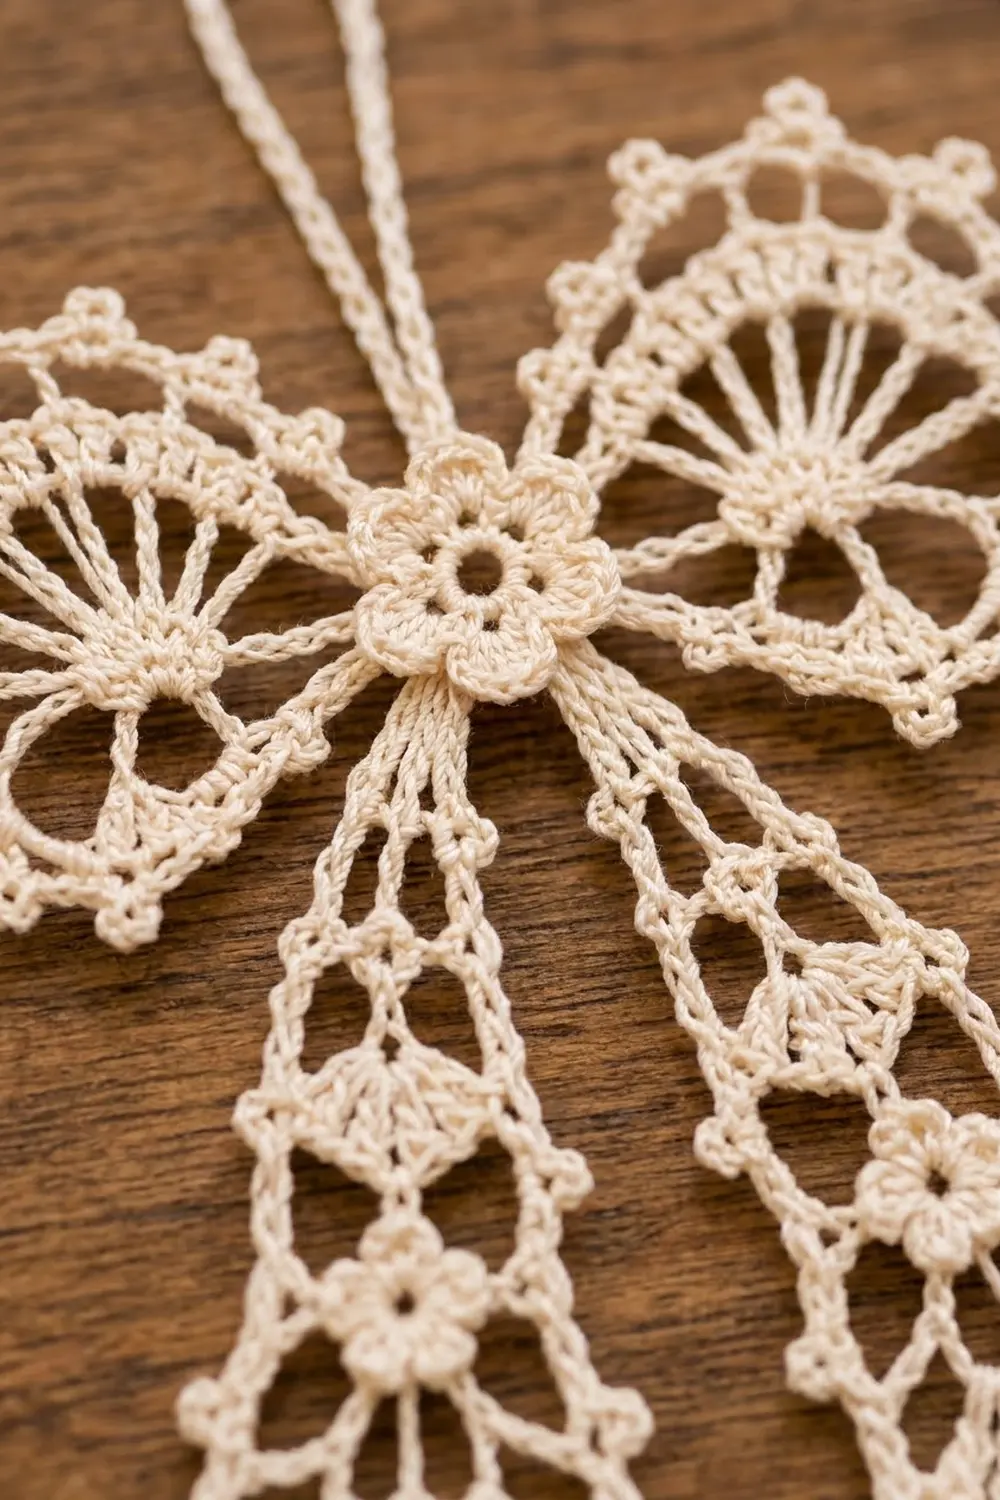
Center Flower
Work in joined rounds with the right side facing. Do not turn.
Round 1: Ch 5, sl st in the first ch to form a ring. Ch 3 (counts as dc), 14 dc in the ring, sl st in the top of the beginning ch-3. (15 dc)
Round 2: Ch 1, sc in the same st, ch 3, skip 2 dc, sc in next dc, ch 3, skip 2 dc; repeat from * 3 more times, sl st in the first sc. (5 sc, 5 ch-3 sps) Check: 5 × (1 + 2) = 15 sts used.
Round 3: In each ch-3 sp, work (sc, hdc, 3 dc, hdc, sc). Sl st in the first sc. (5 petals, 35 sts)
Round 4: Sl st in the next 3 sts (hdc, dc, dc). You are now in the center dc of the first petal. Ch 1, sc in the same st, ch 5, sc in the center dc of the next petal, ch 5; repeat from * 3 more times, sl st in the first sc. (5 sc, 5 ch-5 sps) Fasten off.
Mark the layout. Call the petal where Round 4 started Petal A and place the marker in it. With the right side facing, label the other petals B, C, D and E in order. Hold the flower with Petal A pointing straight down. The spaces are now:
- Sp 1 (A–B): lower right, for the right tail
- Sp 2 (B–C): right and slightly raised, for the right wing
- Sp 3 (C–D): straight up, for the hanging loop
- Sp 4 (D–E): left and slightly raised, for the left wing
- Sp 5 (E–A): lower left, for the left tail
Every row is symmetrical, so you don’t need mirrored instructions for the left and right sides.
Wings (Make 2)
Each wing is a fan worked back and forth from one ch-5 space. The spokes spread out into a rounded loop.
Row 1: With the right side facing, join the thread in Sp 2 with a sl st. Ch 3 (counts as dc), 9 dc in the same sp. Turn. (10 dc)
Row 2: Ch 4 (counts as dc + ch 1), dc in next dc, ch 1, dc in next dc; repeat from * 7 more times. The last dc goes in the top of the turning ch. Turn. (10 dc, 9 ch-1 sps)
Row 3: Ch 7 (counts as tr + ch 3), tr in next dc, ch 3, tr in next dc; repeat from * 7 more times. The last tr goes in the 3rd ch of the turning ch-4. Turn. (10 tr, 9 ch-3 sps)
The long tr spokes give the wing its sunburst look. Checkpoint: the wing should be 0.75 in (1.9 cm) long.
Row 4: Ch 1, sc in the first tr, 3 sc in next ch-3 sp, sc in next tr; repeat from * 8 more times. The last sc goes in the 4th ch of the turning ch-7. Turn. (1 + 36 = 37 sc)
Row 5: Ch 1, sc in the first sc, ch 5, skip 3 sc, sc in next sc; repeat from * 8 more times. Turn. (10 sc, 9 arches) Check: 1 + (9 × 4) = 37 sc used.
Row 6: Picot edge. See the Border section below.
Work the second wing the same way in Sp 4.
Tails (Make 2)
Each tail is a narrow mesh that flares out. It has a framed flower cluster in the middle and a spoke fan at the hem.
Row 1: With the right side facing, join the thread in Sp 1 with a sl st. Ch 1, 5 sc in the same sp. Turn. (5 sc)
Row 2: Ch 1, sc in the first sc, ch 5, skip 1 sc, sc in next sc; repeat from * once more. Turn. (3 sc, 2 arches)
Row 3 (growth): Ch 1, sc in the first sc, ch 5, sc in next arch; repeat from * once more, ch 5, sc in the last sc. Turn. (4 sc, 3 arches)
Row 4 (flower base): Ch 1, sc in the first sc, ch 5, sc in the first arch, ch 2, 7 dc in the center arch, ch 2, sc in the last arch, ch 5, sc in the last sc. Turn. (4 sc, 7 dc, 2 arches, 2 ch-2 sps)
Row 5 (flower petals): Ch 1, sc in the first sc, ch 5, sc in the next arch, ch 5, skip the ch-2 sp, sc in the 1st dc of the shell, ch 3, skip 1 dc, sc in next dc; repeat from * 2 more times (your last sc lands in the 7th dc). Ch 5, skip the ch-2 sp, sc in the next arch, ch 5, sc in the last sc. Turn. (8 sc, 4 arches, 3 ch-3 petals)
The 7-dc shell and its three petal loops form the small tail flower.
Row 6 (flower frame): Ch 1, sc in the first sc, ch 5, sc in next arch, ch 5, sc in next arch, ch 4, sc in the center ch-3 petal, ch 4, sc in next arch, ch 5, sc in next arch, ch 5, sc in the last sc. Turn. (7 sc; 4 arches + 2 ch-4 sps = 6 sps)
Row 7 (growth): Ch 1, sc in the first sc, ch 5, sc in next sp; repeat from * 5 more times, ch 5, sc in the last sc. Turn. (8 sc, 7 arches)
Row 8 (hem fan): Ch 4 (counts as dc + ch 1), (dc, ch 1, dc, ch 1) in next arch; repeat from * 6 more times, dc in the last sc. Turn. (16 dc, 15 ch-1 sps)
Row 9: Picot hem. See the Border section below.
Work the second tail the same way in Sp 5.
Border: Picot Edging and Hanging Loop
The border is the picot row at the end of each wing and tail. Work it right after wing Row 5 or tail Row 8, without fastening off first. Border gauge: in size 10 thread the picot edge is 1/8 in (0.3 cm) deep, with about 3 picots per 1 in (2.5 cm) of curve.
Wing Row 6 (both wings): Ch 1, (3 sc, picot, 3 sc) in next arch; repeat from * 8 more times, sl st in the last sc of Row 5. Fasten off. (54 sc, 9 picots per wing)
Tail Row 9 (both tails): Ch 1, sc in the first dc, (sc, picot, sc) in next ch-1 sp, sc in next dc; repeat from * 14 more times. The last sc goes in the 3rd ch of the turning ch-4. Fasten off. (1 + 45 = 46 sc, 15 picots per tail)
Hanging loop: With the right side facing, join the thread in Sp 3 with a sl st. Ch 1, 3 sc in the same sp, ch 35, sl st in the first sc to close the loop. Work 45 sc over the chain into the loop, then sl st in the 3rd base sc. Fasten off. (3 base sc + 45 loop sc)
Why the math works:
- A ch-5 arch is about the width of 6 sc. Six sc per arch keeps the wing edge flat, so it doesn’t ruffle or cup. 9 arches × 6 = 54 sc.
- The tail hem alternates spokes and spaces. 15 spaces × 3 sts, plus 1 starting sc, makes 46 sc.
- One picot per arch or space lines each bead up with one spoke group, so the picots are evenly spaced.
- The edging adds 1/8 in (0.3 cm) to each outer edge. In width, 3.75 in + 0.25 in (0.6 cm) = 4 in (10.2 cm). In height, 4.25 in becomes 4.5 in (11.4 cm).
- 45 sc packed onto 35 ch makes the loop firm and corded.
Final Blocking
- Weave in the ends through solid stitches, not across open arches.
- Soak the bow for 5 minutes in cool water with a little mild soap. Rinse, then press it in a towel without wringing.
- Soak it in fabric stiffener, or plan to starch it heavily after pinning.
- Pin the flower center first, with Petal A pointing down.
- Open each wing into a rounded fan. Pin the tips 2 in (5.1 cm) from the flower center.
- Angle the tails down and outward, with the hem centers 3 in (7.6 cm) apart. Pin each tail to 2.4 in (6.1 cm) long.
- Put a pin through every picot so it opens into a round bead.
- Pin the hanging loop into a slim oval 1.5 in (3.8 cm) tall.
- Let it dry completely (12–24 hours) before you unpin it.
Final Quality-Control Checklist
- The flower has 5 even petals and a round center hole.
- Each wing has 10 spokes, 9 arches and 9 picots.
- Each tail has 1 framed flower, 16 hem spokes and 15 picots.
- The two wings match within 1/8 in (0.3 cm).
- Both tails measure 2.4 in (6.1 cm).
- The overall size is 4 in × 4.5 in (10.2 cm × 11.4 cm), plus the loop.
- No ends show on the front.
- The bow hangs straight from its loop.
Troubleshooting
The wing edge ruffles. You are working more than 6 sc per arch, or your arches are too tight. Recount and loosen the arches.
The wing cups like a bowl. The Row 3 spokes are too short. Wrap each tr fully and evenly.
The tail flower disappears. Check that Row 4 has 7 dc and that Row 6 anchors to the middle petal.
The tails splay too wide. Your arches are loose. Use a smaller hook for the tails, or pin them closer together when blocking.
The hanging loop twists. Spread the 45 sc evenly before closing, then pin the loop straight while it dries.
The wings are uneven. Recount Row 1 on both wings. It is easy to work 11 dc instead of 10.
Care
Hand wash in cool water with mild soap, press dry in a towel and starch again if needed. Store flat in tissue paper so the picots keep their shape.
Final Notes
Here is the measurement chain. The flower is 0.8 in (2.0 cm), and the chain ring brings it to 1.1 in (2.8 cm). The wings grow to 1.5 in (3.8 cm) and the tails to 2.4 in (6.1 cm), giving 3.75 in × 4.25 in (9.5 cm × 10.8 cm) before the edging. The picot border and blocking bring the bow to 4 in × 4.5 in (10.2 cm × 11.4 cm), plus its 1.5 in (3.8 cm) loop. If your flower measures right, the rest of the bow will follow.
Happy crocheting!