

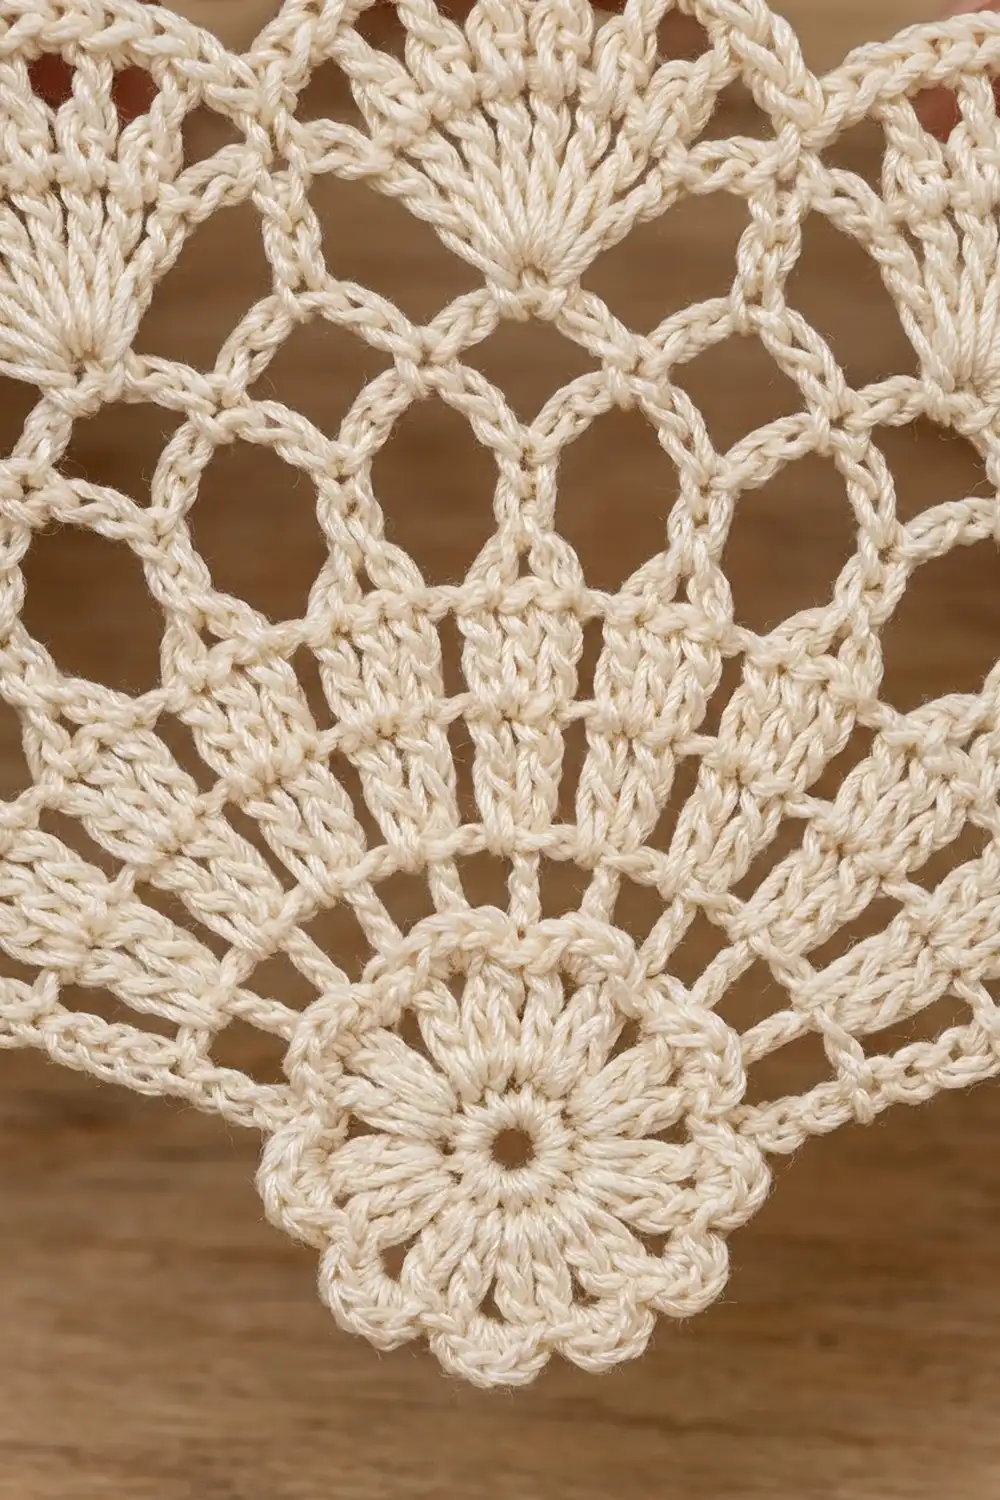
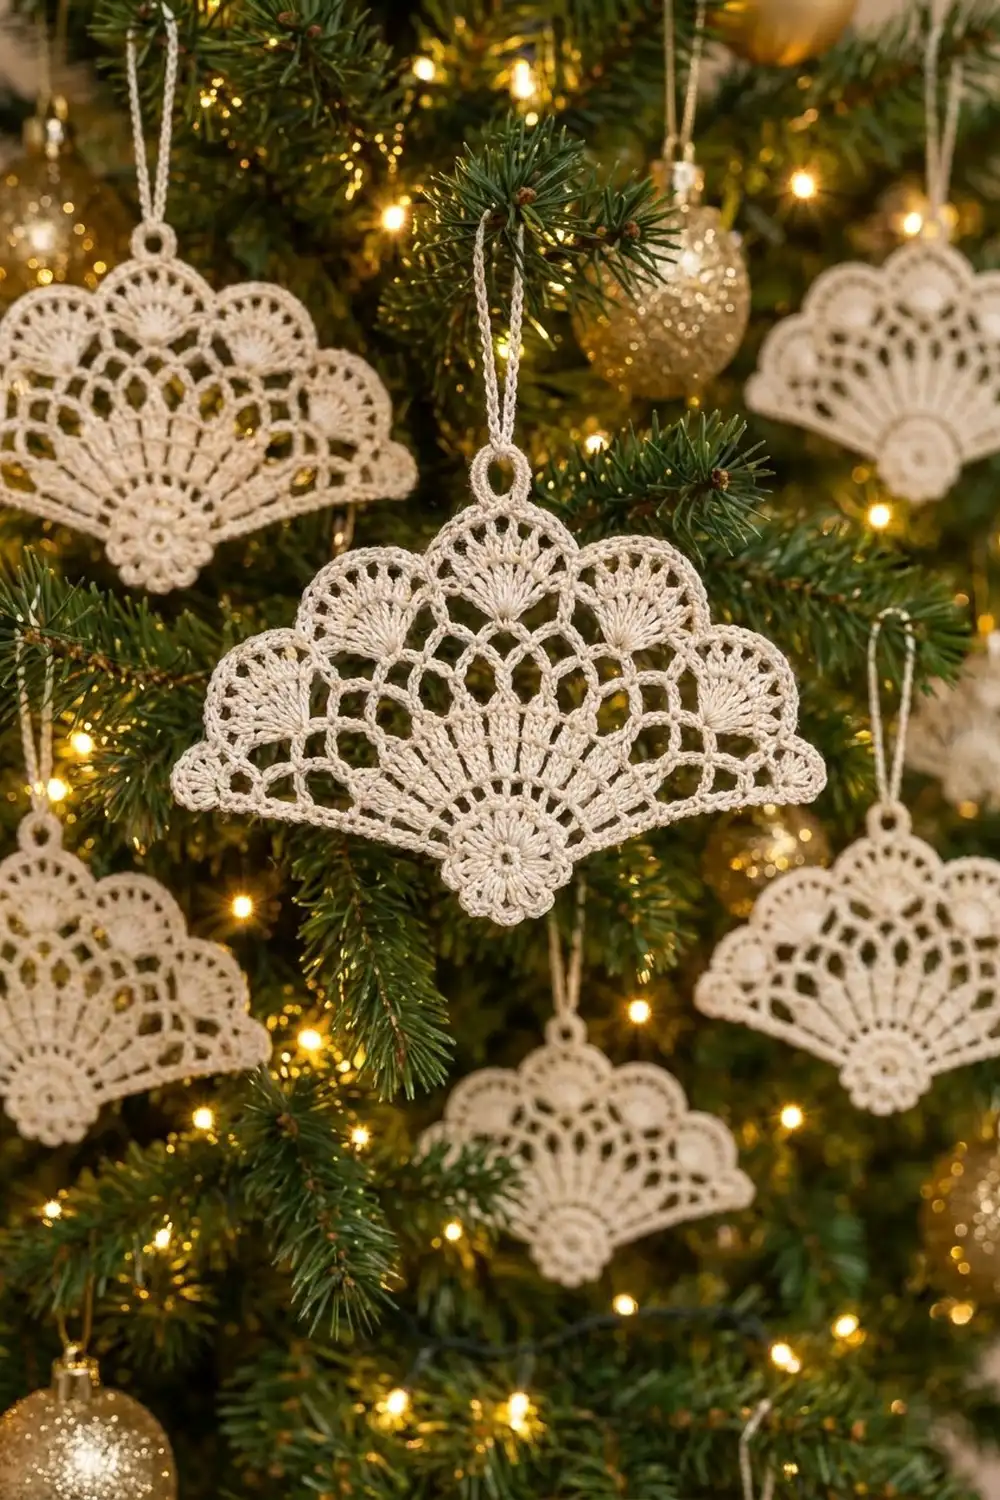
This little fan is a classic thread-lace Christmas ornament. A small flower medallion sits at the base like the pivot of a folding fan. Treble spokes radiate from it, a tier of chain arches opens up the middle, and seven shell scallops finish the curved top edge.
The whole ornament uses one color, a soft ivory cotton thread, so the stitch texture does all the work. It has a vintage, delicate look against green branches and gold baubles.
All instructions use US crochet terms. The finished ornament measures about 5 in (12.7 cm) wide across the fan tips and 3 in (7.6 cm) tall from the bottom of the medallion to the top of the center scallop. The hanging cord is not included in that height.
Construction is simple. First you crochet the medallion in the round. Then you turn it so five petals face up and work six turned rows across that top half to build the fan. A single crochet border edges the sides and top, and the hanging loop goes on last.
Finished Size and Construction
- Finished size: 5 in (12.7 cm) wide x 3 in (7.6 cm) tall
- Hanging cord: about 1.75 in (4.4 cm) above the ring
- Skill level: Intermediate (thread work, turned rows on a curve)
- Terminology: US crochet terms
- Yarn weight: Size 10 cotton crochet thread (Lace, weight 0)
- Hook: 1.75 mm (US steel 4)
- Number of pieces: 1 (single piece)
- Layout: One fan with the medallion at the bottom center; no joining
- Piece size: 5 in x 3 in (12.7 cm x 7.6 cm)
- Size before border: 4.75 in x 2.875 in (12.1 cm x 7.3 cm)
- Border depth: about 0.125 in (0.3 cm) on each bordered edge
Materials
Use a tightly twisted, mercerized cotton thread in size 10. It keeps stitches crisp, takes starch well and has a soft sheen. Avoid fuzzy or acrylic thread, which blurs the spokes and won’t stiffen well.
- Ivory (only color): 5 g, about 25 m
One ornament uses about 3 g (about 15 m). The quantities above include a margin for a test piece, the hanging cord and weaving in ends.
Tools:
- 1.75 mm (US steel 4) steel crochet hook
- Fine tapestry needle
- Small sharp scissors
- Stitch marker
- Blocking board or foam mat and rustproof pins
- Fabric stiffener or liquid starch
- Ruler or tape measure
Abbreviations (US Terms)
- ch – chain
- sl st – slip stitch
- sc – single crochet
- hdc – half double crochet
- dc – double crochet
- tr – treble crochet (yarn over twice)
- sp(s) – space(s)
- st(s) – stitch(es)
- RS / WS – right side / wrong side
- rep – repeat
Special stitches:
- Petal: (sc, hdc, 3 dc, hdc, sc) all in the same ch-3 loop. The center dc of a petal is the 2nd of its 3 dc.
- Shell: 7 dc in the same ch-5 loop.
Gauge and Checkpoints
Make one ornament first, then block and measure it before you make a set.
Gauge: Medallion Rounds 1–2 = 0.75 in (1.9 cm) across.
Checkpoints (measured flat, before blocking):
- After Round 2: 0.75 in (1.9 cm) diameter
- After Round 4: 1.25 in (3.2 cm) diameter
- After Row 1: fan 2 in (5.1 cm) across, tip to tip
- After Row 2: 2.75 in (7.0 cm) across
- After Row 3: 3.5 in (8.9 cm) across
- After Row 4: 4 in (10.2 cm) across
- After Row 5: 4.5 in (11.4 cm) across
- After Row 6: 4.75 in (12.1 cm) across
- After border: 5 in (12.7 cm) across, 3 in (7.6 cm) tall
If your medallion is too big, switch to a 1.5 mm (US steel 6) hook. If it’s too small, switch to a 2 mm (US steel 2) hook. Change the hook, not the stitch counts. A difference of up to 0.25 in (0.6 cm) in final width will block out.
Medallion
Round 1 (RS): Make a magic ring. Ch 1, work 8 sc in the ring and join with sl st to first sc. (8 sc)
Don’t pull the ring fully shut. Leave a hole about 0.125 in (0.3 cm) wide to form the open flower center.
Round 2: Ch 3 (counts as dc), dc in same st, 2 dc in each sc around. Join with sl st to top of ch-3. (16 dc)
Check: 0.75 in (1.9 cm) across.
Round 3: Ch 1, sc in same st, ch 3, skip next dc, sc in next dc, ch 3, skip next dc; rep from * 7 times. Join with sl st to first sc. (8 sc, 8 ch-3 loops)
Round 4: Sl st into first ch-3 loop. Work 1 Petal in each ch-3 loop around. Join with sl st to first sc. (8 petals, 56 sts)
Each petal has 7 sts, and 8 x 7 = 56. Fasten off and weave in the tail.
Check: 1.25 in (3.2 cm) across, petal tip to petal tip.
Orient the medallion. Hold it with the RS facing you. Turn it so one petal points straight right (Petal 1) and the opposite petal points straight left (Petal 5). Counting counterclockwise across the top, you have Petals 1 to 5. Petals 6, 7 and 8 point down and stay visible as the flower at the base.
Fan
Work the fan in turned rows across the top half of the medallion only.
Row 1 (RS): Join with sl st in the center dc of Petal 1. Ch 4 (counts as tr), ch 3, tr in the Round 3 sc between this petal and the next one (insert the hook down between the two petals), ch 3, tr in center dc of next petal; rep from * 3 more times, ending in Petal 5. (9 tr, 8 ch-3 sps)
That’s 1 starting tr plus 2 tr per repeat x 4 repeats = 9 spokes, evenly fanned.
Row 2 (WS): Turn. Ch 4 (counts as tr), ch 2, tr in next ch-3 sp, ch 2, tr in next tr; rep from * across, working the last tr in the 4th ch of the turning ch. (17 tr, 16 ch-2 sps)
This is a growth row. Each of the 8 spaces gains a new spoke, so 9 + 8 = 17 tr. Lay the work flat. It should be a smooth half circle 2.75 in (7.0 cm) across.
Row 3 (RS): Turn. Ch 1, sc in first tr, ch 4, sc in next tr; rep from * across, working the last sc in the top of the turning ch. (17 sc, 16 ch-4 loops)
Row 4 (WS): Turn. Ch 5 (counts as dc + ch 2), sc in first ch-4 loop, ch 5, sc in next ch-4 loop; rep from * 15 times, ch 2, dc in last sc. (16 sc, 15 ch-5 loops, 2 dc including turning ch, 2 ch-2 sps)
These ch-5 arches form the open middle tier. The ch-2 half loops at each end keep the side edges straight.
Row 5 (RS): Turn. Ch 1, sc in first dc, ch 2, sc in first ch-5 loop, Shell in next ch-5 loop, sc in next ch-5 loop; rep from * 6 more times, ch 2, sc in 3rd ch of turning ch. (7 shells = 49 dc, 10 sc, 2 ch-2 sps)
This uses all 15 loops: 1 + (2 x 7) = 15. The shells sit in loops 2, 4, 6, 8, 10, 12 and 14, so Shell 4 lands exactly at the top center.
Row 6 (WS): Turn. Ch 1, sc in first sc, ch 2, sc in next sc, ch 2, (dc in next dc, ch 1) 6 times, dc in next dc, ch 2, sc in next sc; rep from * 6 more times, ch 2, sc in last sc. (7 scallops of 7 dc and 6 ch-1 sps each, 10 sc, 16 ch-2 sps)
The ch-1 spaces spread each shell into a rounded scallop with a fanned cluster at its base. Fasten off.
Check: 4.75 in (12.1 cm) across and 2.875 in (7.3 cm) tall.
Border
Border gauge: On the top edge, work 1 sc in each sc, dc and ch-1 sp, and 2 sc in each ch-2 sp. Along the side edges, work 1 sc per sc row, 2 sc per dc row and 3 sc per tr row.
The border is a single RS row. It runs up the right side, across the top and down the left side. The bottom flower isn’t bordered.
With the RS facing, join with sl st in the center dc of Petal 1.
Right side edge: Ch 1. Working into the row ends, work 3 sc in Row 1, 3 sc in Row 2, 1 sc in Row 3, 2 sc in Row 4, 1 sc in Row 5 and 1 sc in Row 6. (11 sc)
Top edge: Sc in first sc of Row 6, 2 sc in ch-2 sp, sc in next sc, 2 sc in ch-2 sp, (sc in next dc, sc in next ch-1 sp) 6 times, sc in next dc, 2 sc in ch-2 sp, sc in next sc; rep from * 6 more times, 2 sc in last ch-2 sp, sc in last sc. (133 sc)
Left side edge: Working into the row ends, work 1 sc in Row 6, 1 sc in Row 5, 2 sc in Row 4, 1 sc in Row 3, 3 sc in Row 2 and 3 sc in Row 1. (11 sc) Sl st in center dc of Petal 5 and fasten off.
Border total: 11 + 133 + 11 = 155 sc.
Why the math works: The top edge starts with 4 sts (sc, 2 sc, sc). Each scallop adds 18 sts (2 + 12 + 1 + 2 + 1), and the end adds 3 sts (2 sc, sc). That gives 4 + (7 x 18) + 3 = 133. The two corner sc are part of the top count, and the side counts stop before them, so no corner is counted twice. The side counts follow row height (3 + 3 + 1 + 2 + 1 + 1 = 11), so the edges lie flat.
Stitch 67 is the exact center of the top edge. The first 4 sts plus 3 scallops of 18 bring you to st 58. Scallop 4 begins at st 59, and its center dc falls on st 67.
Hanging Loop
- Mark st 67 of the top edge and join with sl st there.
- Ch 8, then sl st in the same st to form a ring.
- Ch 1, work 12 sc into the ring and sl st to first sc. The ring should measure about 0.375 in (1.0 cm) across.
- Sl st in the next 5 sc to reach the top of the ring.
- Ch 40, then sl st in the same sc to form the cord.
- Fasten off and weave in.
The cord sits about 1.75 in (4.4 cm) above the ring.
Final Blocking
- Weave in all ends along the spokes or border and trim close.
- Soak the ornament in cool water, then press it in a towel. Don’t wring it.
- Dip it in stiffener and press out the excess so no film fills the open spaces.
- Lay it RS up on the board and pin the medallion center first.
- Pin the two lower fan tips 5 in (12.7 cm) apart, keeping the side edges straight.
- Pin the tip of each of the 7 scallops along an even curve. The center scallop should top out 3 in (7.6 cm) above the bottom of the medallion.
- Straighten each spoke so it points to the medallion center, and pin open any ch-5 arches that need it.
- Pin out the 3 lower petals and lay the cord straight.
- Let it dry fully, at least 12 hours, before you unpin it.
Final Quality-Control Checklist
- 8 even petals: 5 under the fan, 3 visible below
- 9 spokes in Row 1 and 17 in Row 2
- 15 full ch-5 arches in the middle tier
- 7 scallops, with Scallop 4 at the top center
- Top border has 133 sc; each side has 11 sc
- Side edges are straight, with no waves
- Loop is at st 67 and the ornament hangs level
- Finished size is 5 in x 3 in (12.7 cm x 7.6 cm)
- No stiffener film or visible tails
Troubleshooting
Fan cups upward: Your spoke rows are too tight. Loosen your trebles, and check that Row 2 has 16 ch-2 sps.
Top edge ruffles: Your chains are too loose. Go down a hook size for Rows 3–6.
Spokes lean: Check where each Row 1 tr went. Each one belongs in a petal center dc or in the Round 3 sc between petals.
Shell 4 is off center: You skipped or doubled a loop in Row 5. All 15 loops must be used.
Side edges wave: Too many sc went into the row ends. Keep it to 11 per side.
Ornament hangs crooked: Move the loop to st 67, or re-block the fan symmetrically.
Care
Hand wash in cool water with mild soap, then re-stiffen and block it as above. Store it flat between tissue paper so the scallops stay crisp.
Final Notes
Here is the full measurement chain. The medallion measures 0.75 in (1.9 cm) after Round 2 and 1.25 in (3.2 cm) when finished. The fan grows through 2 in (5.1 cm), 2.75 in (7.0 cm), 3.5 in (8.9 cm), 4 in (10.2 cm) and 4.5 in (11.4 cm) to 4.75 in (12.1 cm) at Row 6. The 0.125 in (0.3 cm) border brings it to 5 in x 3 in (12.7 cm x 7.6 cm).
The stitch counts follow along: 56 medallion sts, 9 spokes, 17 spokes, 16 loops, 15 arches, 7 shells and a 155-stitch border. If your first ornament matches these numbers, the rest of the set will too.
Happy crocheting!