

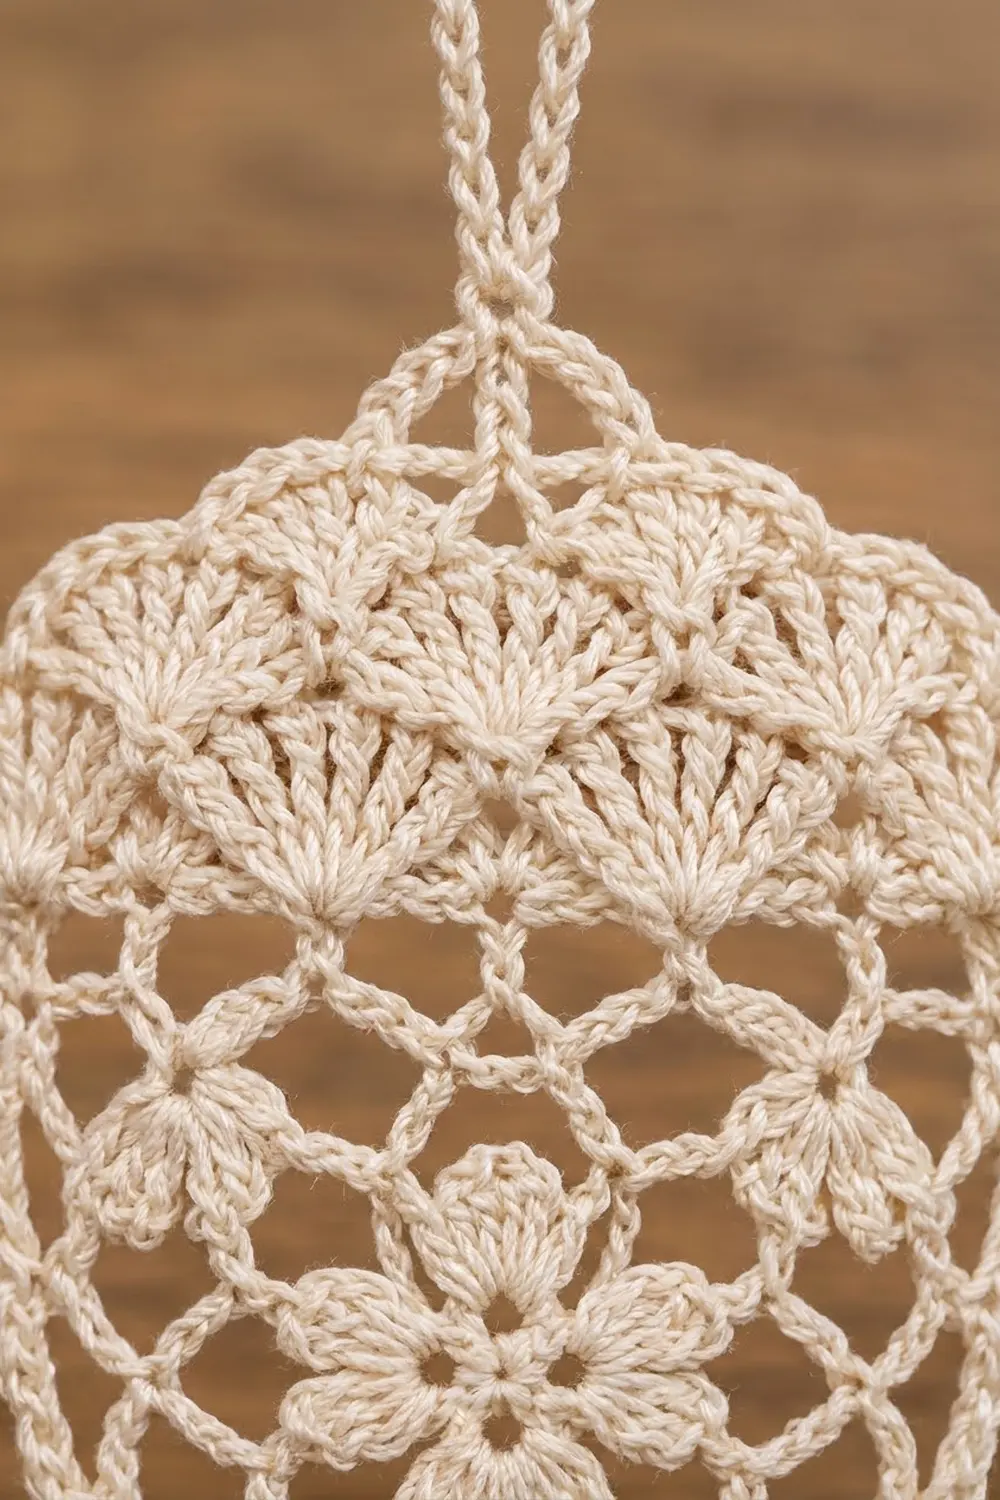
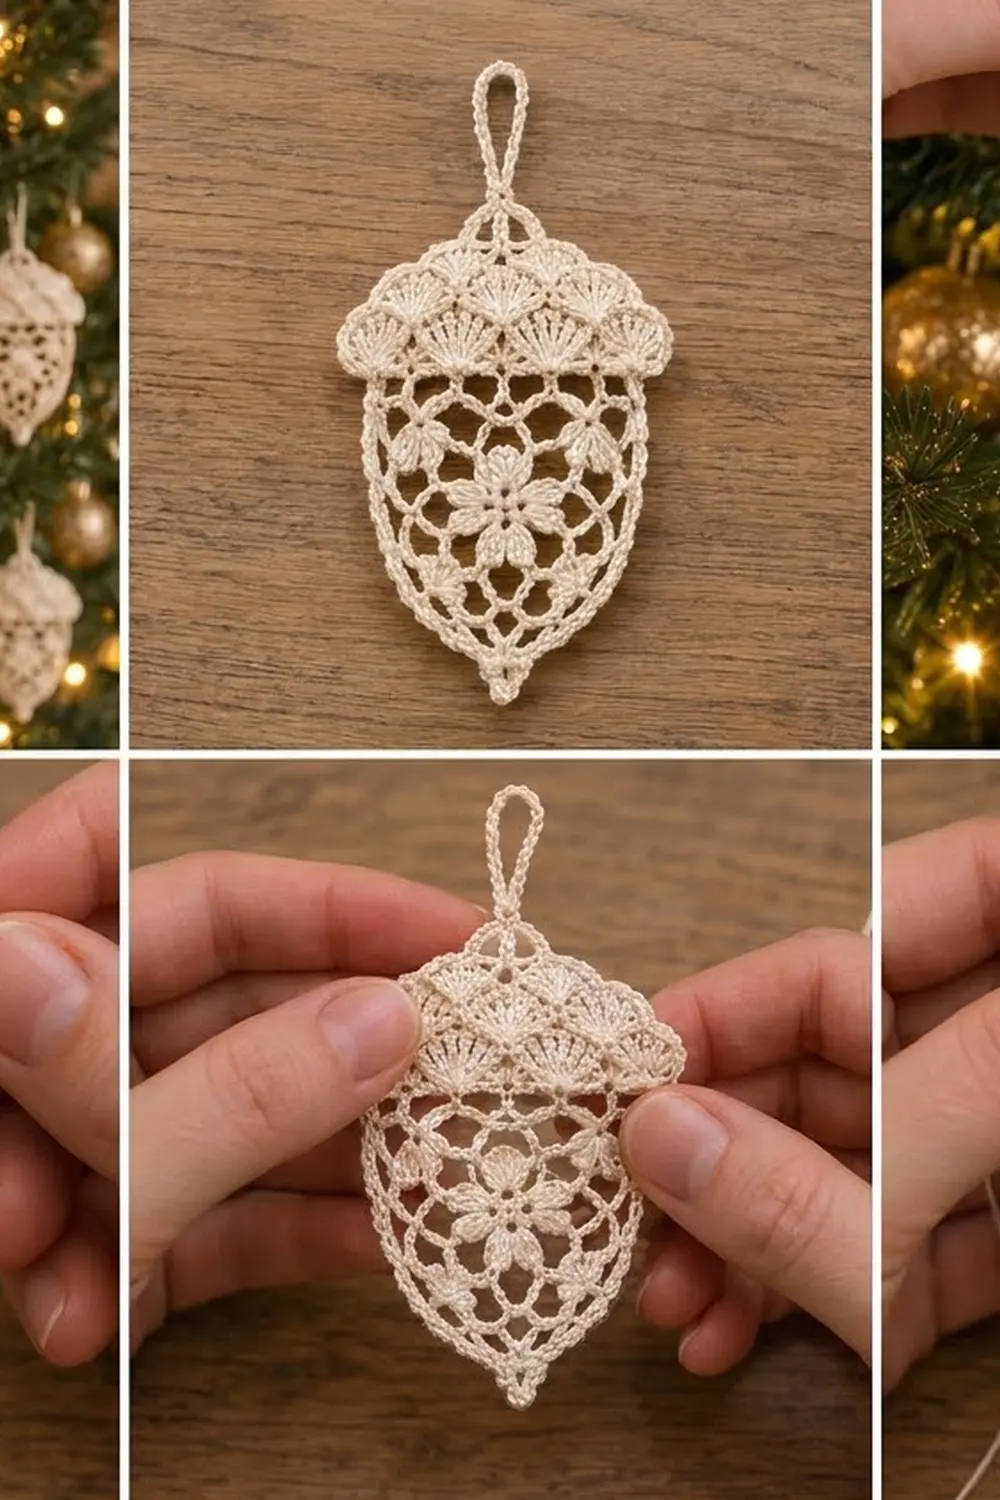
This lace acorn is a light, airy thread ornament. The nut is an open lace oval with a six-petal flower in the middle, wrapped in a mesh of chain loops and tapering to a neat point. On top sits a textured cap of staggered fan shells that flares just past the sides of the nut, like a real acorn cup.
It is worked in a single ivory cotton thread, which gives it a soft vintage, heirloom look on a tree. It suits woodland, farmhouse, or white-and-gold holiday themes, and also works as a gift tag or package topper.
The pattern uses US crochet terms throughout. The finished ornament measures about 2.75 in (7.0 cm) wide across the cap and 4.25 in (10.8 cm) tall without the loop. The hanging loop adds about 1.5 in (3.8 cm).
The construction is simple. You crochet the flower center in the round, then add mesh rounds and one shaping round that pulls the circle into an acorn shape. An edging round outlines the nut, and the cap is then worked in rows straight up from the top edge, ending with the hanging loop. It is one continuous piece with no sewing.
Finished Size and Construction
- Finished size: 2.75 in (7.0 cm) wide × 4.25 in (10.8 cm) tall, plus a 1.5 in (3.8 cm) loop
- Skill level: Intermediate (thread lace, reading stitch counts)
- Terminology: US crochet terms
- Yarn weight: Size 3 cotton crochet thread
- Hook: 2.25 mm (US B-1)
- Number of pieces: 1 (single ornament, worked continuously)
- Layout: Lace nut worked in the round, cap worked in rows on the nut’s top edge
- Nut size before edging: 2.25 in (5.7 cm) wide × 2.75 in (7.0 cm) tall
- Nut size after edging: 2.5 in (6.4 cm) wide × 3 in (7.6 cm) tall
- Edging (border) depth: about 0.125 in (0.3 cm) on each edge
- Cap height above the nut: about 1.25 in (3.2 cm)
Materials
Thread advice: Choose a smooth, tightly twisted mercerized cotton in size 3. Mercerized cotton shows the stitches crisply, holds starch well, and keeps the lace open after blocking. Avoid fuzzy or very soft acrylic, because the mesh will collapse.
- Ivory (main and only color): 5 g, about 20 m
These quantities include a margin of roughly 30% for your gauge swatch, tails, and any ripping back. One ornament actually uses closer to 15 m.
Tools:
- 2.25 mm (US B-1) crochet hook
- Fine tapestry needle
- Small sharp scissors
- Rustproof pins and a foam blocking board
- Spray bottle, plus spray starch or a diluted fabric stiffener (optional)
- Ruler or tape measure marked in inches and cm
- 1 locking stitch marker
Abbreviations (US Terms)
- ch: chain
- sl st: slip stitch
- sc: single crochet
- hdc: half double crochet
- dc: double crochet
- sc2tog: single crochet 2 together
- sc3tog: single crochet 3 together
- sk: skip
- sp(s): space(s)
- st(s): stitch(es)
- RS / WS: right side / wrong side
- [ ]: repeat the instructions in brackets as directed
Special stitches:
- Picot: Ch 3, then sl st in the 3rd ch from the hook.
- Fan: Work the stated number of dc (7 or 5) all into the same stitch.
- Petal: Work (sc, hdc, 3 dc, hdc, sc) all into the same ch-3 space.
Gauge and Checkpoints
Gauge isn’t critical for an ornament, but it controls the final size and how well the cap fits the nut. Make your first ornament as a test piece and measure it at each checkpoint below.
- Base gauge: Rounds 1–3 (the flower) measure 1 in (2.5 cm) across.
- Edging gauge: 11 sc = 1 in (2.5 cm), measured along the edging round.
Checkpoints:
- After Round 1: 0.4 in (1.0 cm) across
- After Round 3: 1 in (2.5 cm) across
- After Round 4: 1.5 in (3.8 cm) across
- After Round 5: 2 in (5.1 cm) across
- After Round 6: 2.25 in (5.7 cm) wide × 2.75 in (7.0 cm) tall, gently stretched
- After Round 7: 2.5 in (6.4 cm) wide × 3 in (7.6 cm) tall
- After Cap Row 1: 2.75 in (7.0 cm) across the fan tips
If your piece is too big: go down to a 2.0 mm hook, or tighten the chains in Rounds 4–6. Loose chains are the most common reason the ornament grows.
If your piece is too small: go up to a 2.5 mm hook. Don’t add extra chains, because the edging counts depend on the chain counts given.
Nut Pattern (Lace Body)
Center Flower
Round 1: Make a magic ring. Ch 1, then work 12 sc into the ring. Sl st to the first sc and pull the ring tight. (12 sc)
Round 2: Ch 1, sc in the same st as the join, ch 3, sk 1. [Sc in the next st, ch 3, sk 1] 5 times. Sl st to the first sc. (6 sc, 6 ch-3 sps; 24 sts total)
Round 3: Sl st into the first ch-3 sp. Work 1 petal in each ch-3 sp around, for 6 petals. Sl st to the first sc. (6 petals × 7 sts = 42 sts)
The flower should lie flat, with the petals touching but not overlapping.
Mesh Rounds
Round 4: Fold the petals toward you. Working behind them, ch 1, then sc around the post of the first Round 2 sc from the back. Ch 6. [Sc around the post of the next Round 2 sc, ch 6] 5 times. Sl st to the first sc. (6 sc, 6 ch-6 loops; 42 sts total)
Each ch-6 loop sits behind one petal, framing it.
Round 5: Sl st into the first ch-6 loop. Ch 1, then work (sc, ch 5, sc) in the same loop and ch 5. [(Sc, ch 5, sc) in the next ch-6 loop, ch 5] 5 times. Sl st to the first sc. (12 sc, 12 ch-5 loops; 72 sts total)
This round creates the diamond mesh. The loops alternate between “point” loops, which sit inside the old loops, and “bridge” loops, which run between them.
Shaping Round
Before Round 6, number the 12 ch-5 loops of Round 5 in your working direction. Loop 1 is the first point loop, right after your join, and Loop 7 is directly opposite it. Turn the piece so that Loop 1 is at the top and Loop 7 is at the bottom. Loops 2–6 run down one side and Loops 8–12 run back up the other.
Round 6: Sl st in the next 3 ch to reach the center of Loop 1. Then work:
- Ch 1, sc in Loop 1.
- [Ch 4, sc in the next loop] 2 times (Loops 2 and 3).
- Ch 6, sc in Loop 4.
- [Ch 7, sc in the next loop] 2 times (Loops 5 and 6).
- Ch 7. In Loop 7 (the tip), work (sc, ch 4, sc).
- [Ch 7, sc in the next loop] 3 times (Loops 8, 9 and 10).
- Ch 6, sc in Loop 11.
- Ch 4, sc in Loop 12.
- Ch 4, then sl st to the first sc.
Round 6 count:
- 13 sc (Loop 7 holds 2)
- Chain spaces: 4 ch-4 sps, 2 ch-6 sps, 6 ch-7 sps, and the ch-4 tip sp
- Chains: (4 × 4) + (2 × 6) + (6 × 7) + 4 = 74
- Total: 13 + 74 = 87 sts
The shaping is mirrored on both sides, which keeps the acorn symmetrical. The short ch-4 spaces between Loops 11, 12, 1, 2 and 3 flatten the top where the cap will sit. The long ch-7 spaces stretch the lower half into a taper, and the ch-4 tip space forms the point.
Edging (Border) of the Nut
Border gauge: 11 sc = 1 in (2.5 cm). Working one sc per chain keeps the edge flat. It is neither too tight, which would make it cup, nor too loose, which would make it ruffle.
Round 7: Ch 1. Starting in the same sc as the join, work around the nut as follows:
- Sc in each Round 6 sc.
- Work 4 sc in each ch-4 sp, 6 sc in each ch-6 sp, and 7 sc in each ch-7 sp.
- In the ch-4 tip sp, work (2 sc, picot, 2 sc).
Sl st to the first sc. (87 sc plus 1 picot)
Counts per section of the edge:
- Top edge, from the sc over Loop 11 through the sc over Loop 3: 5 sc over loop sc + (4 × 4) sc in the ch-4 sps = 21 sts
- Side A, after the Loop 3 sc up to the tip: 6 + 1 + 7 + 1 + 7 + 1 + 7 = 30 sts
- Tip, both Loop 7 sc plus the tip sp: 1 + 2 + 2 + 1 = 6 sc, plus the picot
- Side B, after the tip up to the Loop 11 sc: 7 + 1 + 7 + 1 + 7 + 1 + 6 = 30 sts
- Total: 21 + 30 + 6 + 30 = 87 sc
Each stitch belongs to exactly one section, so no corner stitch is counted twice. Place your marker in the sc over Loop 11, which is the first top-edge stitch.
Why the math works: The top edge has exactly 21 sts, and 21 = (4 × 5) + 1. That is precisely what five fans need (1 sc, then 4 sts per fan repeat). Each side curve of 30 sts measures about 2.7 in (6.9 cm) at border gauge, and the top edge measures about 1.9 in (4.8 cm). Together they give the 2.5 in (6.4 cm) × 3 in (7.6 cm) nut.
Don’t fasten off. Sl st along the top edge to the marked st if needed, or fasten off and rejoin at the marker for a neater start.
Cap Pattern
The cap is worked in rows on the 21 top-edge stitches, starting at the marked stitch over Loop 11.
Row 1 (RS): Ch 1, sc in the marked st. [Sk 1, 7 dc in the next st (fan), sk 1, sc in the next st] 5 times. (5 fans of 7 dc + 6 sc = 41 sts)
The fans flare to about 2.75 in (7.0 cm) across. That flare creates the slight overhang and the rounded corners of the cap.
Row 2 (WS): Turn. Sl st in the first 4 sts to reach the center (4th) dc of the first fan. Ch 1, sc in the same dc. [7 dc in the next sc, sc in the center dc of the next fan] 4 times. (4 fans of 7 dc + 5 sc = 33 sts)
These fans sit between the fans of Row 1, creating the staggered second tier.
Row 3 (RS): Turn. Sl st in the first 4 sts to the center dc of the first fan. Ch 1, sc in the same dc. [5 dc in the next sc, sc in the center dc of the next fan] 3 times. (3 fans of 5 dc + 4 sc = 19 sts)
Row 4: Turn. Sl st in the first 3 sts to the center (3rd) dc of the first fan. Ch 1, sc in the same dc, ch 6, sc in the center dc of the next fan, ch 6, sc in the center dc of the last fan. (3 sc, 2 ch-6 sps; 15 sts total)
Row 5: Turn. Ch 1, sc in the first sc, 6 sc in the ch-6 sp, sc in the next sc, 6 sc in the next ch-6 sp, sc in the last sc. (15 sc: 3 sc worked 1-per-existing-sc + 12 sc worked into the spaces)
Row 6: Turn. Sl st in the first 6 sts. Ch 1, sc in the same st as the last sl st, then sc in the next 4 sts. (5 sc, centered over sts 6–10)
Row 7: Turn. Ch 1, sc2tog, sc in the next st, sc2tog. (3 sc)
Row 8: Turn. Ch 1, sc3tog. (1 st)
Hanging loop: Ch 36, then sl st in the top of the sc3tog. Fasten off, leaving a 6 in (15.2 cm) tail.
Weave the tail back down through the chains of the loop to stiffen it slightly. Weave in all other ends along the solid edging and fan stitches, never through the open mesh.
Cap checkpoint: The cap should rise about 1.25 in (3.2 cm) above the nut’s top edge. It should be about 0.125 in (0.3 cm) wider than the nut on each side.
Final Blocking
- Soak the ornament in cool water for 5 minutes, then roll it in a towel to remove the excess.
- Pin it RS up onto a foam board. Pin the tip picot first, then the center of the hanging loop, so the piece is straight and centered.
- Pin the side curves out to 2.5 in (6.4 cm) at the widest point of the nut. Check that the nut measures 3 in (7.6 cm) from the cap edge to the tip.
- Pin into every ch-7 and ch-6 space so the mesh opens into even diamonds.
- Pin the five Row 1 fans out to 2.75 in (7.0 cm) total width, with one pin at the center of each fan.
- Lay the loop straight and pin it at its fold.
- If you like, mist the piece with starch or diluted stiffener until it is damp but not dripping.
- Let it dry completely, usually 6–12 hours, then unpin.
Final Quality-Control Checklist
- The flower has 6 even petals and lies flat.
- Round 5 has 12 loops, and Round 6 has 13 sc with 13 chain spaces.
- The edging has 87 sc plus 1 picot: 21 on top, 30 on each side, and 6 at the tip.
- The acorn is symmetrical when folded in half lengthwise.
- The cap has 5 fans, then 4, then 3, and its crown triangle is centered.
- The nut measures 2.5 in (6.4 cm) × 3 in (7.6 cm).
- The ornament measures 2.75 in (7.0 cm) × 4.25 in (10.8 cm) without the loop.
- The loop measures about 1.5 in (3.8 cm) and is centered.
- All ends are woven into solid stitches and none show from the front.
Troubleshooting
The flower cups or ruffles: Your petal tension doesn’t match your sc tension. Redo Round 3 with a looser or tighter hand.
The mesh looks lopsided: You probably miscounted the Round 6 chain lengths. Check that the counts mirror each other: 4, 4, 6, 7, 7, 7 on one side and 7, 7, 7, 6, 4, 4 on the other.
The tip is blunt: Make sure you worked (sc, ch 4, sc) in Loop 7, and pin the picot firmly when blocking.
The cap is narrower than the nut: Your fans are tight. Use a 2.5 mm hook for Rows 1–3 only.
The cap waves or flips up: Starch and pin each fan flat. If it is still wavy, rework Row 1 with 6 dc fans, but note that this changes the Row 2 sl st count to 3 sts.
The edging pulls the nut tight: Work Round 7 with a looser tension. Don’t skip any of the one-sc-per-chain stitches.
Care
Hand wash in cool water with a mild soap, press out the water in a towel, and reshape and pin the ornament to dry. Store it flat in tissue paper so the cap fans and the loop keep their shape.
Final Notes
The measurement chain is short and easy to check:
- The flower measures 1 in (2.5 cm).
- The mesh grows the piece to 2 in (5.1 cm).
- The shaping round produces a 2.25 in (5.7 cm) × 2.75 in (7.0 cm) acorn.
- The 87-stitch edging brings the nut to 2.5 in (6.4 cm) × 3 in (7.6 cm).
- The 21-stitch top edge supports exactly 5 fans, so the cap flares to 2.75 in (7.0 cm).
- The finished ornament is 4.25 in (10.8 cm) tall, plus a 1.5 in (3.8 cm) loop.
If your piece matches each checkpoint, the next one will follow naturally. Once your test ornament checks out, make as many as you like for a matching set on the tree.
Happy crocheting!