

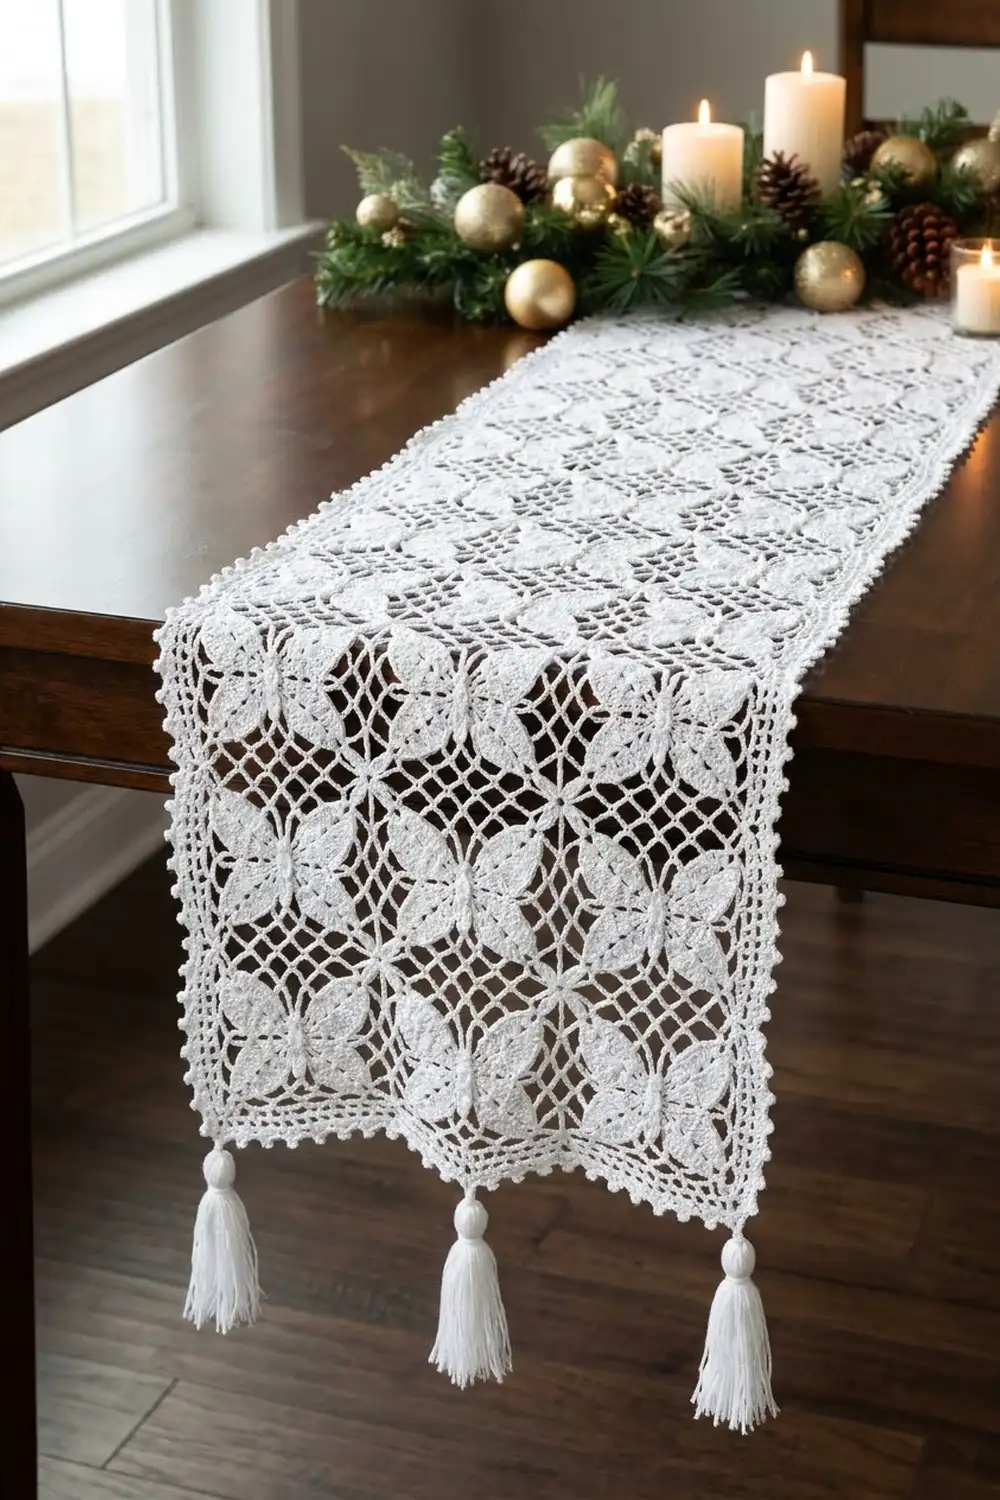
The Lacewing Butterfly Table Runner is a light, airy runner made of thirty white thread butterflies. Each butterfly has a raised oval body, two curled antennae with ring tips, large forewings with oval openings and fans of tall stitches, and smaller hindwings edged with picots. Chain bridges between the rows make a soft diamond lattice, and a white tassel hangs from each column at both short ends.
The runner is all one color, a bright white, so the lace and the shadows behind it do the work. It looks at home on a holiday table, but it also suits a plain wooden sideboard all year.
This pattern uses US crochet terms. The finished runner measures 13.25 in (33.7 cm) wide by 40 in (101.6 cm) long before tassels, or 48 in (121.9 cm) long with the tassels.
You make one butterfly from start to finish, then join the rest as you go during their last round. After that, one chain-outline border round firms up the edges and gives the tassels a place to sit.
Finished Size and Construction
- Finished size: 13.25 in (33.7 cm) x 40 in (101.6 cm); 48 in (121.9 cm) long with tassels
- Skill level: Intermediate
- Terminology: US crochet terms
- Yarn weight: Size 3 cotton crochet thread (Lace / 0)
- Hook: 2.25 mm (B-1)
- Number of pieces: 30 butterfly motifs
- Layout: 3 motifs wide x 10 motifs long
- Piece size: 4.25 in (10.8 cm) wide x 3.5 in (8.9 cm) tall
- Size before border: 12.75 in (32.4 cm) x 39.5 in (100.3 cm)
- Border depth: 0.25 in (0.6 cm) per edge
Materials
Choose a smooth, mercerized cotton thread in size 3. Mercerized cotton keeps its stitch definition, blocks crisply, and stands up to washing. Use a bright white with no flecks so that all the motifs match.
- White: 250 g (approx. 750 m / 820 yd)
- Motifs: about 5 g (15 m) each, 150 g (450 m) in total
- Border: about 10 g (30 m)
- Tassels: about 5 g (15 m) each, 30 g (90 m) for six
These quantities include a margin of about 25% for gauge swatches and differences between thread brands.
Tools:
– 2.25 mm (B-1) crochet hook
– Fine tapestry needle
– Sharp scissors
– Stitch markers
– Stiff card, 4.5 in (11.4 cm) wide, for the tassels
– Blocking mats, rustproof pins, and a spray bottle
– Ruler or tape measure
Abbreviations (US Terms)
- ch – chain
- sl st – slip stitch
- sc – single crochet
- hdc – half double crochet
- dc – double crochet
- tr – treble crochet
- BLO – back loop only
- sk – skip
- sp – space
- st(s) – stitch(es)
Special stitches:
– Picot: ch 3, sl st in 3rd ch from hook.
– Joining picot (JP): ch 1, sl st in the matching picot on the neighboring motif, ch 1, sl st in the first ch.
– Bridge: ch 6, sl st in the named picot on the motif above, ch 6, sl st in the first ch of the bridge.
– Antenna: ch 9, sl st in 5th ch from hook (this makes the ring tip), sl st in each of the next 4 ch.
Gauge and Checkpoints
Make one full butterfly before you start the runner, and block it. Exact gauge matters here because a small error in each motif is repeated 30 times.
- Border gauge: 12 ch = 1 in (2.5 cm)
- After Rnd 2: body measures 1.75 in (4.4 cm) long x 0.5 in (1.3 cm) wide
- After Rnd 4: width across both forewing rings is 3 in (7.6 cm)
- After Rnd 5: width across the forewing fans is 3.75 in (9.5 cm)
- After Rnd 6 (blocked): 4.25 in (10.8 cm) wide x 3.5 in (8.9 cm) tall
If your motif comes out bigger, go down to a 2.0 mm hook. If it comes out smaller, go up to a 2.5 mm hook. Then make a new test motif. Being off by 0.25 in (0.6 cm) per motif adds up to 2.5 in (6.4 cm) over the length of the runner.

Butterfly Motif
Body
Ch 13.
Rnd 1: Sc in 2nd ch from hook, hdc in next 2 ch, dc in next 6 ch, hdc in next 2 ch, 3 sc in last ch. Now work along the opposite side of the foundation: hdc in next 2 ch, dc in next 6 ch, hdc in next 2 ch, 2 sc in the same ch as the first sc. Join with sl st to the first sc. (26 sts)
Number the stitches 1 to 26 from the first sc. Sts 1, 25, and 26 make the tail. Sts 12, 13, and 14 make the head, with st 13 at its center.
Rnd 2: Ch 1, sc in BLO of each st around, join. (26 sc) The back-loop stitches leave a ridge so the body stands up from the wings.
Rnd 3 (wing frames and antennae): Ch 1. Sc in sts 1–4, (sc, ch 12, sc) in st 5 for the right hindwing loop, sc in sts 6–8, (sc, ch 16, sc) in st 9 for the right forewing loop, sc in sts 10–12. In st 13 work (sc, antenna, sc, antenna, sc). Sc in sts 14–16, (sc, ch 16, sc) in st 17 for the left forewing loop, sc in sts 18–20, (sc, ch 12, sc) in st 21 for the left hindwing loop, sc in sts 22–26, join. (32 sc, 2 ch-12 loops, 2 ch-16 loops, 2 antennae)
Rnd 4 (covering the rings): Ch 1. Sl st in each sc of Rnd 3. When you reach a loop, work 17 sc in each ch-12 loop and 25 sc in each ch-16 loop. Keep the antennae in front of your work and skip them. Join. (32 sl st, 84 sc) The open center of each covered loop is the oval wing window.
Rnd 5 (fans): Work a sl st in each sl st along the body. Work the wings like this:
– Each forewing (over its 25 sc): sc in 1st sc, [ch 2, sk 1, tr in next sc] 11 times, ch 2, sk 1, sc in 25th sc. (11 tr, 12 ch-2 sps)
– Each hindwing (over its 17 sc): sc in 1st sc, [ch 2, sk 1, dc in next sc] 7 times, ch 2, sk 1, sc in 17th sc. (7 dc, 8 ch-2 sps)
Join. (32 sl st, 22 tr, 14 dc, 8 sc, 40 ch-2 sps)
Rnd 6 (picot edge): Work a sl st in each sl st and sc along the body.
– Forewing: in each ch-2 sp, work (sc, hdc, picot, hdc, sc). (12 scallops per forewing)
– Hindwing: in each ch-2 sp, work (sc, picot, sc). (8 picots per hindwing)
Join, and fasten off. (40 picots per motif)
Picot numbering for joining: Count forewing scallops from the head end, F1 to F12. Count hindwing picots from the tail end, H1 to H8. On the right wings you reach them in reverse order (H1→H8, then F12→F1). On the left wings you reach them in forward order (F1→F12, then H8→H1).
Make All Pieces
Make 1 complete motif (A1). Make the other 29 motifs through Rnd 5, and join each one during Rnd 6. All 30 motifs are White, which takes about 150 g (450 m) in total.
Layout (head end at top, all butterflies facing the same way):
Row 1:   A1   A2   A3
Row 2:   B1   B2   B3
Row 3:   C1   C2   C3
...
Row 10:  J1   J2   J3
Joining
Join as you go in Rnd 6. Work across each row from left to right, and finish one row before you start the next.
- Side joins (between columns): On the new motif’s left forewing, work F6 as a JP into the right-forewing F6 of the motif to its left. On its left hindwing, work H5 as a JP into the right-hindwing H5 of that same motif. That makes 2 joins per side seam.
- Row joins: On both forewings of the new motif, work F2 as a Bridge to the H2 picot of the matching hindwing on the motif directly above. That makes 2 bridges per motif. The bridges form the diamond lattice between rows.
Every join replaces a normal picot one for one, so no stitches are added or lost.
Tension: Work the sl st of a JP snugly but don’t pull it tight, or the wing tips will pucker. Keep the bridge chains at the same tension as your gauge chain. A tight bridge pulls the rows together, and a loose one lets them sag.
Size checkpoint: When you finish Row 3, the piece should measure 12.75 in (32.4 cm) wide x 11.5 in (29.2 cm) long: 3 motifs at 3.5 in (8.9 cm) each plus 2 bridges at 0.5 in (1.3 cm) each. When all 10 rows are done, it should measure 12.75 in (32.4 cm) x 39.5 in (100.3 cm).
Border
The border is one chain-outline round. It joins the free outer picots, follows the wing outlines, and stabilizes the edge without hiding the butterflies.
Border gauge: 12 ch = 1 in (2.5 cm). A ch-3 covers 0.25 in (0.6 cm), the spacing between neighboring picots. A ch-5 covers 0.42 in (1.1 cm), the dip at the head, the tail, and between wings. A ch-7 covers 0.58 in (1.5 cm), the gap between rows.
Border points per motif:
– Long side: F4–F9 and H4–H7 = 10 points
– Short end: F1–F3 on both forewings (top end), or H1–H3 on both hindwings (bottom end) = 6 points
Border Rnd 1: Join with a sc in F4 of the right forewing on motif A3. Then work down the right long side, across the bottom, up the left side, and across the top. Put 1 sc in each border point, with chains between the points as follows:
- Long sides (each): 10 motifs x 10 points = 100 sc. On each motif, work ch 3 between neighboring picots on the same wing (8 per motif) and ch 5 across the F9-to-H7 wing dip (1 per motif). Work ch 7 across each of the 9 row seams. That makes 80 ch-3, 10 ch-5, and 9 ch-7, which is 99 spaces for 100 points.
- Short ends (each): 3 motifs x 6 points = 18 sc. On each motif, work ch 3 between neighboring picots (4 per motif) and ch 5 across the head or tail (1 per motif). Work ch 7 across each of the 2 column seams. That makes 12 ch-3, 3 ch-5, and 2 ch-7, which is 17 spaces for 18 points.
- Corners: ch 3 at each of the 4 corners (F4 to F3 at the top, H4 to H3 at the bottom). The corners are separate from the side points, so no point is counted twice.
Join with sl st to the first sc. (236 sc, 236 ch-sps)
Why the math works: 2 x 100 + 2 x 18 = 236 points. The spaces add up the same way: 2 x 99 + 2 x 17 + 4 corners = 236. A closed round always has as many spaces as points, so the count checks out. Each chain length matches the distance it crosses at border gauge, so the edge lies flat. With the border, the runner measures 13.25 in (33.7 cm) x 40 in (101.6 cm).
Tassels (make 6): Wrap thread 60 times around the 4.5 in (11.4 cm) card. Tie the loops together at the top and cut them at the bottom. Wrap the neck tightly 0.5 in (1.3 cm) below the top, then trim the tassel to 4 in (10.2 cm). Tie one tassel to the center of each tail ch-5 at the bottom end and each head ch-5 at the top end, so you have 3 per end.
Final Blocking
- Weave in all ends along the body ridges, where they won’t show.
- Soak the runner in cool water for 10 minutes, then press the water out in a towel. Don’t wring it.
- Pin it out to 13.25 in (33.7 cm) x 40 in (101.6 cm) on blocking mats.
- Pin every picot, and pull each bridge straight.
- Open each wing window into a smooth oval, and curl the antennae outward.
- Let it dry completely. Then unpin it and comb out the tassels.
Final Quality-Control Checklist
- All 30 motifs measure 4.25 in (10.8 cm) x 3.5 in (8.9 cm).
- Every motif has 40 picots, 2 antennae, and 4 open wing windows.
- There are 2 side joins per seam and 2 bridges per motif below Row 1.
- The border has 236 sc: 100 per long side and 18 per short end.
- The runner measures 13.25 in (33.7 cm) x 40 in (101.6 cm).
- The 6 tassels are all 4 in (10.2 cm) and hang evenly.
Troubleshooting
- Wings cup or ruffle: Your covering sc are too tight or too loose. Rework Rnd 4 with exactly 17 or 25 sc.
- Body looks flat: Make sure Rnd 2 was worked in BLO.
- Rows sag apart: Your bridge chains are loose. Rework them a little tighter.
- Border edge waves: Your chains are too long. Check that you match 12 ch per 1 in (2.5 cm).
- Border pulls in: Your chains are too short. Loosen your tension, or go up a hook size for the border only.
- Antennae droop: Pin them while blocking, or use light spray starch.
Care
Hand wash in cool water with a mild detergent and dry it flat, re-pinning if needed. Don’t tumble dry, or the picots will lose their shape.
Final Notes
The measurement chain is short and easy to check. Each motif is 4.25 in (10.8 cm) x 3.5 in (8.9 cm). Three across makes 12.75 in (32.4 cm). Ten rows with nine 0.5 in (1.3 cm) bridges makes 39.5 in (100.3 cm). The 0.25 in (0.6 cm) border brings the runner to 13.25 in (33.7 cm) x 40 in (101.6 cm), and the tassels take it to 48 in (121.9 cm). Check the motif first, and the rest will follow.
Happy crocheting!