

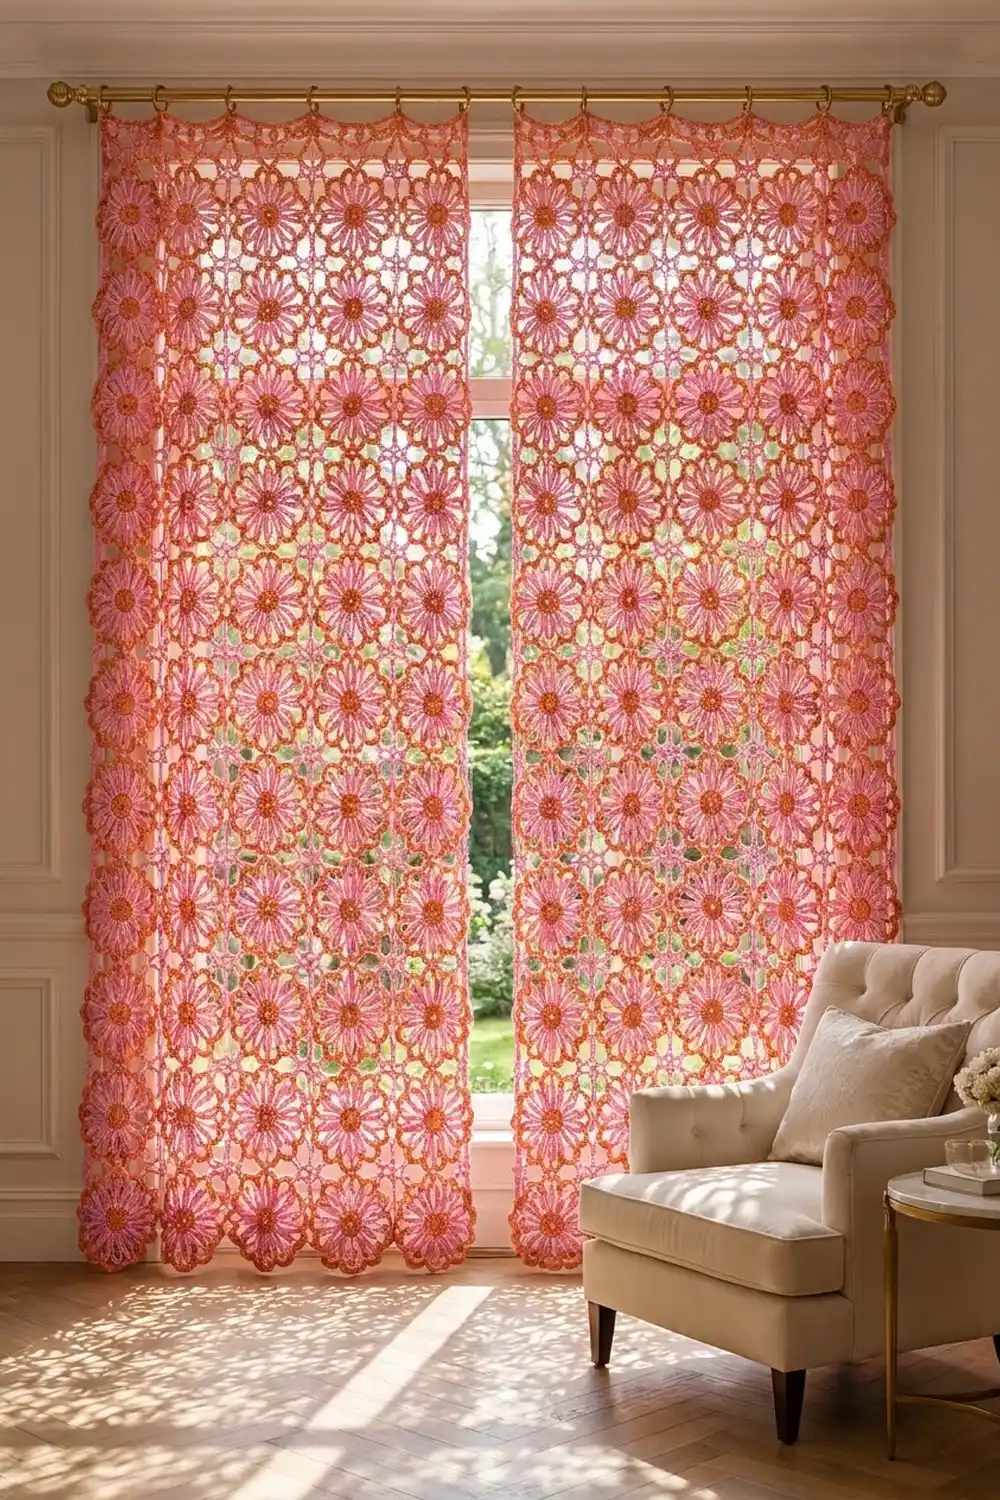
This lacy curtain panel is made of bright daisy motifs. Each flower has a coral-orange center, sixteen long pink loop petals and a scalloped orange edge. The flowers sit in a neat grid. Small pink chain stars fill the gaps between them, so light comes through every opening.
The look is warm and slightly retro, with a modern finish. In a sunny window the open loops cast soft, patterned shadows. One panel works alone in a narrow window. Make two for a pair, as shown.
The pattern uses US crochet terms. One finished panel measures 31.2 x 55.2 in (79.2 x 140.2 cm).
You make 45 motifs and join them as you go on their last round, in a grid 5 motifs wide and 9 motifs tall. Next you crochet 32 pink star fillers into the inner gaps. Last, you work a 3-round pink border that straightens the edge so the panel hangs evenly.
Finished Size and Construction
- Finished panel: 31.2 x 55.2 in (79.2 x 140.2 cm)
- Skill level: Intermediate
- Terminology: US
- Yarn weight: DK (light worsted, #3) cotton
- Hook: 4 mm (G-6)
- Number of pieces: 45 daisy motifs + 32 star fillers
- Layout: 5 motifs wide x 9 motifs tall
- Single motif: 6 in (15.2 cm), measured from arch tip to opposite arch tip
- Size before border: 30 x 54 in (76.2 x 137.2 cm)
- Border depth: 0.6 in (1.5 cm) on each side
Materials
Choose a smooth mercerized or combed cotton DK yarn. It shows the outlined petals clearly and keeps the loops from stretching while the panel hangs. Avoid fuzzy or very stretchy yarns, because long chain loops will sag.
- Color A, coral-orange: 300 g (about 690 m / 755 yd)
- Color B, bubblegum pink: 275 g (about 633 m / 692 yd)
Tools:
– 4 mm (G-6) crochet hook
– Tapestry needle
– Stitch markers
– Rust-proof pins and a large blocking surface (foam mats or a carpet covered with a towel)
– Spray bottle
– Measuring tape
– 11 curtain clip rings for hanging
The quantities are for one panel and include a margin of about 10%. Double them for a pair.
Abbreviations (US Terms)
- ch – chain
- sl st – slip stitch
- sc – single crochet
- hdc – half double crochet
- dc – double crochet
- sp – space
- st(s) – stitch(es)
- MR – magic ring
- Arch tip – the gap between the 5th and 6th sc of a 10-sc arch in Round 6. All joins, fillers and border anchors are worked into this gap.
Gauge and Checkpoints
Make one complete motif before you start production. Measure it after Rounds 2, 4 and 6:
- After Round 2: 1.5 in (3.8 cm) across
- After Round 4: 4.8 in (12.2 cm) from petal tip to opposite petal tip
- After Round 6: 6 in (15.2 cm) from arch tip to opposite arch tip, lightly pressed flat
Border gauge: 18 sc = 4 in (10.2 cm) in DK cotton with the 4 mm hook.
A tolerance of ±0.25 in (0.6 cm) per motif is fine. Larger differences add up quickly. If your motif measures 6.5 in (16.5 cm), the 5-motif width grows by 2.5 in (6.4 cm).
- Too big: go down to a 3.75 mm hook, or tighten the ch-14 petal loops.
- Too small: go up to a 4.5 mm hook.
Check the petals first. They make up most of the motif’s size.

Daisy Motif (make 45)
Round 1 (Color A): Make a MR. Ch 3 (counts as dc), work 15 dc in the ring, then sl st to the top of the beginning ch-3. (16 dc) Pull the ring closed, leaving a small center hole.
Round 2: Ch 1, work 2 sc in each st around, then sl st to the first sc. (32 sc) Fasten off Color A.
Checkpoint: 1.5 in (3.8 cm).
Round 3 (Color B, petal loops): Join B with a sl st in any sc.
Sc in the next sc, ch 14, sc in the next sc; repeat from * 15 more times, then sl st to the first sc.
(32 sc + 16 ch-14 loops)*
Each loop is anchored on 2 neighboring sc, so the petal base stays narrow and the loops fan out evenly.
Round 4 (outlining the petals): Sl st into the first ch-14 loop.
In the loop work (7 sc, ch 2, 7 sc), then move directly to the next loop; repeat from * around, then sl st to the first sc.
(224 sc + 16 ch-2 tips)* That is 14 sc per petal. Fasten off Color B.
Checkpoint: 4.8 in (12.2 cm).
The 7 sc on each side of the ch-2 tip cover a 7-chain half-loop. This gives the thick, rounded pink outline with an open center.
Round 5 (Color A, arch base): Join A in any ch-2 petal tip.
Sc in the ch-2 tip, ch 7; repeat from * around, then sl st to the first sc.
(16 sc + 16 ch-7 arches)*
Round 6 (scallops): Sl st into the first ch-7 arch.
Work 10 sc in the arch; repeat from * around (do not work into the Round 5 sc), then sl st to the first sc.
(160 sc: 16 arches x 10 sc)* Fasten off.
Checkpoint: 6 in (15.2 cm).
Arch Numbering
Lay the motif with the right side up. Number the arches 1 to 16 clockwise, starting from the arch just right of 12 o’clock as arch 2 (so arch 1 is the next arch to its left):
- Top: arches 1–4 (left to right)
- Right side: arches 5–8 (top to bottom)
- Bottom: arches 9–12 (right to left)
- Left side: arches 13–16 (bottom to top)
On each side, the two middle arches are join arches (2–3, 6–7, 10–11, 14–15). The two outer arches are corner arches (1, 4, 5, 8, 9, 12, 13, 16).
Make All Pieces
- Daisy motifs: 45. Each needs Color A for Rounds 1–2 and 5–6 and Color B for Rounds 3–4.
- Star fillers: 32, all in Color B, worked into the panel after joining.
Complete Rounds 1–5 on all 45 motifs. Then work Round 6 as join-as-you-go.
Layout grid (5 wide x 9 tall):
Row 1:  M  M  M  M  M
Row 2:  M  M  M  M  M
Row 3:  M  M  M  M  M
Row 4:  M  M  M  M  M
Row 5:  M  M  M  M  M
Row 6:  M  M  M  M  M
Row 7:  M  M  M  M  M
Row 8:  M  M  M  M  M
Row 9:  M  M  M  M  M
There are 4 x 8 = 32 inner gaps, one wherever four motifs meet. Each gets a star filler.
Joining
Method: join-as-you-go on Round 6.
- Finish Round 6 of the first motif (top-left) as written.
- For each new motif, work Round 6 as usual until you reach an arch that joins a neighbor. In that arch, work 5 sc, sl st into the matching arch tip of the neighbor, then work 5 sc.
- The sl st is not counted, so every arch still has 10 sc and every motif still has 160 sc.
Matching arches:
– Joining to a neighbor on the left: the new motif’s arch 15 joins the neighbor’s arch 6, and arch 14 joins arch 7.
– Joining to a neighbor above: the new motif’s arch 2 joins the neighbor’s arch 11, and arch 3 joins arch 10.
Corner arches are never joined to another motif.
Tension: Keep the joining sl st snug but not tight. A tight join puckers the arch, and a loose one leaves a gap.
Checkpoint:
– Two joined motifs measure 12 in (30.5 cm).
– A full row of 5 measures 30 in (76.2 cm).
– The finished grid measures 30 x 54 in (76.2 x 137.2 cm).
Star Filler (make 32, Color B)
Each inner gap is surrounded by 8 free corner arches, 2 from each of the 4 motifs.
- Ch 6, then sl st to form a ring.
- Ch 1 and work 8 sc in the ring. (8 sc)
- Spokes: ch 4, sl st into the arch tip of the next corner arch around the gap, ch 4, sc in the next sc of the ring; repeat from * 7 more times. (8 spokes)*
- Fasten off.
Each spoke is about 1.1 in (2.8 cm) long. That matches the distance from the center of the gap to each arch tip, so the star sits flat and centered.
Along the panel’s outer edges, the two side-facing corner arches beside each seam stay free. They are open “windows” in the lace.
Border (Color B)
Border gauge: 18 sc = 4 in (10.2 cm).
Per-motif side unit: each motif has 4 arches along any outer side. Rnd 1 works into them with 16 sts: 4 anchor sts + 3 ch-4 spaces.
Seam bridges are shown separately here and are not included in the motif count.
Rnd 1: Join B in the arch tip of arch 1 of the top-left motif. Work along each side as follows:
- For each motif: dc in the tip of the corner arch, ch 4, sc in the tip of the first join arch, ch 4, sc in the tip of the second join arch, ch 4, dc in the tip of the other corner arch. (16 sts)
- Between motifs: ch 12 (seam bridge).
- At each panel corner: ch 11.
The dc at the corner arches raises them to the same height as the middle arches, so the edge line is straight. Each ch-12 spans the 2.7 in (6.9 cm) gap at a stitch rate close to border gauge.
Rnd 1 counts:
– Top and bottom: 5 x 16 + 4 x 12 = 128 sts each
– Sides: 9 x 16 + 8 x 12 = 240 sts each
– Corners: ch-11 each
– Total: 128 + 128 + 240 + 240 + 4 x 11 = 780 sts
Sl st to the first dc.
Rnd 2 (conversion round): Ch 1. Sc in each st and each ch along every side (128 / 240 / 128 / 240). In each corner ch-11, work 5 sc, 3 sc in the 6th ch, then 5 sc.
– Each corner: 11 + 2 = 13 sts
– Total: 736 + 4 x 13 = 788 sts
Sl st to the first sc.
Rnd 3: Ch 1 (does not count). Hdc in each st, working 3 hdc in the center st of each corner.
– Sides: 128 / 240 / 128 / 240
– Each corner: 13 + 2 = 15 sts
– Total: 736 + 4 x 15 = 796 sts
Sl st to join and fasten off.
Why the math works: Between the outermost arch tips, the top edge spans about 27.3 in (69.3 cm). 128 sts over that distance is about 4.7 sts per inch, very close to the 4.5 per inch border gauge, so the edge lies flat without ruffling or pulling in.
The corner chains cover the remaining 1.3 in (3.3 cm) at each end. Rnd 2 (about 0.25 in / 0.6 cm) and Rnd 3 (about 0.35 in / 0.9 cm) add the 0.6 in (1.5 cm) border depth.
Final Blocking
- Weave in all ends along the stitch lines, in the matching color.
- Lay the panel right side up on the blocking surface.
- Pin the four corners first to 31.2 x 55.2 in (79.2 x 140.2 cm).
- Pin the border straight every 3 in (7.6 cm).
- Pin each petal tip and arch tip outward so the motifs open evenly.
- Spray until damp but not soaked.
- Leave it to dry completely before unpinning, usually 12–24 hours.
Final Quality-Control Checklist
- [ ] All 45 motifs measure 6 in (15.2 cm), ±0.25 in (0.6 cm)
- [ ] Every motif has 16 petals, 16 arches and 160 sc in Round 6
- [ ] Join arches are matched exactly (15–6, 14–7, 2–11, 3–10)
- [ ] All 32 star fillers are present, each with 8 spokes
- [ ] Border Rnd 1 counts are 128 / 240 / 128 / 240 plus four ch-11 corners
- [ ] Border Rnd 3 total is 796 sts
- [ ] The panel lies flat at 31.2 x 55.2 in (79.2 x 140.2 cm)
- [ ] No ends show on the right side
Troubleshooting
- Petals twist: In Round 3, make sure the chain is not twisted before you work the anchoring sc.
- Motif cups: The ch-7 arches are too short. Chain more loosely or use a slightly larger hook for Round 5 only.
- Motif ruffles: Check Round 4 for exactly 7 sc on each side of the tip.
- Star filler puckers the gap: Make the spokes ch 5 instead of ch 4 and work loosely.
- Border ripples: Your chains are too loose. Go down a hook size for Rnd 1.
- Border pulls in: Work Rnd 1 with a hook one size larger.
- Panel leans: Re-block, measuring both diagonals until they are equal.
Care
Hand wash in cool water with mild soap. Press out the water in a towel and dry flat, pinned to its measurements. Don’t wring or tumble dry, because the long loops will stretch.
Final Notes
The measurement chain is simple. The center is 1.5 in (3.8 cm), the petals reach 4.8 in (12.2 cm) and the finished motif is 6 in (15.2 cm). The 5 x 9 grid gives 30 x 54 in (76.2 x 137.2 cm), and the 0.6 in (1.5 cm) border brings the panel to 31.2 x 55.2 in (79.2 x 140.2 cm).
Check each stage and the panel will come out right. Space the 11 clip rings evenly along the top edge and hang the panel where the sun can come through.
Happy crocheting!