

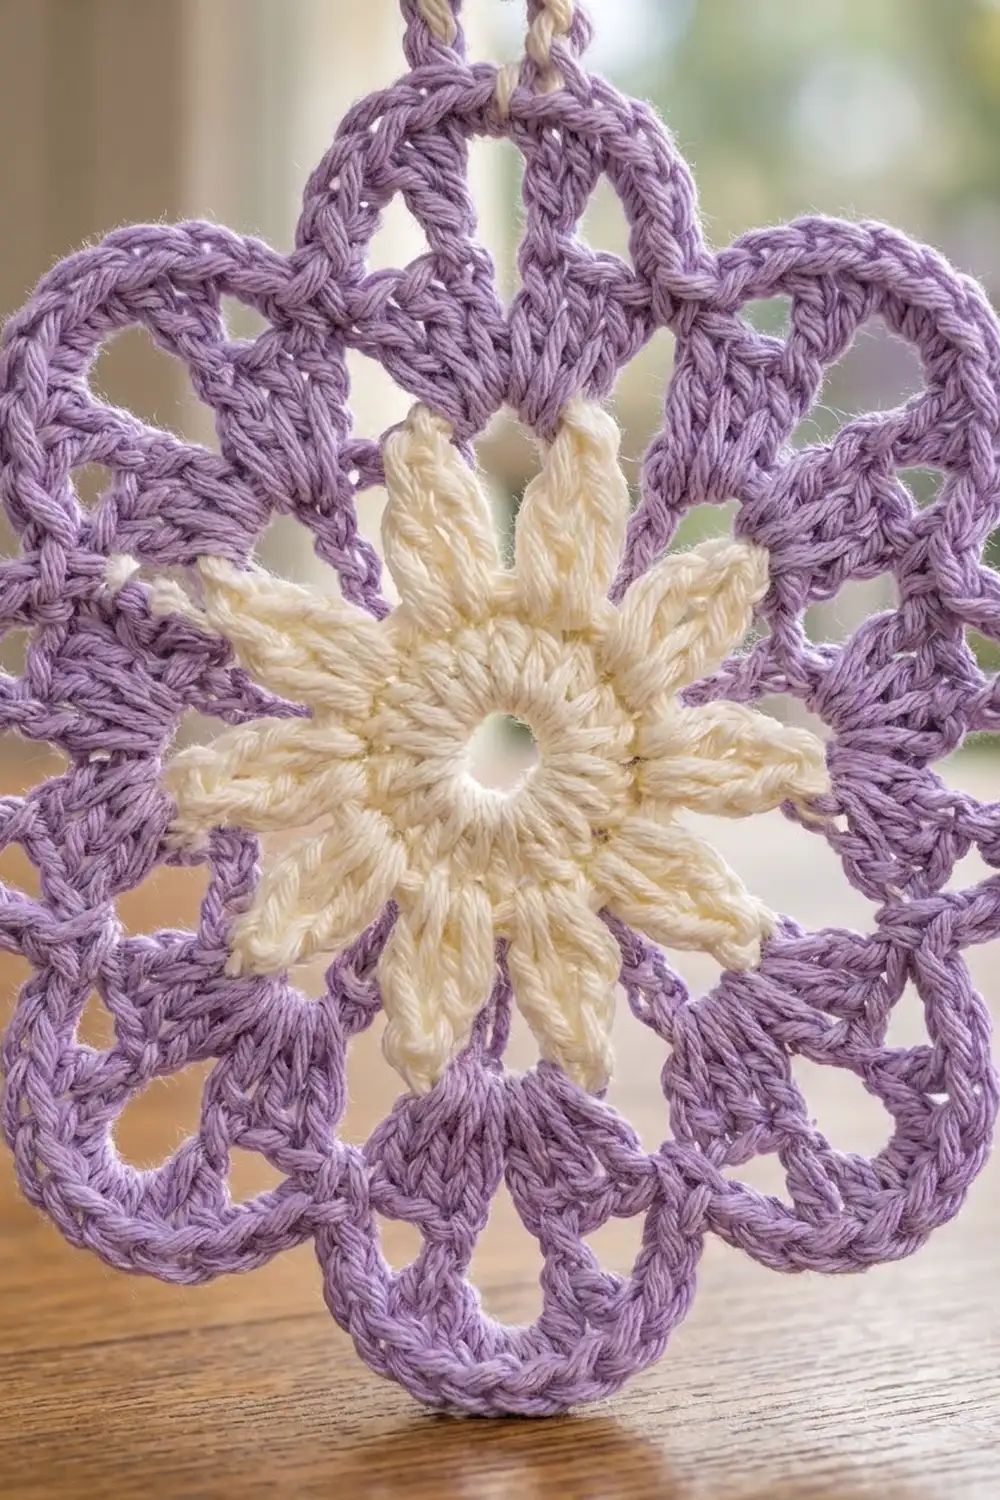
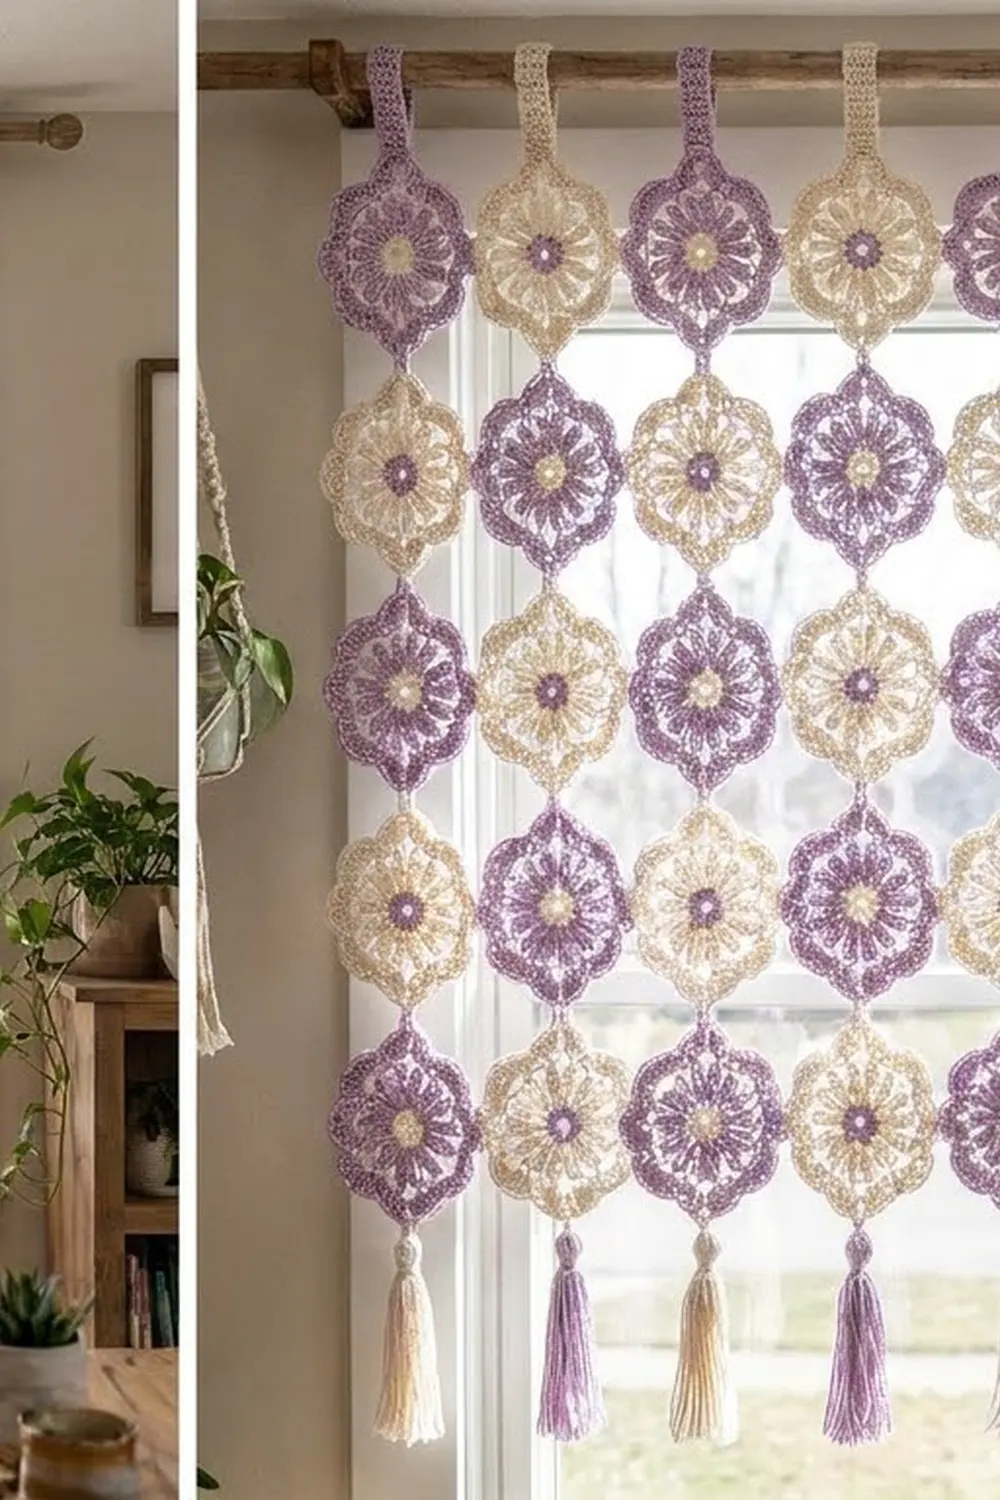
This curtain is made of lavender and cream flower motifs joined into long hanging strands. Each motif has a small daisy center with sixteen pointed petals. Around it are eight open, scalloped outer petals outlined in dense single crochet. Short corded connectors link the flowers. A loop at the top of each strand goes over the curtain rod, and a tassel finishes the bottom.
The palette uses just two colors, lilac and cream. Motif A has a cream center with lilac petals, and Motif B swaps the colors. The motifs alternate down every strand, and neighboring strands start with opposite motifs, so the curtain reads as a soft checkerboard of light and dark flowers.
The pattern uses US crochet terms. The finished curtain is 54 in (137.2 cm) wide and 83.5 in (212.1 cm) long, measured from the top of the rod to the tassel tips. Each motif measures 4.5 in (11.4 cm) from one petal tip to the opposite tip.
Construction is simple. Make 156 motifs of the same size in two colorways. Join them into 12 strands of 13 motifs with chain-and-single-crochet connectors. Then add a hanging loop to the top of each strand and a tassel to the bottom.
Finished Size and Construction
- Finished size: 54 in (137.2 cm) wide x 83.5 in (212.1 cm) long
- Skill level: Intermediate
- Terminology: US crochet terms
- Yarn weight: DK (#3) cotton or cotton blend
- Hook: 4.0 mm (G-6)
- Number of pieces: 156 motifs (78 Motif A, 78 Motif B)
- Layout: 12 strands x 13 motifs, hung side by side
- Piece size: 4.5 in (11.4 cm) tip to tip
- Size before border: 54 in (137.2 cm) x 76.5 in (194.3 cm) of joined motifs and connectors
- Border depth: 3 in (7.6 cm) hanging loop at the top, 4 in (10.2 cm) tassel at the bottom
Materials
Choose a smooth, mercerized or combed cotton in DK weight. Cotton holds the petal shapes, resists stretching under its own weight, and shows the lace clearly against window light. Avoid fuzzy or very stretchy yarns, because long strands can grow several inches once hung.
- Lilac: 600 g, about 1,380 m (twelve 50 g / 115 m balls)
- Cream: 600 g, about 1,380 m (twelve 50 g / 115 m balls)
Each motif uses about 6 g: roughly 1.5 g for Rounds 1–2 and 4.5 g for Rounds 3–7. The amounts above also cover connectors, hanging loops, and tassels. They include a margin of about 10% for test pieces and differences in tension.
Tools:
- 4.0 mm (G-6) crochet hook
- Tapestry needle and scissors
- Stitch markers
- A 4.5 in (11.4 cm) piece of stiff card for tassels
- Blocking mat, rust-proof pins, and a spray bottle
- Measuring tape
Abbreviations (US Terms)
- ch – chain
- sl st – slip stitch
- sc – single crochet
- hdc – half double crochet
- dc – double crochet
- sp(s) – space(s)
- st(s) – stitch(es)
- Rnd – round
Special stitch – Pointed petal: Ch 4, sc in 2nd ch from hook, hdc in next ch, dc in next ch, sl st in next st of the previous round. The skipped chain becomes the petal tip.
Gauge and Checkpoints
Make one complete Motif A before you start the rest. Measure gauge on the motif itself, laid flat and lightly blocked.
- After Rnd 1: 1.25 in (3.2 cm) across
- After Rnd 2: 2.25 in (5.7 cm) across the petal tips
- After Rnd 4: 3 in (7.6 cm) across
- After Rnd 5: 3.75 in (9.5 cm) across the dc petal tips
- After Rnd 7: 4.5 in (11.4 cm) from tip to opposite tip
- Chain gauge: 6 ch = 1 in (2.5 cm), so a 9-ch connector is 1.5 in (3.8 cm)
If your motif is larger than 4.5 in (11.4 cm), switch to a 3.75 mm hook. If it is smaller, try a 4.5 mm hook. Being off by only 0.25 in (0.6 cm) per motif adds up to 3.25 in (8.3 cm) over a 13-motif strand.
Motif Pattern
Colors for each motif:
- Motif A: Rnds 1–2 in Cream, Rnds 3–7 in Lilac
- Motif B: Rnds 1–2 in Lilac, Rnds 3–7 in Cream
The rounds below are written with Color 1 (center) and Color 2 (outer petals).
Rnd 1 (Color 1): Ch 4, sl st in first ch to form a ring. Ch 3 (counts as dc), 15 dc in ring, sl st in top of beg ch-3. (16 dc)
The ring leaves a small round hole at the center of the flower.
Rnd 2 (Color 1): Pointed petal, working the closing sl st into the next dc; repeat from * 15 more times, working the last sl st into the joining st of Rnd 1. Fasten off. (16 pointed petals)
The center now looks like a small daisy with sixteen narrow, pointed petals.
Rnd 3 (Color 2): Join Color 2 with a sc in the tip of any petal, ch 3, sc in tip of next petal, ch 3; repeat from * 14 more times, sl st in first sc. (16 sc, 16 ch-3 sps)
Rnd 4: Sl st in first ch-3 sp, ch 1, sc in same sp, ch 7, sc in next ch-3 sp, ch 3, sc in next ch-3 sp, ch 7, sc in next ch-3 sp, ch 3; repeat from * 6 more times, sl st in first sc. (16 sc, 8 ch-7 loops, 8 ch-3 sps)
This round divides the circle into eight sections. Each ch-7 loop becomes one outer petal, and each ch-3 sp becomes a valley between petals.
Rnd 5: Sl st in first ch-7 loop, ch 3 (counts as dc), (2 dc, ch 3, 3 dc) in same loop, sc in next ch-3 sp, (3 dc, ch 3, 3 dc) in next ch-7 loop, sc in next ch-3 sp; repeat from * 6 more times, sl st in top of beg ch-3. (48 dc, 8 sc, 8 ch-3 tip sps)
Rnd 6: Ch 1, sc in same st, ch 5, (sc, ch 3, sc) in next ch-3 tip sp, ch 5, sc in last dc of same petal, ch 2, skip valley sc, sc in first dc of next petal, ch 5, (sc, ch 3, sc) in next ch-3 tip sp, ch 5, sc in last dc of same petal, ch 2, skip valley sc; repeat from * 6 more times, sl st in first sc. (32 sc, 16 ch-5 loops, 8 ch-3 tip sps, 8 ch-2 valley sps)
The ch-5 arches stand away from the dc fans, which leaves an open window inside each outer petal.
Rnd 7: Ch 1, 6 sc in next ch-5 loop, (2 sc, ch 2, 2 sc) in next ch-3 tip sp, 6 sc in next ch-5 loop, sc in next ch-2 valley sp; repeat from * 7 more times, sl st in first sc. Fasten off. (136 sc, 8 ch-2 tips; 17 sc per petal)
Work into the spaces only, not into the Rnd 6 sc. This dense round gives each petal its smooth, scalloped outline. Weave in all ends on the wrong side, hidden inside the dc fans.
Make All Pieces
- Motif A (Cream center, Lilac petals): 78
- Motif B (Lilac center, Cream petals): 78
Odd-numbered strands start with Motif A, and even-numbered strands start with Motif B. Each odd strand uses 7 A and 6 B, and each even strand uses 7 B and 6 A. Across 6 odd and 6 even strands, that makes 78 of each.
Layout (strands 1–12 run left to right, motifs run top to bottom):
Row  1:  ABABABABABAB
Row  2:  BABABABABABA
Row  3:  ABABABABABAB
Row  4:  BABABABABABA
Row  5:  ABABABABABAB
Row  6:  BABABABABABA
Row  7:  ABABABABABAB
Row  8:  BABABABABABA
Row  9:  ABABABABABAB
Row 10:  BABABABABABA
Row 11:  ABABABABABAB
Row 12:  BABABABABABA
Row 13:  ABABABABABAB
Block all motifs before joining (see Final Blocking), so every connector attaches to a petal of the correct size.
Joining
Motifs are joined vertically only. The strands are not attached to each other and hang free side by side.
Join points: Each motif has 8 ch-2 tips on Rnd 7. Choose any tip as the top (Tip 1). Count around to the opposite tip (Tip 5) for the bottom. Mark both tips.
Connector color: Use Lilac for odd strands and Cream for even strands.
Connector: Lay two motifs right side up, one above the other. Join yarn with a sl st in the bottom ch-2 tip of the upper motif. Ch 9, sl st in the top ch-2 tip of the lower motif. Without turning the work over, work back along the chain: sc in each of the 9 ch, sl st in the bottom tip of the upper motif. Fasten off. (9 ch + 9 sc)
The sc row turns the connector into a firm cord that will not stretch under the strand’s weight. Keep the chain loose and even. A tight chain makes the sc row curve and twists the motifs.
Each strand has 12 connectors, so the curtain has 144 in total.
Size checkpoint: One strand, measured flat without pulling, should be 13 x 4.5 in (11.4 cm) + 12 x 1.5 in (3.8 cm) = 58.5 + 18 = 76.5 in (194.3 cm). If a strand is more than 1 in (2.5 cm) off, check the connector lengths first.
Border
This curtain has no side border, because the strands hang independently. The finishing edge is a row of hanging loops at the top and a row of tassels at the bottom.
Border gauge: 6 ch = 1 in (2.5 cm). A 36-ch loop measures 6 in (15.2 cm) around, so it hangs about 3 in (7.6 cm) from a rod up to 1.25 in (3.2 cm) in diameter.
Top edge – hanging loops (12 per curtain, 1 per strand): With Lilac, join with a sl st in the top ch-2 tip of the first motif. Ch 36, sl st in the same tip to form a loop. Ch 1, work 36 sc into the loop (1 per chain) + 4 extra sc spaced evenly, sl st in first sc. Fasten off. (40 sc)
The 4 extra sc slightly overfill the loop, so it stays round and firm instead of folding flat.
Bottom edge – tassels (12 per curtain, 1 per strand): Wrap yarn 30 times around the 4.5 in (11.4 cm) card. Slide a 10 in (25.4 cm) tie strand under the wraps at one edge and knot it tightly. Cut through the wraps at the opposite edge. Wrap a separate strand 6 times around the bundle 0.5 in (1.3 cm) below the top, then knot it and hide the ends inside. Trim the tassel to 4 in (10.2 cm). Use the tie strand to attach it to the bottom ch-2 tip of the last motif.
Tassel colors alternate across the bottom: Lilac on strands 1, 3, 5, 7, 9, and 11, and Cream on strands 2, 4, 6, 8, 10, and 12. (6 Lilac, 6 Cream)
Why the math works: Width = 12 strands x 4.5 in (11.4 cm) = 54 in (137.2 cm). With the loops spaced 4.5 in (11.4 cm) apart on the rod, the petal tips of neighboring strands just touch. Length = 3 in (7.6 cm) loop + 76.5 in (194.3 cm) strand + 4 in (10.2 cm) tassel = 83.5 in (212.1 cm).
Final Blocking
- Before joining, pin each motif to 4.5 in (11.4 cm) tip to tip, with one pin in each of the 8 ch-2 tips.
- Open each ch-5 arch with a pin so the petal windows show clearly.
- Mist with water until damp but not soaked, and let the motifs dry completely.
- After joining, hang the curtain on its rod.
- Mist each strand lightly from top to bottom and let it dry hanging. The weight of the strand straightens the connectors.
- Once dry, trim the tassels as needed so all the tassel tips line up.
Final Quality-Control Checklist
- Every motif measures 4.5 in (11.4 cm) tip to tip.
- Every motif has 16 center petals and 8 outer petals with 17 sc each.
- Motifs alternate A and B down each strand and across each row.
- Every strand has 13 motifs and 12 connectors of 9 ch + 9 sc.
- Connectors attach to opposite tips.
- Each strand measures 76.5 in (194.3 cm) before the loop and tassel are added.
- All 12 loops have 40 sc.
- Tassels alternate Lilac and Cream and are trimmed to 4 in (10.2 cm).
- All ends are woven in on the wrong side.
Troubleshooting
Center petals curl forward: The chains are too tight. Work the ch 4 of each pointed petal more loosely.
Outer petals ruffle: The sc in Rnd 7 are overfilling the arches. If your gauge is otherwise correct, work 5 sc in each ch-5 loop instead of 6, which gives 15 sc per petal.
Motif cups: The ch-7 loops in Rnd 4 are too short. Chain more loosely, or go up one hook size for Rnd 4 only.
Strands twist: The connectors were attached to tips that aren’t opposite each other. Recount to Tip 5 and redo the connector.
Strand grows after hanging: The cotton has relaxed. Rework one or two connectors with a tighter sc row, or block the strand flat again.
Care
Hand wash in cool water with a mild detergent, roll the curtain in a towel to remove water, and dry it flat or hanging. Do not tumble dry, because that tangles and stretches the strands.
Final Notes
Here is how the measurements build up. A 4.5 in (11.4 cm) motif plus a 1.5 in (3.8 cm) connector gives a 6 in (15.2 cm) repeat. Thirteen motifs and twelve connectors make a 76.5 in (194.3 cm) strand. A 3 in (7.6 cm) loop and a 4 in (10.2 cm) tassel bring the total length to 83.5 in (212.1 cm). Twelve strands at 4.5 in (11.4 cm) each give 54 in (137.2 cm) of width.
To resize, add or remove strands in 4.5 in (11.4 cm) steps for width, and add or remove motifs in 6 in (15.2 cm) steps for length. Check your first motif and keep your connectors the same length, and the curtain will hang straight and even.
Happy crocheting!