

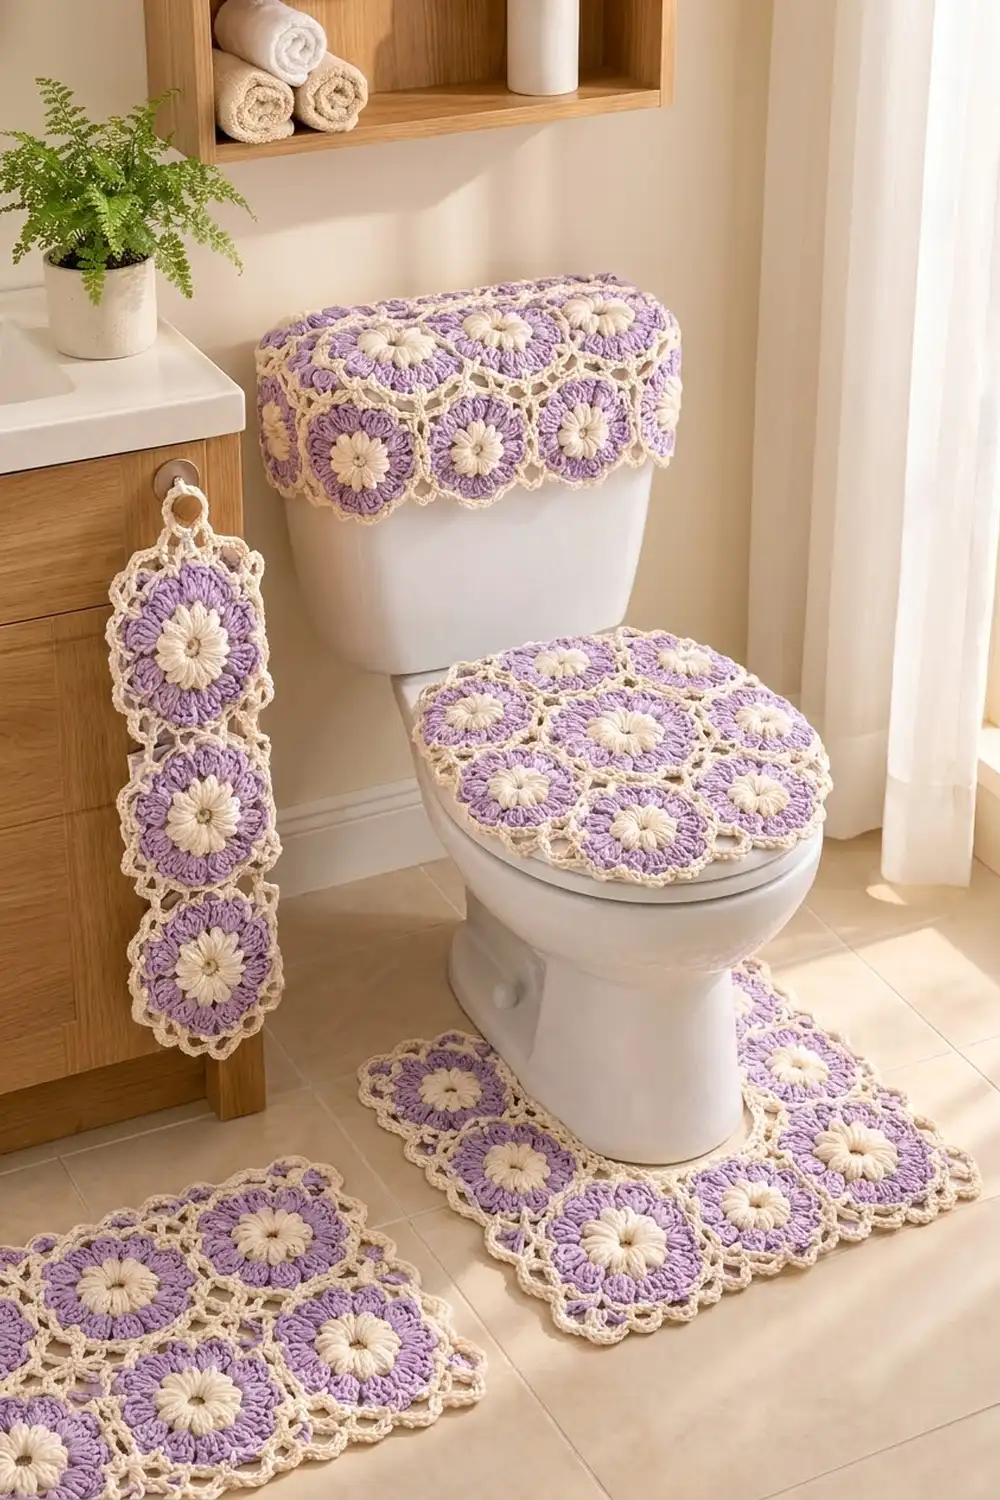
This lid cover is made from seven hexagon flower motifs joined into a soft rosette. Each motif starts with a cream puff-stitch flower. A ring of rounded lavender petals goes around it, then a cream chain-loop round and a firm cream outline with pointed corners. Once the motifs are joined, the cream outlines form a light lattice between the flowers.
The colors are warm cream and soft lavender. The style is fresh and cottage-like, which suits a calm, handmade bathroom. This pattern uses US crochet terms.
Laid flat before you pull the drawstring, the finished cover measures 17.2″ x 17.8″ (43.7 x 45.2 cm). It fits a standard round toilet lid of about 14″ x 16.5″ (35.6 x 41.9 cm). The border curls over the rim, and a chained drawstring holds it in place underneath.
Here’s how it’s built. You make 7 hexagon motifs and slip-stitch them into a 2-3-2 rosette. Then you work a 4-round border that curves the edge down and adds eyelets for the drawstring.
Finished Size and Construction
- Finished size (flat, before cinching): 17.2″ x 17.8″ (43.7 x 45.2 cm)
- Fits: round lids about 14″ x 16.5″ (35.6 x 41.9 cm)
- Skill level: Easy-intermediate
- Terminology: US
- Yarn weight: Worsted (#4) cotton
- Hook: US H/8 (5 mm)
- Number of pieces: 7 hexagon motifs plus 1 drawstring
- Layout: 3 columns of flat-topped hexagons: 2, 3, 2
- Motif size: 5″ (12.7 cm) flat-to-flat, 5.75″ (14.6 cm) point-to-point, side length 2 7/8″ (7.3 cm)
- Size before border: 14.4″ x 15″ (36.6 x 38.1 cm)
- Border depth: 1.4″ (3.6 cm)
Materials
Choose a smooth worsted-weight cotton or cotton blend. Cotton keeps the puff stitches crisp, washes well, and stays neat in a humid room. Look for about 180 m per 100 g.
- Color A, Cream: 100 g (about 180 m). Used for the flower centers, motif outlines, border and drawstring.
- Color B, Lavender: 50 g (about 90 m). Used for the petal rounds.
Both amounts include a margin of about 25%, which covers a gauge swatch and a reworked round.
Tools
- US H/8 (5 mm) crochet hook
- Tapestry needle
- Scissors
- At least 6 stitch markers
- Rust-proof pins and a blocking mat or folded towel
- Spray bottle
- Measuring tape
Abbreviations (US Terms)
- ch = chain
- sl st = slip stitch
- sc = single crochet
- hdc = half double crochet
- dc = double crochet
- sc2tog = single crochet 2 together
- hdc2tog / hdc3tog = half double crochet 2 / 3 together
- sp = space
- st(s) = stitch(es)
- rep = repeat
- BLO = back loop only
Special stitches
- Puff: (yo, insert hook in st, pull up a loop to 1/2″ [1.3 cm] height) 3 times. Yo and pull through all 7 loops.
- Beg puff: ch 2, then (yo, insert, pull up a loop) 2 times. Yo and pull through all 5 loops.
- 4-dc cluster: (yo, insert in sp, pull up a loop, yo, pull through 2 loops) 4 times. Yo and pull through all 5 loops.
- Beg cluster: ch 2, then work a 3-dc cluster in the same sp.
Gauge and Checkpoints
Before making anything else, crochet one full motif and block it. This motif is your gauge swatch.
Target: 5″ (12.7 cm) flat-to-flat after Round 6, with each side 2 7/8″ (7.3 cm) long.
After each round, lay the motif flat and measure it without stretching:
- Round 1: 1.25″ (3.2 cm) across
- Round 2: 2″ (5.1 cm) across
- Round 3: 3″ (7.6 cm) across
- Round 4: 3.75″ (9.5 cm) across
- Round 5: 4.5″ (11.4 cm) across
- Round 6: 5″ (12.7 cm) flat-to-flat
Being within 1/4″ (0.6 cm) is fine. If the motif is larger than 5.25″ (13.3 cm), go down to a 4.5 mm hook. If it’s smaller than 4.75″ (12.1 cm), go up to a 5.5 mm hook. Blocking won’t fix a large size difference, so change hooks first.
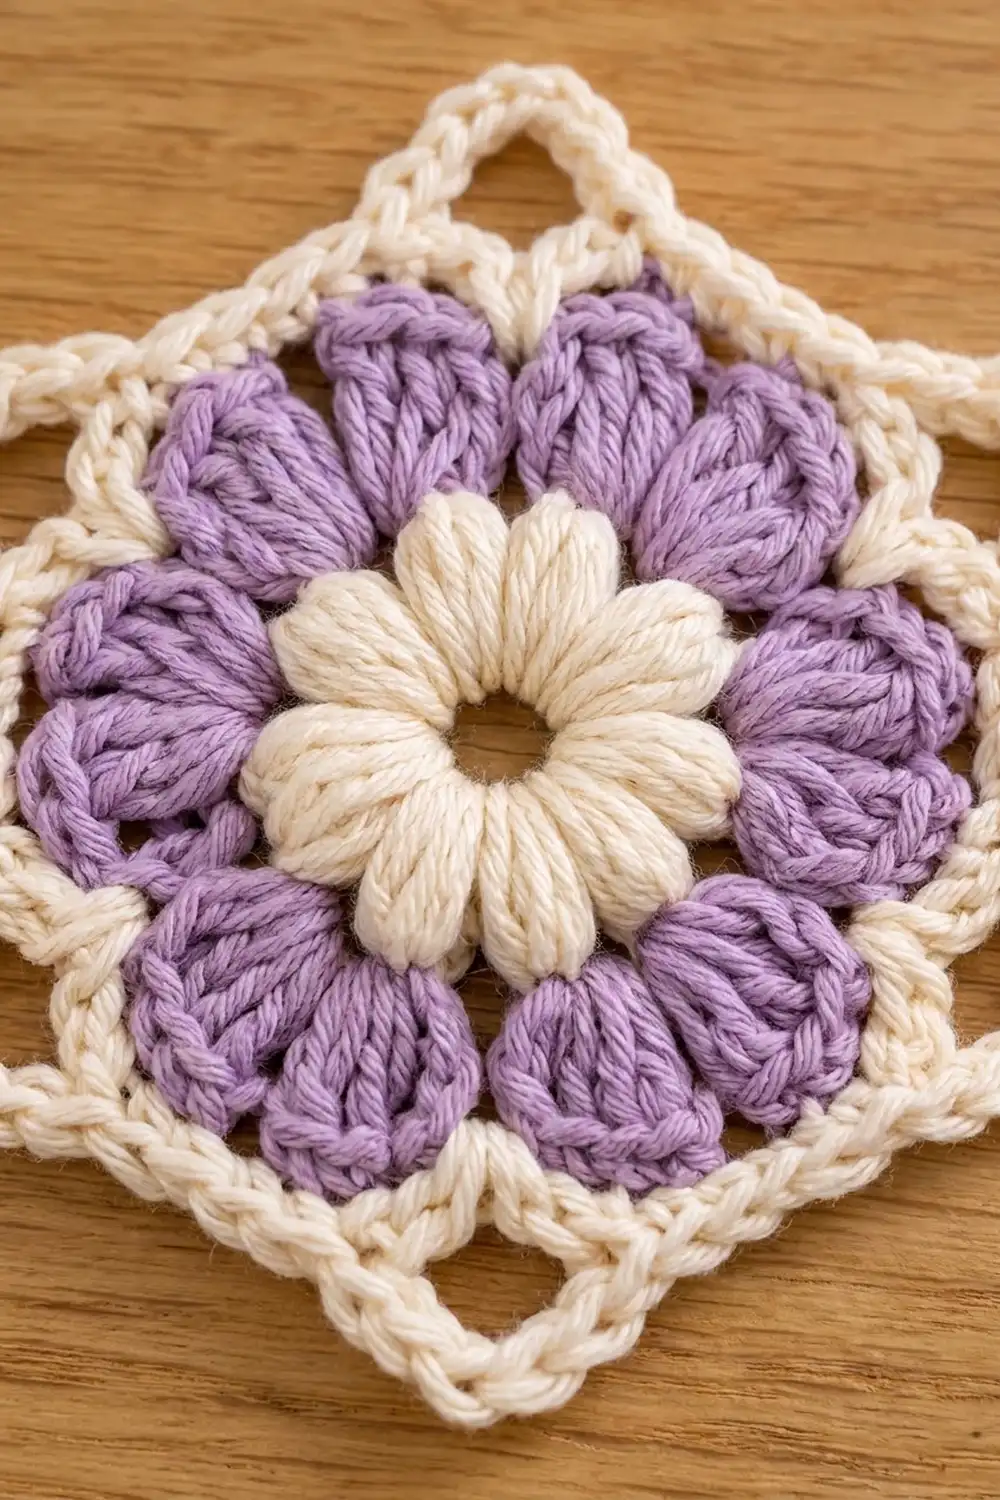
Hexagon Flower Motif (Make 7)
Round 1 (A): Make a magic ring. Ch 3 (counts as dc), work 11 dc in the ring, then sl st to the top of the ch-3. Pull the ring closed, leaving a small center hole. (12 dc)
Round 2 (A): Beg puff in the same st as the join, ch 1. Puff in next dc, ch 1; rep from * 10 more times. Sl st to the top of the beg puff. (12 puffs, 12 ch-1 sps)* Fasten off A.
These 12 puffs make the cream flower.
Round 3 (B): Join B in any ch-1 sp. Beg cluster in the same sp, ch 3. 4-dc cluster in next ch-1 sp, ch 3; rep from * 10 more times. Sl st to the top of the beg cluster. (12 clusters, 12 ch-3 sps)*
Round 4 (B): Sl st into the next ch-3 sp. Ch 2 (counts as hdc), then work 3 dc and 1 hdc in the same sp. (Hdc, 3 dc, hdc) in next ch-3 sp; rep from * 10 more times. Sl st to the top of the ch-2. (60 sts: 12 petals of 5 sts)* Fasten off B.
Each petal sits in one ch-3 sp, so the 12 rounded lavender petals line up between the cream puffs.
Round 5 (A): Join A with a sc in the center dc of any petal, then ch 5. Sc in center dc of next petal, ch 5; rep from * 10 more times. Sl st to the first sc. (12 sc, 12 ch-5 sps)*
This is the open cream round. Each ch-5 loop arches from one petal tip to the next.
Round 6 (A), hexagon outline: Ch 1, sc in the same st as the join. (3 sc, ch 2, 3 sc) in next ch-5 sp to make a corner, sc in next sc, 5 sc in next ch-5 sp, sc in next sc; rep from * 5 more times, ending the last rep at *. Sl st to the first sc. Fasten off, leaving a 6″ (15.2 cm) tail.
Count: 1 + 6 + 1 + 5 = 13 sc per repeat, so 6 x 13 = 78 sc and 6 ch-2 corner sps.
Per side: between two corner ch-2 sps there are 3 + 1 + 5 + 1 + 3 = 13 sc. The corner chains aren’t counted. A corner falls in every second ch-5 loop, so each side spans 2 petals and the motif becomes a hexagon with pointed corners.
Weave in the inner ends. Block each motif to 5″ (12.7 cm) flat-to-flat before joining.
Make All Pieces
- Motifs: 7, all identical
- Color A in each motif: Rounds 1, 2, 5 and 6
- Color B in each motif: Rounds 3 and 4
- Drawstring: 1, in A (made after the border)
Layout grid (flat-topped hexagons, right side up):
        Back (hinge)
            C1
      L1          R1
            C2
      L2          R2
            C3
          Front
C2 is the center motif. Each of the other 6 motifs shares one side with C2 and one side with each of its two neighbors in the ring.
Joining
Method: slip-stitch seam through the back loops.
Hold two motifs wrong sides together with their edges lined up. Join A with a sl st through both corner ch-2 sps. Sl st through the BLO of all 13 sc, matching them stitch to stitch. Finish with a sl st through the next pair of corner sps. (15 sl sts per seam: 1 + 13 + 1)
Every side has exactly 13 sc, so you never need to ease a seam. If one side has an extra stitch, recount Round 6 on that motif.
Joining order:
- Join C2 to each outer motif (6 seams).
- Join neighboring outer motifs: C1–R1, R1–R2, R2–C3, C3–L2, L2–L1, L1–C1 (6 seams).
That’s 12 seams in total. Where three motifs meet, work the second seam into the same corner sp as the first so all three corners lock together.
Tension: keep the slip stitches about as loose as the sc beneath them. Tight seams pucker and push the rosette into a dome. If it helps, go up one hook size just for joining.
Checkpoint: the rosette should measure 14.4″ (36.6 cm) wide from the outer point of L1/L2 to the outer point of R1/R2. It should measure 15″ (38.1 cm) long from the flat edge of C1 to the flat edge of C3, which is three motifs at 5″ (12.7 cm) each. The width is one point-to-point measurement, 5.75″ (14.6 cm), plus two column offsets of 4.3″ (10.9 cm) each.
Border
Border gauge: in A with the same hook, 4.5 sc = 1″ (2.5 cm). This matches the motif sides.
Six outer motifs each have 3 exposed sides, which gives 18 sides of 13 sc. Each outer motif also has 2 outward-pointing (convex) corners, 12 in total. There are 6 inward notches where two outer motifs meet.
Round 1 (A), outline: Join A in any convex corner sp and ch 1. Working around the edge:
- Work 1 sc in each of the 13 sc on every exposed side.
- Work (sc, ch 2, sc) in each convex corner ch-2 sp.
- At each notch, work a sc2tog with one leg in each of the two joined corner sps.
Sl st to the first sc.
Count: 234 sc worked 1-per-stitch (18 x 13) + 24 corner sc (12 x 2) + 6 sc2tog = 264 sts and 12 ch-2 sps. Each outer motif has 39 + 4 + 1 = 44 sts (6 x 44 = 264).
Round 2 (A), cupping: Ch 2 (doesn’t count). Work hdc in each st, except:
- At each convex corner, hdc2tog over the sc before and the sc after the ch-2 sp, skipping the sp itself.
- At each notch, hdc3tog over the sc before the notch, the sc2tog and the sc after it.
Sl st to the first hdc.
Count: 222 hdc worked 1-per-stitch + 12 hdc2tog + 6 hdc3tog = 240 sts. Stitches used: 222 + 24 + 18 = 264, which matches Round 1. Each outer motif now has 40 sts.
Removing the corner fullness makes the border bend down over the rim.
Round 3 (A), eyelets: Ch 4 (counts as dc + ch 1). Sk next st, dc in next st, ch 1; rep from * around, ending with a skipped st. Sl st to the 3rd ch of the ch-4. (120 dc, 120 ch-1 sps)* That’s 20 eyelets per outer motif.
Round 4 (A): Ch 1. Sc in next dc, sc in next ch-1 sp; rep from * around. Sl st to the first sc. (240 sc)* Fasten off.
Why the math works: each motif side has exactly 13 sc, so the layout fixes the outline at 18 x 13 = 234. Round 1 adds only the corner and notch stitches. Round 2 removes exactly 24. Because 240 is even, the skip-1 eyelet repeat closes perfectly.
Depth: 0.25″ (0.6 cm) + 0.4″ (1.0 cm) + 0.5″ (1.3 cm) + 0.25″ (0.6 cm) = 1.4″ (3.6 cm).
Drawstring: holding A double, chain a cord 60″ (152.4 cm) long and fasten off. Start at center back, between L1 and R1 at the hinge. Weave the cord in and out of the Round 3 eyelets all the way around, and bring both ends out at the back.
Final Blocking
- Weave in all remaining ends along the seam lines.
- Lay the cover right side up with the drawstring loose.
- Pin the rosette to 14.4″ x 15″ (36.6 x 38.1 cm), with a pin at each convex corner.
- Shape the puffs and petals with your fingers so they sit round.
- Mist until the cover is damp but not soaked.
- Leave the border unpinned so it keeps its natural curve.
- Let it dry completely, about 12 hours.
- Unpin and fit the cover over the lid. Pull the drawstring snug underneath and tie a bow at the hinge.
Final Quality-Control Checklist
- Every motif measures 5″ (12.7 cm) flat-to-flat, within 1/4″ (0.6 cm).
- Every motif side has 13 sc between corners.
- Each motif has 12 cream puffs and 12 lavender petals.
- All 12 seams have 15 sl sts each and don’t pucker.
- The rosette measures 14.4″ x 15″ (36.6 x 38.1 cm) before the border.
- Border counts are 264, 240, 120 eyelets and 240.
- The border curves down evenly, with no flared corners.
- The drawstring passes through every eyelet.
- All ends are secured and hidden.
Troubleshooting
- Center hole is too big: pull the magic ring tighter and run the tail around it once more.
- Puffs look flat: pull every loop up to the same 1/2″ (1.3 cm) height.
- Motif cups: your Round 5 chains are too tight. Work ch 6 instead of ch 5, with the same Round 6 counts.
- Motif ruffles: your Round 5 chains are too loose. Work those chains with a hook one size smaller.
- Seams pucker: rejoin with looser slip stitches or a larger hook.
- Border flares: recount Round 2 to make sure it has 240 sts.
- Lid is elongated: repeat Round 4 once or twice before threading the drawstring.
Care
Hand wash, or machine wash cool on a gentle cycle in a mesh bag. Reshape while damp and dry flat.
Final Notes
Every measurement in this cover builds on the one before it:
- Each motif is 5″ (12.7 cm) flat-to-flat with 13 sc per side.
- Seven motifs in a 2-3-2 rosette measure 14.4″ x 15″ (36.6 x 38.1 cm).
- The 18 exposed sides set the first border round at 264 sts, which decreases to 240 so the 1.4″ (3.6 cm) border curls over the rim.
- Laid flat, the finished cover measures 17.2″ x 17.8″ (43.7 x 45.2 cm).
If your test motif matches the gauge, everything else will fit.
Happy crocheting!