

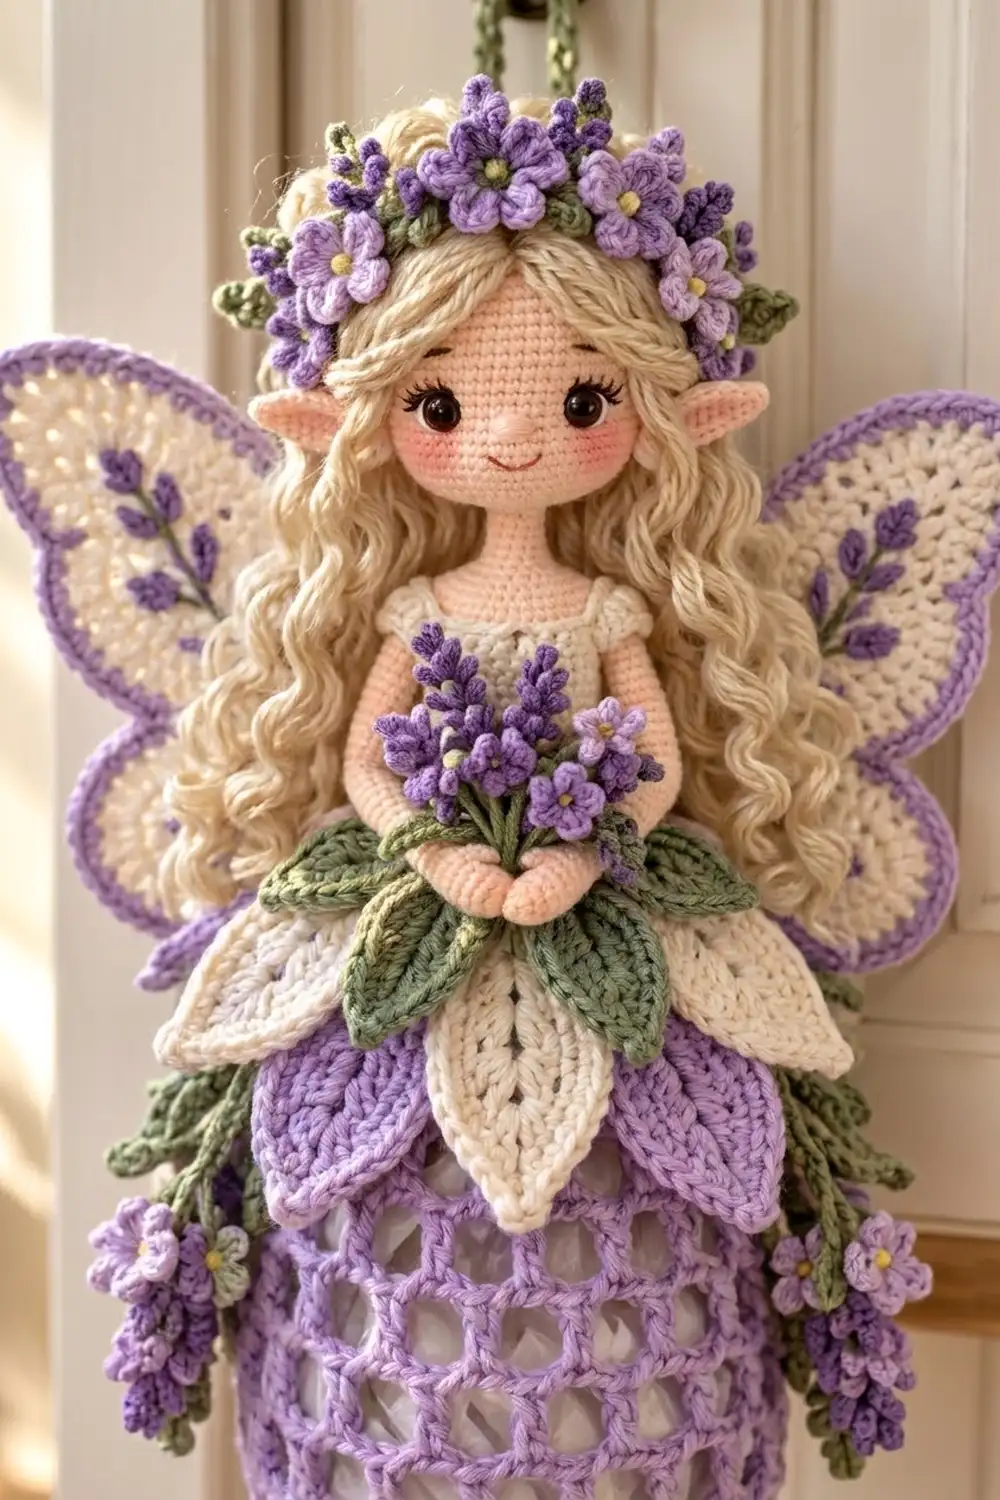
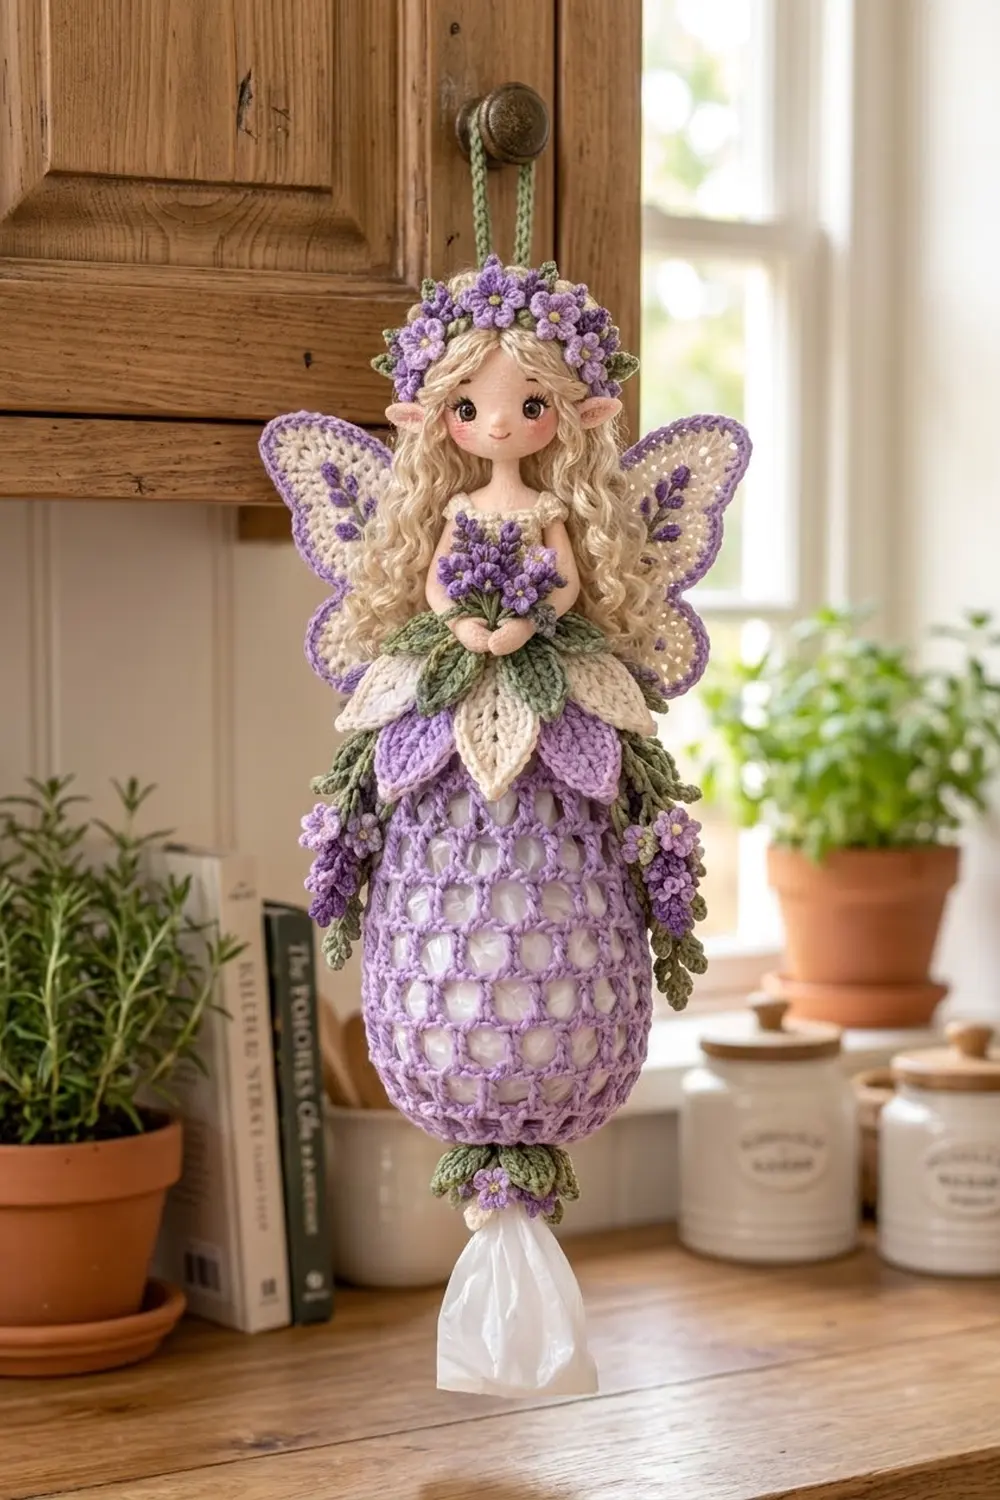
This lavender fairy keeps plastic grocery bags out of sight and looks pretty doing it. A curly-haired fairy with a flower crown, cream-and-lavender wings and a petal skirt sits on top of an open mesh body that holds the bags. You pull bags out one at a time through a small cuffed opening at the bottom.
The colors are soft and cottage-style: light lavender mesh, deeper purple flowers and lavender sprigs, cream wing centers and petals, sage green leaves, a light peach face and wheat-blonde corkscrew curls.
The pattern uses US crochet terms. The finished holder is about 17 in (43.2 cm) tall without the hanging loop, with a 10 in (25.4 cm) wingspan. The mesh body is about 6 in (15.2 cm) across once it’s filled with bags.
You start the mesh body at the bottom opening and work up in ch-4 loop rounds. Then you finish both openings with a firm border. Next you make the doll and all the appliqué pieces and sew everything onto the front of the top cuff. The back stays open so you can stuff bags in.
Finished Size and Construction
- Finished size: 17 in (43.2 cm) tall, 10 in (25.4 cm) wingspan
- Skill level: Intermediate
- Terminology: US
- Yarn weight: Worsted (#4) cotton
- Hooks: 5.0 mm (H-8) for the body, 4.0 mm (G-6) for everything else
- Number of pieces: 1 mesh body plus 98 small pieces, all sewn into one finished item
- Layout: Doll on the front of the top cuff, petals around the cuff, wings on the doll’s back, sprigs down both sides, flower trim at the bottom
- Mesh body: 19.2 in (48.8 cm) around at its widest, 9.6 in (24.4 cm) wide laid flat
- Body height before border: 10.25 in (26.0 cm)
- Border depth: 0.4 in (1.0 cm) at the top, 0.25 in (0.6 cm) at the bottom
Materials
Use a smooth worsted cotton or cotton blend at about 95 m per 50 g. Cotton holds its shape and stands up to bags rubbing against it.
- Light lavender (main color): 100 g, 190 m
- Purple: 25 g, 48 m
- Cream: 30 g, 57 m
- Sage green: 25 g, 48 m
- Light peach: 15 g, 29 m
- Wheat blonde: 40 g, 76 m
All quantities include about a 15% margin.
Tools:
- 5.0 mm (H-8) and 4.0 mm (G-6) hooks
- 1 pair of 10 mm black safety eyes
- About 20 g of polyester fiberfill
- Black and pink embroidery floss
- Pink chalk blush
- Tapestry needle
- Stitch markers and pins
Abbreviations (US Terms)
- ch – chain
- sl st – slip stitch
- sc – single crochet
- hdc – half double crochet
- dc – double crochet
- sc2tog – single crochet 2 together
- MR – magic ring
- sp – space
- st(s) – stitch(es)
- rnd – round
- FO – fasten off
Special stitches
- rev sc (reverse single crochet): Work sc from left to right (right to left if you crochet left-handed). This makes a corded edge.
- bud: Work (sl st, ch 2, sl st) in the same ch.
Gauge and Checkpoints
Before you start the full body, test the mesh with the 5.0 mm hook. Ch 30, join, and work Rnds 1–4 below.
- Mesh gauge (5.0 mm): 5 ch-4 loops and 6 rnds = 4 in (10.2 cm). Each loop is about 0.8 in (2.0 cm) wide.
- Border gauge (5.0 mm): 16 sc = 4 in (10.2 cm).
- Appliqué gauge (4.0 mm): 18 sc and 20 rnds = 4 in (10.2 cm).
Checkpoints
- After Rnd 4: the body lies 9.6 in (24.4 cm) wide when flattened.
- After Rnd 16: the body is 10.25 in (26.0 cm) tall.
- Finished head: 2.6 in (6.6 cm) across.
- Finished large petal: 2.75 in (7.0 cm) long.
If your pieces come out too big, go down half a hook size. If they’re too small, go up half a hook size. Change hooks, not stitch counts, so all the attachment math still works.
Mesh Body (5.0 mm hook, lavender)
In every mesh round, each sc sits in a ch-4 sp from the round below. Each “ch 4, sc” makes one new loop, so the number of loops always equals the number of sc.
Rnd 1: Ch 30 and sl st to the first ch to form a ring. Be careful not to twist it. Ch 1, then sc in each ch around. Sl st to the first sc. (30 sc)
Rnd 2 (conversion): Ch 1, sc in the first st. Ch 4, skip 1 st, sc in next st; repeat from * around. End with ch 4, skip 1 st, sl st to the first sc. (15 loops: 30 sts ÷ 2)
Rnd 3 (growth): Sl st to the center of the first loop. Ch 1, then (sc, ch 4, sc) in that loop. Ch 4, sc in next loop, ch 4, sc in next loop, ch 4, (sc, ch 4, sc) in next loop; repeat from * 3 more times. Then ch 4, sc in next loop, ch 4, sc in next loop, ch 4, and sl st to the first sc. (20 loops: 5 increases)
Rnd 4 (growth): Sl st to the center of the first loop. Ch 1, sc in the same loop. Work (ch 4, sc in next loop) around, but in every 5th loop work (sc, ch 4, sc) instead. End with ch 4, sl st to the first sc. (24 loops: 4 increases)
Rnds 5–15: Sl st to the center of the first loop. Ch 1, sc in the same loop. Ch 4, sc in next loop; repeat around. End with ch 4, sl st to the first sc. (24 loops in each rnd)
Rnd 16 (decrease): Sl st to the center of the first loop. Ch 1, sc in the same loop. (Ch 4, sc in next loop) 4 times, ch 4, skip next loop, sc in next loop; repeat around. Adjust the last repeat so it ends with ch 4, sl st to the first sc. Each repeat uses 6 loops and makes 5 new ones. (20 loops)
Don’t fasten off. The border starts here.
Doll (4.0 mm hook)
Head (peach):
- Rnd 1: 6 sc in MR. (6)
- Rnd 2: 2 sc in each st. (12)
- Rnd 3: (Sc 1, 2 sc in next) around. (18)
- Rnd 4: (Sc 2, 2 sc in next) around. (24)
- Rnd 5: (Sc 3, 2 sc in next) around. (30)
- Rnd 6: (Sc 4, 2 sc in next) around. (36)
- Rnds 7–14: Sc around. (36)
- Rnd 15: (Sc 4, sc2tog) around. (30)
- Rnd 16: (Sc 3, sc2tog) around. (24)
Insert the safety eyes between Rnds 10 and 11, 7 sts apart. Embroider the lashes with black floss and a small smile with pink floss, and add a little chalk blush on the cheeks. Stuff the head firmly.
- Rnd 17: (Sc 2, sc2tog) around. (18)
- Rnd 18: (Sc 1, sc2tog) around. (12)
- Rnd 19: Sc2tog around. (6)
FO and close the hole.
Ears (peach, make 2): Ch 4. Sl st in the 2nd ch from the hook, sc in the next ch, hdc in the last ch. (3 sts) Each ear is a small pointed triangle.
Torso (cream):
- Rnd 1: Ch 24, join, sc around. (24)
- Rnds 2–6: Sc around. (24)
- Rnd 7: (Sc 2, sc2tog) around. (18)
- Rnd 8: (Sc 1, sc2tog) around. (12)
- Rnd 9: Sc around. (12)
Stuff lightly. The torso is 1.8 in (4.6 cm) tall and 2.7 in (6.9 cm) wide when flattened.
Arms (make 2): With peach, 6 sc in MR. Work Rnds 2–8 even with 6 sc per rnd. Change to cream and work Rnds 9–10 even for the puff sleeve. Don’t stuff the arms. Each arm is 2 in (5.1 cm) long.
Hair:
- Cap (wheat): Work Rnds 1–6 as for the head. (36) Work Rnds 7–11 even. (36) FO.
- Long curls (make 16): Ch 26. Work 3 sc in the 2nd ch from the hook and in each ch across. (75 sc) The curl twists into a 4.5 in (11.4 cm) corkscrew.
- Short curls (make 8): Ch 11. Work 3 sc in the 2nd ch from the hook and in each ch across. (30 sc) Each is 2 in (5.1 cm) long.
Wings (4.0 mm hook)
Upper lobe (make 2), 3.5 × 2.25 in (8.9 × 5.7 cm):
- Rnd 1 (cream): Ch 11. Sc in the 2nd ch from the hook and in the next 8 ch, then 3 sc in the last ch. Working along the other side of the chain, sc in the next 8 ch and 2 sc in the first ch you used. Sl st to join. (22)
- Rnd 2 (cream): Sc 4, hdc 3, dc 2, 2 dc in each of the next 3 sts, dc 2, hdc 3, sc 3, 2 sc in each of the last 2 sts. (27: 22 sts worked + 5 increases)
- Rnd 3 (lavender): Sc 9, 2 sc in each of the next 6 sts, sc 8, 2 sc in each of the last 4 sts. (37: 27 + 10) FO.
Lower lobe (make 2), 2.4 × 1.6 in (6.1 × 4.1 cm):
- Rnd 1 (cream): Ch 8. Sc in the 2nd ch from the hook and in the next 5 ch, then 3 sc in the last ch. Along the other side, sc 5, then 2 sc in the first ch you used. Sl st to join. (16)
- Rnd 2 (cream): Sc 3, hdc 2, 2 dc in each of the next 3 sts, hdc 2, sc 4, 2 sc in each of the last 2 sts. (21: 16 + 5)
- Rnd 3 (lavender): Sc 5, 2 sc in each of the next 6 sts, sc 6, 2 sc in each of the last 4 sts. (31: 21 + 10) FO.
On each upper lobe, embroider 3 green straight-stitch stems. Add purple lazy-daisy buds along the top of each stem to make lavender sprigs.
Petals, Leaves, and Flowers (4.0 mm hook)
Large petal, 2.75 × 1.25 in (7.0 × 3.2 cm):
- Ch 13.
- Starting in the 2nd ch from the hook: sc, hdc, dc in the next 7 ch, hdc, sc. (11 sts)
- In the last ch, work (sc, ch 2, sc) for the pointed tip.
- Working along the other side of the chain: sc, hdc, dc in the next 7 ch, hdc, sc. (11 sts)
- Sl st to the first sc. (24 sts plus the ch-2 tip)
The foundation chain forms a raised center vein.
Small leaf, 1.75 in (4.4 cm): Work as for the large petal, but start with ch 9 and work dc in only 3 ch on each side. (16 sts plus the ch-2 tip)
Mini leaf, 1 in (2.5 cm): Ch 6. Starting in the 2nd ch from the hook: sl st, sc, hdc, sc, sl st. (5 sts)
Sprig: With purple, ch 12. Work a bud in the 2nd ch from the hook and in each of the next 9 ch. (10 buds, 2.25 in / 5.7 cm) Sl st in the last ch. Change to green, ch 10 for the stem (2 in / 5.1 cm), and FO.
Small flower, 1 in (2.5 cm): With purple, work (ch 2, 2 dc, ch 2, sl st) 5 times in an MR. (5 petals) Pull the ring closed and make a cream French knot in the center.
Make All Pieces
| Piece | Color | Qty |
|---|---|---|
| Large petals | Lavender / cream | 4 / 4 |
| Small leaves | Green | 6 |
| Mini leaves | Green | 23 |
| Sprigs | Purple + green | 6 |
| Small flowers | Purple | 19 |
| Wing lobes | Cream + lavender | 2 upper, 2 lower |
| Head, ears, torso, arms | Peach / cream | 1, 2, 1, 2 |
| Hair cap, curls | Wheat | 1, 24 |
| Hanging cord | Green | 1 |
Front layout (top to bottom):
[ wreath: 9 flowers + 6 mini leaves ]
[wing]   [ head + curls ]   [wing]
         [ torso + bouquet ]
[ 6 small leaves at the waist ]
[ 8 large petals: L C L C L C L C ]
[sprigs] [ mesh body ] [sprigs]
[ bottom trim: 5 flowers + 6 mini leaves ]
Border (5.0 mm hook, lavender)
Top border:
- Rnd T1 (conversion): Ch 1, then 2 sc in each ch-4 sp around. Sl st to the first sc. (40 sc: 20 loops × 2 sc, 0 extra)
- Rnd T2: Ch 1, rev sc in each st around. (40) FO.
Count 20 sts across the front half and 20 across the back half, and place markers at both side points.
Bottom border:
- Rnd B1: Join lavender in a free loop of the foundation chain. Ch 1, rev sc in each of the 30 free loops. (30: 15 front, 15 back) FO.
Why the math works: At the border gauge, 40 sc measure 10 in (25.4 cm). The 20 top loops measure 16 in (40.6 cm), so the border gathers the top in by 6 in (15.2 cm). That gives the neckline its tapered shape. At the bottom, 30 sts make an opening about 2.4 in (6.1 cm) across. That’s wide enough to pull bags out but firm enough to hold the rest in.
Joining (Assembly)
Use matching yarn and small whipstitches. Pull each stitch snug, but not so tight that it puckers.
- Torso: Flatten the torso so 12 sts face front. Sew those 12 lower-edge sts to the center 12 of the 20 front border sts, which leaves 4 sts free on each side. Don’t sew the torso to the back 20 sts, so you can load bags behind the doll.
- Head: Sew the torso’s 12 top sts around the base of the head, centered on Rnds 17–18.
- Hair: Sew the hair cap over the back and top of the head. Attach the long curls in 2 rows around the cap edge, then sew the short curls across the forehead.
- Ears: Sew one ear to each side of the head at Rnd 11.
- Arms: Sew the arms to the sides of the torso at Rnd 7, then curve them forward to meet in front.
- Bouquet: Sew 5 flowers and 3 mini leaves between the hands.
- Petals: Sew the 8 large petals by their bases along Rnd T1, one petal every 4 sts across the 32 front and side sts, alternating lavender and cream. Leave the center back 8 sts clear.
- Waist leaves: Fan the 6 small leaves across the front of torso Rnds 1–2 so they overlap the tops of the petals.
- Wings: Sew the upper lobes to the back of the torso at Rnd 6, angled outward. Sew the lower lobes just below them, overlapping by 0.5 in (1.3 cm).
- Sprigs: Sew 3 sprigs and 4 mini leaves down each side, starting under the petals.
- Wreath: Sew 9 flowers and 6 mini leaves around the crown of the head.
- Bottom trim: Sew 5 flowers and 6 mini leaves around Rnd 1.
- Hanging cord: With green, ch 40, then sc in the back bump of each ch. (39 sc, 9 in / 22.9 cm) Fold the cord in half and sew both ends securely to the top of the head with doubled yarn.
Size checkpoint: The holder now measures 17 in (43.2 cm) tall with a 10 in (25.4 cm) wingspan.
Final Blocking
- Lightly mist the wings and petals with water.
- Pin the wings flat and the petals pointing downward.
- Fill the body with bags, or with a rolled towel 6 in (15.2 cm) across, so the mesh holds its shape.
- Let everything dry completely.
- Steam lightly from a distance, without letting the iron touch the yarn.
Final Quality-Control Checklist
- [ ] Rnd 16 has 20 loops, and Rnd T1 has 40 sc.
- [ ] The bottom opening is 2.4 in (6.1 cm) across.
- [ ] The safety eyes are locked and level.
- [ ] The back 20 border sts aren’t sewn to the torso.
- [ ] The petals alternate colors evenly.
- [ ] The hanging cord holds firm when you tug it.
- [ ] All yarn ends are woven in.
Troubleshooting
- The mesh slants or twists: Start every round with a sl st to the center of the loop.
- The body is too short: Repeat Rnd 15 one or two more times.
- The top ruffles: Your border is too loose. Redo it with a 4.5 mm hook.
- Bags fall out the bottom: Work Rnd B1 more tightly, or work sc2tog 3 times evenly around.
- The curls are limp: Crochet them more tightly, or spritz them and twist them by hand.
Care
Spot clean with mild soap and cool water, then lay flat to dry. Don’t machine wash it, because that can loosen the safety eyes and flatten the curls.
Final Notes
All the measurements connect, one step leading to the next:
- Mesh gauge: 5 loops = 4 in (10.2 cm).
- 24 loops give a body 19.2 in (48.8 cm) around.
- 20 loops gather into a 40-sc top border that is 10 in (25.4 cm) around.
- The torso’s 12 sts sit centered on the 20 front sts.
- The 8 petals fill 32 sts.
- The finished fairy is 17 in (43.2 cm) tall.
Check each checkpoint as you go, and every piece will end up where it belongs.
Happy crocheting!