
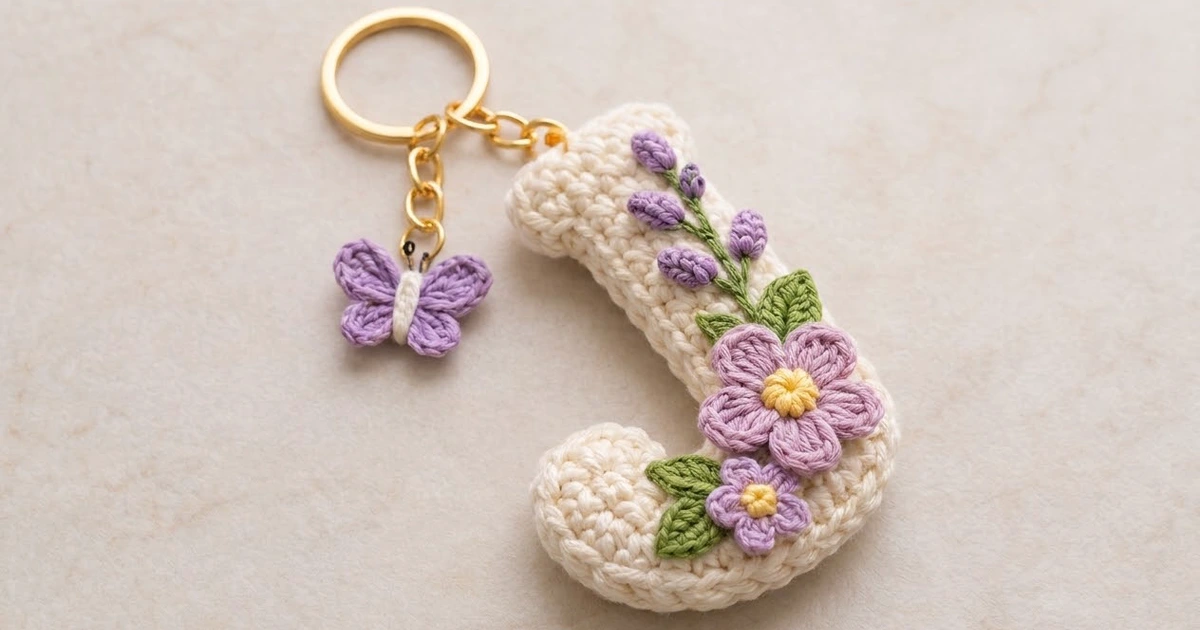
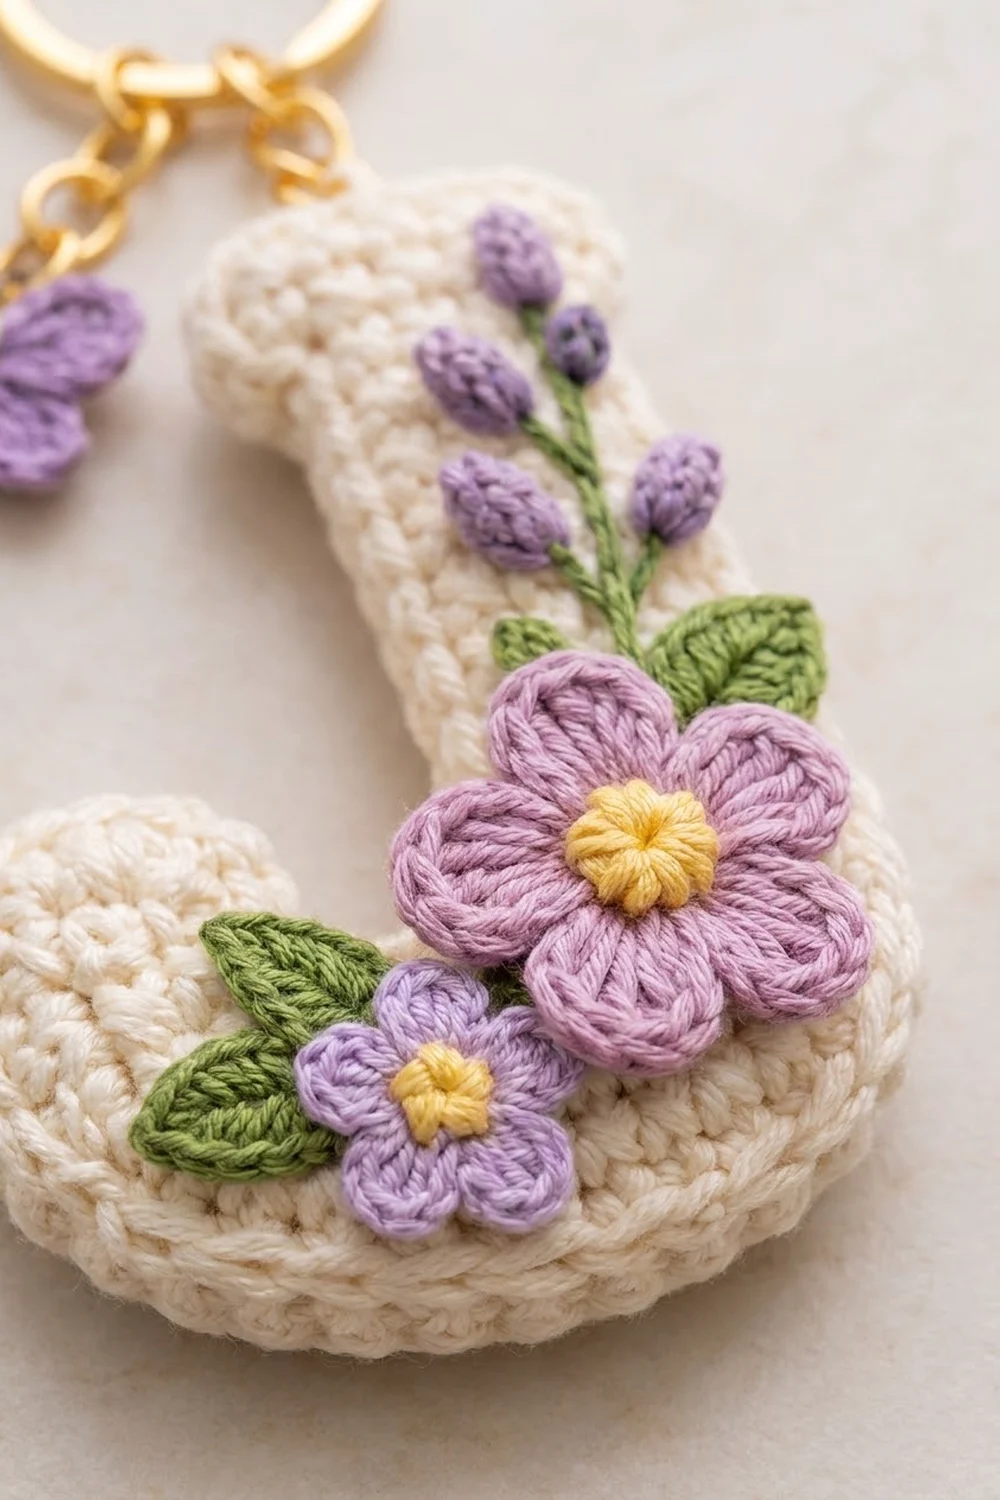
This little letter J keychain is soft, puffy, and covered in a tiny spring garden. The letter is worked in creamy ivory single crochet, so the fabric reads as a neat, dense grid. Across the curve sits a mauve five-petal flower and a smaller lilac flower, both with sunny yellow centers. A lavender sprig climbs the stem, and a small lilac butterfly dangles beside the letter on its own gold chain.
The colors are soft and calm: cream, mauve, lavender, leaf green, and a touch of yellow. The style is cottage-garden sweet, but the construction is simple. It makes a lovely personalized bag charm for a tote handle or zipper pull.
This pattern uses US crochet terms. Without the hardware, the finished letter is about 2.8 in (7.1 cm) wide and 4.1 in (10.4 cm) tall.
You will crochet two identical flat J panels in rows and sew the appliqués to the front panel. Then you join both panels with one round of single crochet, stuffing lightly as you go. That joining round is also the border. The butterfly and hardware go on last.
Finished Size and Construction
- Finished letter size: 2.8 in x 4.1 in (7.1 cm x 10.4 cm)
- Skill level: Easy to intermediate
- Terminology: US crochet terms
- Yarn weight: DK (light worsted, #3) cotton
- Hook: 3.0 mm
- Number of pieces: 1 finished keychain, made from 2 identical J panels plus 5 small crocheted appliqués (2 flowers, 3 leaves), embroidered buds, and 1 butterfly charm
- Layout: One letter, with the stem on the right and the hook curving up on the left
- Panel size before border: 2.4 in (6.1 cm) wide x 3.7 in (9.4 cm) tall
- Border depth: about 0.2 in (0.5 cm) on every edge
Materials
Choose a smooth combed or mercerized cotton in DK weight. Cotton keeps the stitches crisp and holds its shape on a bag that gets used every day. Avoid fuzzy yarns, because they blur the tiny petals and hide the stitch grid.
The amounts below assume a DK cotton of about 115 m per 50 g:
- Cream (main color, butterfly body): 15 g, about 35 m
- Mauve (large flower): 3 g, about 7 m
- Lavender (small flower, buds, butterfly): 4 g, about 9 m
- Green (leaves, sprig stem): 3 g, about 7 m
- Yellow (flower centers): 1 g, about 2 m
All quantities include extra yarn for a gauge swatch and for weaving in ends.
Tools:
- 3.0 mm crochet hook
- Tapestry needle
- Small amount of polyester fiberfill
- Gold split key ring, 1 in (2.5 cm) diameter
- 2 lengths of gold chain: 1.5 in (3.8 cm) and 1 in (2.5 cm)
- 3 gold jump rings, 6 mm
- 2 pairs of jewelry pliers
- Stitch marker, scissors, and pins
Abbreviations (US Terms)
- ch – chain
- sl st – slip stitch
- sc – single crochet
- hdc – half double crochet
- dc – double crochet
- tr – treble crochet
- sc2tog – single crochet 2 together
- st(s) – stitch(es)
- MR – magic ring
- rep – repeat
Special stitch – lazy daisy (embroidery): Bring the needle up at the base of the bud. Put it back down into the same hole and bring it out about 0.2 in (0.5 cm) above, with the yarn loop under the needle tip. Pull gently into a teardrop shape, then hold the tip down with one tiny stitch over the loop.
Gauge and Checkpoints
Gauge: 10 sc and 12 rows = 2 in (5.1 cm), in single crochet worked in rows.
This gauge is firm on purpose so the stuffing doesn’t show through. Make one full panel first and measure it before you start the second.
Checkpoints:
- After Row 6: 2.4 in (6.1 cm) wide x 1 in (2.5 cm) tall
- Stem width (Rows 7–19): 1.2 in (3.0 cm)
- After Row 19: about 3.2 in (8.1 cm) tall
- Hook tip: 0.8 in (2.0 cm) wide; total height on the hook side about 1.8 in (4.6 cm)
- After Row 22: 2.4 in (6.1 cm) wide x 3.7 in (9.4 cm) tall, with a top cap 1.6 in (4.1 cm) wide
Too big? Go down to a 2.75 mm hook. Too small? Go up to a 3.25 mm hook. Don’t change the stitch counts, because the border is based on the exact counts below.
J Panels (Make 2, Cream)
The two panels are identical. Single crochet looks almost the same on both sides, so later you can stack them in the same orientation without flipping either one. That way the outlines match exactly.
The ch 1 at the start of each row is a turning chain. It does not count as a stitch. Always work your first sc into the first stitch of the row.
Hold the work so the stem ends up on the right and the hook tip on the left.
Bottom bar
Ch 9.
Row 1: Sc in 2nd ch from hook and in each ch across, turn. (8 sc)
Row 2: Ch 1, 2 sc in first st, sc in next 6 sts, 2 sc in last st, turn. (10 sc)
Row 3: Ch 1, 2 sc in first st, sc in next 8 sts, 2 sc in last st, turn. (12 sc)
Rows 4–6: Ch 1, sc in each st across, turn. (12 sc)
The increases in Rows 2–3 round off the bottom corners of the J.
Checkpoint: 2.4 in (6.1 cm) wide x 1 in (2.5 cm) tall.
Stem
Row 7: Ch 1, sc in first 6 sts, turn, leaving the other 6 sts unworked. (6 sc)
Rows 8–19: Ch 1, sc in each st across, turn. (6 sc)
Checkpoint: the stem is 1.2 in (3.0 cm) wide and the panel is about 3.2 in (8.1 cm) tall.
Row 20: Ch 1, 2 sc in first st, sc in next 4 sts, 2 sc in last st, turn. (8 sc)
Rows 21–22: Ch 1, sc in each st across, turn. (8 sc)
Fasten off. Rows 20–22 make the slightly flared, rounded cap at the top of the J.
Hook tip
Go back to Row 6. Of the 6 unworked sts, skip the 2 sts next to the stem. These 2 sts form the inner gap between the stem and the tip.
Row 7: Join cream in the next st, ch 1, sc in same st and in next 3 sts, turn. (4 sc)
Rows 8–10: Ch 1, sc in each st across, turn. (4 sc)
Row 11: Ch 1, sc2tog twice. (2 sc)
Fasten off. The sc2tog row rounds off the top of the tip.
Checkpoint: 2.4 in (6.1 cm) wide x 3.7 in (9.4 cm) tall. The tip stands about 0.8 in (2.0 cm) above the bar, with a 0.4 in (1.0 cm) gap beside the stem.
Weave in all ends. Use the neater panel as the front.
Appliqués
Leave a 6 in (15.2 cm) tail on every appliqué for sewing.
Large flower (make 1)
Rnd 1 (yellow): MR, 10 sc in ring, sl st to first sc. (10 sc) Fasten off.
Rnd 2 (mauve): Join in any st, *(hdc, 2 dc, hdc) in next st, sl st in next st; rep from * 4 more times. (5 petals)
Fasten off. Diameter: about 1.3 in (3.3 cm).
Small flower (make 1)
Rnd 1 (yellow): MR, 5 sc in ring, sl st to first sc. (5 sc) Fasten off.
Rnd 2 (lavender): Join in any st, *(sl st, ch 2, dc, ch 2, sl st) in next st; rep from * 4 more times. (5 petals)
Fasten off. Diameter: about 0.8 in (2.0 cm).
Leaves (green, make 3)
Ch 6. Sc in 2nd ch from hook, hdc in next ch, dc in next ch, hdc in next ch, 3 sc in last ch. Now work along the other side of the chain: hdc in next ch, dc in next ch, hdc in next ch, sc in last ch, sl st to first sc.
Fasten off. Length: about 0.8 in (2.0 cm).
Butterfly charm (lavender, make 1)
MR. *Ch 3, 3 tr in ring, ch 3, sl st in ring (upper wing); ch 2, 2 dc in ring, ch 2, sl st in ring (lower wing); rep from * once more. (4 wings)
Pull the ring tight and fasten off. For the body, wrap cream yarn 6 times around the center and knot it at the back. For the antennae, thread two short lavender strands through the top of the body, knot each end, and trim them to 0.3 in (0.8 cm). Width: about 1.2 in (3.0 cm).
Arrange and Sew the Front Panel
Sew the appliqués on before joining so that all the sewing ends are hidden inside the letter.
- Pin the large flower over the lower left curve, where the bar meets the hook.
- Pin the small flower just below and to the left of it, slightly overlapping its petals.
- Tuck one leaf behind the left edge of the large flower, pointing toward the hook tip.
- With green, backstitch a sprig stem 1.6 in (4.1 cm) long up the center of the stem, starting just above the large flower.
- Sew the other 2 leaves along the lower part of the sprig, one on each side, angled upward.
- With lavender, work 7 lazy daisy buds up the top of the sprig: 3 pairs angled outward, plus 1 bud at the tip.
- Sew each appliqué down with small stitches around its outer edge.
Keep every appliqué at least 0.2 in (0.5 cm) in from the panel edge so you have room to work the border round.
Border and Joining Round
Border gauge: one round of sc worked through both panels at once. It adds about 0.2 in (0.5 cm) to every edge.
Stack the panels wrong sides together and facing the same way, with the front panel on top and the appliqués facing up. Every stitch and row end should line up. Put the hook through both layers for every stitch.
Join cream through both layers in the first st of Row 22.
Rnd 1:
- Top cap (Row 22): 3 sc in first st, sc in next 6 sts, 3 sc in last st. (12 sc)
- Outer stem side: 1 sc in each row end of Rows 21 to 2. (20 sc)
- Bottom (foundation ch): 3 sc in first ch, sc in next 6 ch, 3 sc in last ch. (12 sc)
- Outer hook side: 1 sc in each row end of Rows 2 to 10. (9 sc)
- Tip top (Row 11): 2 sc in each of the 2 sts. (4 sc)
- Inner tip side: 1 sc in each row end of Rows 10 to 7. (4 sc)
- Inner gap (Row 6): sc in each of the 2 skipped sts. (2 sc)
- Inner stem side: 1 sc in each row end of Rows 7 to 21. (15 sc)
Before the last 6 sc of the inner stem side, stuff the letter lightly: the hook first, then the bar, then the stem. You want a gentle puff, not a firm cushion. Finish the round and sl st to the first sc. (78 sc)
Count check: 12 + 20 + 12 + 9 + 4 + 4 + 2 + 15 = 78 sc.
Why the math works: Along the top and bottom, 1 sc per stitch keeps each edge the same length. Each outer corner gets 3 sc in 1 st, which adds the 2 extra sts needed to turn the corner and still lie flat. Along the sides, 1 sc per row end gives 6 sc per inch, while the fabric has 5 sts per inch. That small surplus is deliberate. Once the letter is stuffed, the edge bulges outward and gets a little longer, and the extra sts let the rim curve smoothly. The inner gap gets only 1 sc per st, which keeps the inside angle crisp.
Fasten off and weave the tail through the stuffing.
Checkpoint: 2.8 in (7.1 cm) wide x 4.1 in (10.4 cm) tall.
Attaching the Hardware
- Pass a jump ring through both layers of the border at the top left corner of the cap.
- Attach the 1.5 in (3.8 cm) chain to that jump ring, then attach the other end of the chain to the split ring.
- Make a small lavender yarn loop at the top of the butterfly body and add a jump ring to it.
- Attach the 1 in (2.5 cm) chain to the butterfly’s jump ring. Join the other end of the chain to the split ring with the last jump ring.
Close every jump ring fully. Twist the ends sideways with two pliers rather than pulling them apart.
Final Blocking
- Mist the letter lightly. Don’t soak it, because wet stuffing dries slowly.
- Pinch the border into a neat, even rim.
- Lay the letter flat on a towel, front side up.
- Ease the outline to 2.8 in (7.1 cm) x 4.1 in (10.4 cm) and pin around the edge only.
- Open each petal and leaf flat with your fingertips.
- Pin the butterfly wings open on their own.
- Let everything dry completely before you take out the pins.
Final Quality-Control Checklist
- Both panels have 22 rows on the stem side and 11 rows on the hook side.
- The border round has exactly 78 sc.
- The letter measures 2.8 in (7.1 cm) x 4.1 in (10.4 cm).
- No stuffing shows between stitches.
- The appliqués lie flat, with no loose petal tips.
- The sprig has 7 buds and 2 leaves.
- All jump rings are fully closed.
- All ends are woven in.
Troubleshooting
The border ruffles. Your tension is loose. Redo the round with a 2.75 mm hook, or skip 1 row end in every 6 on the long sides.
The border puckers. Your tension is tight, or a corner is missing its 3 sc.
The panels don’t line up. One panel is flipped. Stack both facing the same way.
Stuffing peeks through. Use less fiberfill, or go down a hook size.
The flower cups up. Block it flat, or work Rnd 2 more loosely.
The letter looks lumpy. Pull the stuffing apart into small wisps before you put it in.
Care
Spot clean with a damp cloth and mild soap, then dry flat. Don’t machine wash it, because the hardware can scratch and the stuffing may shift.

Final Notes
Here is how the measurements build on each other. The gauge is 5 sc and 6 rows per inch. At that gauge, each panel measures 2.4 in (6.1 cm) x 3.7 in (9.4 cm). The 78-st border adds 0.2 in (0.5 cm) to each edge, which brings the letter to 2.8 in (7.1 cm) x 4.1 in (10.4 cm). Check your size at each stage and your keychain will come out the right size.
You can draw other letters on the same grid of 5 sts and 6 rows per inch and decorate them with the same garden appliqués.
Happy crocheting!