

This little dragonfly is one finished motif: a plump, beaded lavender body with curled antennae and four cream lace wings. You work the body in the round like a tiny amigurumi, so the head, thorax and segmented tail stand up in soft relief. The wings are flat openwork ovals with large “window” spaces and a smooth single crochet outline.
The palette is just two colors, lavender and cream, which gives the piece a calm, cottage-garden look. You can use it as an appliqué, a gift topper, a bag charm or an ornament.
The pattern uses US crochet terms. The finished dragonfly measures about 6.25 in (15.9 cm) across the wings and 6.5 in (16.5 cm) from the antenna tips to the tail tip.
The construction is simple. You crochet the body in one continuous spiral from the top of the head down to the tail and add the two antennae directly onto the head. Then you crochet four separate wings and sew them to the thorax.
Finished Size and Construction
- Finished size: 6.25 in (15.9 cm) wingspan x 6.5 in (16.5 cm) tall
- Skill level: Intermediate (small amigurumi rounds plus simple lace)
- Terminology: US crochet terms
- Yarn weight: DK / light (#3) cotton
- Hook: 3.25 mm (US D/3)
- Number of pieces: 1 finished motif (a body with antennae, plus 4 sewn-on wings)
- Layout: a single dragonfly, laid flat
- Piece sizes: body 4.75 in (12.1 cm) long; upper wings 3 in x 1.5 in (7.6 cm x 3.8 cm); lower wings 2.75 in x 1.5 in (7.0 cm x 3.8 cm)
- Wing size before edging: upper 2.6 in x 1.1 in (6.6 cm x 2.8 cm); lower 2.35 in x 1.1 in (6.0 cm x 2.8 cm)
- Wing edging depth: 0.2 in (0.5 cm), one round of single crochet
Materials
Choose a smooth, mercerized or combed DK cotton. Cotton holds the lace windows open and keeps the body beads crisp. Avoid fuzzy or very stretchy acrylic, which blurs the segments.
- Lavender (body and antennae): 8 g, about 18 m
- Cream (wings): 8 g, about 18 m
Both amounts include a comfortable margin for a gauge test and sewing tails.
Tools:
- 3.25 mm (US D/3) crochet hook
- A small amount of polyester fiberfill, about 2 g
- 1 stitch marker
- Tapestry needle
- Sewing pins
- Scissors
- Blocking mat or folded towel, rust-proof pins and a spray bottle
Abbreviations (US Terms)
- ch – chain
- sl st – slip stitch
- sc – single crochet
- dc – double crochet
- inc – 2 sc in the same stitch
- sc2tog – single crochet 2 together
- MR – magic ring
- sp – space
- st(s) – stitch(es)
Special stitch – window: dc in the next stitch, ch 3, then skip the following stitch. Each window uses 2 stitches of the previous round and makes 1 dc and 1 ch-3 space.
Gauge and Checkpoints
Gauge is 20 sc and 22 rounds = 4 in (10.2 cm). That equals 5 sc and 5.5 rounds per 1 in (2.5 cm). Crochet the body tightly so the stuffing does not show.
Make one upper wing first and measure it before you make the rest. It is the quickest way to test your gauge.
Checkpoints:
- Head after Round 4: about 0.75 in (1.9 cm) across
- Thorax after Round 11: about 1 in (2.5 cm) wide and 1.25 in (3.2 cm) long
- Each abdomen bead: about 0.6 in (1.5 cm) wide and 0.4 in (1.0 cm) long
- All six beads together: about 2.4 in (6.1 cm)
- Tail tip: about 0.5 in (1.3 cm)
- Upper wing after Round 2: 2.6 in x 1.1 in (6.6 cm x 2.8 cm)
- Upper wing after Round 3: 3 in x 1.5 in (7.6 cm x 3.8 cm)
Too big? Switch to a 3.0 mm hook. Too small? Switch to a 3.5 mm (US E/4) hook. If only the wings are off, change the hook for the wings alone and keep the body as it is.
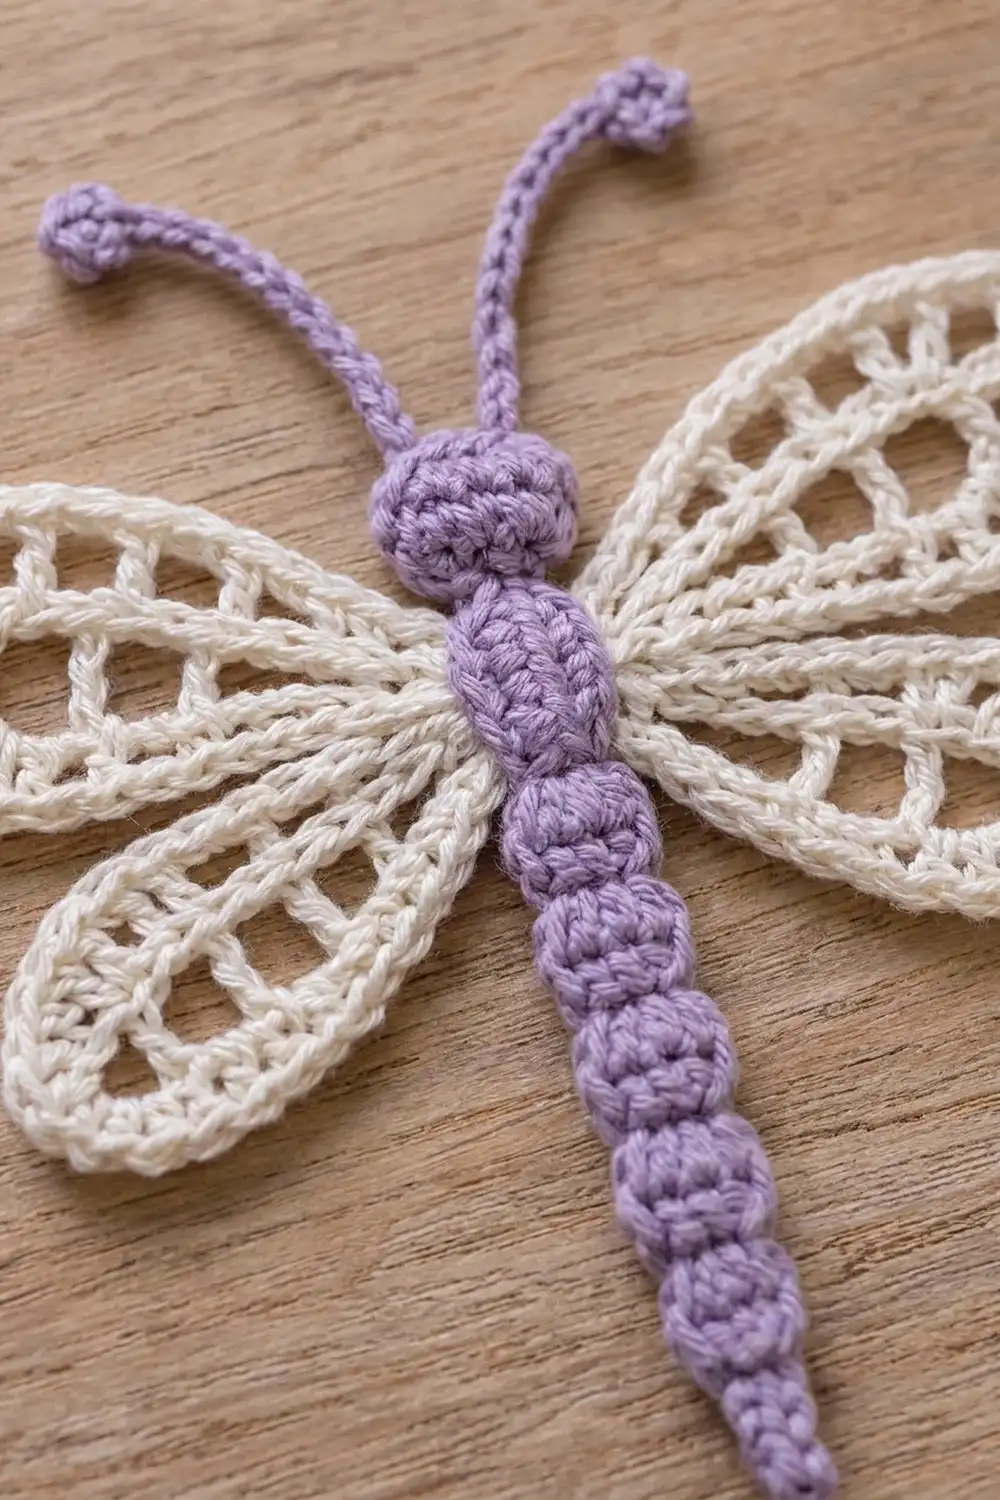
Body (Lavender)
Work the body in a continuous spiral from the top of the head down to the tail. Do not join the rounds. Place the marker in the first stitch of each round and move it up as you go.
Head
- Round 1: 6 sc in MR. (6 sts)
- Round 2: inc in each st around. (12 sts)
- Round 3: sc in each st around. (12 sts)
Stuff the head firmly.
- Round 4: sc2tog 6 times. (6 sts)
This 6-stitch round forms the neck between the head and the thorax.
Thorax
- Round 5: inc in each st around. (12 sts)
- Round 6: (sc in next st, inc) 6 times. (18 sts)
- Rounds 7–9: sc in each st around. (18 sts)
- Round 10: (sc in next st, sc2tog) 6 times. (12 sts)
Stuff the thorax firmly so it is the widest, roundest part of the body.
- Round 11: sc2tog 6 times. (6 sts)
Checkpoint: the thorax should be about 1 in (2.5 cm) wide.
Abdomen Beads
Each bead takes two rounds. The increase round makes the bulge, and the decrease round makes the waist between beads.
- Round 12: (sc in next st, inc) 3 times. (9 sts)
- Round 13: (sc in next st, sc2tog) 3 times. (6 sts)
Before you close the bead, push a small pinch of stuffing into it with the tip of your hook.
- Rounds 14–23: repeat Rounds 12–13 five more times, adding a pinch of stuffing to each bead. Every even round has 9 sts and every odd round has 6 sts. (6 beads total)
Tail Tip
- Rounds 24–25: sc in each st around. (6 sts)
- Round 26: sc2tog 3 times. (3 sts)
Fasten off and leave a 6 in (15.2 cm) tail. Thread it through the front loops of the last 3 sts, pull it closed and weave it in. The tip should taper to a soft point.
Checkpoint: the body is about 4.75 in (12.1 cm) long, from 26 rounds at 5.5 rounds per 1 in (2.5 cm).
Antennae (make 2, worked onto the head)
Hold the head with the magic ring facing up. Join lavender with a sl st into a stitch of Round 2, just left of center.
- Ch 14.
- Sl st in the 4th ch from the hook to form a small ring.
- Work 5 sc into the ring, then sl st to the first sc. This makes the round knob at the tip.
- Sl st in each of the remaining 10 ch, working back toward the head.
- Sl st into the head, fasten off and weave in the end.
Make the second antenna the same way, joining it 2 sts to the right of the first so the two sit side by side. Gently bend each one outward into a soft curve. Each antenna rises about 1.75 in (4.4 cm) above the head.
Wings (Cream)
Every wing is worked in joined rounds around both sides of a foundation chain. The end where you work the first sc is the base end, which gets sewn to the body. The opposite end, where you work 3 sc, is the tip.
Upper Wing (make 2)
Ch 9.
- Round 1: sc in the 2nd ch from the hook, sc in the next 6 ch, then 3 sc in the last ch (tip). Turn the piece and work along the other side of the chain: sc in the next 6 ch, then 2 sc in the last ch (the same ch as the first sc). Join with a sl st to the first sc. Count: 1 + 6 + 3 + 6 + 2 = 18 sts.
- Round 2 (windows): ch 6 (counts as dc + ch 3), skip the next st, dc in the next st, ch 3, skip the next st; repeat from * 7 more times. Join with a sl st to the 3rd ch of the beginning ch-6. (9 dc, 9 ch-3 sps)
The nine large spaces are the open “windows” of the wing, and the dc posts form the radiating veins.
Checkpoint: 2.6 in x 1.1 in (6.6 cm x 2.8 cm).
Lower Wing (make 2)
Ch 8.
- Round 1: sc in the 2nd ch from the hook, sc in the next 5 ch, then 3 sc in the last ch (tip). Working along the other side of the chain: sc in the next 5 ch, then 2 sc in the last ch. Join. Count: 1 + 5 + 3 + 5 + 2 = 16 sts.
- Round 2 (windows): ch 6 (counts as dc + ch 3), skip the next st, dc in the next st, ch 3, skip the next st; repeat from * 6 more times. Join to the 3rd ch of the beginning ch-6. (8 dc, 8 ch-3 sps)
Checkpoint: 2.35 in x 1.1 in (6.0 cm x 2.8 cm).
Border: Wing Edging
The edging is the smooth, slightly raised cream outline around every wing. The body has no border.
Border gauge: 5 sc per 1 in (2.5 cm). This round adds 0.2 in (0.5 cm) to every edge.
Round 3 – Upper Wings
Ch 1, sc in the same st as the join, 3 sc in the next ch-3 sp, sc in the next dc, 3 sc in the next ch-3 sp; repeat from * 7 more times. Join to the first sc. Count: (9 dc x 1 sc) + (9 sps x 3 sc) = 9 + 27 = 36 sts.
By side: the 4 windows along the upper edge carry 16 sc, the 3 windows along the lower edge carry 12 sc, and the tip window and the base window carry 4 sc each (16 + 12 + 4 + 4 = 36).
Round 3 – Lower Wings
Work the same way, but repeat from * only 6 more times. Count: (8 dc x 1 sc) + (8 sps x 3 sc) = 8 + 24 = 32 sts.
By side: the 3 windows along the upper edge carry 12 sc, the 2 windows at the tip carry 8 sc, the 2 windows along the lower edge carry 8 sc, and the base window carries 4 sc (12 + 8 + 8 + 4 = 32).
Fasten off every wing, leaving a 10 in (25.4 cm) tail for sewing.
Why the math works: one sc in each dc keeps the veins in line, and 3 sc in each ch-3 space exactly matches its 3 chains. Nothing is added or skipped, so the outline lies flat. The round adds 0.2 in (0.5 cm) to each edge, so every wing grows from 1.1 in to 1.5 in (2.8 cm to 3.8 cm) wide. The upper wing grows from 2.6 in to 3 in (6.6 cm to 7.6 cm) long, and the lower wing from 2.35 in to 2.75 in (6.0 cm to 7.0 cm).
Assembly: Attach the Wings
- Pinch the base end of each wing slightly so it narrows to about 0.25 in (0.6 cm).
- Pin the upper wings to the sides of the thorax at Rounds 7–8, with the tips angled about 10 degrees upward.
- Pin the lower wings just below them, at Rounds 9–10, with the tips angled about 20 degrees downward. Leave a hairline gap between the upper and lower wings.
- Sew each base end to the thorax with small whipstitches through the back half of the body so no cream stitches show on the front.
- Check from the front: the wings should mirror each other and the body should sit in the center.
Final Blocking
- Lightly mist the wings with water until they are damp but not soaked.
- Lay the dragonfly face up on the blocking mat.
- Pin each wing tip and both long edges, opening every window into a clean oval.
- Check the sizes: upper wings 3 in (7.6 cm), lower wings 2.75 in (7.0 cm), wingspan 6.25 in (15.9 cm).
- Shape the antennae into outward curves and pin them in place.
- Do not wet or flatten the body. Just plump the beads back up with your fingers.
- Let it dry completely, then remove the pins.
Final Quality-Control Checklist
- Head: 12 sts at its widest, firmly stuffed
- Thorax: 18 sts at its widest, clearly larger than the head
- Abdomen: 6 even beads, each 9 sts wide with 6-st waists
- Tail: closed point with no hole
- Two antennae of matching length, each with a round knob
- Upper wings: 9 windows and 36 edge sts each
- Lower wings: 8 windows and 32 edge sts each
- Wings symmetrical and securely sewn, with no stitches showing on the front
- Finished size: 6.25 in (15.9 cm) wide x 6.5 in (16.5 cm) tall
- All ends woven in
Troubleshooting
Stuffing shows through the body. Your stitches are too loose. Use a hook one size smaller for the body only.
The beads look like a smooth tube. Check that every increase round has 9 sts and every decrease round has 6 sts. Add a little more stuffing to each bead.
The wing ruffles. Your ch-3 spaces are too long. Chain more firmly, or work 2 sc instead of 3 into the tip spaces only.
The wing cups. Your chains are too tight. Loosen them, or use a hook one size larger for Round 2.
The antennae flop. Work the slip stitches back along the chain firmly, then mist and pin the antennae during blocking.
The wings droop when hung. Add a second line of stitches about 0.125 in (0.3 cm) farther out from the base end.
Care
Hand wash in cool water with mild soap. Press the water out in a towel, then dry flat and reshape the wings and antennae while they are damp.

Final Notes
Every size in this dragonfly follows from the gauge. At 5 sc and 5.5 rounds per 1 in (2.5 cm), the 26-round body comes out 4.75 in (12.1 cm) long. The antennae, made of 10 slip stitches plus a knob, rise 1.75 in (4.4 cm) above the head, for a total height of 6.5 in (16.5 cm). The upper wings go from 18 sc to 9 windows to 36 edge stitches and finish at 3 in (7.6 cm). The lower wings go from 16 sc to 8 windows to 32 edge stitches and finish at 2.75 in (7.0 cm). Sewn to a 1 in (2.5 cm) thorax, they give a 6.25 in (15.9 cm) wingspan.
Check each stage against its checkpoint and the finished piece will match.
Happy crocheting!