

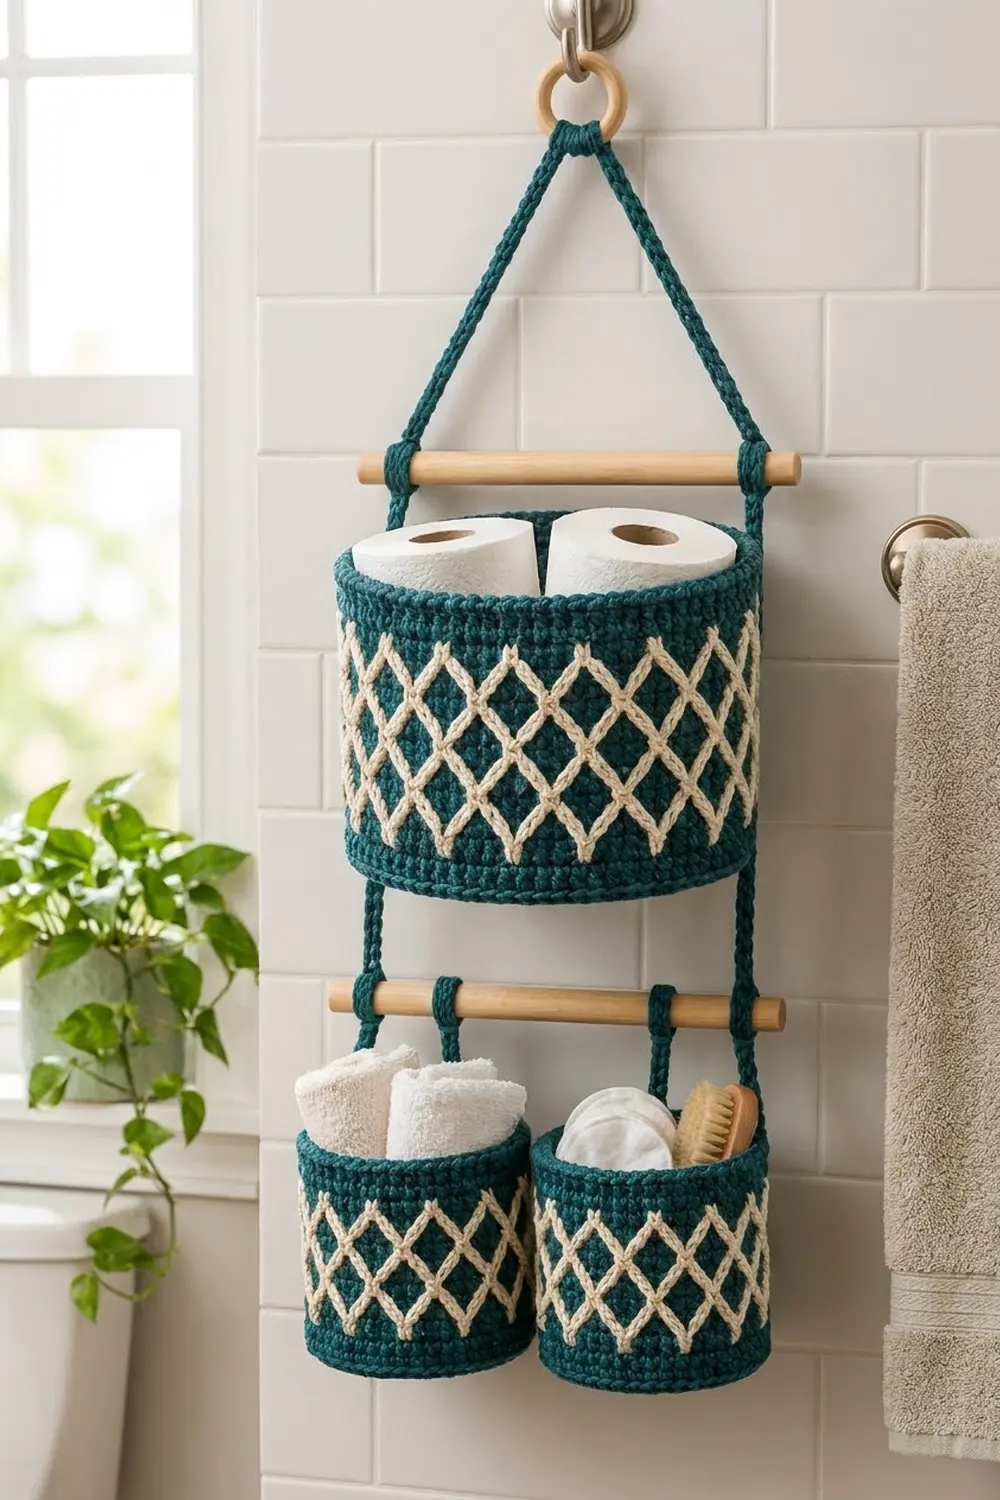
This hanging organizer has three round baskets on two wooden dowels. One large basket hangs at the top and two small ones hang side by side below it. Each basket is deep teal with a raised cream diamond lattice across the middle, plain bands above and below, and a corded top rim.
The color pairing is calm and works well in a bathroom, laundry room or entry. The large basket holds two or three spare toilet rolls lying down. Each small basket fits one standing roll, a stack of washcloths or small supplies.
This pattern uses US crochet terms. The large basket is about 8.6 in (21.8 cm) across and 6.5 in (16.5 cm) tall. The small baskets are about 5.25 in (13.3 cm) across and 5.25 in (13.3 cm) tall. Hung up, the organizer is about 13 in (33.0 cm) wide and 28 in (71.1 cm) tall, ring included.
Each basket starts with a flat single crochet base. One back-loop round turns the wall upward, and the wall is worked in even rounds. When the wall is done, you add the cream lattice in surface slip stitch and finish the rim. Four slip-stitch cords, a ring and two dowels hold everything together.
Finished Size and Construction
- Finished size (hanging): 13 in (33.0 cm) wide x 28 in (71.1 cm) tall
- Skill level: Intermediate
- Terminology: US
- Yarn weight: Worsted (#4), cotton or cotton blend
- Hooks: 4.5 mm (US 7) for the baskets; 5.5 mm (US I-9) for the cords
- Number of pieces: 3 baskets (1 large, 2 small) and 4 cords (2 long, 2 short)
- Layout: Large basket on top, two small baskets side by side below
- Large basket: 8.6 in (21.8 cm) diameter x 6.5 in (16.5 cm) tall
- Small basket: 5.25 in (13.3 cm) diameter x 5.25 in (13.3 cm) tall
- Height before rim: large 6 in (15.2 cm); small 4.75 in (12.1 cm)
- Rim (border) depth: 0.5 in (1.3 cm), 2 rounds
Materials
Choose a firm worsted cotton or cotton blend, about 190 m per 100 g. Cotton keeps the walls upright and handles bathroom humidity well. Acrylic also works, but the baskets will be a little softer.
- Deep teal (main color): 140 g, about 266 m
- Cream (lattice): 80 g, about 152 m
These quantities include a margin of about 20 percent, so you have spare yarn for a gauge test and small adjustments.
Tools and hardware:
- 4.5 mm (US 7) and 5.5 mm (US I-9) crochet hooks
- 2 wooden dowels, 13 in (33.0 cm) long and 1/2 in (1.3 cm) thick
- 1 wooden ring, 3 in (7.6 cm) across
- Stitch markers (at least 20)
- Tapestry needle, scissors, measuring tape
- Optional: plastic canvas circles cut to size, to stiffen the bases
Abbreviations (US Terms)
- ch – chain
- sl st – slip stitch
- sc – single crochet
- inc – 2 sc in the same stitch
- BLO – back loop only
- rev sc – reverse single crochet (crab stitch)
- st(s) – stitch(es)
- rnd(s) – round(s)
Special stitch – surface slip stitch (surf sl st): With the right side facing you, hold the cream yarn inside the basket. Push the hook through the fabric from the front, between two stitches. Yarn over and pull a loop to the front. For each following stitch, push the hook through at the next point on the line, pull a loop to the front, and draw it through the loop on the hook. This makes a raised chain line on the surface.
Gauge and Checkpoints
Gauge: 16 sc x 16 rnds = 4 in (10.2 cm) with the 4.5 mm hook. That is 4 sts and 4 rnds per inch.
Make one small basket base first (Rnds 1–11) as your test piece. It should measure about 5.25 in (13.3 cm) across. If it does, the rest of the pattern will fit.
Checkpoints:
- Rnd 6 (36 sts): about 2.9 in (7.4 cm) across
- Rnd 11 (66 sts): about 5.25 in (13.3 cm) across
- Rnd 18 (108 sts): about 8.6 in (21.8 cm) across
- Large wall circumference: 27 in (68.6 cm)
- Small wall circumference: 16.5 in (41.9 cm)
If your base is more than 1/4 in (0.6 cm) too large, go down half a hook size. If it is that much too small, go up half a size. Do not add or skip rounds to fix the size. The stitch counts must stay multiples of 6 so the lattice repeats evenly.

Large Basket
Work in joined rounds. End each round with sl st to the first sc, and start each round with ch 1, which does not count as a stitch. Joined rounds keep the stitch columns lined up, and the lattice depends on that.
Base
Rnd 1: With teal and the 4.5 mm hook, 6 sc in a magic ring. (6 sts)
Rnd 2: Inc in each st around. (12 sts)
Rnd 3: Sc 1, inc 6 times. (18 sts)
Rnd 4: Sc 2, inc 6 times. (24 sts)
Rnds 5–18: In each round, work 6 increases with one more sc between them than in the round before. In Rnd n, work sc (n − 2), inc 6 times. Each round’s total is 6 x n:
| Rnd | 5 | 6 | 7 | 8 | 9 | 10 | 11 | 12 | 13 | 14 | 15 | 16 | 17 | 18 |
|---|---|---|---|---|---|---|---|---|---|---|---|---|---|---|
| Sts | 30 | 36 | 42 | 48 | 54 | 60 | 66 | 72 | 78 | 84 | 90 | 96 | 102 | 108 |
To keep the base round instead of hexagonal, place the increase in the middle of the repeat on every other round.
Checkpoint: the base lies flat and measures 8.6 in (21.8 cm) across. (108 sts)
Wall
Rnd 19 (turning round): Sc in BLO of each st: 108 sts worked one per stitch, plus 0 added. (108 sts) The unused front loops make a clean fold line, and the wall rises from here.
Rnds 20–24: Sc in each st. (108 sts) This is the lower plain band: 6 rnds (Rnds 19–24), 1.5 in (3.8 cm).
Rnds 25–36: Sc in each st. (108 sts) This is the lattice band: 12 rnds, 3 in (7.6 cm).
Rnds 37–42: Sc in each st. (108 sts) This is the upper plain band: 6 rnds, 1.5 in (3.8 cm).
Checkpoint: the wall is 6 in (15.2 cm) tall and 27 in (68.6 cm) around. Do not fasten off yet. Put the live loop on a marker and add the lattice before you work the rim.
Lattice (Cream)
Number the stitches of Rnd 25 from 1 to 108. Put a marker in st 1, st 7, st 13, and every 6th st after that, for 18 markers in total.
Each line has 12 surf sl sts, one in each rnd from 25 to 36. Hold two strands of cream together so the lines look bold.
- Rising-right lines: Start at a marked st in Rnd 25. In each rnd above, move 1 st to the right. A line that starts at st 1 ends at st 12 in Rnd 36.
- Rising-left lines: Start at the same marked st. In each rnd above, move 1 st to the left. A line that starts at st 7 ends at st 104 in Rnd 36, counting backward past st 1.
Work all 18 rising-right lines, then all 18 rising-left lines, for 36 lines in total. Where two lines share a stitch, work the second line straight over the first. For example, the rising-right line from st 1 and the rising-left line from st 7 cross at st 4 in Rnd 28.
This gives diamonds 6 sts wide and 6 rnds tall, or 1.5 in (3.8 cm) each way. There are two full rows of diamonds, with half-diamonds along the top and bottom of the band, and teal shows in the center of each one. Weave in the ends on the inside, sewing each tail back along its own line.
Small Basket (Make 2)
Base
Work Rnds 1–11 as for the large basket. (66 sts) Checkpoint: 5.25 in (13.3 cm) across.
Wall
Rnd 12 (turning round): Sc in BLO of each st: 66 worked plus 0 added. (66 sts)
Rnds 13–15: Sc in each st. (66 sts) Together with Rnd 12, this is the lower band: 4 rnds, 1 in (2.5 cm).
Rnds 16–27: Sc in each st. (66 sts) This is the lattice band: 12 rnds, 3 in (7.6 cm).
Rnds 28–30: Sc in each st. (66 sts) This is the upper band: 3 rnds, 0.75 in (1.9 cm).
Checkpoint: the wall is 4.75 in (12.1 cm) tall and 16.5 in (41.9 cm) around.
Lattice
In Rnd 16, mark st 1 and every 6th st after it, for 11 markers. Work 11 rising-right and 11 rising-left lines through Rnds 16–27, 12 surf sl sts each, the same way as on the large basket. That makes 22 lines in total.
Cords
Use two strands of teal held together and the 5.5 mm hook. At this size the chain runs about 3 ch per inch.
Long Cord (Make 2)
Step 1: Ch 6, then sl st in the first ch to form a 1 in (2.5 cm) end loop.
Step 2: Ch 63, about 21 in (53.3 cm). Change the count if you need to in order to reach that length.
Step 3: Ch 6, then sl st in the 6th ch from the hook to form the second loop.
Step 4: Sl st in the back bump of each of the 63 shaft ch, working back to the first loop. Sl st into the base of that loop and fasten off. (63 sl sts)
The finished cord is 23 in (58.4 cm) long, loops included.
Short Cord (Make 2)
Work as for the long cord, but ch 15 in Step 2 for a 5 in (12.7 cm) shaft. (15 sl sts) The finished cord is 7 in (17.8 cm) long.
Make All Pieces
Teal: 1 large basket, 2 small baskets, 2 long cords, 2 short cords.
Cream: lattice on all 3 baskets (36 + 22 + 22 = 80 lines).
Layout:
            [ ring ]
           /        \
   ===|=====upper dowel=====|===
      |   [ LARGE BASKET ]  |
      |                     |
   ===|==|===lower dowel==|=|===
         |                |
      [SMALL]          [SMALL]
Assembly (Joining)
The pieces are not crocheted together. The cords and a few tacking stitches connect them. Use a single strand of teal and the tapestry needle for all sewing.
- Ring: Push the top loop of one long cord through the ring. Pass the whole cord through that loop and pull it snug (a lark’s head knot). Repeat with the second long cord.
- Upper dowel: Measure 2 in (5.1 cm) in from each end of the dowel. Wrap each long cord once around the dowel at its mark and tack it with 3 or 4 stitches. The cords now hang 9 in (22.9 cm) apart, which is just wider than the large basket.
- Large basket: Hang the basket 1 in (2.5 cm) below the upper dowel. Sew one cord at st 1 and the other at st 55, which is 54 sts (half the round) away. Sew each cord at the rim and again at Rnd 19. The two cords are directly opposite each other, so the basket hangs level.
- Lower dowel: Slide the bottom loop of each long cord onto the lower dowel, 2 in (5.1 cm) from each end. Leave 2 in (5.1 cm) between the base of the large basket and the dowel.
- Small baskets: Sew the bottom loop of each short cord flat to the inside back wall of a small basket, 1.5 in (3.8 cm) below the rim. Slide the top loops onto the lower dowel, 3.5 in (8.9 cm) from each end.
Tension: Sew firmly, but not so tightly that the wall puckers. Take the tacking stitches through the cord and only the inner half of each basket stitch so they stay hidden.
Checkpoint: Hang the organizer. Both dowels should sit level, and the total height should be about 28 in (71.1 cm). If one side sags, adjust that cord’s wrap on the upper dowel before tacking it in place.
Border (Top Rim)
Work the rim on each basket after its lattice is done. Put the held loop back on the 4.5 mm hook.
Border gauge: 4 sts and 4 rnds per inch, the same as the wall.
Large basket:
- Rnd 43: Sc in each st. (108 sts: 108 worked + 0 added)
- Rnd 44: Rev sc in each st. (108 sts) Fasten off and weave in.
Small baskets:
- Rnd 31: Sc in each st. (66 sts: 66 worked + 0 added)
- Rnd 32: Rev sc in each st. (66 sts) Fasten off and weave in.
Why the math works: The rim has the same stitch count as the wall, so the edge stays straight without flaring or pulling in. Both counts are multiples of the 6-stitch lattice repeat (108 = 18 x 6 and 66 = 11 x 6), so the diamonds close evenly all the way around. The two rim rounds add 0.5 in (1.3 cm). That takes the large basket from 6 in (15.2 cm) to 6.5 in (16.5 cm) and the small baskets from 4.75 in (12.1 cm) to 5.25 in (13.3 cm). The reverse sc forms the rolled, corded edge.
Final Blocking
- Lightly spray each basket with water until it is damp but not soaked.
- Stuff it with a towel, or slide it over a straight-sided container of the right size: 8.6 in (21.8 cm) across for the large basket and 5.25 in (13.3 cm) for the small ones.
- Press the base flat on a table and smooth the fold line at the turning round.
- Straighten the cream lines with your fingers so the diamonds are even.
- Let everything dry completely, then add the plastic canvas bases if you are using them.
- Assemble the organizer only after all the pieces are dry.
Final Quality-Control Checklist
- Bases lie flat with no ripples or cupping
- Stitch counts stay at 108 (large) and 66 (small) all the way up
- Every diamond is 6 sts x 6 rnds, with half-diamonds at the band edges
- No cream tails show on the outside
- Rims are even all the way around
- Cords are tacked securely and both dowels hang level
- Finished heights are 6.5 in (16.5 cm) and 5.25 in (13.3 cm)
Troubleshooting
- Base cups upward: Your tension is too tight. Go up a hook size or stagger the increases more.
- Base ruffles: Go down a hook size and check that each round has exactly 6 increases.
- Lattice slants or misses a crossing: A stitch was skipped. Check each line against its marker: in the 4th rnd of the band, it should be 3 sts from where it started.
- Cream lines pucker the wall: Use a hook one size larger for the surface slip stitch.
- Walls lean outward: Tighten your tension on the plain rounds, and check that the turning round was worked in BLO.
- Organizer tilts: Re-tack the cord wraps so each is exactly 2 in (5.1 cm) from its end of the dowel.
Care
Hand wash in cool water, roll in a towel to press out the water, and reshape the baskets to dry flat. Take out any plastic canvas bases before washing.
Final Notes
Each measurement builds on the one before it. A gauge of 4 sts per inch gives bases of 108 and 66 sts, at 8.6 in (21.8 cm) and 5.25 in (13.3 cm) across. Walls of 24 and 19 rnds reach 6 in (15.2 cm) and 4.75 in (12.1 cm), and the rim adds 0.5 in (1.3 cm). With the cords set 9 in (22.9 cm) apart, the organizer is 13 in (33.0 cm) wide and 28 in (71.1 cm) tall. Keep to the gauge and the 6-stitch repeat and everything else will line up.
Happy crocheting!