

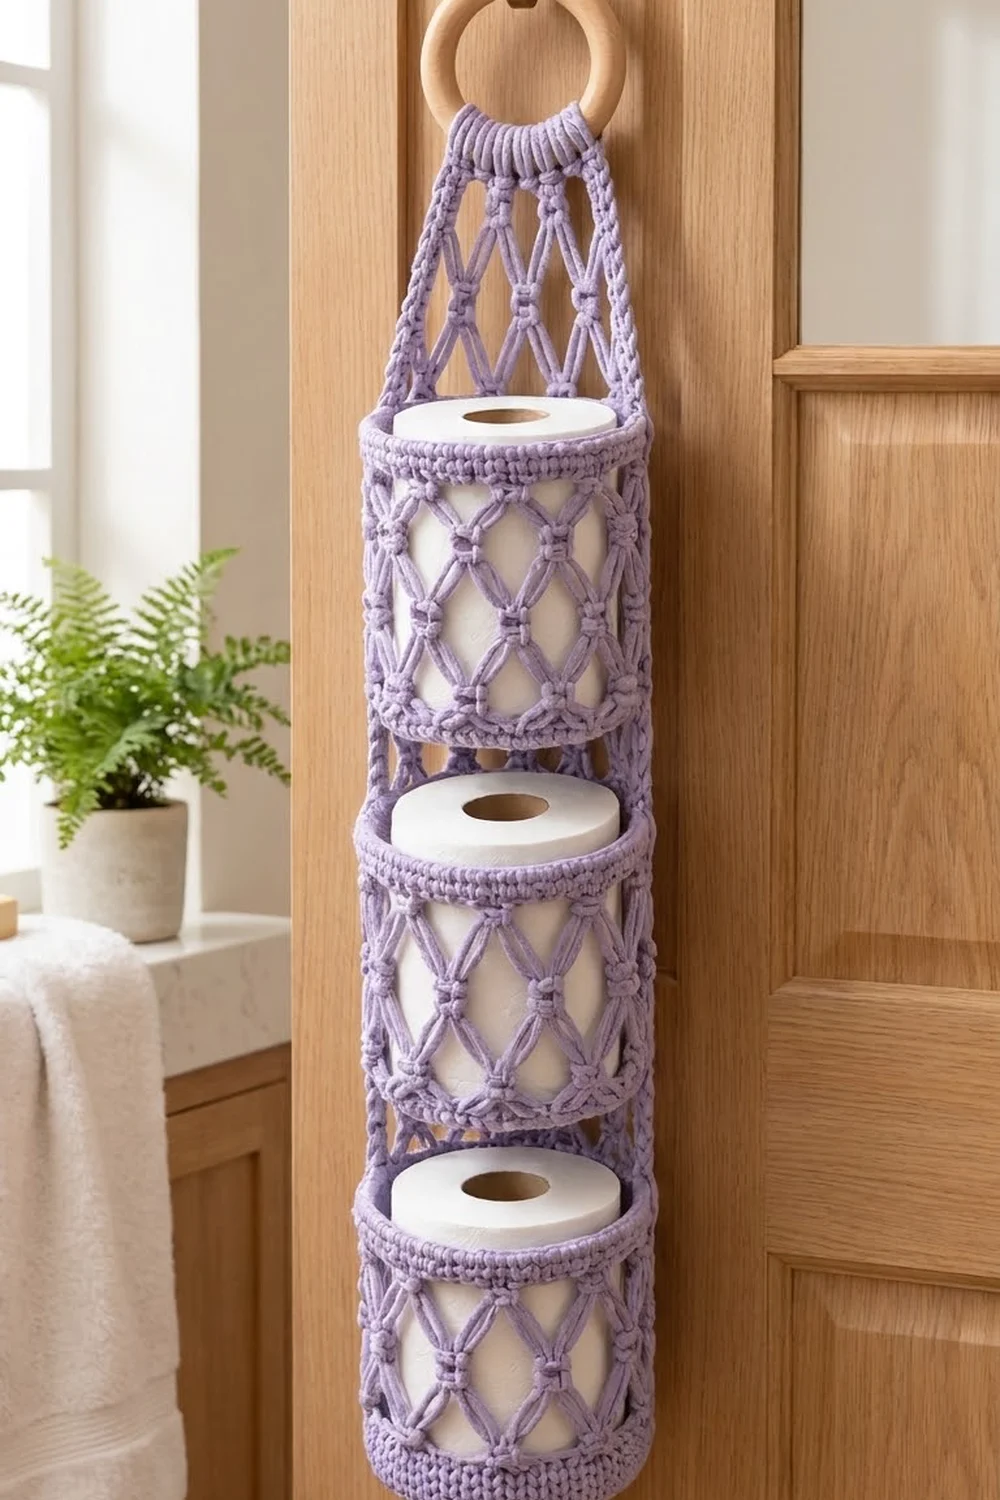
This hanging toilet paper holder puts three spare rolls on the back of a door or on a wall hook. A long diamond-mesh panel hangs from a wooden ring, and three round pockets are stacked down its front, each one holding a single roll.
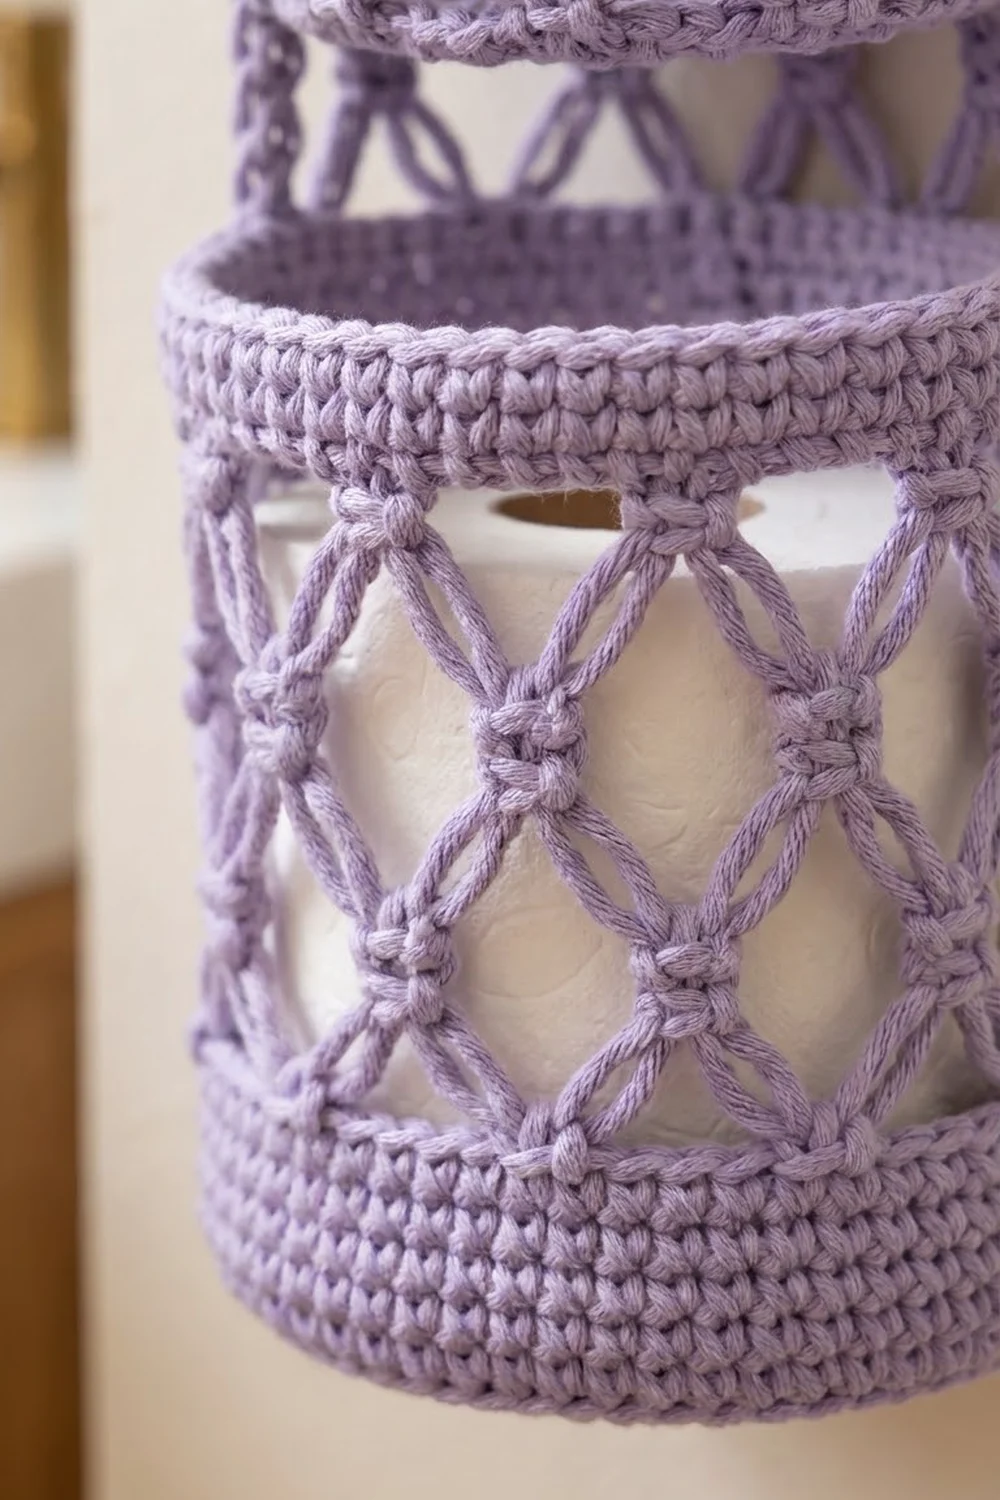
The sample is all one soft lavender cotton. The open lattice keeps it light and gives it a slight macramé look, and the solid single crochet bands at the top and bottom of each pocket keep the shape firm. Small knots where the chain loops meet give the mesh its texture.
The pattern uses US crochet terms. The finished holder is about 26″ (66.0 cm) long including the ring. Each pocket is about 5″ (12.7 cm) across and 6″ (15.2 cm) tall and holds a standard roll up to about 4.5″ (11.4 cm) wide.
You make one flat mesh back panel in rows and three pockets in the round. Then you sew the pockets to the panel stitch by stitch, add a corded border to each pocket rim, and fold the panel’s top strap over the ring.
Finished Size and Construction
- Finished size: about 26″ (66.0 cm) long including the ring
- Skill level: Intermediate
- Terminology: US crochet terms
- Yarn weight: worsted (#4) cotton
- Hook: 5.0 mm (H-8)
- Number of pieces: 4 (1 back panel and 3 pockets), plus 1 wooden ring
- Layout: 3 pockets stacked vertically on 1 panel (1 column × 3 rows)
- Piece size: each pocket is 5″ (12.7 cm) across and 6″ (15.2 cm) tall; the panel is 4.25″ (10.8 cm) wide and 24.2″ (61.5 cm) long before folding
- Size before border: pocket height 6″ (15.2 cm)
- Border depth: about 0.2″ (0.5 cm), added to each pocket rim
Materials
Use a smooth, firm cotton or cotton blend in worsted weight. Cotton holds its shape when filled, stays crisp in a humid bathroom and shows the knots clearly. Avoid very soft or stretchy acrylic, because the pockets can sag.
- Lavender: 250 g, about 425 m (465 yd)
Tools:
- 5.0 mm (H-8) crochet hook
- 1 wooden ring, 3″ (7.6 cm) outer diameter
- 6 locking stitch markers
- Tapestry needle
- Scissors
- Measuring tape
- Rust-proof pins and a blocking mat
The quantity includes a margin of about 25% for your gauge swatch and seams.
Abbreviations (US Terms)
- ch – chain
- sl st – slip stitch
- sc – single crochet
- dc – double crochet
- inc – 2 sc in the same stitch
- BLO – back loop only
- sp – space
- st(s) – stitch(es)
- rsc – reverse single crochet (crab stitch): single crochet worked from left to right (right-handed)
Special stitch – Knot (kn): (sc, ch 1, sc) all in the same stitch or space. Each knot counts as 1 mesh point. Its ch-1 space is used in later rounds.
Gauge and Checkpoints
Solid gauge: 15 sc × 17 rows = 4″ (10.2 cm).
Mesh gauge (panel): 16 sts wide = 4.25″ (10.8 cm); 5 mesh rows = 3″ (7.6 cm).
Make one pocket before you start the panel. It works as a full-size gauge test, and the pocket has to fit a roll anyway.
Checkpoints:
- Pocket base after Round 10: 5″ (12.7 cm) across, lying flat
- Lower band after Round 14: 0.9″ (2.3 cm) tall
- Mesh after Round 20: 3.9″ (9.9 cm) tall
- Top band after Round 25: 1.2″ (3.0 cm) tall
- Whole pocket: 6″ (15.2 cm) tall, 16″ (40.6 cm) around
If it is too big, go down 0.5 mm in hook size. If it is too small, go up 0.5 mm. If only the mesh is off, change your chain tension and leave the hook as it is. Loose chains make the pocket taller, and tight chains pull it in.
Pocket (Make 3)
Work in continuous joined rounds with the right side facing. Do not turn.
Base
- Round 1: Make a magic ring, ch 1, 6 sc in the ring, join with sl st to the first sc. (6)
- Round 2: Ch 1, inc in each st around, join. (12)
- Round 3: Ch 1, (sc, inc) 6 times, join. (18)
- Round 4: Ch 1, (sc in next 2, inc) 6 times, join. (24)
- Round 5: Ch 1, (sc in next 3, inc) 6 times, join. (30)
- Round 6: Ch 1, (sc in next 4, inc) 6 times, join. (36)
- Round 7: Ch 1, (sc in next 5, inc) 6 times, join. (42)
- Round 8: Ch 1, (sc in next 6, inc) 6 times, join. (48)
- Round 9: Ch 1, (sc in next 7, inc) 6 times, join. (54)
- Round 10: Ch 1, (sc in next 8, inc) 6 times, join. (60)
Checkpoint: the base is 5″ (12.7 cm) across.
Lower band
- Round 11: Ch 1, sc in BLO of each st around, join. (60) This leaves a ridge of unworked front loops from Round 10. The ridge turns the work up into a cylinder, and you will use it for the seam later.
- Rounds 12–14: Ch 1, sc in each st around, join. (60)
Mesh
- Round 15 (setup): Ch 1, kn in first st, (ch 5, sk 4 sts, kn in next st) 11 times, ch 5, sk 4 sts, join with sl st to the first sc. (12 knots, 12 ch-5 loops; 12 × 5 = 60 sts used)
- Round 16: Sl st in the ch-1 sp of the first knot, sl st in the next sc, sl st into the next ch-5 sp. Ch 1, kn in the same ch-5 sp, (ch 5, kn in next ch-5 sp) 11 times, ch 5, join to the first sc. (12 knots, 12 ch-5 loops)
- Rounds 17–20: Repeat Round 16. (12 knots, 12 ch-5 loops each round)
Because each knot sits in the middle of the loop below it, the loops form diamonds and the knots line up where the diamonds meet.
Top band
- Round 21 (conversion): Sl st in the ch-1 sp of the first knot, ch 1, sc in the same sp, 4 sc in the next ch-5 sp, (sc in the ch-1 sp of the next knot, 4 sc in the next ch-5 sp) 11 times, join. (12 sc in knots + 48 sc in loops = 60)
- Rounds 22–25: Ch 1, sc in each st around, join. (60)
Fasten off and leave a 24″ (61.0 cm) tail for sewing. Weave in the starting tail.
Back Panel
Work in rows and turn at the end of each row. The panel has two alternating mesh rows. Row A starts and ends with sc, and Row B starts and ends with dc.
- Foundation: Ch 17.
- Row 1: Sc in the 2nd ch from the hook and in each ch across, turn. (16)
- Row 2 (Row A setup): Ch 1, sc in the first st, (ch 5, sk 4 sts, kn in next st) 2 times, ch 5, sk 4 sts, sc in the last st, turn. (2 edge sc, 2 knots, 3 ch-5 loops; 1 + 5 + 5 + 5 = 16 sts used)
- Row 3 (Row B): Ch 3 (counts as dc), ch 2, kn in the first ch-5 sp, (ch 5, kn in next ch-5 sp) 2 times, ch 2, dc in the last sc, turn. (2 dc, 3 knots, 2 ch-5 loops, 2 ch-2 half loops)
- Row 4 (Row A): Ch 1, sc in the first dc, ch 5, (kn in next ch-5 sp, ch 5) 2 times, sc in the 3rd ch of the turning ch, turn. (2 edge sc, 2 knots, 3 ch-5 loops)
- Rows 5–33: Alternate Row B (odd rows) and Row A (even rows), ending with Row B on Row 33.
Checkpoint: 19.5″ (49.5 cm) long and 4.25″ (10.8 cm) wide.
Neck
- Rows 34–37: Work Row A, Row B, Row A, Row B as before, but use ch 4 for every full loop and ch 1 for each half loop in the B rows. These four rows add 2″ (5.1 cm).
- Rows 38–41: Work the same way with ch 3 for every full loop and ch 1 for each half loop. These rows add 1.6″ (4.1 cm). Row 41 is a B row: dc, ch 1, kn, ch 3, kn, ch 3, kn, ch 1, dc.
- Row 42 (conversion): Ch 1, sc in the first dc, sc in the ch-1 sp, (sc in the ch-1 sp of the next knot, 2 sc in the next ch-3 sp) 2 times, sc in the ch-1 sp of the last knot, sc in the ch-1 sp, sc in the top of the turning ch, turn. (3 knots × 1 + 2 loops × 2 + 2 half loops × 1 + 2 edges × 1 = 11)
Checkpoint: the panel is about 23″ (58.4 cm) long, and the neck has narrowed to 3″ (7.6 cm).
Strap
- Rows 43–46: Ch 1, sc in each st across, turn. (11)
Fasten off and leave a 24″ (61.0 cm) tail. Checkpoint: 24.2″ (61.5 cm) long, measured flat.
Make All Pieces
- Lavender: 1 back panel
- Lavender: 3 pockets
Layout (front view):
        ( wooden ring )
      [ strap, Rows 43–46 ]
      [ neck,  Rows 34–42 ]
      [ panel mesh, Row 33 ]
 [ Pocket 3 : rim Row 32, base Row 22 ]
 [ Pocket 2 : rim Row 22, base Row 12 ]
 [ Pocket 1 : rim Row 12, base Row 2  ]
      [ panel, Row 1 ]
Joining
Method: whipstitch with the yarn tails, matching stitch to stitch.
Every A row on the panel has exactly 16 sewing points: sc, 4 chains of the loop, knot, 4 chains, knot, 4 chains, sc (1 + 4 + 1 + 4 + 1 + 4 + 1 = 16). Each pocket has a 16-stitch back section in its rim and a matching 16 loops in its base ridge.
- On each pocket, find the joining seam at the back of the rim. Mark the 8 stitches on each side of it in Round 25 (16 sts). Directly below, mark the matching 16 free front loops of Round 10.
- Lay the panel right side up. Place Pocket 1 so that its base ridge sits on Row 2 and its rim sits on Row 12.
- Whipstitch the 16 rim sts to the 16 points of Row 12 in order, one stitch to one point. Then whipstitch the 16 base loops to Row 2.
- Repeat with Pocket 2 on Rows 12 and 22, sewing its base through the same Row 12 points just above Pocket 1’s rim. Then attach Pocket 3 to Rows 22 and 32.
Tension: pull each stitch snug but not tight. The mesh should lie flat behind the pocket. If it puckers, you have pulled too hard.
Checkpoint: the three pockets together measure 18″ (45.7 cm), and Row 33 shows just above the top rim.
Ring: Fold Rows 44–46 to the back around the wooden ring. Whipstitch the 11 sts of Row 46 to the 11 sts of Row 43, one to one, so the ring is enclosed in a sleeve.
Border
Border gauge: 1 rsc per sc. The border adds 0.2″ (0.5 cm) to the height and no width.
Work 1 round on each pocket rim. Join the yarn at the rim seam with the right side facing.
- Border round: Ch 1, rsc in each st around, join. (60 rsc: 44 front sts + 16 back sts)
The 16 back stitches have already been sewn to the panel. Work the rsc through them anyway, because it locks the seam. Repeat on all 3 pockets, for 180 rsc in total (3 × 60). Fasten off and weave in the ends.
Why the math works: each rim has 60 sc, and the border uses 60 rsc with no increases or skips. The edge keeps its 16″ (40.6 cm) circumference, so it does not flare or pull in. The 16-stitch back section matches the panel’s 16 sewing points exactly.
Final Blocking
- Weave in all remaining ends along the solid bands.
- Wet the holder thoroughly in cool water and gently press out the excess. Do not wring it.
- Roll it in a towel to absorb more moisture.
- Lay it flat and pin the panel to 4.25″ (10.8 cm) wide, opening each diamond evenly.
- Put a roll or a 5″ (12.7 cm) jar inside each pocket so the cylinders dry round.
- Check the overall length of about 26″ (66.0 cm) with the ring. Let it dry completely.
Final Quality-Control Checklist
- Each pocket has 60 sts in Rounds 10, 21 and 25.
- Every mesh round has 12 knots and 12 loops.
- The panel A rows have 2 knots and 3 loops, and the B rows have 3 knots.
- The pockets are centered, and the seams sit on Rows 2, 12, 22 and 32.
- The rim border has 60 rsc on each pocket.
- The ring sleeve is closed securely with 11 sts.
- All ends are woven in and the knots look even.
Troubleshooting
- Pocket flares at the top: you probably have extra stitches. Recount Round 21 (it should be 60) or tighten the top band.
- Mesh is too tall: your chains are loose. Chain more firmly or go down 0.5 mm in hook size for the mesh only.
- The roll will not fit: the base is too small. Check Round 10 for 60 sts at 5″ (12.7 cm).
- Panel twists: check that every B row starts with ch 3 and every A row starts with ch 1.
- Holder sags: the cotton is too soft or the seams are too loose. Sew the seams again with a firmer tension.
Care
Hand wash in cool water, reshape while damp and dry flat with something round inside each pocket. Take the holder off the ring hook before washing to avoid stretching the strap.
Final Notes
The measurements build on each other. A gauge of 15 sc = 4″ (10.2 cm) gives a 60-stitch pocket of 5″ (12.7 cm) across and 6″ (15.2 cm) tall. Three pockets stack to 18″ (45.7 cm) on a 4.25″ (10.8 cm) panel that measures 19.5″ (49.5 cm) at Row 33. The neck brings it to 24.2″ (61.5 cm) before folding, and the ring finishes it at about 26″ (66.0 cm). If you check each stage as you go, the stitch-to-stitch seams will line up.
Happy crocheting!