

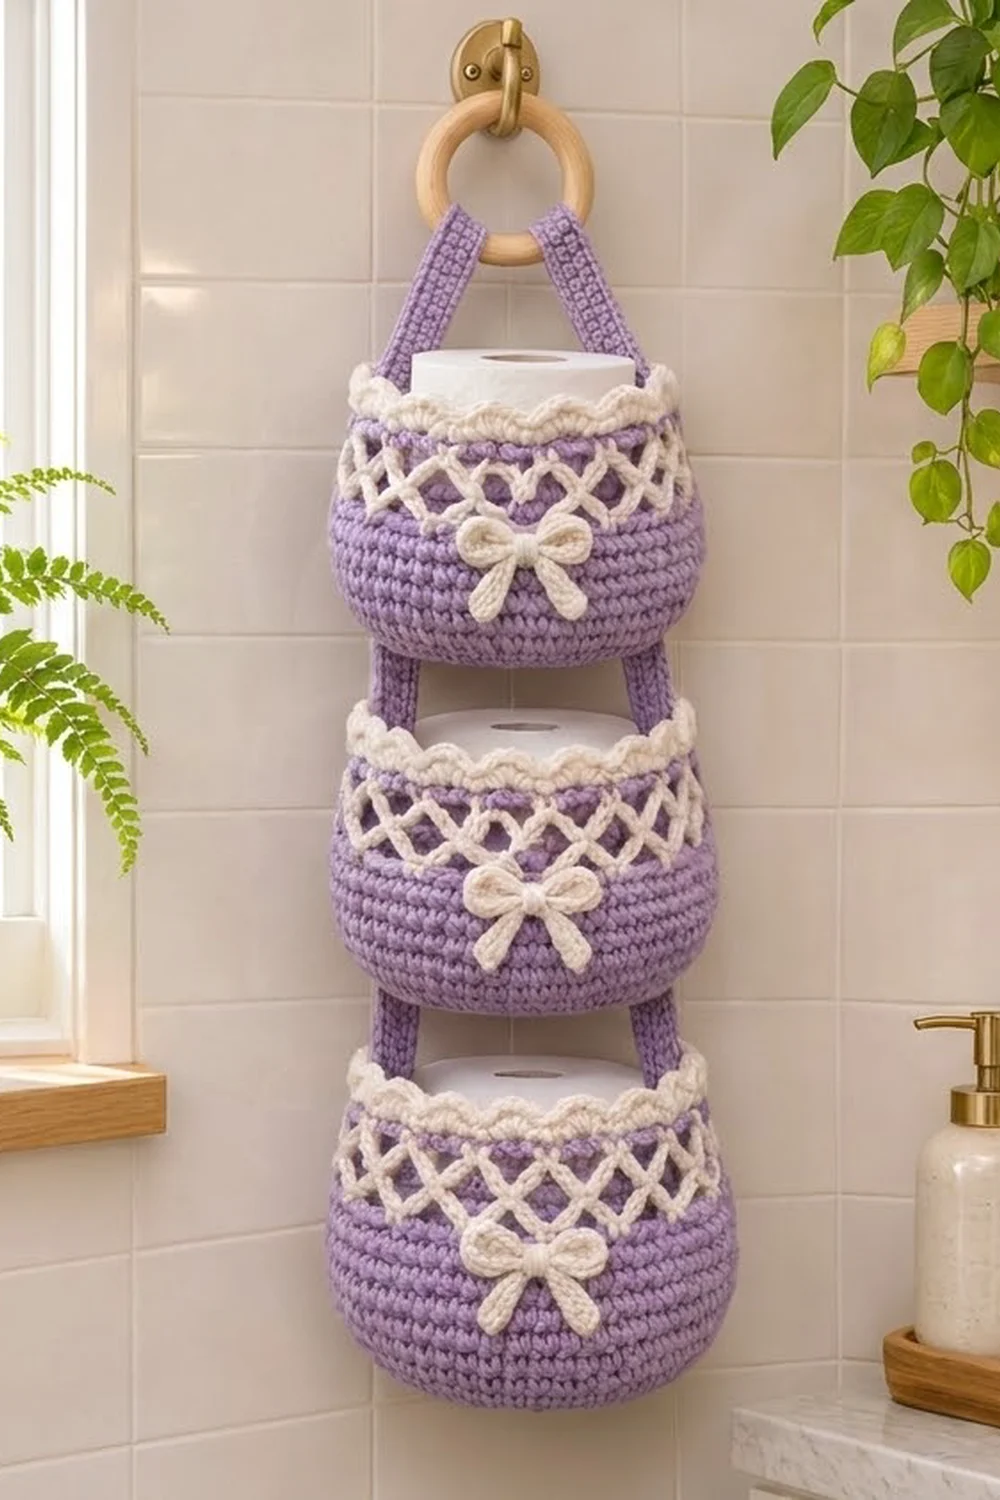
This hanging holder stacks three soft, rounded baskets on a wooden ring, and each basket holds one standard toilet paper roll. It’s practical bathroom storage that also looks pretty on the wall.
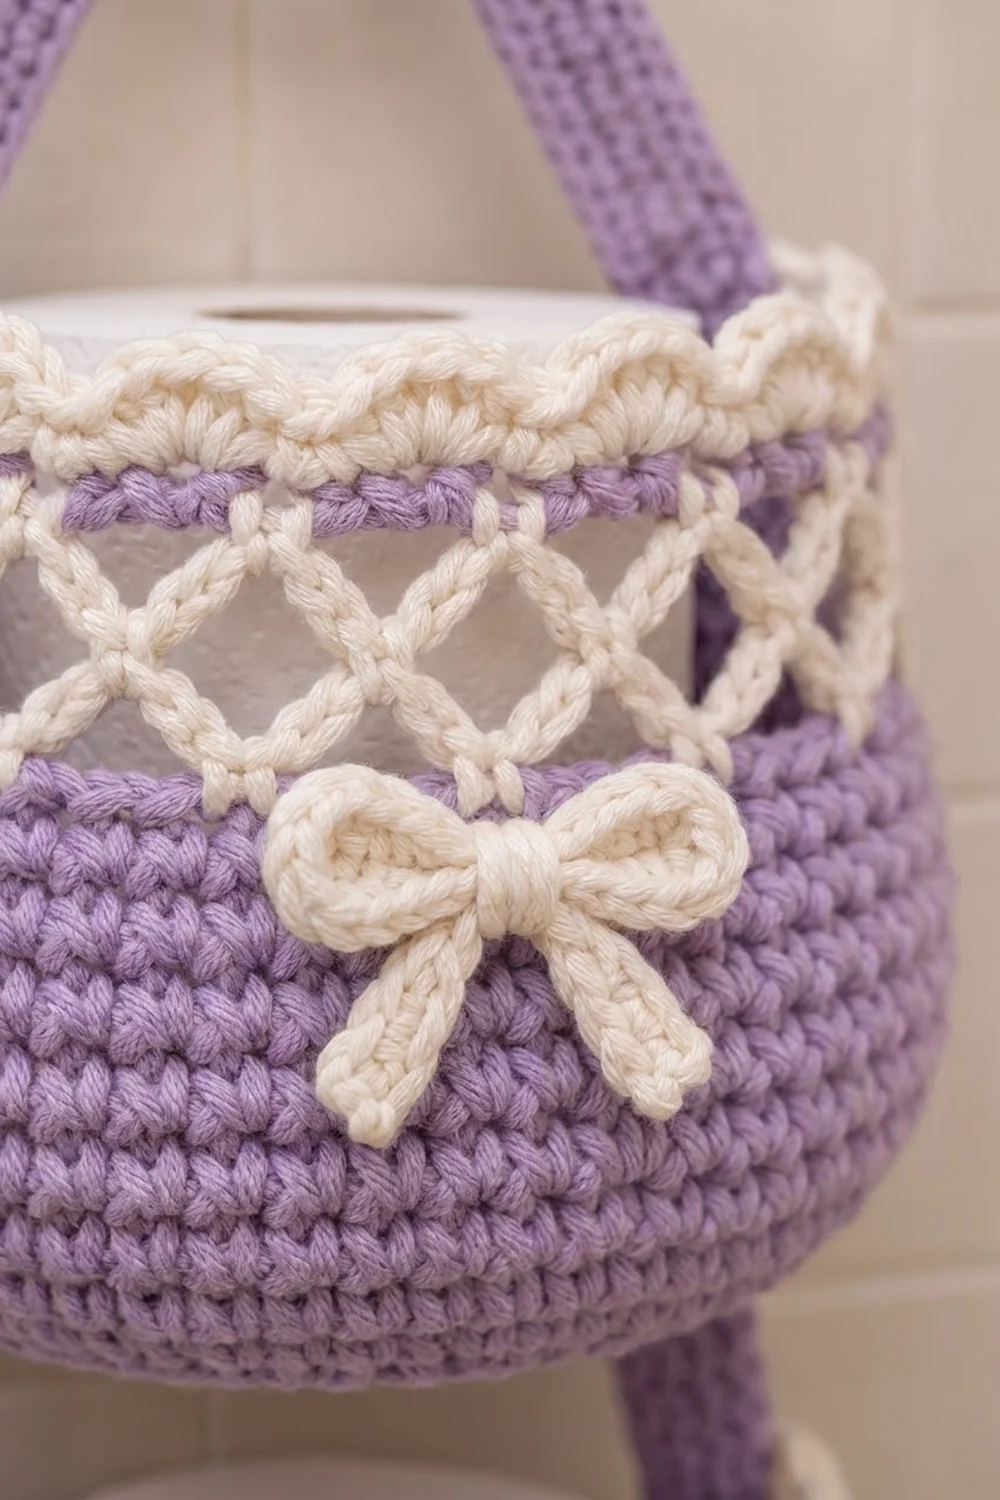
Each basket is worked in lavender with a cream diamond lattice band, a cream scalloped rim and a small cream bow at center front. Lavender straps join the three baskets into one vertical column. The style is cottage-romantic, and the dense single-crochet fabric keeps everything firm.
The pattern uses US crochet terms. The finished holder is about 5.75 in (14.6 cm) wide and about 23.5 in (59.7 cm) long from the top of the ring to the bottom of the lowest basket. Each basket is about 4.5 in (11.4 cm) tall.
Here is how it’s built. Each basket starts as a flat circle, turns upward at a back-loop ridge and grows into a gentle belly. The cream lattice is crocheted onto the outside of the wall from free front loops. A cream rim round then locks the lattice to the wall, and the scallops finish the edge. The bows and straps are made separately and sewn on.
Finished Size and Construction
- Finished size: 5.75 in (14.6 cm) wide x about 23.5 in (59.7 cm) long
- Skill level: Intermediate
- Terminology: US
- Yarn weight: Worsted (#4), cotton or cotton blend
- Hook: 4.0 mm (G-6)
- Number of pieces: 11 crocheted pieces (3 baskets, 3 bows, 1 hanging strap, 4 connector straps), plus 1 wooden ring
- Layout: 1 column x 3 baskets, hung vertically
- Piece size (one basket): 5.75 in (14.6 cm) across the belly x 4.5 in (11.4 cm) tall
- Size before border: wall height 3.75 in (9.5 cm), measured from the base ridge
- Border (rim) depth: 0.75 in (1.9 cm)
Materials
Use a smooth worsted cotton that holds its shape. Acrylic works too, but the baskets will be softer. These amounts assume about 85 m per 50 g.
- Lavender: 150 g / about 255 m (baskets and straps)
- Cream: 75 g / about 128 m (lattice, rims and bows)
Both quantities include a margin of roughly 40%, so you won’t run short if your gauge is slightly loose.
Tools:
– 4.0 mm (G-6) crochet hook
– 1 wooden ring, 2.75 in (7.0 cm) outside diameter
– 6 stitch markers
– Tapestry needle
– Scissors
– Measuring tape
Abbreviations (US Terms)
- ch – chain
- sc – single crochet
- dc – double crochet
- sl st – slip stitch
- inc – 2 sc in the same stitch
- BLO / FLO – back loop only / front loop only
- st(s) – stitch(es)
- sp – space
Special stitch – Shell: 5 dc in the same stitch.
Special stitch – Joined sc: insert the hook through the cream stitch and then through the lavender stitch behind it, and complete 1 sc through both layers.
Gauge and Checkpoints
Gauge: 16 sc and 18 rounds = 4 in (10.2 cm) in sc, which is 4 sc per inch (2.5 cm).
Make one complete basket before starting the others. Check it at each of these points:
- After Round 10: the base is 4.75 in (12.1 cm) across and lies flat.
- After Round 12: the circumference is 18 in (45.7 cm).
- After Round 18: the wall is 1.75 in (4.4 cm) tall above the ridge.
- After Round 27: the wall is 3.75 in (9.5 cm) tall.
- Lattice band: about 2 in (5.1 cm) tall, the same height as lavender Rounds 19–27.
- Finished basket: 5.75 in (14.6 cm) across x 4.5 in (11.4 cm) tall.
If your base is too big, go down 0.5 mm in hook size. If it’s too small, go up 0.5 mm. Don’t add or remove rounds, because the lattice and the scallops both depend on 72 stitches.
Basket (Make 3)
Work in continuous spiral rounds. Mark the first stitch of each round and move the marker up as you go.
Base
With lavender:
- R1: Make a magic ring and work 6 sc into it. (6)
- R2: Inc in each st around. (12)
- R3: [Sc 1, inc] x 6. (18)
- R4: [Sc 2, inc] x 6. (24)
- R5: [Sc 1, inc, sc 2] x 6. (30)
- R6: [Sc 4, inc] x 6. (36)
- R7: [Sc 2, inc, sc 3] x 6. (42)
- R8: [Sc 6, inc] x 6. (48)
- R9: [Sc 3, inc, sc 4] x 6. (54)
- R10: [Sc 8, inc] x 6. (60)
Checkpoint: the base measures 4.75 in (12.1 cm) across.
The staggered increases keep the circle round instead of hexagonal.
Wall
- R11: Sc BLO in each st around. (60) This makes the turning ridge.
- R12: [Sc 4, inc] x 12. (72) This increase shapes the belly.
- R13–R18: Sc in each st around. (72 each round)
- R19: Sc BLO in each st around. (72) This leaves the 72 front loops of R18 free on the outside to anchor the lattice.
- R20–R27: Sc in each st around. (72 each round)
Finish R27 with a sl st into the next st and fasten off.
Checkpoint: the wall is 3.75 in (9.5 cm) tall, and the belly measures 18 in (45.7 cm) around.
Lattice Band
Hold the basket upside down so you are working into the free front loops of R18. Join cream at the round start, directly below your R27 marker.
- L1: Ch 1, then sc in each free front loop around. Join with a sl st to the first sc. (72 sc)
- L2: Ch 1, sc in the first st, [ch 5, sk 2, sc in the next st] x 23, ch 5, sk 2, and join to the first sc. (24 ch-5 loops) Each repeat uses 3 sts, and 24 x 3 = 72.
- L3: Sl st into the 3rd ch of the first loop. Ch 1, sc in the same loop, [ch 5, sc in the next loop] x 23, ch 5, and join. (24 loops)
- L4: Repeat L3. (24 loops)
- L5: Sl st into the first loop. Ch 1, work 3 sc in each loop around, and join. (24 x 3 = 72 sc) Don’t fasten off.
The loops in each round sit centered over the loops below, which forms two full rows of diamonds. The lavender wall shows through the openings.
Bows (Make 3)
With cream:
- Loop cord: Ch 31. Sc in the 2nd ch from the hook and in each ch across. (30 sc, 7.5 in / 19.1 cm) Fasten off.
- Tail strip: Ch 11. Sc in the 2nd ch from the hook and in each ch across. (10 sc, 2.5 in / 6.4 cm) Fasten off.
Assembly:
1. Bring both ends of the loop cord to the middle so they overlap by 0.25 in (0.6 cm). This forms two loops.
2. Fold the tail strip into a V and place it behind the center.
3. Wrap cream yarn 6 times around the center, pull it snug and secure it on the back.
The finished bow measures about 2.5 in (6.4 cm) wide x 1.5 in (3.8 cm) tall.
Straps
Work all straps in lavender, in rows.
- Hanging strap (make 1): Ch 5. Sc in the 2nd ch from the hook and across. (4 sc) Then ch 1, turn, and sc across (4 sc) for each row until you have 63 rows. The strap measures 1 in (2.5 cm) x 14 in (35.6 cm).
- Connector straps (make 4): Work the same way for 18 rows. Each strap measures 1 in (2.5 cm) x 4 in (10.2 cm).
Make All Pieces
| Piece | Qty | Colors |
|---|---|---|
| Basket | 3 | Lavender body, cream lattice and rim |
| Bow | 3 | Cream |
| Hanging strap | 1 | Lavender |
| Connector strap | 4 | Lavender |
Layout:
        ( ring )
        /      \
   [  Basket 1  ]
     |          |
   [  Basket 2  ]
     |          |
   [  Basket 3  ]
Work the rim (next section) on all three baskets before joining any straps.
Border: Scalloped Rim (Each Basket)
Border gauge: same as the body, 4 sts per inch (2.5 cm).
Continue with cream from L5.
- J (joining round): Fold the lattice band up against the wall so that L5 lies in front of lavender R27. Line up the round starts. Work 1 Joined sc through each L5 st and the matching R27 st. (72 sc)
- S (scallop round): Ch 1 and sc in the first st. Then work [sk 1, Shell in the next st, sk 1, sc in the next st] x 17. Finish with sk 1, Shell in the next st, sk 1, and join to the first sc. Fasten off. (18 shells and 18 sc = 90 sts)
Per half: the front 36 sts and the back 36 sts each carry 9 scallops.
Why the math works: each scallop uses 4 sts. The opening sc uses 1, then 17 full repeats use 68, for 69 sts. The final sk, Shell, sk uses the last 3, which brings the total to exactly 72. Because 72 also divides evenly by 3 (for the lattice) and by 12 (for the belly increase), every section lines up.
Joining
The holder is joined by whipstitching with lavender yarn and a tapestry needle. Each 4-st-wide strap end is sewn stitch for stitch to 4 rim or wall stitches, working through both loops of each stitch.
Mark the sides. The round start of each basket is center back, so center front is st 36/37. Place markers to cover sts 17–20 (left side) and sts 53–56 (right side).
Hanging strap:
1. Pass the hanging strap through the wooden ring and center it.
2. Sew the last 5 rows of each end to the inside of Basket 1, over sts 17–20 and sts 53–56. Start just below Round J.
3. Tack the two strap edges together for 2 rows directly under the ring so the ring can’t slide.
Connector straps:
1. Sew rows 1–6 of a connector strap to the outside of the upper basket over sts 17–20, covering wall Rounds 12–17.
2. Sew rows 14–18 to the inside of the lower basket’s rim at the same 4 sts.
3. Repeat at sts 53–56 for the right side. Then join Basket 2 to Basket 3 the same way.
This leaves 7 free rows in each connector, which makes a gap of about 1.5 in (3.8 cm) between baskets.
Tension: match the stitches 1:1 and pull each whipstitch just snug. If you pull harder, the rim puckers.
Bows: sew one bow to each basket at center front (st 36/37). Center the knot on L1 of the lattice band.
Size checkpoint: hang the holder. It should measure about 23.5 in (59.7 cm) long with all three baskets level.
Final Blocking
- Mist each basket until it is lightly damp.
- Stuff each basket with a towel to a 5.75 in (14.6 cm) belly.
- Pin the scallops so they are even and pointing outward.
- Lay the straps flat and smooth them to 1 in (2.5 cm) wide.
- Leave everything to dry completely, for at least 12 hours.
- Remove the towels and hang the holder.
Final Quality-Control Checklist
- Each base is flat and measures 4.75 in (12.1 cm).
- The wall has 72 sts on every round from R12 to R27.
- Each lattice band has 24 loops per round and shows two rows of diamonds.
- The lattice lies flat with no bagging.
- Each rim has 18 scallops, 9 on the front and 9 on the back.
- The bows sit centered at front.
- The straps are sewn at matching side stitches.
- The baskets hang level, with even 1.5 in (3.8 cm) gaps.
- All ends are woven in securely.
Troubleshooting
- Base ruffles: your tension is too loose or you worked extra increases. Recount each round against the list above.
- Base cups upward: you’ve worked too few stitches. Check that every round is a full multiple of 6.
- Lattice bulges outward: the band is taller than R19–R27. Rework the loops as ch 4 instead of ch 5.
- Lattice pulls the rim down: the loops are too tight. Use ch 6 or go up one hook size for L2–L4 only.
- Scallops come out uneven: the stitch count isn’t 72. Count Round J before starting the scallops.
- Basket tilts when hung: the straps are sewn at different stitches. Re-sew them at sts 17–20 and 53–56.
- Roll doesn’t fit: your gauge is tight. Make the next basket with a larger hook.
Care
Hand wash in cool water and reshape while damp. Lay flat to dry, and don’t wring the baskets.
Final Notes
Each measurement in this pattern sets up the next one:
- A 60-stitch base is 4.75 in (12.1 cm) across.
- The belly increase brings the wall to 72 stitches, which is 18 in (45.7 cm) around and 5.75 in (14.6 cm) across.
- The 72 free front loops give 24 lattice loops, and those return to 72 sc.
- The 72 joined stitches give exactly 18 scallops.
- Three 4.5 in (11.4 cm) baskets, two 1.5 in (3.8 cm) gaps and the hanging strap add up to about 23.5 in (59.7 cm).
If your first basket hits every checkpoint, the other two will match it.
Happy crocheting!