

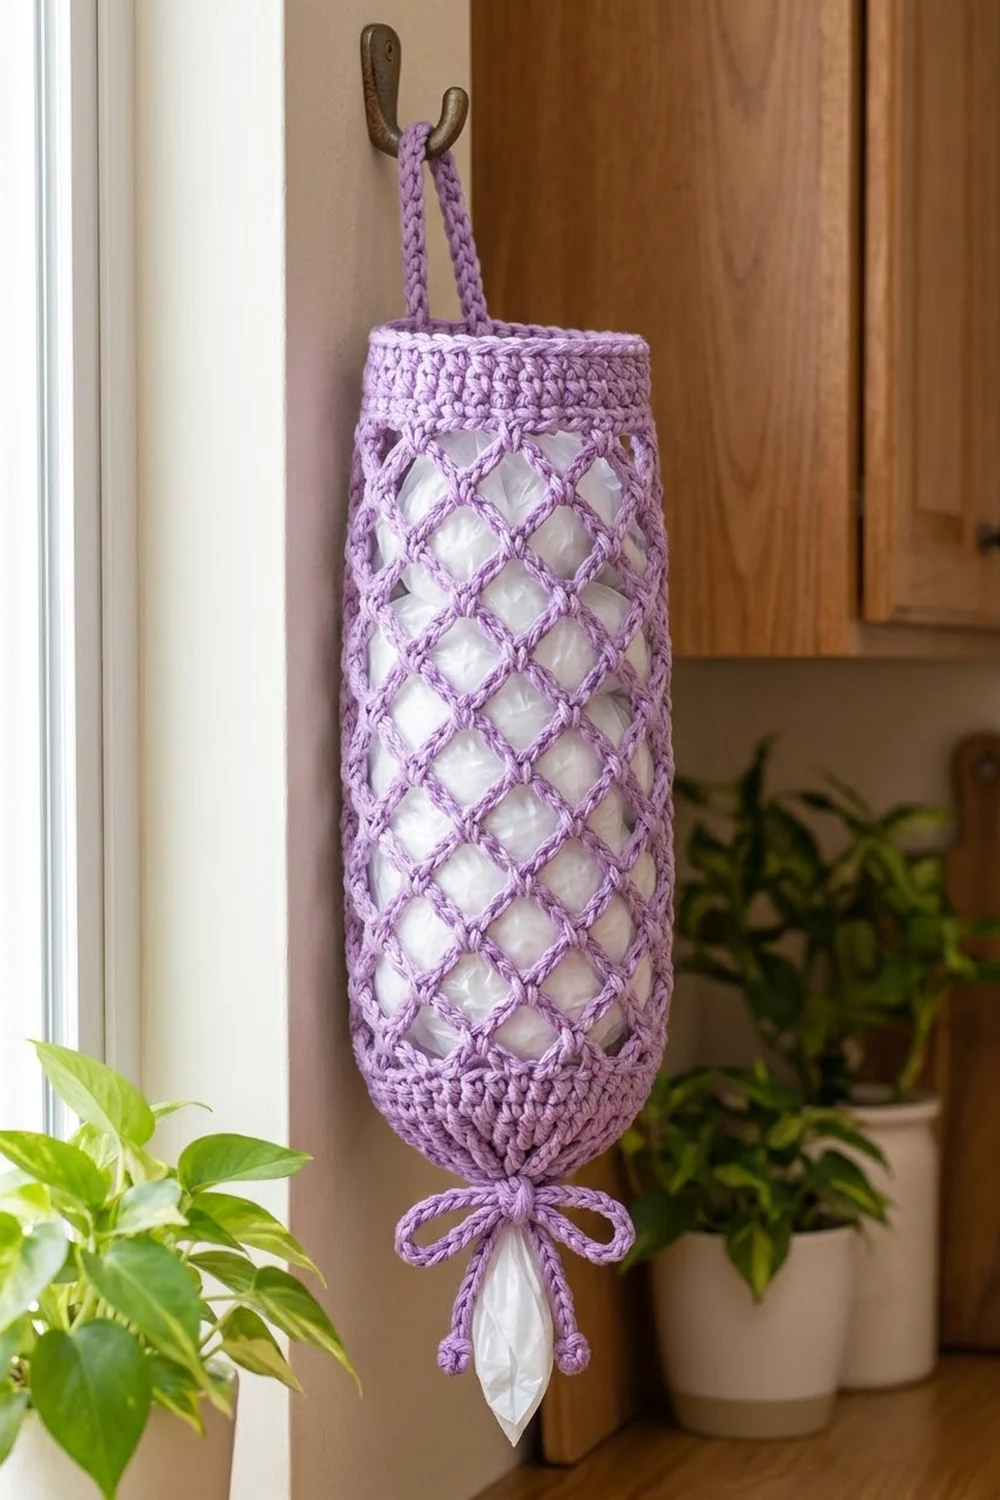
Plastic bags pile up fast, and a hanging dispenser keeps them tidy and easy to reach. The Lavender Lattice holder is a tall mesh tube. You stuff bags in through the top and pull them out one at a time through a cinched, bow-tied opening at the bottom.
The whole piece uses one color, a soft lavender worsted cotton. The open diamond lattice shows the bags inside and uses little yarn. Solid single crochet bands at the top and bottom keep the shape stable, and a slim strap lets it hang from a hook or cabinet knob.
This pattern uses US crochet terms. The finished holder measures 5.5 in (14.0 cm) wide laid flat and 15 in (38.1 cm) long before cinching. The hanging loop adds 3.25 in (8.3 cm) above the rim.
You start at the bottom with a foundation chain joined into a ring. You work a short solid band that includes a round of eyelets, then 12 rounds of chain-loop mesh and a solid top band with a rolled rim. Last, you make a short strap for the hanging loop and a beaded drawstring. Everything is worked in joined rounds, so there is no side seam.
Finished Size and Construction
- Finished size: 5.5 in (14.0 cm) wide flat × 15 in (38.1 cm) long; 18.25 in (46.4 cm) including the loop
- Circumference: 11 in (27.9 cm)
- Skill level: Easy
- Terminology: US
- Yarn weight: Worsted (#4), cotton or cotton blend
- Hook: 4.5 mm (US 7)
- Number of pieces: 1 body + 1 hanging strap + 1 drawstring
- Layout: Single tube, worked bottom-up in joined rounds
- Body size before top band: 5.5 in (14.0 cm) flat × 13.5 in (34.3 cm) long
- Top band (border) depth: 1.5 in (3.8 cm)
Materials
Cotton works best here. It holds the lattice open, doesn’t stretch out under the weight of the bags, and survives washing. Acrylic also works, but the mesh will droop a little more.
- Lavender worsted cotton: 90 g, approx. 155 m
- 4.5 mm (US 7) crochet hook
- Tapestry needle
- 2 locking stitch markers
- Scissors
- Tape measure
- Rust-proof pins and a rolled towel for blocking
The yarn quantity includes a margin of about 20% for your gauge swatch and tension differences.
Abbreviations (US Terms)
- ch – chain
- sc – single crochet
- dc – double crochet
- sl st – slip stitch
- sk – skip
- sp – space
- st(s) – stitch(es)
- rev sc – reverse single crochet (crab stitch): sc worked from left to right (right to left if left-handed)
- Rnd – round
Special stitch – Bobble bead: Yarn over, insert hook in indicated ch, yarn over and pull up a loop, yarn over and draw through 2 loops. Repeat from * to * 3 more times (5 loops on hook). Yarn over and draw through all 5 loops.
Gauge and Checkpoints
Base gauge: 16 sc and 16 rounds = 4 in (10.2 cm) in sc worked in the round.
Mesh gauge: 1 mesh round = 1 in (2.5 cm) tall when lightly stretched lengthwise. Each ch-5 loop spans 1 in (2.5 cm) of circumference.
Treat the bottom band as your test piece. It is only 5 rounds, and it tells you whether the whole tube will come out the right size.
Checkpoints:
- After Rnd 5: The band measures 5.5 in (14.0 cm) wide laid flat and 1.5 in (3.8 cm) tall.
- After Rnd 11: The body measures 7.5 in (19.1 cm) long, stretched gently.
- After Rnd 17: The body measures 13.5 in (34.3 cm) long.
- After Rnd 23: The body measures 15 in (38.1 cm) long.
Band too wide? Go down to a 4 mm hook and restart. Don’t drop stitches. The count of 44 must stay the same, because the mesh repeat depends on it.
Band too narrow? Go up to a 5 mm hook.
Mesh too long or too short? Add or remove mesh rounds in the middle of the body. Each round changes the length by about 1 in (2.5 cm).
Pattern
Bottom Band
Foundation: Ch 44 and sl st to the first ch to form a ring. Make sure the chain isn’t twisted.
Rnd 1: Ch 1, sc in each ch around. Sl st to the first sc. (44 sc)
Rnd 2: Ch 1, sc in each st around. Sl st to the first sc. (44 sc)
Rnd 3 (eyelet round): Ch 4 (counts as dc + ch 1). Sk next st, dc in next st, ch 1, sk next st. Repeat from * to * around. Sl st to the 3rd ch of the beginning ch-4. (22 dc + 22 ch-1 sps = 44 sts)
Rnd 4: Ch 1, sc in each dc and in each ch-1 sp around. Sl st to the first sc. (22 sc in dc + 22 sc in sps = 44 sc)
Rnd 5: Ch 1, sc in each st around. Sl st to the first sc. (44 sc)
Checkpoint: 5.5 in (14.0 cm) flat × 1.5 in (3.8 cm) tall.
Lattice Body
The mesh repeat uses 4 stitches, so 44 sc ÷ 4 = 11 loops around. Each round ends with “ch 2, dc in first sc.” That ch 2 + dc stands in for the last ch-5 loop and leaves your hook at the centre of that loop, ready for the next round. You never need to slip stitch across.
Rnd 6: Ch 1, sc in the same st as the join. Ch 5, sk 3 sts, sc in next st. Repeat from * to * 9 more times. Ch 2, sk the last 3 sts, dc in the first sc. (11 sc + 11 loops)
Rnds 7–16: Ch 1, sc around the post of the joining dc. Ch 5, sc in next ch-5 loop. Repeat from * to * 9 more times. Ch 2, dc in the first sc. (11 loops)
Each sc lands in the centre of a loop from the round below, which staggers the loops into diamonds.
Rnd 17 (closing mesh round): Ch 1, sc around the post of the joining dc. Ch 5, sc in next ch-5 loop. Repeat from * to * 9 more times. Ch 5, sl st to the first sc. (11 full ch-5 loops)
This round closes with a full ch-5 so that all 11 loops are the same size for the top band.
Checkpoint: about 13.5 in (34.3 cm) long, gently stretched.
Hanging Strap
Ch 37. Sc in the 2nd ch from the hook and in each ch across. (36 sc) Fasten off and leave a 10 in (25.4 cm) tail.
The strap measures 9 in (22.9 cm). You will attach it after the top band is done.
Drawstring
- Ch 3 and work a bobble bead in the 3rd ch from the hook. This is bead 1.
- Ch 100.
- Ch 3 and work a bobble bead in the 3rd ch from the hook. This is bead 2.
- Turn. Sl st in the back bump of each of the 100 chains, working back toward bead 1.
- Sl st into the base of bead 1 and fasten off.
The finished cord is a firm 25 in (63.5 cm) between beads. That covers the 11 in (27.9 cm) circumference plus two bow tails of about 7 in (17.8 cm) each.
Border (Top Band)
Border gauge: 16 sc = 4 in (10.2 cm), the same as the bottom band.
When the tube is laid flat, each side (“front” and “back”) holds 22 stitches.
Rnd 18 (conversion round): Sl st into the first ch-5 loop. Ch 1, then work 4 sc in each ch-5 loop around. Sl st to the first sc.
– Count: 11 loops × 4 sc = 44 sc (22 per flat side).
– This round turns the loops back into solid fabric.
Rnds 19–22: Ch 1, sc in each st around. Sl st to the first sc. (44 sc each round; 22 per flat side)
Rnd 23 (rolled rim): Ch 1. Rev sc in each st around. Sl st to the first rev sc. (44 rev sc; 22 per flat side) Fasten off.
Why the math works: The bottom band and the top band both hold 44 stitches at 4 stitches per inch, so each one is 11 in (27.9 cm) around and 5.5 in (14.0 cm) flat. The mesh uses exactly 4 stitches per loop, and Rnd 18 puts exactly 4 stitches back into each loop. Because no stitches are gained or lost, the tube stays straight from bottom to top. The border depth is 5 sc rounds (1.25 in / 3.2 cm) plus the rim round (0.25 in / 0.6 cm), for 1.5 in (3.8 cm) in total.
Attaching the Strap
- Lay the tube flat with the beginning-of-round joins at the centre back.
- Mark 2 stitches on the back side of the top band, 1 in (2.5 cm) apart and centred.
- Place each end of the strap inside the tube so that 1.25 in (3.2 cm) of strap overlaps the band at each marker.
- Whipstitch each end securely to the inside of the band, sewing through Rnds 18–22 only so the stitches don’t show on the rim.
- Weave in the ends.
About 3.25 in (8.3 cm) of loop stands above the rim.
Threading the Drawstring
- Start at the centre front of Rnd 3.
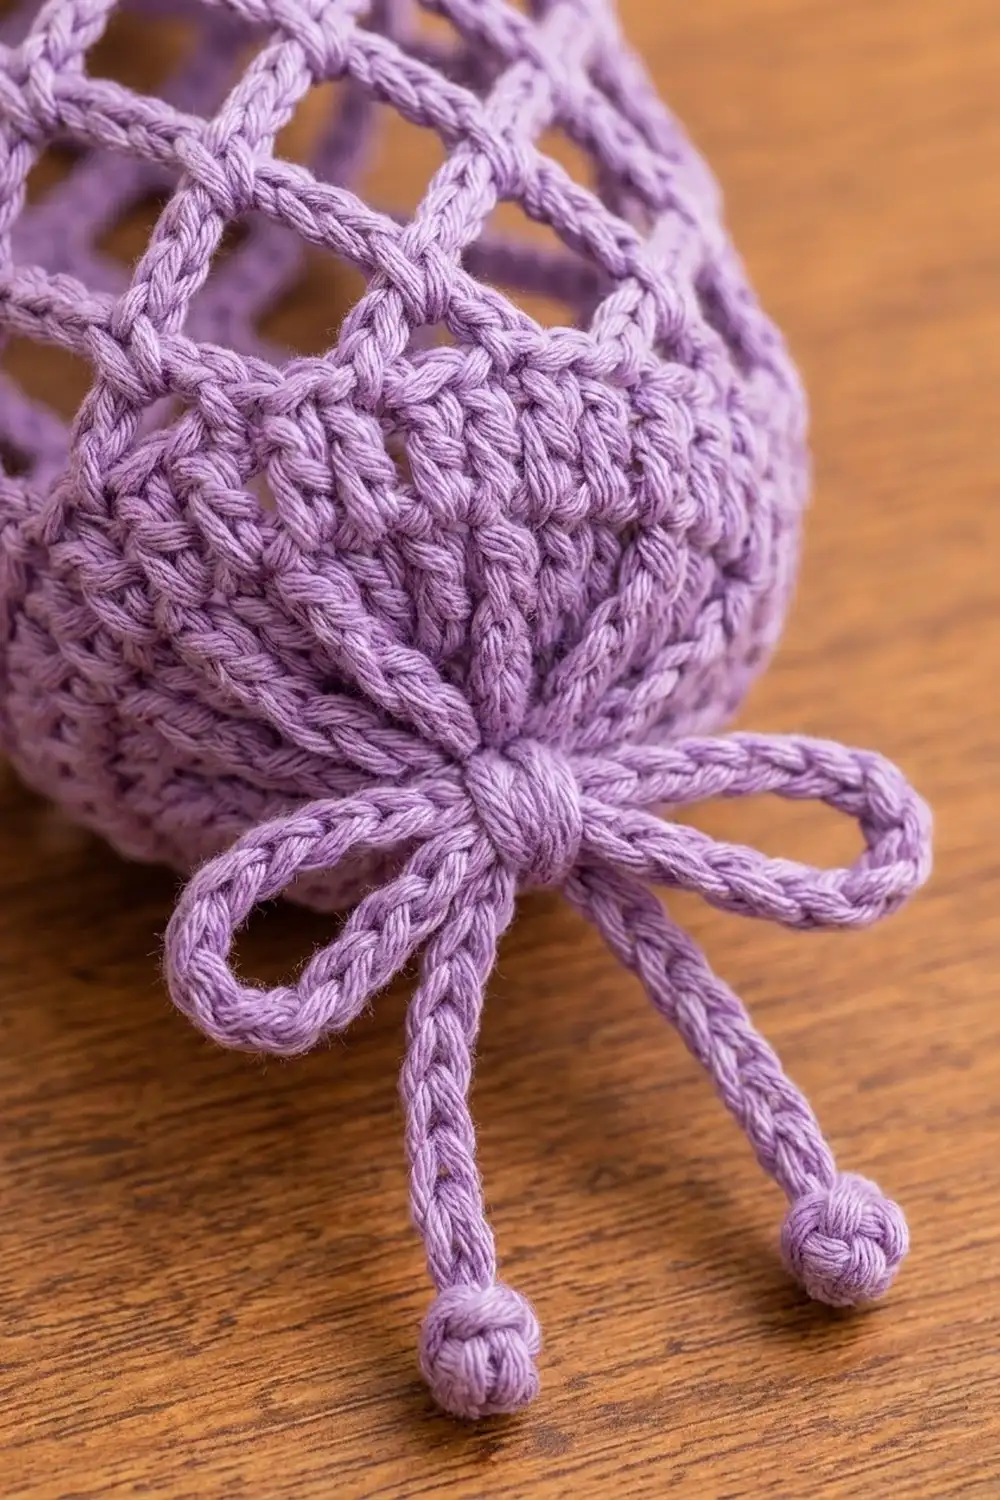
- Weave the cord in and out through the 22 ch-1 eyelet spaces, going over one dc and under the next, all the way around.
- Both beaded tails should come out through neighbouring spaces at the front.
- Pull the cord until the bottom opening is about 1.5 in (3.8 cm) across.
- Tie a bow.
Rnds 1–2 gather below the eyelets into the small ruffled spout that the bags come out of.
Final Blocking
- Untie the bow and remove the drawstring.
- Soak the body in lukewarm water for 10 minutes, then press the water out gently. Don’t wring it.
- Roll it in a towel to remove most of the moisture.
- Slide a rolled towel or a paper towel tube wrapped in plastic inside the tube to hold it at 11 in (27.9 cm) around.
- Lay it flat and ease it to 5.5 in (14.0 cm) wide and 15 in (38.1 cm) long. Pin the bands straight.
- Nudge each diamond so its points line up vertically.
- Let it dry completely.
- Rethread the drawstring and tie the bow.
Final Quality-Control Checklist
- Both bands count 44 stitches.
- Every mesh round has 11 loops.
- The diamonds line up in straight vertical columns with no spiralling.
- The body lies flat at 5.5 in (14.0 cm) wide and 15 in (38.1 cm) long.
- The rev sc rim is even all the way around.
- The strap ends are sewn 1 in (2.5 cm) apart and are invisible from the front.
- The loop stands 3.25 in (8.3 cm) above the rim.
- The drawstring passes through all 22 eyelets and both beads are firm.
- All ends are woven in at least 2 in (5.1 cm).
Troubleshooting
- Mesh is spiralling. Check that each round starts with the sc around the joining dc and has exactly 10 repeats before the ch 2 + dc ending.
- Loops are uneven in size. Pull each ch-5 to the same snugness. The ch 2 + dc should match a ch-5 in length; if it’s short, try ch 3 + hdc instead.
- Top band flares or puckers. Recount Rnd 18. Every loop must have exactly 4 sc.
- Bottom won’t close tightly. Make sure the cord goes over and under alternate dc posts and doesn’t skip any eyelets.
- Beads are loose or floppy. Pull the last yarn-over through the bobble firmly and add one ch to lock it.
- Holder sags when full. Your mesh gauge is loose. Use a smaller hook or work 1–2 fewer mesh rounds.
Care
Hand wash in cool water or machine wash on a gentle cycle in a mesh bag, then reshape and dry flat. Take out the drawstring before washing so it doesn’t tangle.
Final Notes
Here is the measurement chain. Forty-four stitches at 4 per inch give an 11 in (27.9 cm) circumference and a 5.5 in (14.0 cm) flat width. The 1.5 in (3.8 cm) bottom band, 12 in (30.5 cm) of mesh and 1.5 in (3.8 cm) top band add up to 15 in (38.1 cm). The 9 in (22.9 cm) strap becomes a 3.25 in (8.3 cm) loop, and the 25 in (63.5 cm) drawstring goes around 11 in (27.9 cm) of eyelets with two bow tails.
If your bottom band matches the first checkpoint, the rest will follow.
Happy crocheting!