

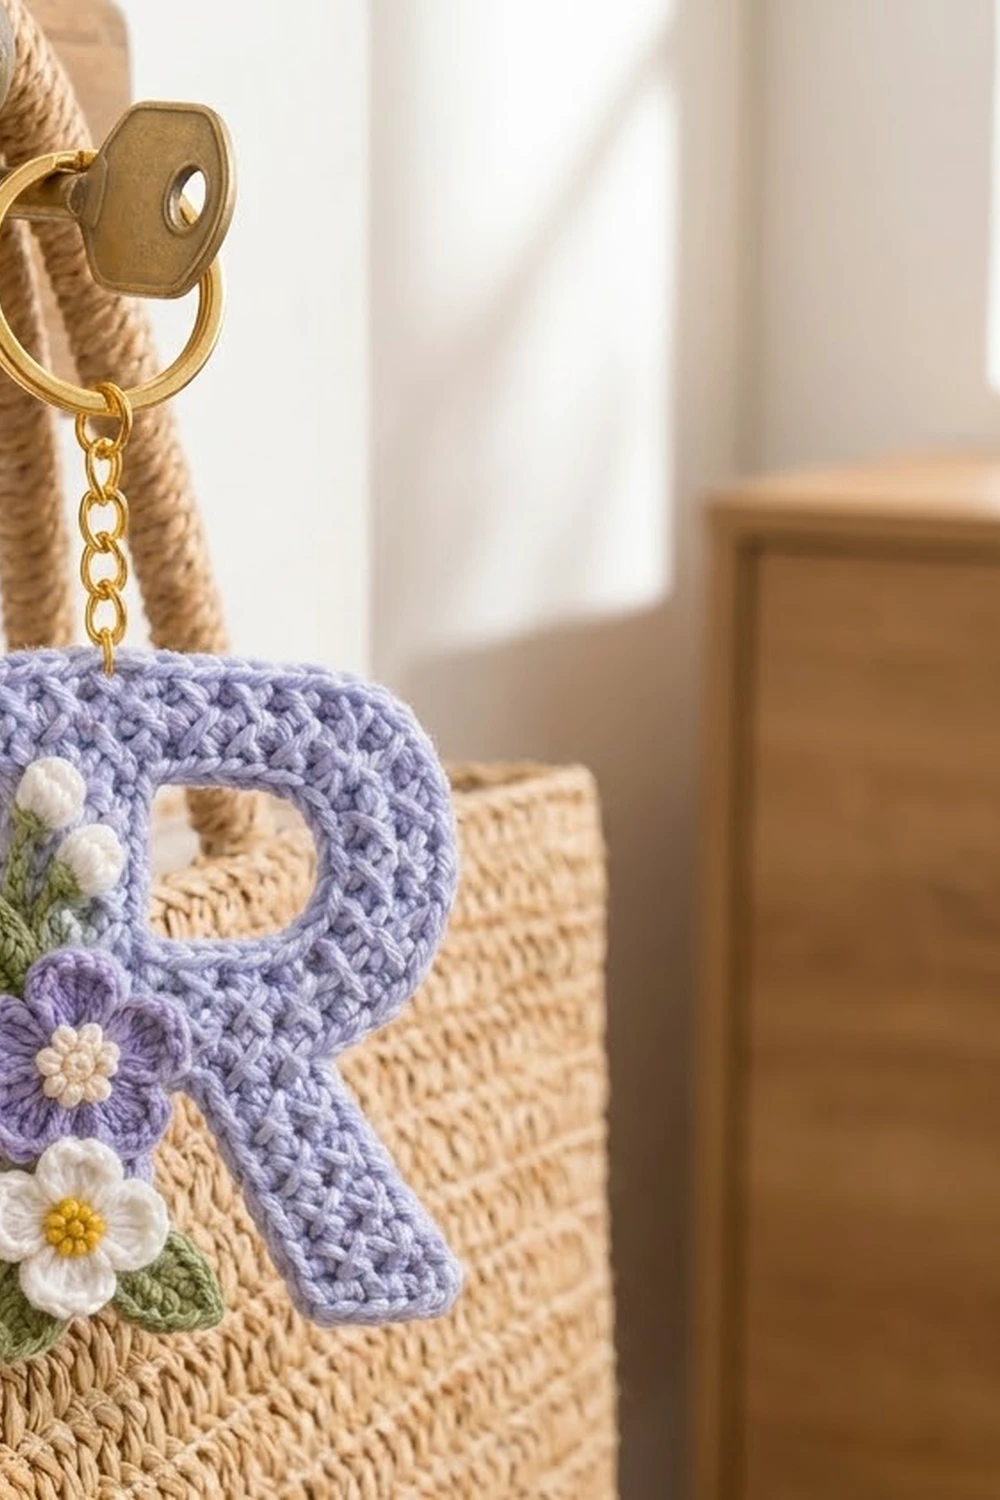
This Lavender Meadow keychain is a capital letter “R” made in a soft lavender linen stitch. The texture looks woven and holds its shape well. A small bunch of flowers runs down the left stem: two white buds, a purple blossom, a white daisy-style blossom and a few sage-green leaves. A gold split ring finishes it off.
The colors are pale lavender, medium purple, white, cream, golden yellow and sage green. It makes a sweet personalized gift, a bag charm or a tag for a baby basket.
The pattern uses US crochet terms. The finished keychain is 3 in (7.6 cm) wide and 3.75 in (9.5 cm) tall, including the border.
The letter is one piece worked in rows from the bottom up. You make the stem and the leg separately, join them in one row, and work the bowl on top, splitting the rows to form the opening. One round of single crochet border goes around the outside and a second around the opening. The flowers and leaves are made separately and sewn on.
Finished Size and Construction
- Finished size: 3 in wide x 3.75 in tall (7.6 cm x 9.5 cm)
- Skill level: Intermediate (shaping in rows, working separate sections)
- Terminology: US crochet terms
- Yarn weight: Sport weight (2), cotton or cotton blend
- Hook: 3.0 mm (US C/2 or D/3)
- Number of pieces: 1 letter, plus 9 small appliqués sewn onto it
- Layout: Single letter shape, not part of a larger project
- Letter grid: 15 stitches wide x 21 rows tall at its widest points
- Size before border: 2.75 in wide x 3.5 in tall (7.0 cm x 8.9 cm)
- Border depth: 1 round of sc, about 0.125 in (0.3 cm) on each edge
Materials
Use a smooth, mercerized sport-weight cotton. It shows the linen-stitch texture clearly and stands up to being handled as a keychain. Avoid fuzzy yarns, which blur the woven pattern.
- Pale lavender (letter and border): 8 g, about 24 m
- Medium purple (petals of flower 1): 2 g, about 6 m
- White (petals of flower 2, buds): 2 g, about 6 m
- Sage green (leaves, bud stems): 2 g, about 6 m
- Cream (center of flower 1): 1 g, about 3 m
- Golden yellow (center of flower 2): 1 g, about 3 m
These quantities include a margin for your gauge swatch and sewing tails.
Tools:
– 3.0 mm crochet hook
– Tapestry needle
– 2 locking stitch markers
– Gold split key ring, 1 in (2.5 cm), with about 1 in (2.5 cm) of gold chain
– 2 gold jump rings, 6 mm, and 2 pairs of flat-nose pliers
– Blocking board, rust-proof pins and a spray bottle
– Scissors
Abbreviations (US Terms)
- ch – chain
- sl st – slip stitch
- sc – single crochet
- hdc – half double crochet
- dc – double crochet
- sc2tog – single crochet 2 together
- sp – space
- st(s) – stitch(es)
- MR – magic ring
Special stitch: linen pattern. Every ch-1 and every sc counts as 1 st.
- On each row, the first and last st are always sc, worked into the edge st below.
- Between them, work 1 sc into each ch-1 sp of the row below.
- Over each sc of the row below, work ch 1 and skip that sc.
Each st below makes 1 st above, so the count stays the same unless shaping is given. The sc positions shift on every row, which creates the woven look. The fabric is almost reversible.
Gauge and Checkpoints
Gauge: 22 sts and 24 rows = 4 in (10.2 cm) in the linen pattern. That works out to 5.5 sts and 6 rows per inch.
Test one piece first. The stem section (Part A) is your gauge test. When it is finished, it should measure:
- After Part A (5 sts x 9 rows): 0.9 in wide x 1.5 in tall (2.3 cm x 3.8 cm)
- After Row 12: 2 in tall (5.1 cm); the bowl is about 2.5 in wide (6.4 cm)
- After Row 21: 3.5 in tall (8.9 cm); widest point at the bottom is 2.75 in (7.0 cm)
- After the border: 3 in x 3.75 in (7.6 cm x 9.5 cm)
If your piece is too big, go down 0.25 mm in hook size. If it is too small, go up 0.25 mm. Linen stitch tightens easily, so keep your chains as relaxed as your sc. Rows that are too short usually mean tight chains.

Part A: Stem
With lavender, ch 6.
Row 1: Sc in 2nd ch from hook and in each ch across. (5 sts)
Row 2: Ch 1 (does not count as a st), turn. Sc in first st, sc in next st, ch 1, skip next st, sc in next st, sc in last st. (5 sts)
Rows 3–9: Ch 1, turn. Work the linen pattern across. (5 sts)
Checkpoint: 0.9 in x 1.5 in (2.3 cm x 3.8 cm). Do not fasten off. Put the live loop on a stitch marker and set the stem aside.
Part B: Leg
The leg is the same width as the stem, but it shifts 1 st toward the stem on every other row. That creates the slant.
With lavender, ch 6.
Row 1: Sc in 2nd ch from hook and in each ch across. (5 sts)
Row 2: Ch 1, turn. Work the linen pattern across. (5 sts)
Row 3 (shift row): Ch 1, turn. At the edge that will face the stem, work 2 sc in the edge st. Work the pattern across to the last 2 sts. Sc2tog over the last 2 sts at the outer edge. (5 sts)
Rows 4–9: Repeat Rows 2–3 three more times, ending with a shift row. (5 sts)
The leg has now shifted 4 sts toward the stem. Fasten off.
Placing the pieces: Lay both pieces flat with the foundation chains at the bottom. The stem’s live loop must be on its outer (left) edge. Because the fabric is reversible, you can flip the stem if needed. The leg should slant up toward the stem. Its top edge should sit 1 st width away from the stem: the stem covers columns 1–5, the gap is column 6 and the leg top covers columns 7–11.
Part C: Joining Row and Lower Bowl
Row 10: Pick up the stem’s live loop. Ch 1, turn.
– Work the pattern across the 5 stem sts.
– Ch 1 to bridge the gap. This ch counts as a st and becomes a ch-1 sp for Row 11.
– Work the pattern across the first 4 leg sts.
– Work 3 sc in the last leg st.
Count: 5 + 1 + 4 + 3 = 13 sts (columns 1–13). The 3-sc group starts the curve of the bowl.
Row 11: Ch 1, turn. Work 2 sc in the first st (bowl edge), then work the pattern across.
Count: 13 sts worked 1 per st, + 1 added = 14 sts.
Row 12: Ch 1, turn. Work the pattern across. (14 sts)
Checkpoint: 2 in (5.1 cm) tall from the bottom of the stem.
Part D: Bowl Opening (Split Rows)
Bowl side: Continue with the working yarn, which is at the bowl edge.
Row 13: Ch 1, turn. Work the pattern over the first 4 sts only (columns 14–11). Turn and leave the remaining 10 sts unworked. (4 sts)
Rows 14–18: Ch 1, turn. Work the pattern across. (4 sts)
Row 18 ends at the outer bowl edge. Put the live loop on a marker. Do not fasten off.
Stem side: Back on Row 12, skip the next 5 sts after the bowl section (columns 10–6). These form the bottom of the opening.
Row 13: Join new lavender with a sc in the next st (column 5, at the edge of the opening). Work the pattern across the remaining sts. (5 sts)
Rows 14–18: Ch 1, turn. Work the pattern across. (5 sts)
Row 18 ends at the edge of the opening. Fasten off.
Checkpoint: The opening is 5 sts wide and 6 rows tall, about 0.9 in x 1 in (2.3 cm x 2.5 cm).
Part E: Upper Bowl
Row 19: Pick up the bowl-side loop. Ch 1, turn.
– Work the pattern across the 4 bowl sts.
– Ch 5 loosely.
– Work the pattern across the 5 stem sts.
Count: 4 + 5 + 5 = 14 sts. The ch-5 closes the top of the opening.
Row 20: Ch 1, turn. Work the pattern across to the last 2 sts, treating the chains as alternating sc and ch-1 sps. Sc2tog over the last 2 sts at the bowl edge.
Count: 12 sts worked 1 per st, + 1 sc2tog = 13 sts.
Row 21: Ch 1, turn. Sc2tog over the first 2 sts at the bowl edge, then work the pattern across.
Count: 1 sc2tog + 11 sts worked 1 per st = 12 sts.
Fasten off and weave in all ends on the back.
Checkpoint: 3.5 in (8.9 cm) tall and 2.75 in (7.0 cm) wide across the bottom. The top-left corner is square and the bowl’s right side rounds over 12 rows.
Border
Border gauge: Sc along the top and bottom edges matches the body at 5.5 sts per inch. Linen-stitch rows are short (6 per inch), so 1 sc per row end lies flat without ruffling or cupping.
Rule: Work 1 sc in each st along the top and bottom edges and 1 sc in each row end along the sides. At each of the 5 sharp outer corners, work 2 extra sc. These are the bottom corners of the stem and leg (4 corners) and the top-left corner of the letter.
Round 1 (outer outline): Join lavender at the bottom-left corner of the stem. Work counterclockwise:
- Stem outer side, Rows 1–21: 21 sc
- Top edge, Row 21: 12 sc
- Bowl right side, Rows 21–10: 12 sc
- Underside of the bowl (the 2 sts of Row 10 not above the leg): 2 sc
- Leg outer side, Rows 9–1: 9 sc
- Leg bottom: 5 sc
- Leg inner side, Rows 1–9: 9 sc
- Gap between the legs (the bridging ch-1): 1 sc
- Stem inner side, Rows 9–1: 9 sc
- Stem bottom: 5 sc
- Corner extras: 5 corners x 2 = 10 sc
Total: 85 + 10 = 95 sc. Sl st to the first sc and fasten off.
Round 2 (opening): Join lavender at the bottom-left corner of the opening. Work no extra stitches at its corners:
- Bottom (the 5 skipped sts): 5 sc
- Right side, Rows 13–18: 6 sc
- Top (underside of the ch-5): 5 sc
- Left side, Rows 18–13: 6 sc
Total: 22 sc. Sl st to the first sc and fasten off.
Why the math works: The border sits on the same 15-st x 21-row grid. One sc of depth on each edge adds about 0.125 in (0.3 cm) per side:
- Width: 2.75 in + 0.25 in = 3 in (7.6 cm)
- Height: 3.5 in + 0.25 in = 3.75 in (9.5 cm)
Appliqués
Flower 1 (purple, make 1):
– With cream, MR, ch 1, 5 sc in ring, sl st to the first sc. (5 sts) Fasten off.
– Join medium purple in any sc. In each sc, work (ch 2, 3 dc, ch 2, sl st) for 5 petals.
– Fasten off. It should be about 1 in (2.5 cm) across.
Flower 2 (white, make 1):
– Work as Flower 1, using golden yellow for the center and white for the petals.
Buds (white, make 2):
– MR, ch 1, 6 sc in ring, sl st to the first sc. (6 sts)
– Next round: sc2tog 3 times. (3 sts)
– Tuck the tail inside, fasten off and cinch closed. Each bud is about 0.3 in (0.8 cm) across.
Bud stems (sage, make 2):
– Ch 8 for one stem and ch 6 for the other. Fasten off.
Leaves (sage, make 3):
– Ch 7. Sl st in 2nd ch from hook, then work sc, hdc, dc, hdc and sc in the next 5 ch.
– Ch 1 and work along the other side of the chain: sc, hdc, dc, hdc, sc, sl st.
– Fasten off. Each leaf is about 0.75 in (1.9 cm) long.
Placement (sew with matching yarn through the front loops only):
1. Sew the purple flower over the stem, centered about 1.75 in (4.4 cm) above the bottom edge. Let it overlap the left edge by about 0.25 in (0.6 cm).
2. Sew the white flower directly below it, overlapping the purple flower’s lower petals slightly.
3. Tuck 2 leaves behind the lower edge of the white flower, one angled to each side.
4. Sew both bud stems so they run up from behind the purple flower. Sew a bud to the top of each.
5. Tuck the last leaf behind the base of the stems on the left.
Hardware: Open a jump ring and pass it through the top border, about 0.5 in (1.3 cm) from the top-left corner. Link it to the chain, then attach the split ring to the chain with the second jump ring.
Final Blocking
- Spray the letter lightly until it is damp. Block the letter before attaching the hardware, and before sewing on the appliqués if you can.
- Lay it face up on the blocking board.
- Pin the bottom corners of the stem and leg so the total width is 3 in (7.6 cm).
- Pin the top-left corner so the height is 3.75 in (9.5 cm).
- Shape the bowl into a smooth curve with your fingers. Pin the opening into a neat 0.9 in x 1 in (2.3 cm x 2.5 cm) rectangle.
- Let it dry completely, then unpin it.
- Sew on the appliqués and attach the hardware.
Final Quality-Control Checklist
- Final size is 3 in x 3.75 in (7.6 cm x 9.5 cm).
- The leg slants evenly, with no gaps at the shift rows.
- The gap between the stem and leg is closed by the bridging ch-1.
- The opening is rectangular and fully bordered (22 sc).
- The outer border lies flat (95 sc).
- The appliqués are secure and the stitching does not show on the back.
- The jump rings are fully closed.
Troubleshooting
- The letter cups: The border is too tight. Re-work it with a hook one size larger.
- The edges ruffle: You placed more than 1 sc in some row ends. Recount against the totals above.
- The leg looks stepped: Work the 2-sc increases loosely and block firmly.
- The opening has gaps: Weave the tails from the split rows across the corners.
- The texture looks like plain sc: You worked into the sc instead of skipping it. Check that each ch-1 sits over a sc.
Care
Hand wash in cool water, press out the water in a towel and dry flat. Do not tumble dry, as heat can tarnish the hardware.
Final Notes
The size depends on a short chain of measurements:
- Gauge: 22 sts x 24 rows = 4 in (10.2 cm)
- Stem: 0.9 in x 1.5 in (2.3 cm x 3.8 cm)
- Lower bowl: 2 in (5.1 cm) tall
- Letter before border: 2.75 in x 3.5 in (7.0 cm x 8.9 cm)
- Finished keychain: 3 in x 3.75 in (7.6 cm x 9.5 cm)
Check each stage and the final size will follow.
Happy crocheting!