
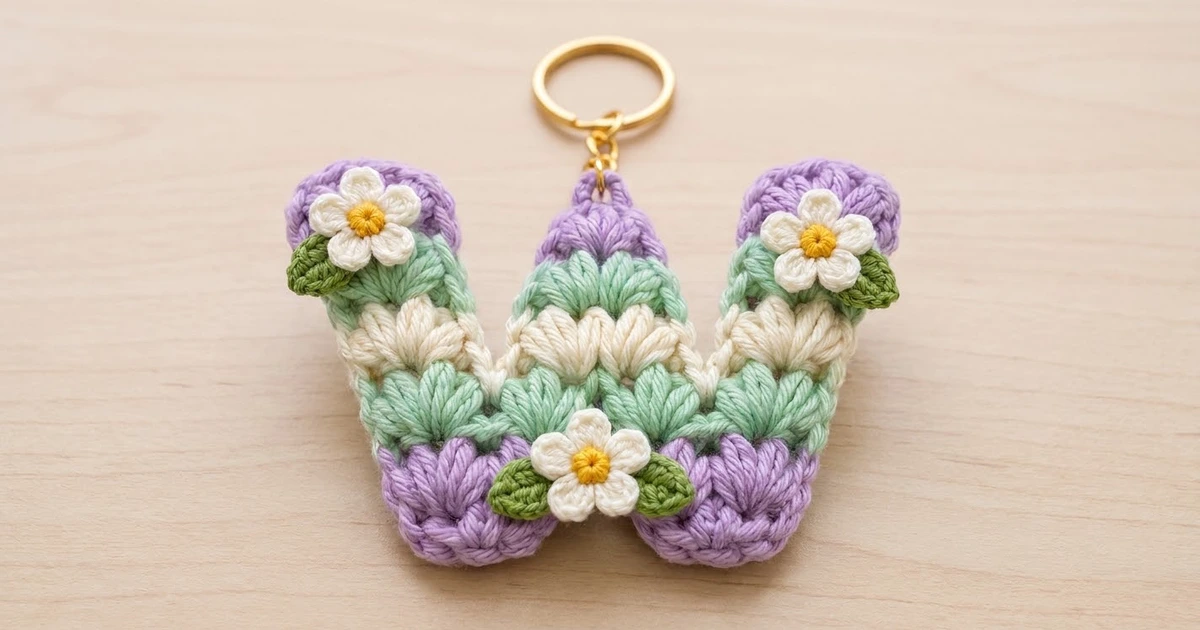
The Lavender Meadow Letter W is a chunky, textured initial keychain worked in rows of puff stitches. Soft stripes of lavender, mint and cream run across the whole letter. Three small white flowers with yellow centers and leaf-green leaves decorate the front, and a gold key ring on a short chain hangs from the middle peak.
The look is pastel and cottagecore, with rounded lobes, three rounded tips and a squishy texture that hides small tension differences. This pattern uses US crochet terms.
The finished letter measures 4.9 in wide x 3.4 in tall (12.4 x 8.6 cm), not counting the hardware. That makes it a generous bag charm that’s easy to read but still fits on a tote handle.
Construction overview: you make two identical base blocks for the bottom lobes. Row 5 joins them in one continuous cream row that also shapes the letter. The piece then splits into three sections (left outer arm, middle peak and right outer arm), and each one is worked up to the top. One lavender single crochet round outlines everything. Last, you sew on the flowers and leaves and attach the hardware.
Finished Size and Construction
- Finished size: 4.9 x 3.4 in (12.4 x 8.6 cm)
- Skill level: Intermediate (puff stitches, simple shaping, working in sections)
- Terminology: US
- Yarn weight: DK / light (#3) cotton or cotton blend
- Hook: 3.5 mm (E-4)
- Number of pieces: 1 letter, plus 3 flowers and 4 leaves as appliqués
- Layout: a single letter W, worked flat in rows from the bottom up
- Piece size before border: 4.5 x 3 in (11.4 x 7.6 cm)
- Border depth: 1 round of sc, about 0.2 in (0.5 cm) on each edge
Materials
Use a smooth DK cotton or cotton blend. Cotton keeps the puffs crisp and holds up well on a bag. Fuzzy yarns will blur the stripes.
- Lavender: 7 g / 15 m (Rows 1-2, Rows 9-10, border)
- Mint: 5 g / 11 m (Rows 3-4 and 7-8)
- Cream: 3 g / 7 m (Rows 5-6)
- White: 2 g / 4 m (petals)
- Yellow: 1 g / 2 m (flower centers)
- Leaf green: 2 g / 4 m (leaves)
These quantities include a margin of about 30% for checking your gauge and weaving in ends.
Tools:
- 3.5 mm (E-4) hook
- Tapestry needle and scissors
- Stitch markers
- Gold split key ring, 1 in (2.5 cm), with a 1.25 in (3.2 cm) chain
- 2 gold jump rings (6 mm) and flat-nose pliers
- Rust-proof pins, a blocking mat and a spray bottle
Abbreviations (US Terms)
- ch: chain
- sl st: slip stitch
- sc: single crochet
- sc2tog: single crochet 2 together
- hdc: half double crochet
- dc: double crochet
- st(s): stitch(es)
- yo: yarn over
- RS / WS: right side / wrong side
Puff: (yo, insert hook in st, yo, pull up a loop to about 1/2 in (1.3 cm)) 3 times, yo, pull through all 7 loops, ch 1 to close. The closing ch-1 is not a separate stitch. On the next row, work into the top of each puff.
Puff2tog: (yo, insert hook in next st, yo, pull up a loop) twice, (yo, insert hook in following st, yo, pull up a loop) twice, yo, pull through all 9 loops, ch 1 to close. This counts as 1 puff.
Turning chain: ch 2 at the start of every row. It does not count as a stitch.
Gauge and Checkpoints
Gauge: 4 puffs = 1 in (2.5 cm) wide. 1 row = 0.3 in (0.8 cm) tall.
Make the first base block before anything else. It is part of the letter, so it doubles as your gauge test.
- After block Row 4: 6 puffs x 4 rows = 1.5 x 1.2 in (3.8 x 3.0 cm).
- After Row 5: 16 puff widths = 4 in (10.2 cm), including a 0.5 in (1.3 cm) bridge between the blocks.
- After Row 10: 4.5 x 3 in (11.4 x 7.6 cm). Each outer arm is 0.75 in (1.9 cm) wide.
- After the border: 4.9 x 3.4 in (12.4 x 8.6 cm).
If your block is too big, switch to a 3.25 mm hook or pull your puff loops a little shorter. If it is too small, switch to a 3.75 mm hook. Change the hook, never the counts, because every count below depends on the 6-puff block.

Pattern
Base Blocks (make 2)
These blocks become the two rounded lobes at the bottom of the W.
Block 1: With lavender, ch 8.
Row 1 (RS): Puff in the 3rd ch from the hook and in each ch across. Turn. (6 puffs)
Row 2 (WS): Ch 2, puff in each st across, working the final yo of the last puff in mint. Turn. (6 puffs)
Row 3 (RS, mint): Ch 2, puff in each st across. Turn. (6 puffs)
Row 4 (WS): Ch 2, puff in each st across. (6 puffs) Fasten off and weave in the ends.
Block 2: Work Rows 1-4 as for Block 1, but don’t fasten off. Work the final yo of Row 4 in cream, then turn.
Checkpoint: each block measures 1.5 x 1.2 in (3.8 x 3.0 cm).
Row 5: Joining and Shaping Row
Lay both blocks RS up, with Block 2 (the one holding your working loop) on the right and Block 1 on the left. Leave a gap of about 0.5 in (1.3 cm) between them.
Row 5 (RS, cream): Ch 2. Across Block 2, work 2 puffs in the next st, puff2tog, puff2tog, then 2 puffs in the next st. Without chaining, continue into the first st of Block 1 and work 2 puffs in the next st, puff2tog, puff2tog, then 2 puffs in the next st. Turn. (12 puffs, 6 per block)
How this row shapes the letter:
- Outer puffs: The first 3 puffs lean outward and start the right outer arm. The last 3 puffs do the same for the left outer arm.
- Middle 6 puffs: These lean toward each other. The two neighboring 2-puff increases add exactly 2 puff widths, which bridges the 0.5 in (1.3 cm) gap and closes the bottom notch.
- Paired decreases: The two puff2togs side by side in each block form the dip at the base of each V notch.
Checkpoint: Row 5 spans 4 in (10.2 cm).
Left Outer Arm (Rows 6-10)
Continue from the working loop and work over the last 3 puffs of Row 5 only.
Row 6 (WS, cream): Ch 2, puff in each of the next 3 sts, working the last yo in mint. Turn. (3 puffs)
Row 7 (RS, mint): Ch 2, puff in each st. Turn. (3 puffs)
Row 8 (WS, shift row): Ch 2, 2 puffs in the first st (outer edge), then puff2tog over the last 2 sts (notch edge). Work the last yo in lavender, then turn. (3 puffs)
Rows 9-10 (lavender): Ch 2, puff in each st. Turn. (3 puffs per row) Fasten off.
Middle Peak (Rows 6-10)
Row 6 (WS, cream): With WS facing, join cream in the first of the middle 6 puffs of Row 5, at the end closest to the left arm. Ch 2, puff in each of the 6 sts, working the last yo in mint. Turn. (6 puffs)
Row 7 (RS, mint): Ch 2, puff in each st. Turn. (6 puffs)
Row 8 (WS): Ch 2, puff2tog, puff in the next 2 sts, puff2tog. Work the last yo in lavender, then turn. (4 puffs)
Row 9 (RS, lavender): Ch 2, puff in each st. Turn. (4 puffs)
Row 10 (WS): Ch 2, puff in the first st, puff2tog, puff in the last st. (3 puffs) Fasten off.
Right Outer Arm (Rows 6-10)
Row 6 (WS, cream): With WS facing, join cream in the first of the remaining 3 puffs of Row 5, at the end closest to the middle peak. Ch 2, puff in each st, working the last yo in mint. Turn. (3 puffs)
Row 7 (RS, mint): Ch 2, puff in each st. Turn. (3 puffs)
Row 8 (WS, shift row): Ch 2, puff2tog over the first 2 sts (notch edge), then 2 puffs in the last st (outer edge). Work the last yo in lavender, then turn. (3 puffs)
Rows 9-10 (lavender): Ch 2, puff in each st. Turn. (3 puffs per row) Fasten off.
Checkpoint: the letter now measures 4.5 x 3 in (11.4 x 7.6 cm). Each V notch is about 1 in (2.5 cm) wide at the top. The bottom notch is 0.5 in (1.3 cm) wide and 1.2 in (3.0 cm) tall.
Left-handed crocheters can follow the same text. Because the W is symmetrical, the mirrored result looks identical.
Flowers (make 3)
Rnd 1 (yellow): Make a magic ring, ch 1, work 5 sc in the ring, then sl st to the first sc. (5 sc) Pull the ring closed and fasten off.
Rnd 2 (white): Join white in any sc. (Ch 2, 2 dc, ch 2, sl st) in the same st, then sl st in the next st. Repeat from * to * 4 more times. (5 petals) Fasten off, leaving a 10 in (25.4 cm) tail.
Each flower is about 1 in (2.5 cm) across.
Leaves (make 4)
With leaf green, ch 6. Starting in the 2nd ch from the hook, work sl st, sc, hdc, sc, sl st. (5 sts) Ch 1 for the tip. Rotate and work along the other side of the chain: sl st, sc, hdc, sc, sl st. (5 sts) Sl st to the first sl st. (10 sts)
Fasten off, leaving an 8 in (20.3 cm) tail. Each leaf is about 0.75 in (1.9 cm) long.
Border
Border gauge:
- Puff tops and foundation chains: 1 sc in each.
- Row ends: 3 sc per 2 row ends (alternate 1 sc and 2 sc).
- Outward-pointing (convex) corners: 3 sc in one st.
- V notch corners: 1 sc2tog to pull the corner in.
Round 1 (lavender, RS facing): Join lavender in the notch-side puff of the left arm’s Row 10, then ch 1. Work these segments in order:
- Left arm tip: 3 sc in the first puff, sc in the next puff, 3 sc in the last puff. (7 sc)
- Left outer edge (Rows 10-1): Alternate 1 sc and 2 sc in the row ends. (15 sc)
- Left lobe bottom: 3 sc in the first foundation ch, sc in the next 4 ch, 3 sc in the last ch. (10 sc)
- Bottom notch:
- Up Block 1’s inner edge: 1, 2, 1 sc in row ends 1-3, then 1 sc in the row 4 end.
- 2 sc around the base of the Row 5 bridge.
- Down Block 2’s inner edge: 1 sc in the row 4 end, then 1, 2, 1 sc in row ends 3-1.
- (12 sc)
- Right lobe bottom: 3 sc, sc in the next 4 ch, 3 sc. (10 sc)
- Right outer edge (Rows 1-10): Alternate 1 sc and 2 sc. (15 sc)
- Right arm tip: 3 sc, 1 sc, 3 sc. (7 sc)
- Right V notch:
- Down the arm: 2, 1, 2, 1 sc in row ends 10-7, then 1 sc in the row 6 end.
- Sc2tog, with one leg in the arm’s row 6 end and one leg in the peak’s row 6 end.
- Up the middle peak: 1 sc in the peak’s row 6 end, then 1, 2, 1, 2 sc in row ends 7-10.
- (15 sc)
- Middle tip: 3 sc, 1 sc, 3 sc. (7 sc)
- Left V notch: Work as for segment 8, going down the peak and up the arm. (15 sc)
Sl st to the first sc. Total: 113 sc (7 + 15 + 10 + 12 + 10 + 15 + 7 + 15 + 7 + 15). Fasten off.
Why the math works:
- Row ends: Each row is 0.3 in (0.8 cm) tall, so 3 sc per 2 rows means 3 sc per 0.6 in (1.5 cm). That matches the width of a DK sc, about 0.2 in (0.5 cm), so the edges lie flat.
- Convex corners: Each 3-sc corner adds exactly 2 stitches, which rounds the lobes and tips.
- V notches: Each sc2tog removes 1 stitch so the inside corner stays crisp instead of ruffling.
- Size: The border adds 0.2 in (0.5 cm) on each side. That gives 4.5 + 0.4 = 4.9 in (12.4 cm) wide and 3 + 0.4 = 3.4 in (8.6 cm) tall.
Final Blocking
- Weave in all ends along rows of the same color so they don’t show through the stripes.
- Pin the letter RS up to 4.9 x 3.4 in (12.4 x 8.6 cm). Keep the three tips level and the two lobes equal.
- Mist until damp, then pat the puffs even.
- Let it dry completely, for at least 4 hours.
- Sew a flower near the top of each outer arm, over the line where mint meets lavender. Tuck one leaf behind each flower so it points toward the outer edge.
- Sew the third flower at the bottom center, over the Row 5 bridge, with one leaf on each side.
- Open a jump ring, pass it through 2 border sc at the middle tip, attach the chain and close the ring fully. Use the second jump ring to join the chain to the key ring if needed.
Final Quality-Control Checklist
- Each block has 6 puffs and is 1.5 in (3.8 cm) wide.
- Row 5 has 12 puffs, and the bottom notch is closed at the top.
- The outer arms have 3 puffs in every row and are 0.75 in (1.9 cm) wide.
- The middle peak has 6, 6, 4, 4 and 3 puffs in Rows 6-10.
- The stripes from the bottom up are lavender, mint, cream, mint, lavender.
- The border has 113 sc and lies flat.
- The finished size is 4.9 x 3.4 in (12.4 x 8.6 cm).
- The flowers and leaves are sewn on firmly, and all rings are fully closed.
Troubleshooting
- Uneven puffs: Pull every loop to the same height and keep the closing ch-1 snug.
- Bottom notch gapes: Snug up the Row 5 bridge stitches and work the 2 bridge sc firmly.
- V notches ruffle: Check that you worked the sc2tog at each notch base.
- Outer edges wave: Work 1 sc instead of 2 in a few row ends, or use a 3.25 mm hook for the border.
- Letter leans: Confirm that you worked the shift rows (Row 5 and Row 8) on both outer arms.
Care
Remove the key ring first. Hand wash in cool water with mild soap, roll the letter in a towel to press out the water, and dry it flat.

Final Notes
The whole pattern follows one measurement chain. At 4 puffs per 1 in (2.5 cm) and 0.3 in (0.8 cm) per row, each block measures 1.5 x 1.2 in (3.8 x 3.0 cm). Row 5 joins the two blocks into a 4 in (10.2 cm) row, and Rows 6-10 bring the letter to 4.5 x 3 in (11.4 x 7.6 cm). The 113-sc border finishes it at 4.9 x 3.4 in (12.4 x 8.6 cm). Check your first block, and the rest will fall into place.
Happy crocheting!