

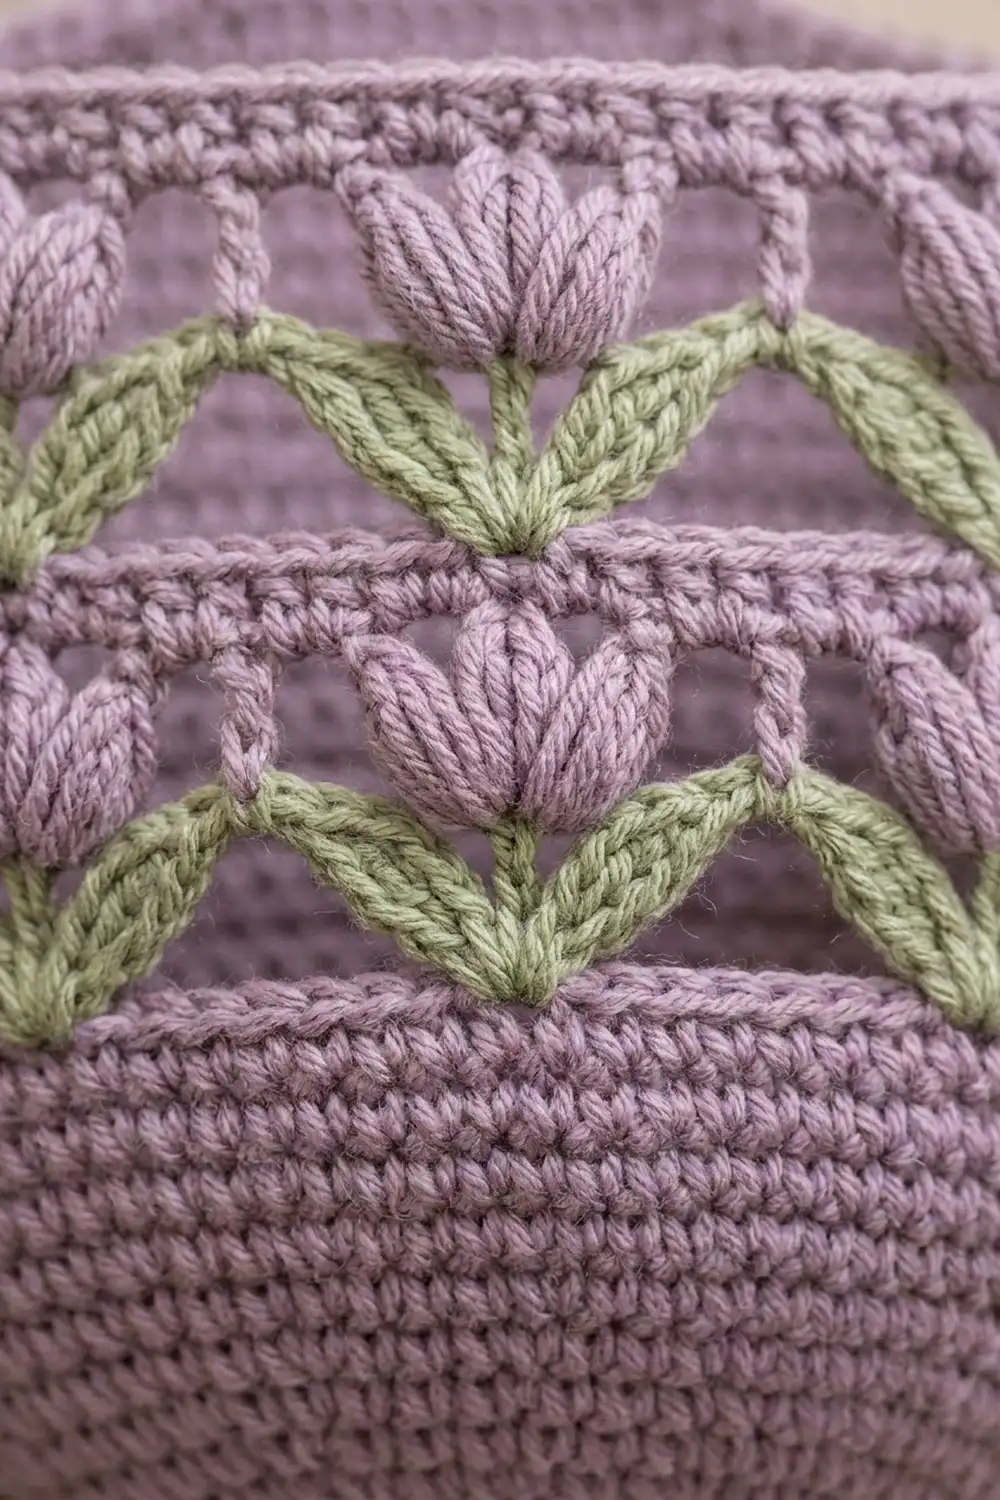
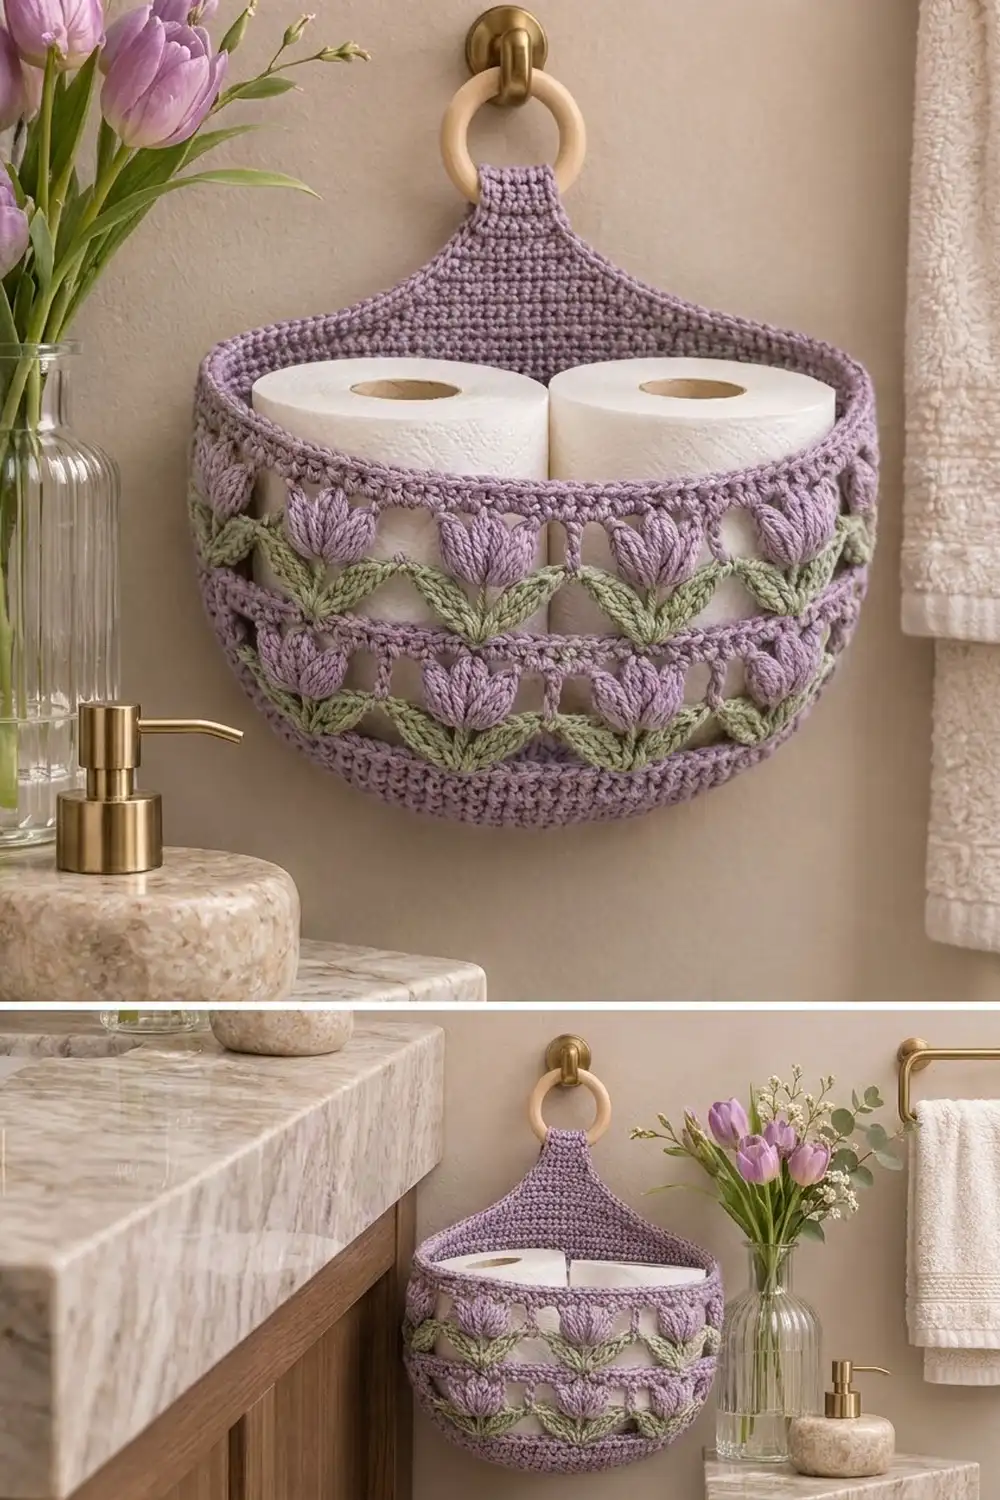
This hanging holder keeps two spare rolls on the wall and looks like a basket of spring flowers. The solid lavender back panel tapers to a slim tab that loops around a wooden ring. The rounded front pocket carries two bands of puffy tulips on sage-green leaves.
The palette is soft and calm: lavender for the body and flowers, with sage green for the leaves only. Open spaces between the tulips keep the pocket from feeling heavy and let the white rolls show through.
The pattern uses US crochet terms. The finished holder measures about 12 3/4 in (32.4 cm) wide and about 13 in (33.0 cm) tall, from the bottom edge to the top of the tab loop. The ring is not included in that height. At the rim, the pocket stands out about 3 1/2 in (8.9 cm) from the panel.
Both parts are worked flat in rows. You crochet the back panel from the bottom up, with built-in curves, and finish with the tab. You then work the front pocket from the bottom up, adding the two tulip bands as you go. Each part gets an edging, the pocket is sewn to the panel stitch for stitch, and a corded border finishes the rim.
Finished Size and Construction
- Finished size: 12 3/4 in (32.4 cm) wide x 13 in (33.0 cm) tall
- Skill level: Intermediate
- Terminology: US
- Yarn weight: Worsted (#4)
- Hook: 4.0 mm (G-6)
- Number of pieces: 2 (1 back panel, 1 front pocket)
- Layout: Pocket sewn over the lower U-shaped edge of the panel
- Back panel size: 12 1/4 in (31.1 cm) wide x 11 1/4 in (28.6 cm) tall before edging, not counting the tab
- Pocket rim width: 15 1/4 in (38.7 cm)
- Pocket height before border: about 6 3/4 in (17.1 cm)
- Border depth: about 1/2 in (1.3 cm), giving a finished pocket height of about 7 1/4 in (18.4 cm)
Materials
Choose a worsted-weight cotton or cotton blend. Cotton holds its shape when the pocket is full, and the clusters stand out clearly in it. Acrylic will also work, but the pocket will be softer and may sag a little.
- Lavender (main color): 200 g, about 380 m
- Sage green (leaves): 25 g, about 48 m
These quantities include a margin of about 15 percent for your gauge swatch and for weaving in ends.
Tools:
– 4.0 mm (G-6) crochet hook
– Wooden ring, 2 1/2 in (6.4 cm) outside diameter
– Tapestry needle
– 6 locking stitch markers
– Scissors
– Measuring tape
– Blocking mat and rust-proof pins
Abbreviations (US Terms)
- ch: chain
- sl st: slip stitch
- sc: single crochet
- dc: double crochet
- tr: treble crochet
- sk: skip
- sp: space
- st(s): stitch(es)
- RS / WS: right side / wrong side
- sc3tog: single crochet 3 together (decreases 2 sts)
- rev sc: reverse single crochet (crab stitch)
Special stitches:
- 2-dc cluster (2-dc cl): [Yo, insert hook in the stitch, yo, pull up a loop, yo, pull through 2 loops] twice, then yo and pull through all 3 loops on the hook.
- Leaf pair (V): Work (2-dc cl, ch 2, 2-dc cl) in the same stitch.
- Tulip (tul): [Yo twice, insert hook in the sp, yo, pull up a loop, (yo, pull through 2 loops) twice] 4 times, so you have 5 loops on the hook. Yo, pull through all 5 loops, then ch 1 to close.
Gauge and Checkpoints
Gauge: 16 sc and 18 rows = 4 in (10.2 cm) in single crochet.
Make a swatch before you start. Check your gauge again after Row 10 of the back panel, because that piece will tell you whether everything else fits.
Checkpoints:
– Panel Row 1: 25 sc = 6 1/4 in (15.9 cm)
– Panel Row 10: 49 sc = 12 1/4 in (31.1 cm) wide
– Panel Row 35: about 7 3/4 in (19.7 cm) tall
– Pocket Row 1: 37 sc = 9 1/4 in (23.5 cm)
– Pocket Row 10: 61 sc = 15 1/4 in (38.7 cm) wide, about 2 1/4 in (5.7 cm) tall
If your piece is too big, go down half a hook size. If it is too small, go up half a size. Matching the stitch gauge matters more than matching the row gauge. The seam is matched stitch for stitch, so the two pieces will still fit together if your rows are a little taller or shorter.
Back Panel
Use lavender throughout. Ch 1 at the start of a row does not count as a stitch. Turn at the end of every row.
Row 1 (RS): Ch 26. Sc in the 2nd ch from the hook and in each ch across. (25 sc)
Rows 2–4: Ch 1, 3 sc in the first st, sc in each st to the last st, 3 sc in the last st. (Row 2: 29 sc, Row 3: 33 sc, Row 4: 37 sc)
Rows 5–10: Ch 1, 2 sc in the first st, sc in each st to the last st, 2 sc in the last st. (Row 5: 39 sc, Row 6: 41 sc, Row 7: 43 sc, Row 8: 45 sc, Row 9: 47 sc, Row 10: 49 sc)
The fast increases in Rows 2–4 followed by the slower ones in Rows 5–10 create the rounded bottom.
Rows 11–35: Ch 1, sc in each st across. (49 sc in each row)
Place a marker at each end of Row 35. The pocket rim will sit at these markers.
Shoulders:
Rows 36–39: Ch 1, sc3tog, sc in each st to the last 3 sts, sc3tog. (Row 36: 45 sc, Row 37: 41 sc, Row 38: 37 sc, Row 39: 33 sc)
Rows 40–51: Ch 1, sc2tog, sc in each st to the last 2 sts, sc2tog. You lose 2 sts per row, so the counts go 31, 29, 27, 25, 23, 21, 19, 17, 15, 13, 11, and 9.
Row 51 has 9 sc. Decreasing quickly and then slowly gives the inward curve that runs up to the tab.
Checkpoint: The panel should be about 11 1/4 in (28.6 cm) tall from Row 1 to Row 51.
Tab:
Rows 52–65: Ch 1, sc in each st across. (9 sc in each row)
The tab should be about 3 in (7.6 cm) long and 2 1/4 in (5.7 cm) wide. Do not fasten off yet.
Front Pocket
Start with lavender. Turn at the end of every row. To change color, work the last yo of the final stitch in the new color.
Row 1 (RS): Ch 38. Sc in the 2nd ch from the hook and in each ch across. (37 sc)
Rows 2–4: Ch 1, 3 sc in the first st, sc in each st to the last st, 3 sc in the last st. (Row 2: 41 sc, Row 3: 45 sc, Row 4: 49 sc)
Rows 5–10: Ch 1, 2 sc in the first st, sc in each st to the last st, 2 sc in the last st. (Row 5: 51 sc, Row 6: 53 sc, Row 7: 55 sc, Row 8: 57 sc, Row 9: 59 sc, Row 10: 61 sc)
Tulip Band 1:
Row 11 (RS): Ch 3 (counts as dc), dc in each st across. (61 dc) Change to green.
Row 12 (WS, green): Ch 1, sc in the first st, *ch 2, sk 2 sts, V in the next st, ch 2, sk 2 sts, sc in the next st; repeat from * 9 more times. (11 sc, 10 V) Change to lavender and fasten off green.
Each repeat uses 6 sts, so 1 + (10 x 6) = 61 sts are used exactly.
Row 13 (RS): Ch 4 (counts as tr), *ch 3, tul in the ch-2 sp at the center of the next V, ch 3, tr in the next sc; repeat from * 9 more times. (11 tr, 10 tulips, 20 ch-3 sps)
The tulips sit on the leaf pairs, and the tr bars with their ch-3 arches leave the open spaces between flowers.
Row 14: Ch 1, sc in the first tr, *2 sc in the next ch-3 sp, sc in the top of the tulip, 2 sc in the next ch-3 sp, sc in the next tr; repeat from * 9 more times. (61 sc)
That is 1 + (10 x 6) = 61, the same count as Row 10.
Row 15: Ch 1, sc in each st across. (61 sc)
Tulip Band 2:
Rows 16–19: Repeat Rows 11–14. (Row 16: 61 dc; Row 17: 11 sc, 10 V; Row 18: 11 tr, 10 tulips; Row 19: 61 sc)
Rows 20–21: Ch 1, sc in each st across. (61 sc in each row)
Fasten off.
Checkpoint: The pocket should be 15 1/4 in (38.7 cm) wide and about 6 3/4 in (17.1 cm) tall.
Make All Pieces
| Piece | Quantity | Colors |
|---|---|---|
| Back panel with tab | 1 | Lavender |
| Front pocket | 1 | Lavender + sage green |
Layout (front view):
        [ tab + ring ]
       /  panel top   \
      |  pocket rim    |
      |  tulip band 2  |
      |  tulip band 1  |
       \ pocket base  /
Edging Each Piece
Panel edging round (lavender): Continue from the tab with RS facing. Work 9 sc across the top of the tab. Then work down the left side:
- Tab rows 52–65: 1 sc per row end (14 sc)
- Rows 40–51: 1 sc per row end (12 sc)
- Rows 36–39: 2 sc per row end (8 sc)
- Rows 1–35: 1 sc per row end, but 2 sc per row end on Rows 2–4 (38 sc)
That gives 72 sc for the left side. Work 25 sc across the underside of the foundation chain. Work the right side in reverse order, again 72 sc. Sl st to the first sc to join.
Total: 9 + 72 + 25 + 72 = 178 sc.
Pocket edging row (lavender): With RS facing, join at the top left corner (the end of Row 21). Work down the left side with 1 sc per sc row end, 2 sc per row end on Rows 2–4, 2 sc per dc or leaf row end, and 3 sc per tr row end. That gives 32 sc. Work 37 sc across the foundation and 32 sc up the right side.
Total: 32 + 37 + 32 = 101 sc. Fasten off.
Joining
Panel U-edge: This is the panel edging from the left Row 35 marker, down around the bottom, and up to the right Row 35 marker: 38 + 25 + 38 = 101 sts. That matches the pocket’s 101 sts exactly.
- Lay the pocket, RS up, on the RS of the panel.
- Clip the first pocket edging st to the panel edging st at the left Row 35 marker. Clip the last pocket st to the panel st at the right marker.
- Clip the center bottom points together. That is pocket st 51 (32 + 19) to panel st 51 (38 + 13).
- Whipstitch through the back loops of both edgings with lavender, one pocket st to one panel st, for all 101 sts.
The pocket base is wider (37 sts) than the panel base (25 sts). Because of that, the pocket’s bottom corners land 6 sts up each side of the panel curve. The extra width pushes the pocket forward into a bowl.
Tension: Pull each whipstitch snug, not tight. A firm seam rolls into the soft ridge along the curve, while a tight seam puckers.
Checkpoint: The pocket rim should sit level with the Row 35 markers and stand out about 3 1/2 in (8.9 cm) at its center.
Border
Border gauge: Sc and rev sc both work at 4 sts per inch along the rim, the same as the body gauge.
Row 1 (RS): Join lavender in the first st of Row 21 at the right-hand seam. Ch 1, sc in each st across. (61 sc) Do not turn.
Row 2: Ch 1, rev sc in each st, working from left to right. (61 rev sc) Fasten off and weave the tail into the seam.
The rim is the only free edge, so these 2 rows are the whole border. All other edges were finished by the panel edging.
Why the math works: The rim has 61 sts, which is 1 + 10 tulip repeats of 6 sts each. Both border rows work 1 st into each existing st, so the rim stays 15 1/4 in (38.7 cm) long. It will not flare or tighten.
The rim is 3 in (7.6 cm) longer than the 12 1/4 in (31.1 cm) panel width behind it. That extra length bows into a curve about 3 1/2 in (8.9 cm) deep, which is enough room for two standard rolls side by side.
Mount the tab: Pass the tab through the wooden ring from front to back. Fold it down and sew Row 65 to the WS of the panel at Row 51. The loop will be about 1 1/2 in (3.8 cm) tall.
Final Blocking
- Spray the holder evenly until it is damp. Do not soak it.
- Lay the back panel flat and pin it to 12 3/4 in (32.4 cm) wide, including the edging.
- Stuff the pocket with a rolled towel so it holds its bowl shape.
- Gently ease each tulip upward and each leaf pair open with your fingers.
- Pin the rim into a smooth arc so the rev sc cord lies evenly.
- Leave it to dry completely, at least 24 hours, before removing the pins.
Final Quality-Control Checklist
- The panel is 12 3/4 in (32.4 cm) wide with matching left and right curves.
- Each band has 10 tulips centered on 10 leaf pairs.
- There are 11 tr bars per tulip row, with even open spaces between them.
- The seam has no gaps or puckers, and the center bottoms are aligned.
- The rim measures 15 1/4 in (38.7 cm) and lies smooth.
- The tab is sewn securely and the ring sits straight.
- All ends are woven in on the WS.
Troubleshooting
- Bottom curve ruffles: You probably worked too many increases. Recount Rows 2–10 against the stated totals.
- Tulips lean sideways: Make sure each tulip goes into the center ch-2 sp of its V and not into a side ch-2 space.
- Pocket is 1 st short at the seam: Recheck the edging rules for the tr rows. Each tr row end needs 3 sc.
- Rim flares: Your border tension is loose. Redo the rev sc row with a 3.75 mm hook.
- Pocket sags when full: Use cotton yarn, or whipstitch the seam a second time from the inside.
Care
Hand wash in cool water with mild soap. Press out the water in a towel, reshape the pocket, and dry flat.
Final Notes
The sizing starts with gauge: 16 sc = 4 in (10.2 cm). That gauge gives a 49-st panel 12 1/4 in (31.1 cm) wide and a 61-st pocket 15 1/4 in (38.7 cm) wide. The 101-st edgings on the panel and pocket match one to one, so the pocket closes neatly around the panel’s U-shape. The 61-st border keeps the rim at its full length and holds the 3 1/2 in (8.9 cm) bowl. Check each of these numbers as you go, and the holder will come out true to size.
Happy crocheting!