

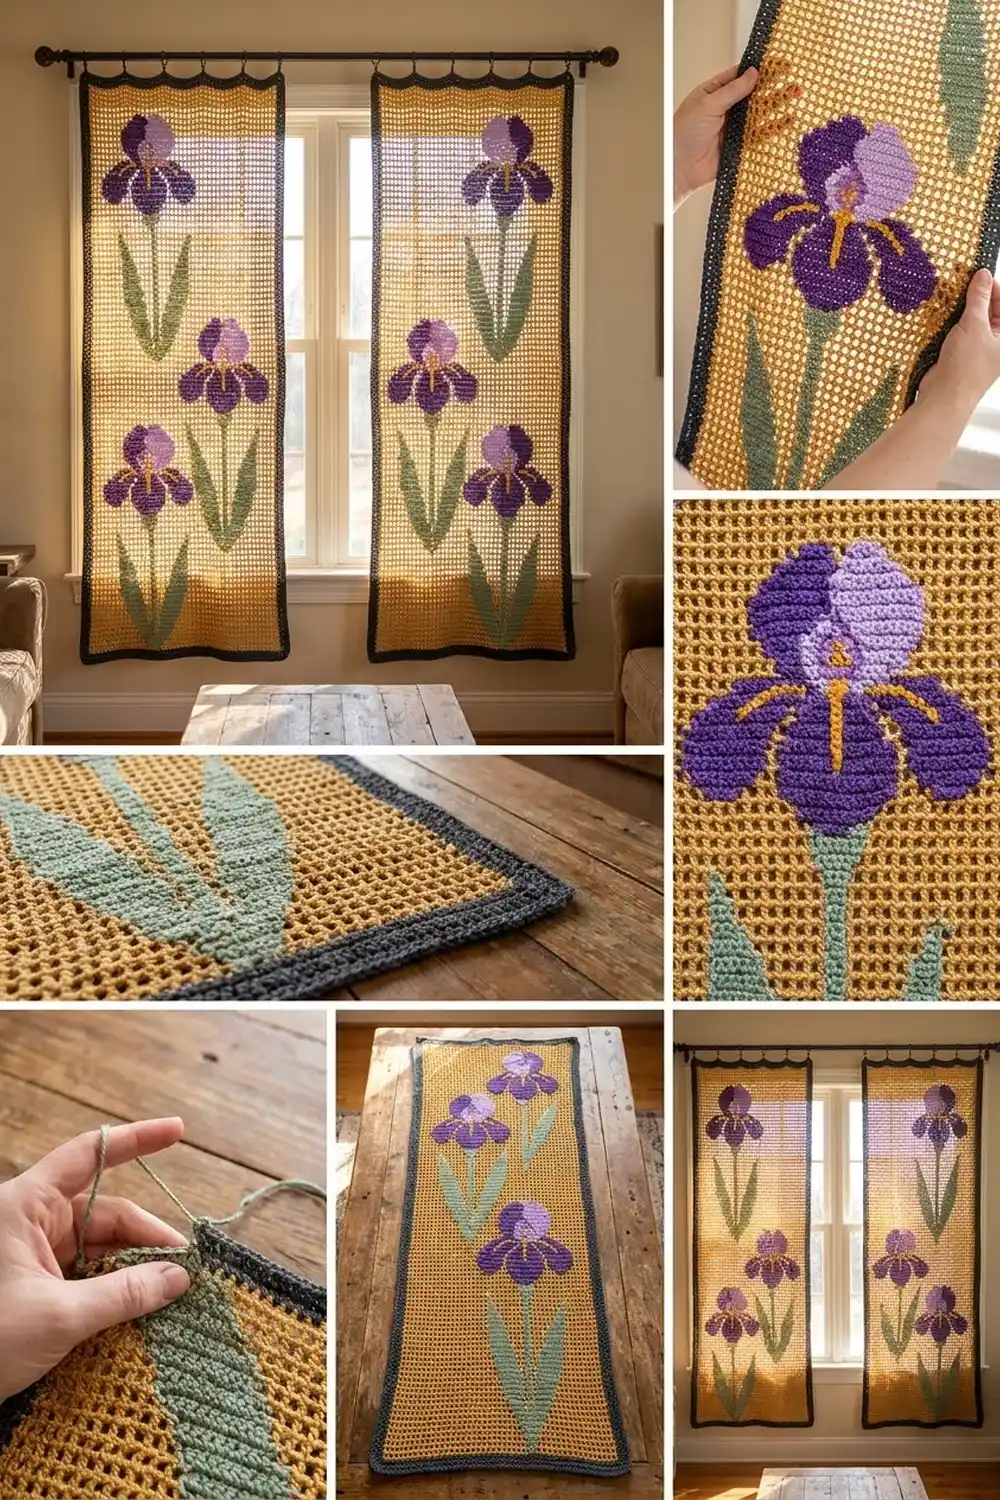
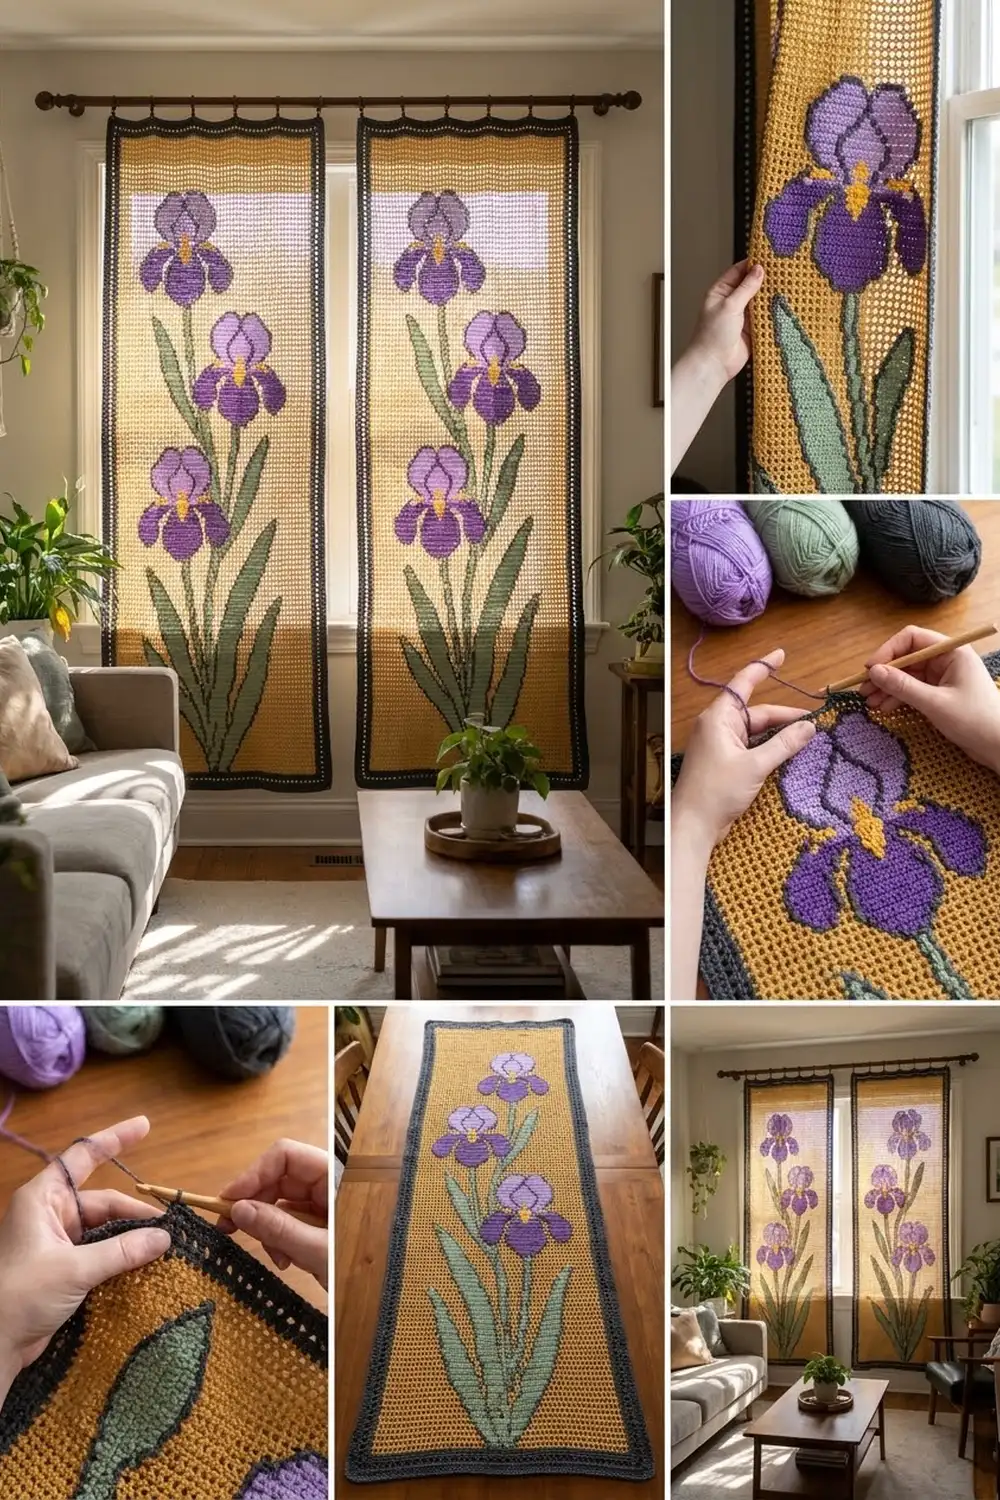
These curtain panels are inspired by Art Nouveau stained glass. Purple irises with lilac centers and marigold beards sit among long sage leaves on a sunny gold mesh. Every shape is outlined in charcoal, like the lead lines in a glass window.
When light shines through, the gold mesh glows and the outlined motifs stand out clearly. A charcoal ladder border frames each panel.
The pattern uses US crochet terms. Each finished panel measures 38 in x 86 in (96.5 cm x 218.4 cm). You make a pair: two separate, identical panels that are never joined, with the second panel’s layout mirrored.
Construction is straightforward. First you crochet one filet-mesh background panel. Then you crochet the petals, leaves and stems as separate appliqués edged in charcoal. You sew them flat onto the mesh, add charcoal surface-slip-stitch lead lines, and finish with a three-round border.
Finished Size and Construction
- Finished size (each panel): 38 in x 86 in (96.5 cm x 218.4 cm)
- Skill level: Intermediate
- Terminology: US
- Yarn weight: DK (#3) cotton
- Hook: 4.0 mm (US G/6)
- Number of pieces: 2 separate panels. Each panel is 1 background plus 30 appliqués.
- Layout: 3 irises per panel (high right, middle left, low center), mirrored on the second panel
- Size before border: 36 in x 84 in (91.4 cm x 213.4 cm)
- Border depth: 1 in (2.5 cm)
- Appliqué sizes:
- Fall: 3.5 in x 3 in (8.9 cm x 7.6 cm)
- Standard: 2.75 in x 2 in (7.0 cm x 5.1 cm)
- Leaf: 24.5 in x 1.5 in (62.2 cm x 3.8 cm)
- Stem: 16.5 in x 0.75 in (41.9 cm x 1.9 cm)
Materials
Use a smooth mercerized DK cotton of about 225 m per 100 g. Cotton hangs well and shows crisp mesh. Avoid pure acrylic, which can stretch over a long drop.
| Color | Per panel | For the pair |
|---|---|---|
| A: Gold (background) | 1,100 g / 2,475 m | 2,200 g / 4,950 m |
| B: Charcoal (outlines, border) | 220 g / 495 m | 440 g / 990 m |
| C: Sage (leaves, stems) | 100 g / 225 m | 200 g / 450 m |
| D: Purple (petals) | 75 g / 169 m | 150 g / 338 m |
| E: Lilac (petal centers) | 25 g / 56 m | 50 g / 113 m |
| F: Marigold (beards) | 10 g / 23 m | 20 g / 45 m |
All quantities include a margin of about 10–15% for swatching and weaving in ends.
Tools:
– 4.0 mm hook
– Tapestry needle
– Stitch markers
– Rustproof pins
– Tape measure
– Blocking mats or a clean sheet
– Spray bottle
– About 10 clip curtain rings per panel
Abbreviations (US Terms)
- ch: chain
- sc: single crochet
- hdc: half double crochet
- dc: double crochet
- fdc: foundation double crochet
- sl st: slip stitch
- sk: skip
- sp: space
- st(s): stitch(es)
- rnd: round
Surface slip stitch: Hold the yarn behind the work. Insert the hook from front to back through the fabric, pull up a loop, and draw it through the loop on the hook. Repeat along the planned line to make a raised chain on the front.
Gauge and Checkpoints
- Mesh gauge: 10 mesh and 9 rows = 4 in (10.2 cm). Each mesh is 2 sts wide, so this works out to 5 sts and 2.25 rows per inch.
- Chain gauge: 5 ch = 1 in (2.5 cm).
Swatch: Work 25 fdc (12 mesh), then 11 rows of mesh. Measure the center 10 mesh x 9 rows.
Before starting the large panel, test one piece first: make one fall and check that it measures 3.5 in x 3 in (8.9 cm x 7.6 cm).
Checkpoints:
– After Row 10: width 36 in (91.4 cm)
– After Row 100: length about 44.4 in (112.8 cm)
– After Row 189: about 84 in (213.4 cm), laid flat
– After the border: 38 in x 86 in (96.5 cm x 218.4 cm)
If your gauge is too big, go down 0.5 mm. If it’s too small, go up 0.5 mm. Never change the stitch counts, because the border math depends on them.
Background Panel (make 1 per panel)
With A:
Row 1: Work 181 fdc. Turn. (181 sts)
Row 2: Ch 4 (counts as dc and ch 1), sk next st, dc in next st, ch 1, sk next st, dc in next st 89 times. Turn. (91 dc, 90 ch-1 sps = 90 mesh)
Rows 3–188: Ch 4 (counts as dc and ch 1), dc in next dc, ch 1, dc in next dc across, working the last dc in the 3rd ch of the turning ch. Turn. (90 mesh per row)
Row 189: Ch 1, sc in each dc and each ch-1 sp across. Fasten off. (181 sc)
Pin the panel to 36 in x 84 in (91.4 cm x 213.4 cm), mist it and let it dry. Appliqués lie flatter on a blocked base.
Fall (lower petal)
With E, ch 11.
Rnd 1: Sc in 2nd ch from hook, hdc in next ch, dc in next 7 ch, 7 dc in last ch. Working along the opposite side, dc in next 7 ch, hdc in next ch, sc in same ch as first sc. Join. Fasten off. (25 sts)
Rnd 2: Join D in first sc. Ch 1, sc in same st and in next hdc, (dc, ch 1) in each of next 7 dc, (dc, ch 1, dc, ch 1) in each of next 7 dc, (dc, ch 1) in each of next 7 dc, sc in next hdc, sc in last sc. Join. (32 sts: 28 dc and 4 sc, plus 28 ch-1 sps)
Rnd 3: Ch 1, sc in first 2 sc, (dc in next dc, ch 1) 7 times, (dc, ch 1, dc, ch 1) in each of next 14 dc, (dc in next dc, ch 1) 7 times, sc in last 2 sc. Skip all ch-1 sps throughout. Join. Fasten off. (46 sts: 42 dc and 4 sc, plus 42 ch-1 sps)
Rnd 4: Join B. Ch 1, sc in each st and each ch-1 sp around. Join. Fasten off, leaving a 24 in (61.0 cm) tail. (88 sc)
Beard: With F, work 8 surface sl sts up the center of the lilac section, starting at the narrow end.
Standard (upper petal)
With E, ch 9.
Rnd 1: Sc in 2nd ch from hook, hdc in next ch, dc in next 5 ch, 7 dc in last ch. Working along the opposite side, dc in next 5 ch, hdc in next ch, sc in same ch as first sc. Join. Fasten off. (21 sts)
Rnd 2: Join D. Ch 1, sc in same st and in next hdc, (dc, ch 1) in each of next 5 dc, (dc, ch 1, dc, ch 1) in each of next 7 dc, (dc, ch 1) in each of next 5 dc, sc in next hdc, sc in last sc. Join. Fasten off. (28 sts: 24 dc and 4 sc, plus 24 ch-1 sps)
Rnd 3: Join B. Ch 1, sc in each st and each ch-1 sp around. Join. Fasten off, leaving a 20 in (50.8 cm) tail. (52 sc)
Leaf
With C, ch 121.
Rnd 1:
1. Sc in 2nd ch from hook and in next 4 ch, hdc in next 5 ch, dc in next ch.
2. Ch 1, sk next ch, dc in next ch 49 times.
3. Hdc in next 5 ch, sc in next 5 ch, 3 sc in last ch.
4. Working along the opposite side, sc in next 5 ch, hdc in next 5 ch, dc in next ch.
5. Ch 1, sk next ch, dc in next ch 49 times.
6. Hdc in next 5 ch, sc in next 4 ch, 2 sc in same ch as first sc.
7. Join. Fasten off. (144 sts, 98 ch-1 sps)
Rnd 2: Join B. Ch 1, sc in each st and each ch-1 sp around, working 3 sc in the center sc of each 3-sc tip. Join. Fasten off, leaving a long tail. (246 sc)
Stem
With C, ch 81.
Rnd 1: Sc in 2nd ch from hook and in each ch to last ch, 3 sc in last ch. Working along the opposite side, sc in each ch across, 2 sc in same ch as first sc. Join. Fasten off. (163 sc)
Rnd 2: Join B. Ch 1, sc in each sc around, working 3 sc in the center sc of each 3-sc tip. Join. Fasten off, leaving a long tail. (167 sc)
Make All Pieces
For each panel, make:
– 9 falls
– 9 standards
– 9 leaves
– 3 stems
That is 30 appliqués per panel, or 60 for the pair. Each iris uses 3 falls and 3 standards.
Layout for Panel 1 (distances measured from the top of the background):
           LEFT       CENTER      RIGHT
 6-14 in    .           .        [IRIS 1]
14-30 in    .        leaves      [stem 1]
32-40 in  [IRIS 2]      .           .
40-56 in  [stem 2]   leaves         .
58-66 in    .        [IRIS 3]       .
66-82 in  leaves     [stem 3]    leaves
Panel 2 mirrors this layout: Iris 1 sits on the left and Iris 2 on the right.
Attaching the Appliqués
Build each iris:
1. Fan out 3 standards with bases touching. The center one stands upright and the outer two tilt about 30 degrees.
2. Lay 3 falls over the bases: one hangs straight down and two droop out to the sides. Overlap the standards by 0.5 in (1.3 cm).
Each finished iris is about 7 in x 8 in (17.8 cm x 20.3 cm).
Stems and leaves: Each stem runs straight down from its iris. Three leaves start at the base of each stem and curve upward beside it, reaching past the flower.
Sewing:
1. Pin all pieces to the blocked background.
2. Using the charcoal tail, whipstitch through the back loop of the outline round and around the nearest dc post or ch-1 bar of the mesh.
3. Work 1 stitch for every 2 outline sc. That’s 44 stitches per fall, 26 per standard, 123 per leaf and about 84 per stem.
4. Where pieces overlap, sew the lower piece first.
Tension: Keep your stitches snug but relaxed. If the mesh bunches, loosen the last few stitches.
Lead lines: With B, work 2 loose lines of surface sl sts from top to bottom, curving between the motifs. Work about 2 sl sts per mesh.
Size checkpoint: The panel should still measure 36 in x 84 in (91.4 cm x 213.4 cm). Re-sew any tight areas before adding the border.
Border
Border gauge:
– Top and bottom: 5 sc per inch, which matches the mesh.
– Sides: 2 sc per mesh row. At 2.25 rows per inch, that’s 4.5 sc per inch.
Each side count below includes that side’s 2 corner stitches.
Rnd 1:
1. Join B in the first st of Row 189. Ch 1, (sc, ch 2, sc) in first st, sc in next 179 sts, (sc, ch 2, sc) in last st.
2. Work 2 sc in the end of each of Rows 188–2.
3. Work (sc, ch 2, sc) in the first fdc of Row 1, sc in next 179 fdc, (sc, ch 2, sc) in last fdc.
4. Work the second side as in step 2. Join.
Top and bottom: 181 sc each. Sides: 374 + 2 = 376 sc each. (1,114 sc, 4 corner ch-2 sps)
Rnd 2 (ladder):
1. Sl st into a corner sp, then ch 5 (counts as corner dc and ch 2).
2. Dc in first sc of side, (ch 2, sk 2 sc, dc in next sc) across the side, ch 2, dc in corner sp, ch 2. Repeat around.
3. On the final repeat, end with the ch 2 after the last side dc, then join to the 3rd ch of the beginning ch-5.
Short sides: 61 dc and 60 sps. Long sides: 126 dc and 125 sps. (378 dc and 378 ch-2 sps in total, including 4 corner dc and 8 corner sps)
Rnd 3: Ch 1, work (sc, ch 2, sc) in each corner dc, sc in each side dc, and 2 sc in each ch-2 sp. Join. Fasten off. Short sides: 187 sc. Long sides: 382 sc. (1,138 sc, 4 corner ch-2 sps)
Why the math works: The ladder repeat is 3 stitches, so each side needs a multiple of 3 plus 1. Both 181 (3 x 60 + 1) and 376 (3 x 125 + 1) fit exactly, so a dc lands on both end stitches of every side. The three rounds together add 1 in (2.5 cm) per edge, which takes the panel from 36 in x 84 in to 38 in x 86 in (96.5 cm x 218.4 cm).
Final Blocking
- Weave in ends along the charcoal outlines.
- Lay the panel face down on mats or a sheet.
- Pin the corners to 38 in x 86 in (96.5 cm x 218.4 cm).
- Pin each edge every 4 in (10.2 cm), keeping the ladder straight.
- Mist until damp.
- Smooth each petal and leaf flat with your palm.
- Let the panel dry completely, at least 24 hours.
- Repeat with the second panel.
Final Quality-Control Checklist
- Each panel measures 38 in x 86 in (96.5 cm x 218.4 cm).
- The two panels are within 0.5 in (1.3 cm) of each other in length.
- Every mesh row has 90 mesh.
- Each iris has 3 standards and 3 falls, and every fall has a beard.
- Outlines have no gaps or loose sewing stitches.
- Corners lie flat and square.
- Panel 2 mirrors Panel 1.
Troubleshooting
- The panel slants: You may be missing the last dc in the turning chain. Count 91 dc posts every 10 rows.
- The rows are too tall: Measure the panel flat, not hanging, and go down a hook size if needed.
- The appliqués cup: The outline round is too tight. Rework it more loosely.
- The border ruffles: You have extra side sc. Recount to 2 sc per row.
- The border pulls in: You are short of stitches. Recount each side to 181 or 376.
- The motifs pucker: Snip the sewing stitches, re-pin and re-sew more loosely.
Care
Hand wash in cool water with mild soap. Roll the panel in a towel and dry it flat, re-pinning to size; never hang it while wet.
Final Notes
Here is the measurement chain:
1. A gauge of 10 mesh x 9 rows = 4 in (10.2 cm) gives a 90-mesh, 189-row background of 36 in x 84 in (91.4 cm x 213.4 cm).
2. That background gives border sides of 181 and 376 stitches, which fit the ladder repeat exactly.
3. The three border rounds bring each panel to 38 in x 86 in (96.5 cm x 218.4 cm).
Check your gauge, count at every checkpoint, and your irises will glow like stained glass.
Happy crocheting!