

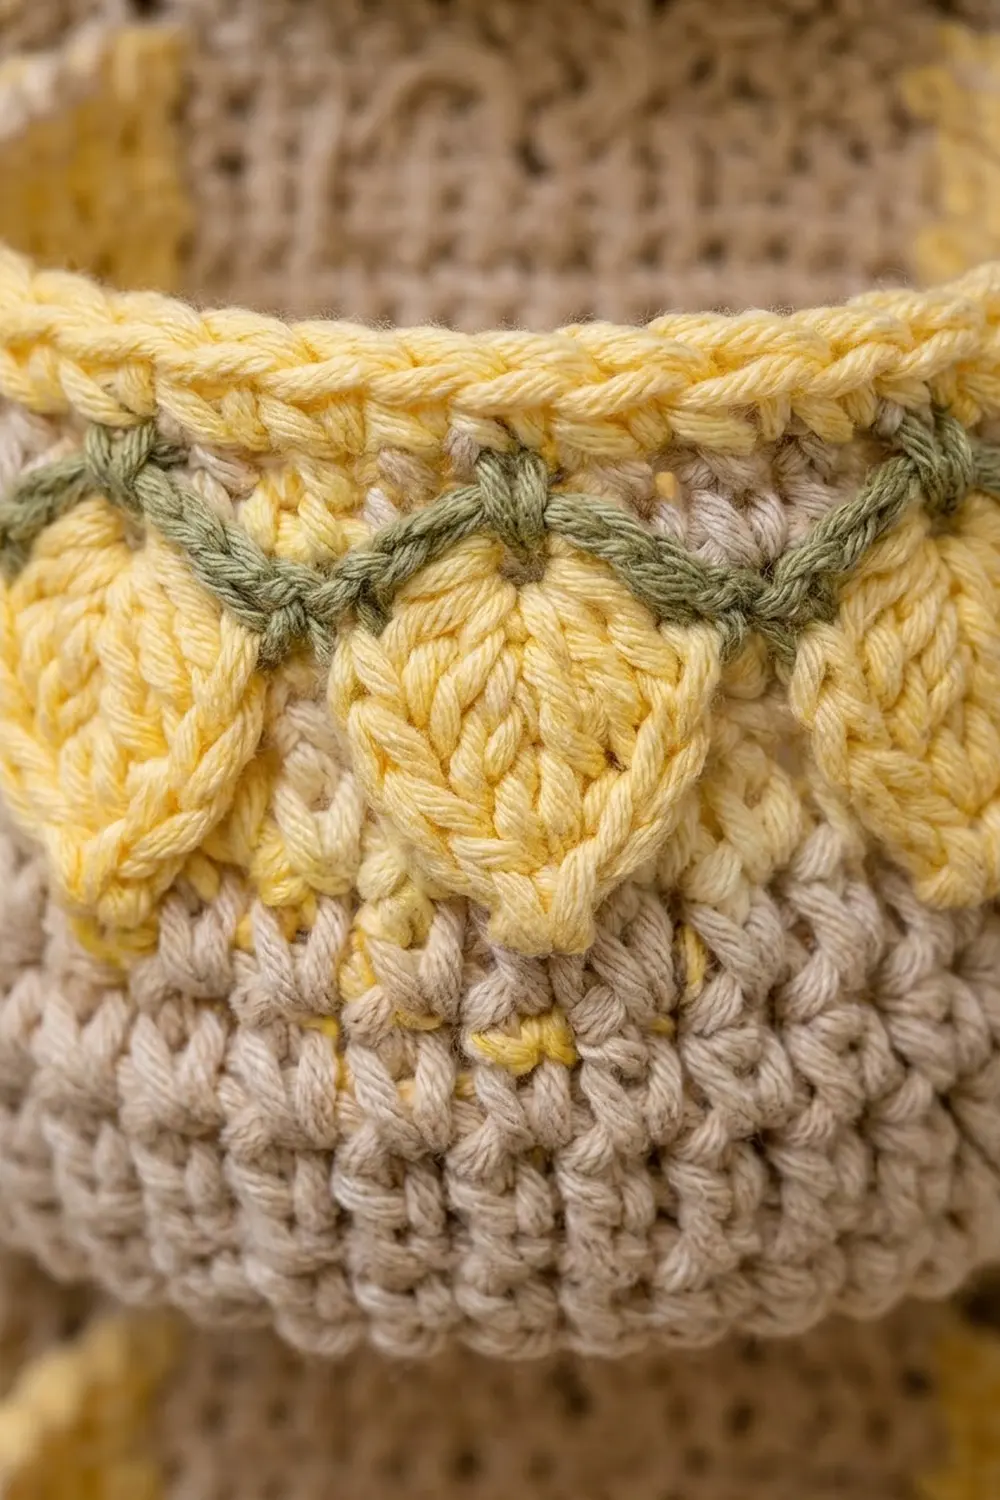
This hanging holder keeps three spare rolls where you need them. It brightens the bathroom without taking up any floor or shelf space. The design has a sturdy oatmeal back panel, three round pockets, and a bright band of yellow lemons on each pocket. Each band sits under a sage-green vine and is finished with a twisted yellow rim.
The colors are soft and warm: oatmeal beige, butter yellow, and sage green. The style is cottage-kitchen cheerful, and it works in a white farmhouse bathroom or a sunny guest room. The pattern uses US crochet terms throughout.
The finished holder is 7 in (17.8 cm) wide and 24 in (61.0 cm) long without the strap. With the strap and wooden ring, it hangs about 28 in (71.1 cm) long. Each pocket holds a standard roll up to 4.5 in (11.4 cm) across.
Construction is simple. You crochet one flat back panel in rows, add a two-round border, make three pockets in joined rounds with tapestry colorwork, and make a short strap. Then you sew the pockets and strap to the panel and wrap the strap around the ring.
Finished Size and Construction
- Finished size: 7 in × 24 in (17.8 cm × 61.0 cm) panel; about 28 in (71.1 cm) overall with the ring
- Skill level: Intermediate (tapestry crochet, reverse single crochet)
- Terminology: US
- Yarn weight: Worsted (#4) cotton
- Hook: 5.0 mm (H-8)
- Number of pieces: 5 (1 back panel, 3 pockets, 1 strap), plus a wooden ring
- Layout: 3 pockets stacked vertically and centered on the panel, 7 in (17.8 cm) apart from base to base
- Panel size before border: 6 in × 23 in (15.2 cm × 58.4 cm)
- Border depth: 2 rounds = 0.5 in (1.3 cm)
- Pocket size: base about 4.75 in (12.1 cm) across; walls 3 in (7.6 cm) tall
Materials
Use a smooth, mercerized or combed worsted cotton, at about 190 m per 100 g. Cotton holds its shape, stands up to bathroom humidity, and shows the lemon colorwork clearly. Avoid fuzzy acrylic, because it blurs the teardrop shapes.
- Oatmeal beige (MC): 250 g / 475 m
- Butter yellow (CC1): 50 g / 95 m
- Sage green (CC2): 25 g / 48 m
These quantities include a comfortable margin of about 20% for gauge swatches and the carried yarn in the colorwork.
Tools:
- 5.0 mm (H-8) crochet hook
- Wooden ring, 2.5 in (6.4 cm) across
- 6 locking stitch markers
- Tapestry needle
- Scissors
- Rustproof pins and a blocking mat
- Tape measure
Abbreviations (US Terms)
- ch – chain
- sc – single crochet
- sl st – slip stitch
- inc – 2 sc in the same stitch
- sc2tog – single crochet 2 together
- BLO – back loop only
- MR – magic ring
- rev sc – reverse single crochet (crab stitch)
- st(s) – stitch(es)
- MC / CC1 / CC2 – beige / yellow / green
Special stitch: Tapestry sc. Lay the unused color along the top of the round and work your sc over it, so the strand is hidden inside the stitch. To change color, work the last sc before the change until 2 loops remain on the hook, then yarn over with the new color and pull it through.
Leaf picot: Ch 3, then sl st in the 3rd ch from the hook. A picot is not counted as a stitch.
Gauge and Checkpoints
Gauge: 16 sc and 16 rows = 4 in (10.2 cm), so 4 sts and 4 rows = 1 in (2.5 cm). Work tightly. A dense fabric keeps the pockets upright.
Before you start the panel, make one pocket as your test piece. It uses every technique in the pattern and shows your gauge in the round.
Checkpoints:
- Pocket base after Rnd 10: about 4.75 in (12.1 cm) across
- Pocket walls after Rnd 22: 3 in (7.6 cm) tall
- Panel after Row 20: 6 in (15.2 cm) wide and 5 in (12.7 cm) tall
- Panel after Row 84: 21 in (53.3 cm) tall
- Panel after Row 92: 23 in (58.4 cm) tall
- Panel after the border: 7 in × 24 in (17.8 cm × 61.0 cm)
If your piece is too big, go down 0.5 mm in hook size. If it is too small, go up 0.5 mm. Don’t change the stitch counts. Check the pocket base against your actual rolls: if a roll won’t sit inside, add one more increase round (66 sts) and keep the 6-st colorwork repeat.
Back Panel
Work the panel in rows with MC. The ch 1 at the start of each row does not count as a stitch.
Row 1: Ch 25. Sc in the 2nd ch from the hook and in each ch across, then turn. (24 sc)
Rows 2–84: Ch 1, sc in each st across, then turn. (24 sc)
The panel now measures 6 in × 21 in (15.2 cm × 53.3 cm).
Shaping the shoulders. On each of the next 8 rows, decrease 1 stitch at each end:
Rows 85–92: Ch 1, sc2tog, sc to the last 2 sts, sc2tog, then turn.
The stitch counts are: Row 85 – 22, Row 86 – 20, Row 87 – 18, Row 88 – 16, Row 89 – 14, Row 90 – 12, Row 91 – 10, Row 92 – 8.
Don’t fasten off. Go straight into the border.
Border
Border gauge: At 4 sc and 4 rows per inch, 1 sc per row end lies flat along the straight sides. Each sloped shoulder rises 8 rows (2 in / 5.1 cm) and steps in 2 in (5.1 cm), so its edge is about 2.8 in (7.1 cm) long. That length needs 11 sc (2.8 × 4 = 11.2).
Round 1 (MC): Ch 1. Work around the panel as follows:
- Top edge: 8 sc across Row 92.
- Left shoulder: 11 sc evenly down the sloped edge (8 row ends + 3 extra sc).
- Left side: 84 sc down the side, 1 per row end.
- Bottom edge: Work 3 sc in the first foundation st, 1 sc in each of the next 22 sts, and 3 sc in the last st. That is 24 sts worked into plus 4 extra sc, for a total of 28.
- Right side: 84 sc up the side.
- Right shoulder: 11 sc up the slope.
Sl st to the first sc to join.
Total: 8 + 11 + 84 + 28 + 84 + 11 = 226 sc.
Round 2 (MC): Ch 1. Sc in each st, but work 3 sc in the center st of each 3-sc bottom corner. That is 226 sts worked into plus 4 extra sc. Join and fasten off.
Total per side: top 8, shoulders 11 each, sides 84 each, bottom 32. Overall, 8 + 11 + 84 + 32 + 84 + 11 = 230 sc.
Why the math works: The sides don’t change in length, so they gain no stitches. Only the two bottom corners need extra stitches to turn flat, and they get 2 extra sc per corner in each round. Each round adds 0.25 in (0.6 cm) on every edge, so the panel grows from 6 in × 23 in to 7 in × 24 in (17.8 cm × 61.0 cm).
Pocket (Make 3)
Work in joined rounds. At the end of each round, sl st to the first sc and ch 1. The ch 1 does not count as a stitch. Joined rounds keep the lemons lined up.
Base (MC)
Rnd 1: 6 sc in a MR. (6)
Rnd 2: Inc in each st. (12)
Rnd 3: (Sc 1, inc) × 6. (18)
Rnd 4: (Sc 2, inc) × 6. (24)
Rnd 5: (Sc 3, inc) × 6. (30)
Rnd 6: (Sc 4, inc) × 6. (36)
Rnd 7: (Sc 5, inc) × 6. (42)
Rnd 8: (Sc 6, inc) × 6. (48)
Rnd 9: (Sc 7, inc) × 6. (54)
Rnd 10: (Sc 8, inc) × 6. (60)
Move the increases around on alternate rounds so the circle stays round instead of turning into a hexagon. The base should measure about 4.75 in (12.1 cm) across.
Walls
Rnd 11 (MC): Sc in the BLO of each st. (60) This round makes the turning ridge where the wall stands up from the base.
Rnds 12–14 (MC): Sc in each st. (60)
The walls now measure 1 in (2.5 cm) tall.
Lemon Band (Tapestry sc in MC and CC1)
Join CC1 and carry it inside your stitches. Each round has ten 6-st repeats, and every round has 60 sts.
Rnd 15: (2 MC, 1 CC1, 3 MC) × 10 — this is the lemon tip.
Rnd 16: (1 MC, 3 CC1, 2 MC) × 10.
Rnd 17: (5 CC1, 1 MC) × 10.
Rnd 18: (5 CC1, 1 MC) × 10.
Rnd 19: (1 MC, 3 CC1, 2 MC) × 10 — this is the rounded top of the lemon.
Each lemon is 1 st wide at the bottom, 5 sts wide in the middle, and 3 sts wide at the top, which makes a downward-pointing teardrop. Cut MC. Leave CC1 attached and carry it through the next round.
Vine and Rim
Rnd 20 (CC2): (Sc in each of the next 6 sts, leaf picot) × 10. (60 sc, plus 10 picots that are not counted)
Each picot falls above the gap between two lemons, so the green vine sits right on top of the lemon band.
Rnd 21 (CC1): Sc in each st, pushing the picots to the outside. (60)
Rnd 22 (CC1): Rev sc in each st. (60) Fasten off and weave in the ends.
The walls now measure 3 in (7.6 cm) tall.
Strap
Row 1 (MC): Ch 9. Sc in the 2nd ch from the hook and in each ch across, then turn. (8)
Rows 2–16: Ch 1, sc in each st, then turn. (8)
The strap measures 2 in × 4 in (5.1 cm × 10.2 cm). Fasten off, leaving a 16 in (40.6 cm) tail for sewing.
Make All Pieces
- Back panel with border: 1 — MC
- Pockets: 3 — MC, CC1, and CC2 each
- Strap: 1 — MC
Layout (front view, top to bottom):
      [ring]
      [strap]
   /  shoulders  \
| ---- 2 in gap ---- |
| [Pocket 3] base at Row 58 |
| [Pocket 2] base at Row 30 |
| [Pocket 1] base at Row 2  |
|_____ bottom border ____|
Joining
Method: Whip stitch with MC through both loops, using matching tension so the seams stay hidden.
Placement:
- Lay the panel right side up.
- For each pocket, mark the 14 panel stitches in the center of the target row, leaving 5 sts free on each side of the original 24. Use Row 2 for the bottom pocket, Row 30 for the middle pocket, and Row 58 for the top pocket. The pockets are 28 rows apart, which is 7 in (17.8 cm).
- On each pocket, mark 14 consecutive back stitches on the Rnd 11 ridge. Choose the half of the pocket where the round joins are, so the colorwork jogs are hidden against the panel.
Stitch-to-stitch logic:
- Bottom seam: Sew the 14 ridge stitches to the 14 marked panel stitches, 1 to 1.
- Side seams: Flatten the back of the pocket. Sew two vertical seams from Rnd 11 up through Rnd 21, matching 1 pocket round to 1 panel row, so each seam covers 11 rows. On the bottom pocket, the seams run from Row 2 to Row 12.
- Rim: Tack the rim to the panel at each side seam.
The flat back measures 3.5 in (8.9 cm) wide. The front of each pocket curves out to cradle the roll.
Tension: Pull each stitch just snug. If you pull too hard, the panel puckers. If you sew too loosely, the pocket tips forward under the weight of a roll.
Size check: The top pocket’s rim lands at about Row 70, which is 17.5 in (44.5 cm) above the bottom of the panel before the border. A roll standing in that pocket reaches about 19 in (48.3 cm), which leaves clear space below the shoulders.
Strap:
- Whip stitch the strap’s foundation (8 sts) to the 8 top sts of the border.
- Pass the strap through the wooden ring from front to back.
- Fold it down behind the panel and sew Row 16 across the back of the strap base, overlapping about 1.5 in (3.8 cm).
Final Blocking
- Before sewing on the ring, spray the panel with water until it is damp.
- Pin it flat to 7 in × 24 in (17.8 cm × 61.0 cm), with the sides straight and the shoulders even.
- Stuff each pocket with a dry roll wrapped in a plastic bag, then mist the pocket walls.
- Shape the rims into round circles and fold the picots outward.
- Let everything dry completely, about 24 hours.
- Remove the pins and the bagged rolls.
Final Quality-Control Checklist
- [ ] The panel measures 7 in × 24 in (17.8 cm × 61.0 cm) and lies flat
- [ ] Border Round 2 counts 230 sts
- [ ] Each pocket has 60 sts and 10 lemons, all pointing down
- [ ] The picots sit between the lemons
- [ ] The rev sc rim is even all the way around
- [ ] The pockets are centered, with bases 7 in (17.8 cm) apart
- [ ] The colorwork jogs are hidden against the panel
- [ ] The strap is sewn securely around the ring
- [ ] All ends are woven in at least 2 in (5.1 cm)
Troubleshooting
- Pocket walls flare out: Your tension is too loose. Go down one hook size for Rnds 11–22.
- Carried yarn shows through: Hold the carried strand slightly tighter, and work your sc over it, not around it.
- Lemons look slanted: Your round joins are drifting. Always sl st into the first sc of the round, not into the ch 1.
- Panel ripples at the sides: The border has too many stitches. Recount to 84 per side.
- Pocket sags under a roll: Add a third vertical seam down the center of the pocket back.
- Roll doesn’t fit: Use the 66-st base option from the gauge section, which gives 11 lemon repeats.
Care
Hand wash in cool water and lay the holder flat to dry, reshaping the pockets while they are damp. Remove the wooden ring before washing.

Final Notes
The sizes in this pattern build on each other in a chain:
- 4 sc per inch gives a 6 in (15.2 cm) wide panel from 24 stitches.
- 84 straight rows plus 8 shoulder rows make the panel 23 in (58.4 cm) long.
- Two border rounds bring it to 7 in × 24 in (17.8 cm × 61.0 cm).
- Each 60-stitch pocket is about 4.75 in (12.1 cm) across and 3 in (7.6 cm) tall.
- The pockets are spaced every 7 in (17.8 cm).
- The strap and ring bring the holder to about 28 in (71.1 cm) overall.
Check each measurement as you go, and the finished holder will hang straight and full of sunshine.
Happy crocheting!