

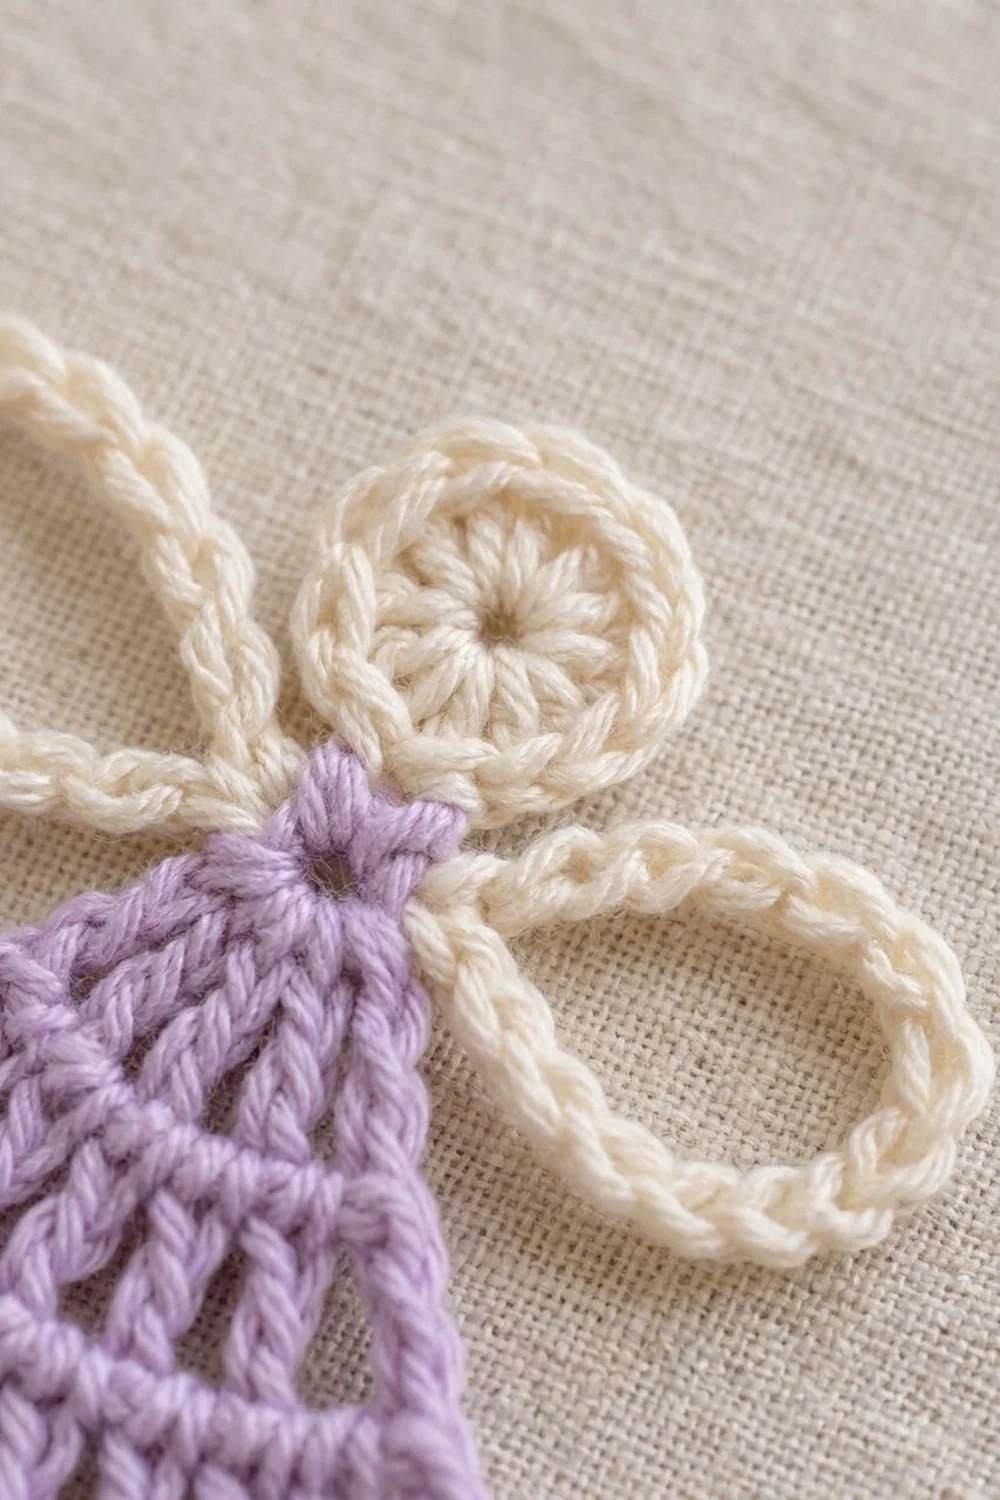
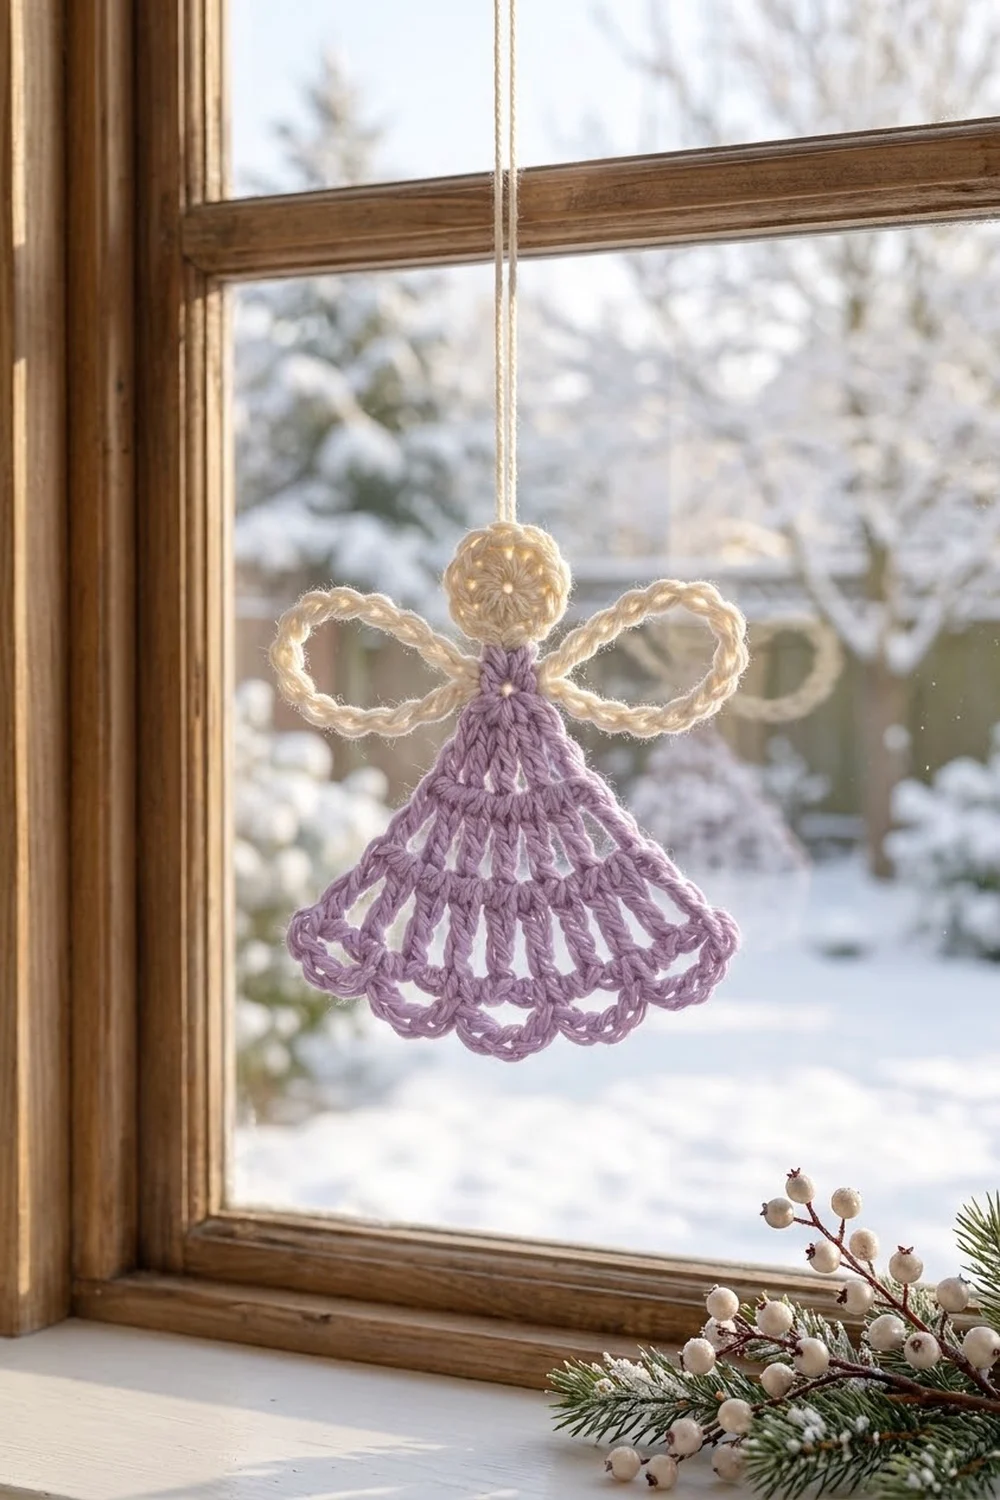
This little angel is a flat motif with a soft lilac bell-shaped skirt, a round cream head, and two airy cream loop wings. The skirt fans out from a narrow neck in rows of double crochet stitches and ends in a small scalloped hem. The turned rows give it gentle horizontal ridges, so it has texture without any complicated stitches.
There are only two colors: lilac for the skirt and cream for the head and wings. The overall look is light, simple, and slightly vintage. It works well as an ornament, a gift-wrap topper, or an appliqué on a card or bag.
The pattern uses US crochet terms. The finished angel measures 3.75 in (9.5 cm) wide across the wings and 3.75 in (9.5 cm) tall from the top of the head to the scalloped hem.
You make three small parts. First you work the skirt in rows from the neck point down to the hem, then add a two-row scalloped border along the bottom. Next you make the head as a single round, and the wings as one figure-eight cord. Finally you block the parts and sew them together from the back.
Finished Size and Construction
- Finished size: 3.75 in (9.5 cm) wide × 3.75 in (9.5 cm) tall
- Skill level: Easy
- Terminology: US crochet terms
- Yarn weight: Worsted weight (#4), cotton or cotton blend
- Hook: 4.0 mm (G-6)
- Number of pieces: 1 angel, made from 3 parts (skirt, head, wings)
- Layout: Wings centered behind the neck, head overlapping the neck point
- Skirt size before border: 3.25 in (8.3 cm) wide at the hem × 2.5 in (6.4 cm) tall
- Skirt size after border: 3.5 in (8.9 cm) wide × 3.0 in (7.6 cm) tall
- Border depth: 0.5 in (1.3 cm), along the hem only
- Head: 1 in (2.5 cm) across
- Each wing: 1.75 in (4.4 cm) long × 1 in (2.5 cm) tall
Materials
Yarn advice: Choose a smooth worsted-weight cotton or cotton blend. Cotton gives crisp stitch definition, and the wing loops and scallops hold their shape after blocking. Fuzzy or very splitty yarns blur the ridges and make the wing cords look lumpy.
Colors:
- Lilac (skirt and hem border): 6 g, about 10 m
- Cream (head and wings): 4 g, about 6.5 m
These quantities include a margin of roughly 30% for your gauge swatch, weaving in ends, and sewing tails.
Tools:
- 4.0 mm (G-6) crochet hook
- Tapestry needle
- Scissors
- 1 stitch marker
- Blocking mat or folded towel
- Rust-proof pins
- Spray bottle with clean water
- Ruler or tape measure
Abbreviations (US Terms)
- ch – chain
- sl st – slip stitch
- sc – single crochet
- dc – double crochet
- st(s) – stitch(es)
- sk – skip
- sp – space
- MR – magic ring
- tch – turning chain
- rep – repeat
Special stitch – Scallop: Work 5 sc into the same ch-3 space. Work the stitches around the chain, not into individual chains, so they cover it completely.
Note: The beginning ch-3 counts as 1 dc throughout. A beginning ch-1 does not count as a stitch.
Gauge and Checkpoints
Gauge: 16 dc and 8 dc rows = 4 in (10.2 cm). That means 4 dc per inch, and each dc row is 0.5 in (1.3 cm) tall.
Gauge matters here because every part has to line up: the wing span has to match the hem width, and the head has to fit the neck. Make one complete skirt before you make anything else, and measure it against these checkpoints:
- After Row 1: a small fan about 1.25 in (3.2 cm) wide, 0.5 in (1.3 cm) tall
- After Row 3: 2.25 in (5.7 cm) wide, 1.5 in (3.8 cm) tall
- After Row 5: 3.25 in (8.3 cm) wide, 2.5 in (6.4 cm) tall
- After the border: 3.5 in (8.9 cm) wide, 3.0 in (7.6 cm) tall
- Head: 1 in (2.5 cm) across
- Wings: 3.75 in (9.5 cm) tip to tip
If your skirt is too big (Row 5 wider than 3.5 in / 8.9 cm), go down to a 3.5 mm hook. If it is too small (Row 5 narrower than 3 in / 7.6 cm), go up to a 4.5 mm hook. Use the same hook for the head and wings so the proportions stay matched.
Skirt (Lilac)
You work the skirt flat in turned rows, starting at the neck point. Row 1 fans 5 dc out from one chain, which creates the pointed neck. After that, you add 1 dc at each edge on every row, so the sides flare out in a smooth bell shape.
Foundation: With lilac, ch 4.
Row 1: Work 4 dc in the 4th ch from the hook. The skipped ch-3 counts as the first dc. Turn. (5 dc)
Row 2: Ch 3 (counts as dc). Dc in the first st (this is the base of the ch-3, an increase). Dc in each of the next 3 sts, then 2 dc in the top of the tch. Turn. (7 dc)
Row 3: Ch 3. Dc in the first st, dc in each of the next 5 sts, then 2 dc in the top of the tch. Turn. (9 dc)
Check that the skirt is 2.25 in (5.7 cm) wide and 1.5 in (3.8 cm) tall.
Row 4: Ch 3. Dc in the first st, dc in each of the next 7 sts, then 2 dc in the top of the tch. Turn. (11 dc)
Row 5: Ch 3. Dc in the first st, dc in each of the next 9 sts, then 2 dc in the top of the tch. Turn. (13 dc)
Check that the skirt is 3.25 in (8.3 cm) wide and 2.5 in (6.4 cm) tall. Don’t fasten off; carry straight on to the border.
Stitch count summary: 5, 7, 9, 11, 13. Each row is 2 dc more than the row before, with 1 added at each edge.
The ridges you see across the skirt come from turning: the stitch tops alternate between the front and back of the fabric. Keep your tension even so the ridges stay straight.
Head (Cream)
Round 1: With cream, make an MR. Ch 3 (counts as dc), then work 11 dc into the ring. Pull the tail until a small center hole remains, about the size of a pencil tip. Sl st to the top of the beginning ch-3. (12 dc)
Fasten off, leaving a 10 in (25.4 cm) tail for sewing. The head should measure 1 in (2.5 cm) across. Don’t close the center completely: the small hole is part of the look.
Wings (Cream)
You make both wings as one figure-eight cord: two chain loops joined at a shared center, then covered with sc.
Loop 1: With cream, ch 18. Sl st into the first ch to form a ring.
Loop 2: Ch 18, then sl st into the same first ch again. You now have two loops meeting at one center point. Place a marker in that center.
Covering round: Ch 1. Work 24 sc into Loop 1, working around the chain. Sl st into the marked center. Then work 24 sc into Loop 2 and sl st into the marked center. (48 sc + 2 sl st)
Fasten off, leaving a 10 in (25.4 cm) tail. Push the sc evenly around each loop so the chain is fully hidden. Each wing should flatten to an oval 1.75 in (4.4 cm) long × 1 in (2.5 cm) tall. The total span is 1.75 + 0.25 (center) + 1.75 = 3.75 in (9.5 cm).
Border
The border runs along the hem only. The sides and neck of the skirt stay plain, as in the finished piece.
Border gauge: Each scallop sits over 2 dc of Row 5, or 0.5 in (1.3 cm) of hem. Each scallop rises about 0.25 in (0.6 cm) above the row below it, and the two border rows together add 0.5 in (1.3 cm) of depth.
Border Row A (lilac): Continue from Row 5 without turning again. Ch 1, sc in the first st. Ch 3, sk 1 st, sc in the next st. Rep from * 5 more times, ending with a sc in the top of the tch. Turn.
Count along the hem: 7 sc + 6 ch-3 sps. This covers all 13 sts: 7 worked and 6 skipped.
Border Row B (lilac): Ch 1, sl st in the first sc. Work 1 Scallop (5 sc) in the next ch-3 sp, then sl st in the next sc. Rep from * 5 more times.
Count along the hem: 6 scallops (30 sc) + 7 sl st.
Fasten off and weave in the ends.
Why the math works: Row 5 has 13 sts, which equals 1 + (2 × 6). The first sc anchors the left corner, and each of the 6 repeats uses exactly 2 sts (1 skipped, 1 worked). The last sc lands on the tch at the right corner. Because the count is odd, the hem starts and ends with a sc, so the scallops are symmetrical. The 30 sc in Border Row B are more than the 13 base sts, which makes the hem flare gently from 3.25 in (8.3 cm) to 3.5 in (8.9 cm).
Final Blocking
You block the parts separately, then assemble them, then give the finished angel a final press.
- Dampen: Spray each part with water until it is evenly damp, but not dripping.
- Pin the skirt: Pin the neck point and both hem corners first. Shape the hem to 3.5 in (8.9 cm) wide and the total skirt height to 3.0 in (7.6 cm). Pin the point of every scallop so each one is round and the same size.
- Pin the head: Shape it into a flat 1 in (2.5 cm) circle with the center hole open.
- Pin the wings: Pin each loop into an oval 1.75 in (4.4 cm) long, with the tips 3.75 in (9.5 cm) apart. Tilt each oval upward by about 20 degrees.
- Dry: Leave all the parts pinned until completely dry.
- Attach the wings: Lay the skirt face down. Center the wing join behind the neck, 0.25 in (0.6 cm) below the neck point. Sew through the wing center with several small stitches using the wing tail.
- Attach the head: Turn the angel face up. Place the head so its lower edge overlaps the neck point by 0.25 in (0.6 cm). Sew it on from the back with the head tail, catching only the back loops so the stitches stay hidden.
- Final press: Lightly mist the assembled angel, pin it to 3.75 in (9.5 cm) × 3.75 in (9.5 cm), and let it dry again.
If you want to hang the angel, sl st cream yarn into the top back of the head, ch 10, sl st into the same spot, and fasten off.
Final Quality-Control Checklist
- Skirt rows count 5, 7, 9, 11, 13 dc.
- Border Row A has 7 sc and 6 ch-3 spaces, and Border Row B has 6 matching scallops.
- The skirt sides are straight and the same length.
- The head is round and flat, with a small open center.
- Each wing has 24 sc and the chain is fully hidden.
- Both wings are the same size and tilt up at the same angle.
- The head overlaps the neck by 0.25 in (0.6 cm) and is centered.
- No sewing stitches show on the front.
- The finished angel measures 3.75 in (9.5 cm) in both directions.
- All ends are woven in securely.
Troubleshooting
Skirt curls or cups: Your tension is probably tight on the increase rows. Loosen up slightly, then block firmly.
One side is longer than the other: You may have missed the increase in the tch. Recount: every row should end with 2 dc in the top of the tch.
Scallops look uneven: Make sure the 5 sc go around the ch-3, not into the chains. Re-pin each scallop point while blocking.
Hem doesn’t come out even: Row 5 must have exactly 13 sts. An even count leaves a spare stitch at the end.
Head ruffles: You probably have more than 12 dc. Frog the round and rework 11 dc plus the ch-3.
Head cups: Your dc are too tight. Go up a hook size for the head only.
Chain shows through the wings: Push the sc closer together, or add 1–2 more sc to each loop. Work the same number on both loops.
Wings droop: Re-block them with the tips pinned higher, and add one more anchoring stitch at the center.
Care
Hand wash in cool water with mild soap, press out the water in a towel, and dry flat, re-pinning the shape if needed. Do not tumble dry or wring.
Final Notes
The measurement chain is simple. Gauge is 4 dc per inch and 0.5 in (1.3 cm) per row. Five rows give a skirt 3.25 in (8.3 cm) wide and 2.5 in (6.4 cm) tall. The 0.5 in (1.3 cm) scalloped border brings it to 3.5 in (8.9 cm) × 3.0 in (7.6 cm). Next comes the 1 in (2.5 cm) head, overlapping the neck by 0.25 in (0.6 cm), which brings the total height to 3.75 in (9.5 cm). The two 1.75 in (4.4 cm) wings plus their 0.25 in (0.6 cm) center match that height with a 3.75 in (9.5 cm) span.
Check each stage as you go, and your angel will come out balanced, flat, and ready to display.
Happy crocheting!