

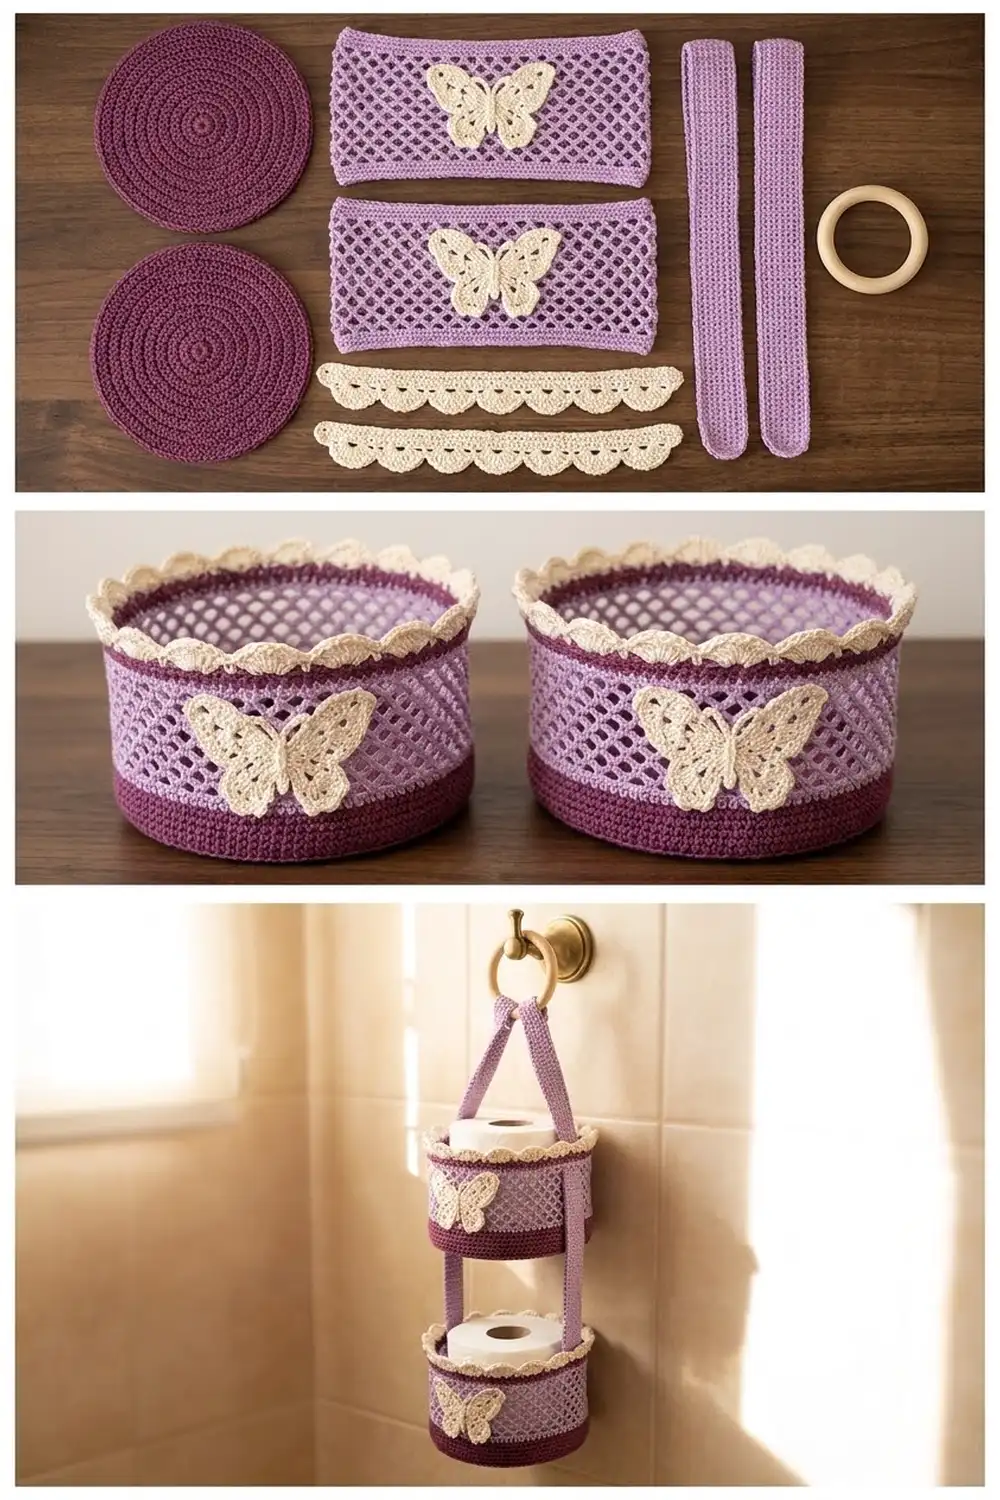
This hanging holder stacks two round baskets on two long straps. It holds two spare rolls without using any floor space. Each basket has a solid plum base, an open lilac diamond mesh wall, a cream butterfly appliqué on the front, and a cream scalloped rim.
The colors are soft and a little vintage: deep plum, dusty lilac, and warm cream. The mesh keeps the baskets light, and the butterflies and shells give them a lacy cottage look.
This pattern uses US crochet terms. Each basket measures about 5.75 in (14.6 cm) across and 5.35 in (13.6 cm) tall, including the scalloped rim. The whole holder hangs about 21.5 in (54.6 cm) from the top of the wooden ring to the bottom of the lower basket.
The holder is built from separate pieces. For each tier you crochet a flat base disc, a flat mesh panel, a butterfly, a scallop strip, and a strap. You seam the panel into a tube, add a plum band to its lower edge, and join that band to the base. Then you sew the scallop strip to the rim and use the straps to join both baskets to a wooden ring.
Finished Size and Construction
- Finished size (each basket): 5.75 in (14.6 cm) diameter x 5.35 in (13.6 cm) tall
- Overall hanging length: about 21.5 in (54.6 cm)
- Skill level: Intermediate
- Terminology: US
- Yarn weight: worsted (#4) cotton
- Hook: 4.0 mm (US G-6)
- Number of pieces: 10 crocheted pieces (2 bases, 2 mesh panels, 2 butterflies, 2 scallop strips, 2 straps) plus 1 wooden ring
- Layout: 2 baskets stacked vertically in 1 column
- Piece size: base disc 5.75 in (14.6 cm) diameter; flat panel 18 in x 3.5 in (45.7 cm x 8.9 cm)
- Size before border: 5.75 in (14.6 cm) diameter x 4.6 in (11.7 cm) tall per basket
- Border depth: scallop rim 0.75 in (1.9 cm)
Materials
Choose a smooth, firm worsted-weight cotton or cotton blend. Cotton holds its shape in a humid bathroom and keeps the mesh crisp. Avoid stretchy acrylic, because it lets the baskets sag under the weight of a roll.
- Plum (Color A): 50 g, about 85 m – bases and base bands
- Lilac (Color B): 100 g, about 170 m – mesh panels and straps
- Cream (Color C): 50 g, about 85 m – butterflies and scallop strips
These amounts include a comfortable margin for gauge checks and seaming.
Tools:
- 4.0 mm (US G-6) crochet hook
- Wooden ring, 2.5 in (6.4 cm) outer diameter
- Tapestry needle
- Stitch markers (at least 4)
- Scissors and measuring tape
- Rust-proof pins
- Wall hook with screws and anchors (optional)
Abbreviations (US Terms)
- ch – chain
- sl st – slip stitch
- sc – single crochet
- hdc – half double crochet
- dc – double crochet
- tr – treble crochet
- sk – skip
- sp – space
- st(s) – stitch(es)
- rnd – round
Picot: (sc, ch 3, sc) worked into the same stitch.
Shell: 5 dc worked into the same stitch.
Gauge and Checkpoints
Gauge: 16 sc and 18 rows or rounds = 4 in (10.2 cm) in sc.
Mesh gauge: 4 ch-5 loops = 4 in (10.2 cm) wide; 4 mesh rows = 1.5 in (3.8 cm) tall.
Make one complete base disc before anything else. It works as your gauge swatch and is also a usable piece.
Checkpoints:
- Base, after Rnd 6 (36 sts): 2.9 in (7.4 cm) diameter
- Base, after Rnd 12 (72 sts): 5.75 in (14.6 cm) diameter
- Panel, after Row 1 (72 sts): 18 in (45.7 cm) wide
- Panel, after Row 9: 3.25 in (8.3 cm) tall
- Panel, after Row 10: 3.5 in (8.9 cm) tall
- Assembled basket before rim: 4.6 in (11.7 cm) tall
If your base comes out too big, go down 0.25 mm in hook size. If it is too small, go up 0.25 mm. Never change the stitch counts. Every piece is built on 72 stitches, and the pieces only fit together if they all keep that count.
Base Disc (Make 2, Plum)
Work in continuous rounds with a marker in the first st of each round. Do not join.
- Rnd 1: Magic ring, 6 sc in ring. (6 sts)
- Rnd 2: 2 sc in each st around. (12 sts)
- Rnd 3: Sc in next st, 2 sc in next st 6 times. (18 sts)
- Rnd 4: Sc in next 2 sts, 2 sc in next st 6 times. (24 sts)
- Rnd 5: Sc in next 3 sts, 2 sc in next st 6 times. (30 sts)
- Rnd 6: Sc in next 4 sts, 2 sc in next st 6 times. (36 sts)
Checkpoint: 2.9 in (7.4 cm) across.
- Rnd 7: Sc in next 5 sts, 2 sc in next st 6 times. (42 sts)
- Rnd 8: Sc in next 6 sts, 2 sc in next st 6 times. (48 sts)
- Rnd 9: Sc in next 7 sts, 2 sc in next st 6 times. (54 sts)
- Rnd 10: Sc in next 8 sts, 2 sc in next st 6 times. (60 sts)
- Rnd 11: Sc in next 9 sts, 2 sc in next st 6 times. (66 sts)
- Rnd 12: Sc in next 10 sts, 2 sc in next st 6 times. (72 sts)
Sl st in next st and fasten off. The disc should lie flat and measure 5.75 in (14.6 cm). If it ruffles, your tension is too loose. If it cups, your tension is too tight.
Mesh Panel (Make 2, Lilac)
Work the panel flat in rows, then seam it into a tube.
- Row 1: Ch 73, sc in 2nd ch from hook and in each ch across. (72 sc)
- Row 2: Ch 1, turn, sc in first st, ch 5, sk 3 sts, sc in next st 17 times, ch 2, sk 2 sts, dc in last st. (17 ch-5 loops + 1 ch-2 half loop)
- Row 3: Ch 1, turn, sc in first dc, sk ch-2 sp, ch 5, sc in next ch-5 sp 17 times, ch 2, dc in last sc. (17 ch-5 loops + 1 half loop)
- Rows 4–9: Repeat Row 3. (8 mesh rows total)
Each sc lands in the center of a loop from the row below. This offsets each row of loops from the last and creates the diamond lattice.
- Row 10 (conversion row): Ch 1, turn, sc in first dc, 2 sc in ch-2 sp, sc in next sc, 3 sc in next ch-5 sp, sc in next sc 17 times. Count: 19 sts worked 1-per-existing-stitch (1 dc + 18 sc) + 53 sts worked into spaces (2 + 17 x 3) = 72 sc.
Fasten off, leaving a 12 in (30.5 cm) tail for seaming. The flat panel measures 18 in x 3.5 in (45.7 cm x 8.9 cm).
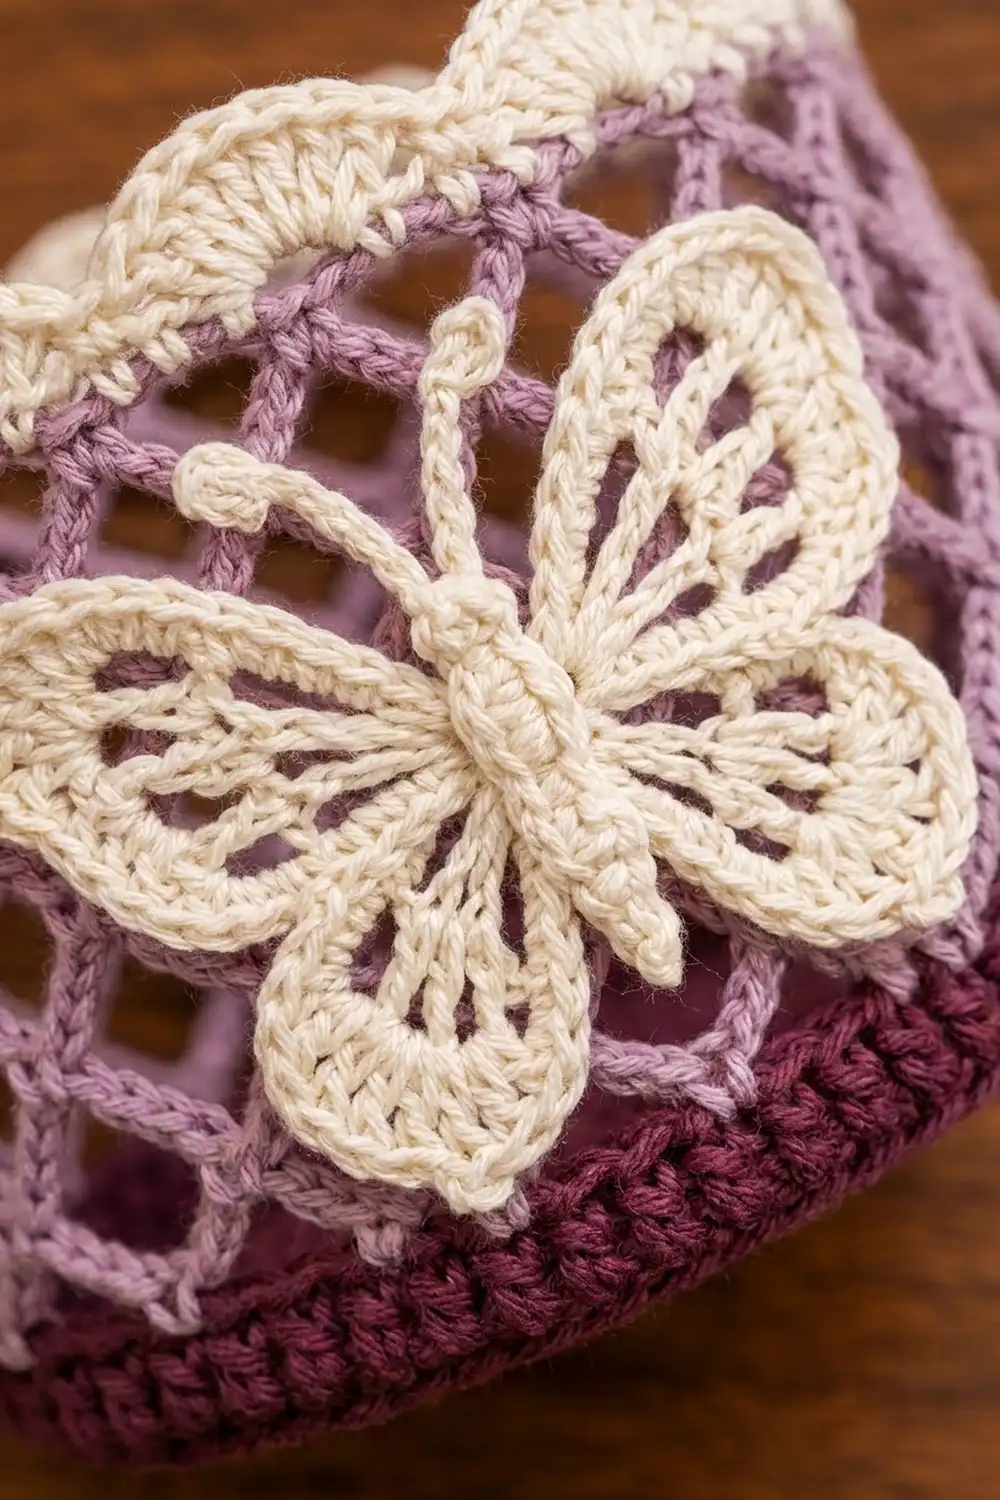
Butterfly Appliqué (Make 2, Cream)
Wings: Ch 5, sl st in first ch to form a ring.
Rnd 1: [Ch 4, 5 tr in ring, ch 4, sl st in ring] twice for the upper wings; [ch 3, 4 dc in ring, ch 3, sl st in ring] twice for the lower wings. (4 wings)
Rnd 2: Do not turn. Edge each wing in order:
- Each upper wing: 4 sc in ch-4 sp, picot in each of next 5 tr, 4 sc in next ch-4 sp, sl st in ring sl st. (18 sc + 5 picots)
- Each lower wing: 3 sc in ch-3 sp, picot in each of next 4 dc, 3 sc in next ch-3 sp, sl st in ring sl st. (14 sc + 4 picots)
Rnd 2 total: 64 sc + 18 picots. Fasten off. The tr and dc posts look like vein lines inside each wing, and the picots form the lacy outline.
Body: Ch 8, sc in 2nd ch from hook (head), hdc in next 5 ch, sc in last ch. (7 sts) Fasten off, leaving an 8 in (20.3 cm) tail.
Antennae: Join cream at the head, ch 6, sl st in 2nd ch from hook and next 4 ch, sl st in head. Repeat once. (5 sl st per antenna)
Sew the body vertically over the center of the wings, with the head between the upper wings. The finished butterfly measures about 3.5 in (8.9 cm) wide x 2.75 in (7.0 cm) tall.
Strap (Make 2, Lilac)
- Foundation: Ch 152, sl st in first ch to join, taking care not to twist.
- Rnd 1: Ch 1, sc in each ch around, sl st to first sc. (152 sc)
- Rnd 2: Ch 1, sc in each st around, sl st to first sc. (152 sc)
Fasten off. Laid flat, the strap forms a long doubled loop 19 in (48.3 cm) long, with a narrow eyelet at each end.
Make All Pieces
- Plum: 2 base discs (the base bands are added during joining)
- Lilac: 2 mesh panels, 2 straps
- Cream: 2 butterflies, 2 scallop strips (see Border)
Layout (front view):
         [ wooden ring ]
          |           |      <- 2 straps
     [   upper basket    ]
          |           |      <- 2.75 in (7.0 cm) strap gap
     [   lower basket    ]
Each basket, from top to bottom: scallop rim, mesh panel with butterfly, plum band, plum base.
Joining
1. Side seam. Fold the panel right side out so the row ends meet. Mattress stitch the edges together with the lilac tail, matching row to row. The tube now has 72 sts around the top (Row 10) and 72 foundation loops around the bottom. This seam is the back of the basket.
2. Plum band. Join plum at the back seam in a foundation loop of Row 1.
- Rnd 1: Ch 1, sc in each foundation loop around, sl st to first sc. (72 sc)
- Rnds 2–4: Ch 1, sc in each st around, sl st to first sc. (72 sc)
3. Base join (Rnd 5). Hold a base disc inside the band, wrong sides together, with the edges lined up. Ch 1, then sc through each band st and its matching base st together, 1-to-1. (72 sc) Fasten off.
The band and the base both have 72 sts, so you don’t need to ease or skip any stitches. Keep your tension even, and stretch the tube gently every quarter round to make sure it isn’t pulling in.
4. Butterfly. Center the butterfly on the front, directly opposite the seam (between sts 36 and 37 counted from the seam), within mesh Rows 2–9. Whipstitch around the body and the wing outlines, catching only the mesh strands.
Checkpoint: The basket now measures 5.75 in (14.6 cm) across and 4.6 in (11.7 cm) tall.
Border: Scalloped Rim (Make 2, Cream)
Border gauge: 72 sc = 18 in (45.7 cm), which matches the panel exactly. The shells stand 0.75 in (1.9 cm) tall.
- Row 1: Ch 73, sc in 2nd ch from hook and in each ch across. (72 sc)
- Row 2: Ch 1, turn, sc in first st, sk 2 sts, shell in next st, sk 2 sts, sc in next st 11 times, sk 2 sts, shell in next st, sk 1 st, sc in last st. (12 shells + 13 sc)
Fasten off, leaving a 24 in (61.0 cm) tail.
Attach: Sew the short ends together with a few stitches to make a ring. Line up the strip seam with the basket’s back seam. Whipstitch the strip’s foundation edge to Row 10 of the panel, 1 st to 1 st (72 to 72), so the shells stand up above the rim.
Counts per side: Divide the rim into two halves at the back seam and the center front. Each half has 36 sts and 6 shells.
Why the math works: Every part is built on 72 sts. The base ends at 72 sts. The panel’s conversion row turns 17 loops plus a half loop back into 72 sts, and the band carries 72. The scallop uses a 6-st repeat, and 72 ÷ 6 = 12 shells. The one slightly wider gap between shells falls at the strip seam, which stays hidden at the back.
Attach the straps: Lay each strap flat as a doubled loop and slip the top eyelets of both straps over the wooden ring. On the upper basket, place one strap at st 18 and the other at st 54, counted from the back seam, on the outside of the basket.
- Measure 7 in (17.8 cm) down from the top fold of the strap. This point lines up with Row 10.
- Sew both strap layers to the wall for 4.6 in (11.7 cm), down to the base seam.
- Leave the next 2.75 in (7.0 cm) of strap free.
- Sew the next 4.6 in (11.7 cm) to the lower basket at the same positions.
The bottom fold of each strap ends at the lower base seam.
Final Blocking
- Spritz each basket lightly with water until damp, not soaked.
- Slide a tin or jar about 5.75 in (14.6 cm) wide inside the basket.
- Ease the mesh so the diamonds are even and vertical.
- Pin each shell into a neat, rounded scallop.
- Pin the butterfly wings flat and open out each picot.
- Let everything dry completely, about 24 hours.
- Hang the holder empty for a day before loading rolls.
Final Quality-Control Checklist
- Each base lies flat at 5.75 in (14.6 cm).
- Each mesh row has 17 full loops plus a half loop.
- Every 72-st round counts 72.
- The side seams, strip seams, and band starts all line up at the back.
- The butterflies are centered and straight.
- The straps are untwisted and sit at sts 18 and 54.
- Both baskets hang level, with a 2.75 in (7.0 cm) strap gap.
- All ends are woven in securely.
Troubleshooting
- Base ruffles: Your hook is too large or you added extra increases. Recount each round.
- Base cups: Your tension is too tight. Go up a hook size.
- Panel too short around: Check that Row 1 and Row 10 each have 72 sc.
- Diamonds lean: Each sc must go into the center of a ch-5 sp, never into a sc.
- Rim flares: You worked 2 sts into one while seaming. Undo and rejoin 1-to-1.
- Basket tilts: The straps are not exactly opposite each other. Re-measure so they sit 36 sts apart.
- Straps twist: The foundation chain twisted before joining. Remake the strap.
Care
Hand wash in cool water with mild soap, then press the water out in a towel. Dry each basket over a jar so it keeps its shape, and do not tumble dry.
Final Notes
The measurements build on each other. At 16 sc = 4 in (10.2 cm), 72 sts = 18 in (45.7 cm) around. That gives a 5.75 in (14.6 cm) base, a 3.5 in (8.9 cm) mesh panel, a 1.1 in (2.8 cm) plum band, and a 0.75 in (1.9 cm) scallop rim, for a 5.35 in (13.6 cm) basket. Two baskets on 19 in (48.3 cm) straps hang about 21.5 in (54.6 cm) from a 2.5 in (6.4 cm) ring. Check your gauge and keep every round at 72, and the pieces will fit together without fuss.
Happy crocheting!