
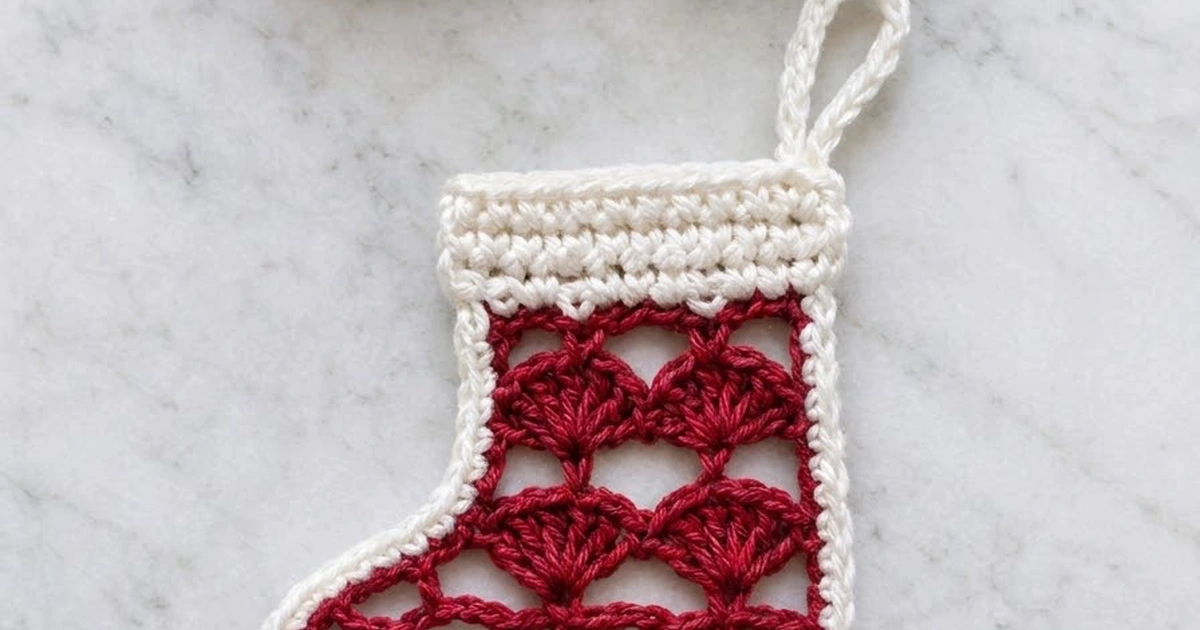
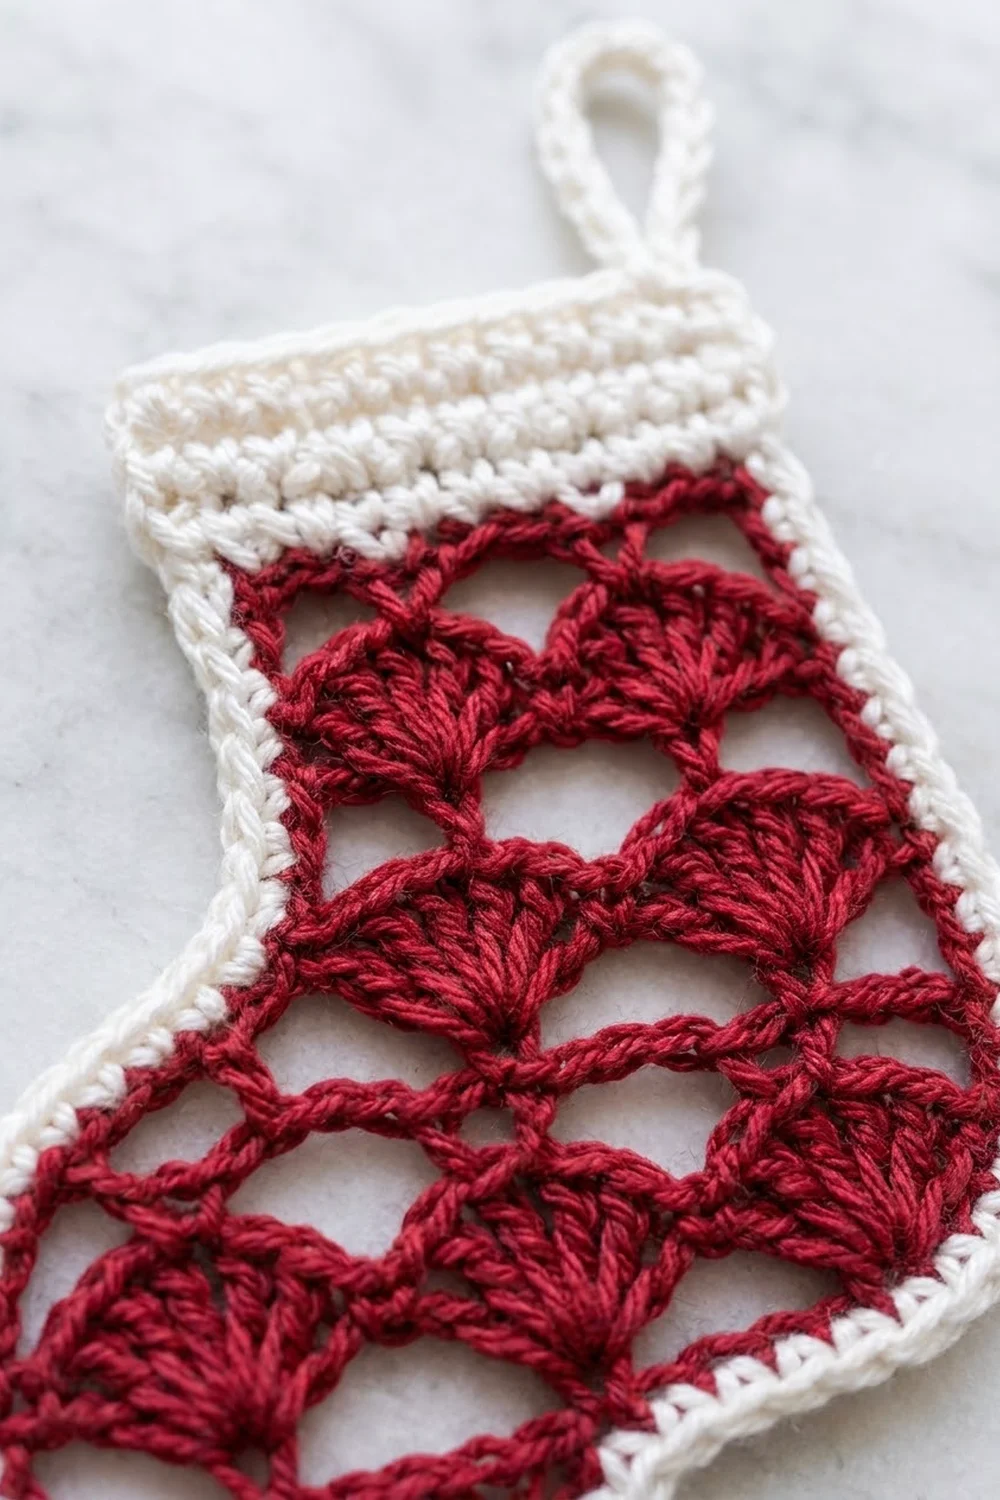
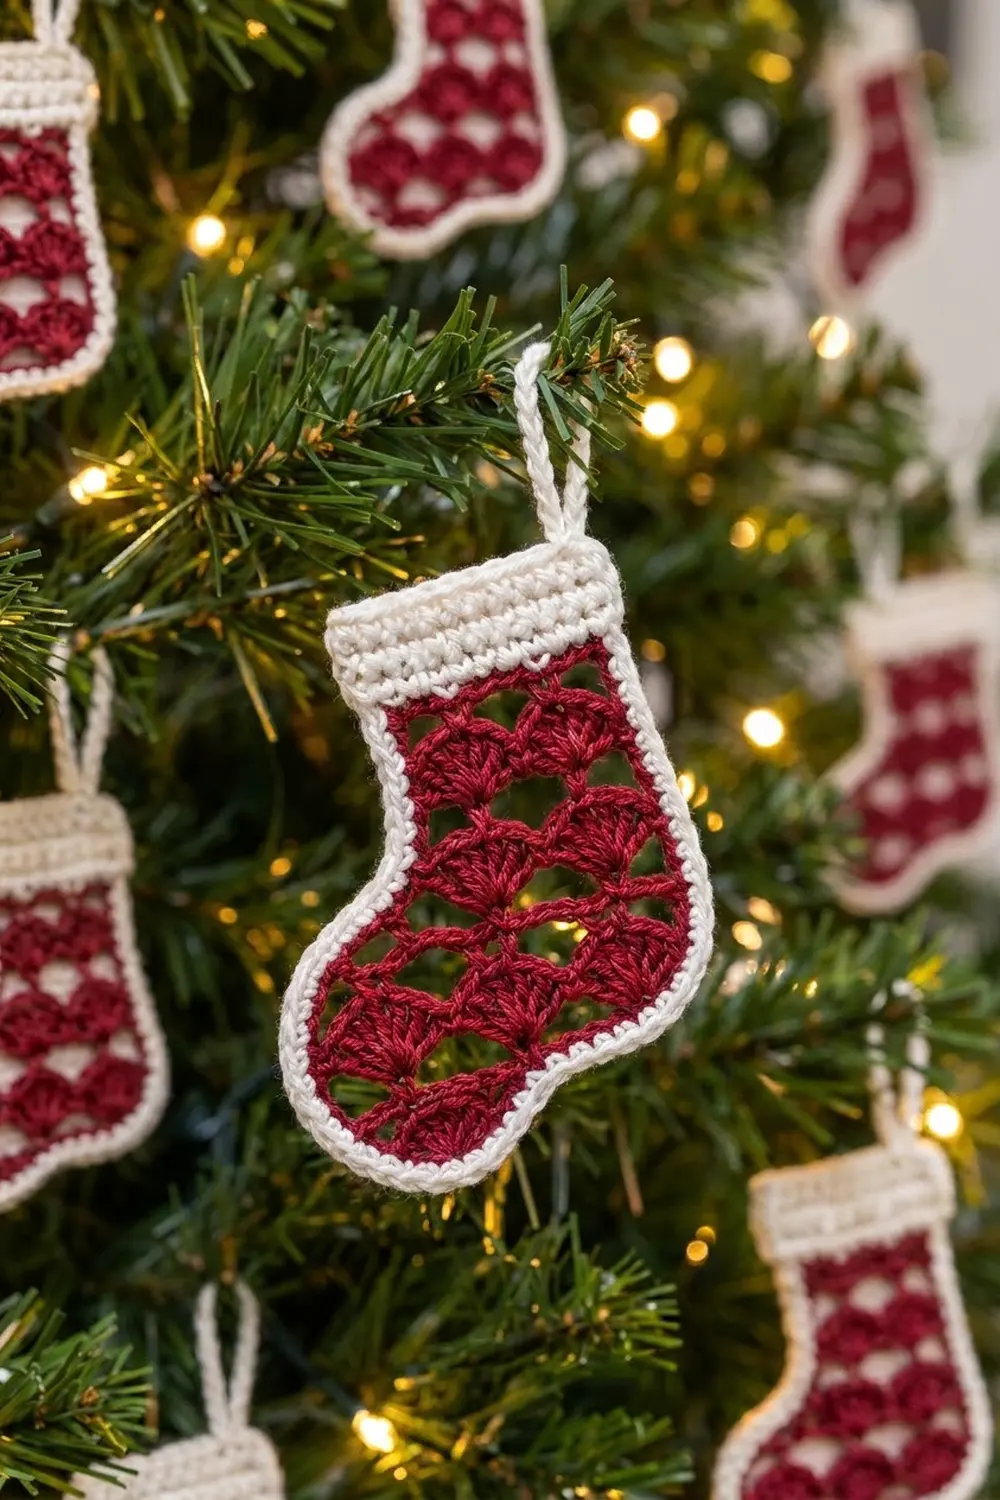
This little stocking is a flat, lacy Christmas ornament. Rows of deep red shells alternate with rows of open chain arcs, so the lace looks like scalloped fans with small open gaps between them. A solid white cuff, a thin white edging and a white hanging loop give it a classic candy-cane look.
The ornament uses two colors: cranberry red for the lace body and soft white for the cuff, border and loop. All instructions use US crochet terms. The finished stocking measures 3.5 in (8.9 cm) across the foot and 4.25 in (10.8 cm) tall, not counting the loop. The loop adds about 1.25 in (3.2 cm).
The stocking is worked flat in one piece. You start at the sole with a foundation row and work three shells across the foot. Then you keep working over only the two shells on the heel side to make the leg. The toe points left when the right side faces you. Three rows of white single crochet make the cuff. One round of white single crochet goes around the whole outline, and a covered chain loop is added at the heel-side corner of the cuff.
The design is quick and uses very little yarn. It’s also good practice for reading shell-and-arc lace, because every row shows you clearly where the next stitches go.
Finished Size and Construction
- Finished size: 3.5 in (8.9 cm) wide at the foot x 4.25 in (10.8 cm) tall, not counting the loop
- Leg width: about 2.5 in (6.4 cm) after the border
- Skill level: Easy-intermediate
- Terminology: US crochet terms
- Yarn weight: DK / light worsted (#3), cotton or cotton blend
- Hook: 3.5 mm (US E-4)
- Number of pieces: 1 (a single flat stocking)
- Layout: Worked in rows from sole to cuff; border worked in the round
- Piece size before border: 3.25 in (8.3 cm) wide x 4 in (10.2 cm) tall
- Border depth: 0.125 in (0.3 cm) on each edge, 1 round
Materials
Choose a smooth DK-weight cotton, either mercerized or matte. Cotton shows the shell texture clearly and blocks crisply. Labels for this kind of yarn usually give about 115 m per 50 g, which is about 2.3 m per gram.
- Red (main color): 8 g, about 18 m (19.7 yd)
- White (contrast color): 4 g, about 9 m (9.8 yd)
These amounts include a margin of about 25 percent for a test stocking and for weaving in ends.
Tools:
- 3.5 mm (US E-4) crochet hook
- Tapestry needle
- Scissors
- 2 stitch markers
- Ruler or tape measure
- Blocking mat and rust-proof pins
- Spray bottle with water
Abbreviations (US Terms)
- ch – chain
- sl st – slip stitch
- sc – single crochet
- dc – double crochet
- sc2tog – single crochet 2 together
- sp – space
- st(s) – stitch(es)
- tch – turning chain
- RS / WS – right side / wrong side
Special stitches:
- Shell: 5 dc in the same stitch. The 3rd dc is the center of the shell.
- Half shell: 3 dc in the same stitch. When a half shell starts with ch 3, that ch 3 counts as the first dc.
- Arc: a ch-2 space. Arcs come in pairs, and each pair either rises to the center of a shell or dips to a dc between shells.
Gauge and Checkpoints
Gauge isn’t critical for an ornament, but it does control the outline. Make one stocking and check it before you make a set.
Base gauge: the 19-st foundation (Row 1) measures 3.25 in (8.3 cm) wide. One shell repeat (6 sts) is about 1 in (2.5 cm).
Checkpoints:
- After Row 1: 3.25 in (8.3 cm) wide and about 0.25 in (0.6 cm) tall.
- After Row 6 (foot): 3.25 in (8.3 cm) wide x 2 in (5.1 cm) tall.
- After Row 11 (leg): the leg is 2.25 in (5.7 cm) wide, and the total height is 3.5 in (8.9 cm).
- After Row 14 (cuff): the total height is 4 in (10.2 cm).
- After the border: 3.5 in (8.9 cm) x 4.25 in (10.8 cm).
If your piece is too big, switch to a 3.25 mm (US D-3) hook, or keep your dc slightly shorter. If it is too small, switch to a 3.75 mm (US F-5) hook. Change the hook rather than the stitch counts, because the shell repeats only line up with these exact counts.
Pattern Notes
- The stocking is worked in turned rows. Each row’s turning chain is given at the start of the row.
- When a ch 3 counts as a dc, work the last stitch of the next row into the top of that ch 3.
- Skip all ch-2 sps in shell rows unless the instructions tell you to work into them.
- Count each row before you turn. A single missing stitch shifts every shell after it.
Body (Red)
With red, ch 20.
Row 1 (RS): Sc in 2nd ch from hook and in each ch across, turn. (19 sc)
Place a marker on the edge where Row 2 begins. This edge is the toe side, and it is on the left when the RS faces you. The opposite edge is the heel side.
Row 2: Ch 1, sc in first sc, *skip 2 sc, shell in next sc, skip 2 sc, sc in next sc; repeat from * 2 more times, turn. (3 shells, 4 sc = 19 sts)
Row 3: Ch 3 (counts as dc), *ch 2, sc in center dc of next shell, ch 2, dc in next sc; repeat from * 2 more times, turn. (4 dc, 3 sc, 6 ch-2 sps)
Row 4: Ch 3 (counts as dc), 2 dc in first dc (half shell made), *sc in next sc, shell in next dc; repeat from * once more, sc in next sc, half shell (3 dc) in top of tch, turn. (2 shells, 2 half shells, 3 sc = 19 sts)
Skip all ch-2 sps. The new shells sit between the Row 2 shells, which creates the offset fan pattern.
Row 5: Ch 1, sc in first dc, *ch 2, dc in next sc, ch 2, sc in center dc of next shell; repeat from * once more, ch 2, dc in next sc, ch 2, sc in top of tch, turn. (4 sc, 3 dc, 6 ch-2 sps)
Row 6: Ch 1, sc in first sc, *shell in next dc, sc in next sc; repeat from * 2 more times, turn. (3 shells, 4 sc = 19 sts)
Row 6 ends on the heel side. Checkpoint: the foot measures 3.25 in (8.3 cm) x 2 in (5.1 cm).
Leg
The leg is worked over the 2 shells on the heel side only. The shell and edge sc on the toe side stay unworked and become the top of the foot.
Row 7: Ch 3 (counts as dc), *ch 2, sc in center dc of next shell, ch 2, dc in next sc; repeat from * once more, turn, leaving the last shell and last sc unworked. (3 dc, 2 sc, 4 ch-2 sps)
Row 8: Ch 3 (counts as dc), 2 dc in first dc, sc in next sc, shell in next dc, sc in next sc, half shell in top of tch, turn. (1 shell, 2 half shells, 2 sc = 13 sts)
Row 9: Ch 1, sc in first dc, ch 2, dc in next sc, ch 2, sc in center dc of shell, ch 2, dc in next sc, ch 2, sc in top of tch, turn. (3 sc, 2 dc, 4 ch-2 sps)
Row 10: Ch 1, sc in first sc, *shell in next dc, sc in next sc; repeat from * once more, turn. (2 shells, 3 sc = 13 sts)
Row 11: Ch 3 (counts as dc), *ch 2, sc in center dc of next shell, ch 2, dc in next sc; repeat from * once more. (3 dc, 2 sc, 4 ch-2 sps) Fasten off red.
Checkpoint: the leg is 2.25 in (5.7 cm) wide, and the total height is 3.5 in (8.9 cm).
Cuff (White)
Row 12: Turn. Join white with a standing sc in the first dc (the last dc you made in Row 11), *2 sc in next ch-2 sp, sc in next sc, 2 sc in next ch-2 sp, sc in next dc; repeat from * once more, turn. (13 sc)
The math: 5 sts worked one per stitch (3 dc + 2 sc), plus 8 sc worked into the 4 ch-2 sps, gives 13 sc.
Rows 13–14: Ch 1, sc in each sc across, turn. (13 sc)
Don’t fasten off. Row 14 ends at the heel side. Checkpoint: the cuff is 0.5 in (1.3 cm) deep, and the total height is 4 in (10.2 cm).
Border (White)
Border gauge: one round of sc adds 0.125 in (0.3 cm) to each edge. That makes the stocking 0.25 in (0.6 cm) wider and 0.25 in (0.6 cm) taller.
Row-end rule: work 1 sc into the end of each sc row and each arc row that starts and ends with sc (Rows 1, 5, 9 and 12–14). Work 2 sc into the end of each dc-height row (Rows 2, 3, 4, 6, 7, 8, 10 and 11).
Round 1: Ch 1, then rotate the piece so you can work down the heel side.
- Heel side: 22 sc down the row ends of Rows 14 to 1 (3 in the cuff + 9 in the leg + 10 in the foot).
- Bottom: working into the underside of the foundation ch, 3 sc in the ch at the base of the first Row 1 sc (heel corner), sc in each of the next 17 ch, 3 sc in the last ch (toe corner). (23 sc)
- Toe side: 10 sc up the row ends of Rows 1–6.
- Top of foot: 3 sc in the unworked edge sc of Row 6 (toe-top corner), sc in each of the next 4 dc. (7 sc)
- Instep corner: sc2tog over the 5th dc of the toe-side shell and the end of Row 7. (1 st)
- Leg front: 11 sc up the remaining row ends (1 more in Row 7 + 7 in Rows 8–11 + 3 in cuff Rows 12–14).
- Cuff top: 3 sc in the first sc of Row 14, sc in each of the next 11 sc, 3 sc in the last sc. (17 sc)
Join with a sl st to the first sc. (91 sts)
Why the math works: the outline has 82 edge positions: 22 heel + 19 bottom + 10 toe + 6 foot top + 12 leg front + 13 cuff top. Each of the five outer corners gets 2 extra sc (+10). The inner instep corner loses 1 stitch to the sc2tog. That gives 82 + 10 – 1 = 91. The extra corner stitches let the toe and heel curve while staying flat, and the decrease stops the inner corner from rippling.
Hanging Loop
Sl st to the center sc of the 3-sc corner where the cuff top meets the heel side. Ch 16, then sl st in the same st. Turn, work 22 sc into the loop, and sl st in the corner st. Fasten off.
The covered loop is about 1.25 in (3.2 cm) tall.
Final Blocking
- Weave in all ends along the border on the WS, keeping them out of the lace gaps.
- Mist the stocking until it is evenly damp.
- Pin it RS up on the mat. It should measure 3.5 in (8.9 cm) across the foot and 4.25 in (10.8 cm) from sole to cuff top.
- Pin the heel side in a straight line. Ease the toe and heel corners into smooth curves.
- Pin the center of each shell so the fans spread evenly and the arcs open up.
- Pin the loop straight up, about 1.25 in (3.2 cm) tall.
- Let it dry completely, at least 6 hours, before you unpin it.
Final Quality-Control Checklist
- Foot rows have 19 sts, and leg rows have 13 sts.
- The toe points left when the RS faces you.
- The heel side runs in a straight line from sole to cuff.
- Shells shift position from one shell row to the next.
- The cuff is 13 sc wide and 3 rows deep.
- The border has 91 sts and no puckering at the corners.
- The loop sits at the heel-side corner of the cuff.
- The finished size is 3.5 in (8.9 cm) x 4.25 in (10.8 cm).
Troubleshooting
Shells look crowded or curl: your dc are too tight. Go up a hook size, or pull up a slightly taller loop.
Arcs sag: your chains are too loose. Keep the ch-2 sps snug and about as tall as the sc.
The leg is on the wrong side: Row 7 must start on the heel side, at the edge where Row 6 ended. Count Rows 2–6 again from the toe marker.
Shells don’t line up: one row is missing a stitch. Check that every shell row has 19 sts (foot) or 13 sts (leg).
Border ruffles: you have too many sts in the row ends. Check them against the 1-or-2 row-end rule.
Border pulls in: work a little looser, and make sure every outer corner has 3 sc.
Inner corner gapes: work the sc2tog firmly and snug the yarn before the next sc.
Care
Hand wash in cool water with mild soap, roll the stocking in a towel to remove water, and lay it flat to dry. Pin it again if the shells lose their shape.
Final Notes
Every measurement builds on the one before. The 19-st foundation sets the foot width at 3.25 in (8.3 cm). Six rows make a 2 in (5.1 cm) foot. Five more rows over 13 sts make a 2.25 in (5.7 cm) leg, and three cuff rows bring the height to 4 in (10.2 cm). One 91-st border round adds 0.125 in (0.3 cm) to each edge, so the finished stocking is 3.5 in (8.9 cm) x 4.25 in (10.8 cm), with a 1.25 in (3.2 cm) loop on top.
Check each stage against these numbers, and every stocking you make will match the first.
Happy crocheting!