
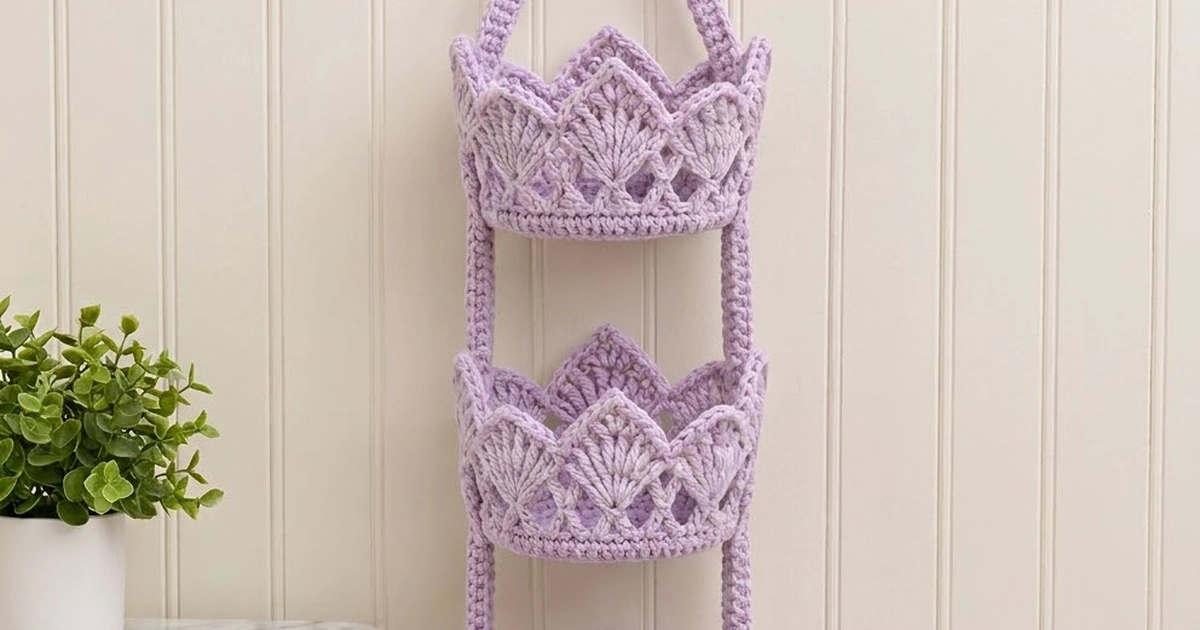
This hanging holder stacks three small crown-shaped baskets on two slim straps, all suspended from a wooden ring. Each basket holds one standard toilet paper roll, so the whole piece works as pretty bathroom storage that keeps spare rolls in reach.
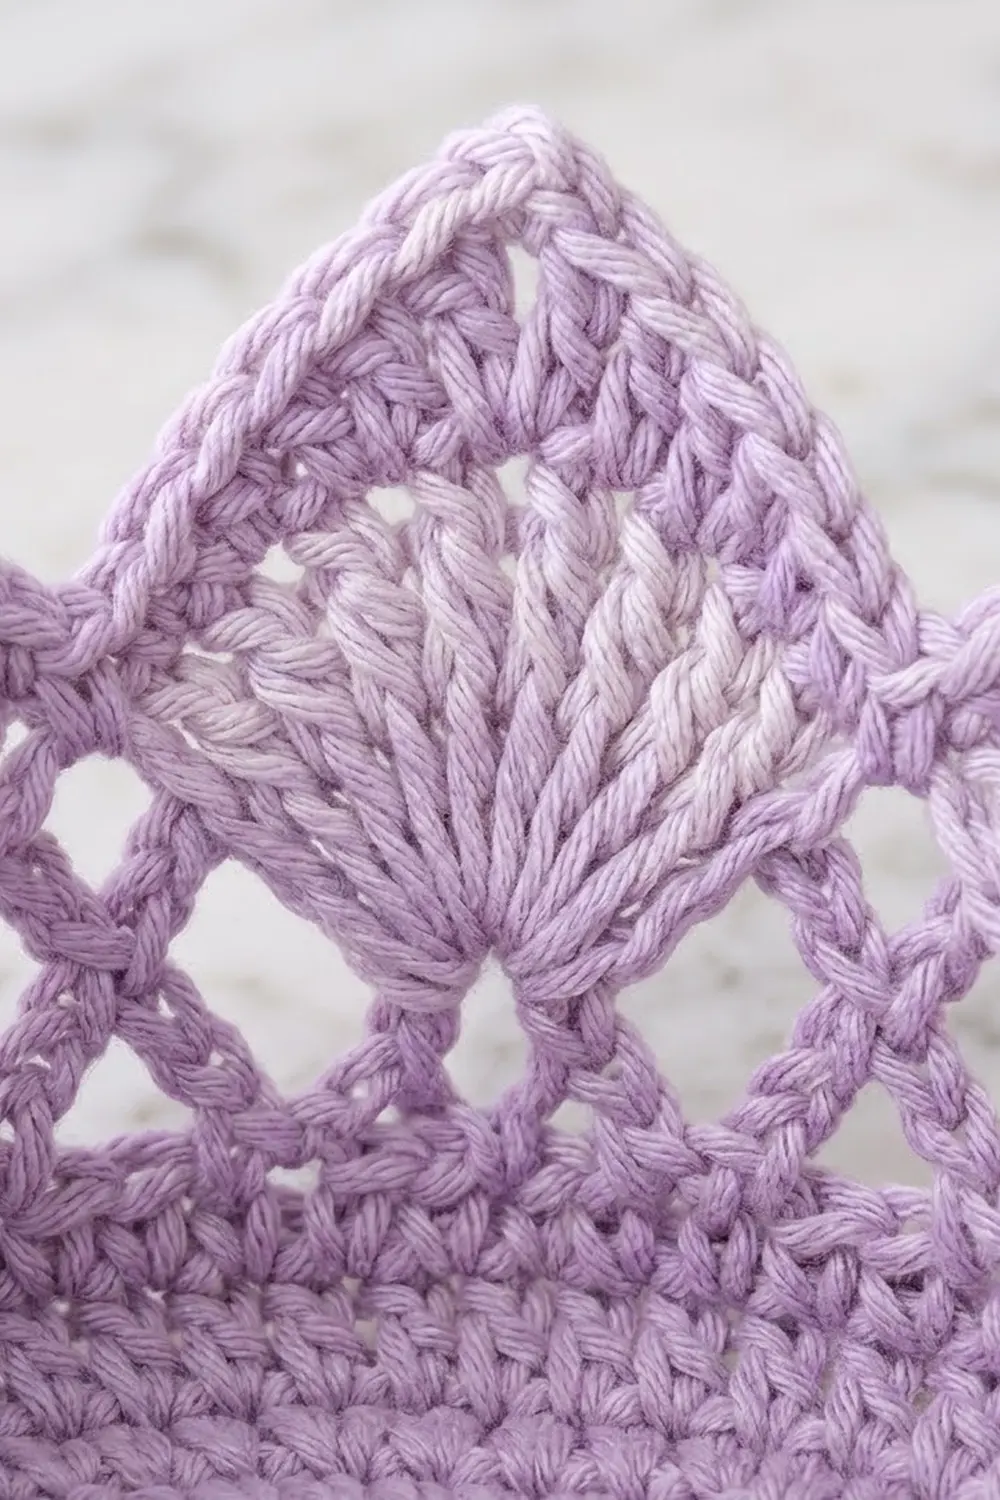
The design is worked in a single soft lilac cotton. The texture does the decorating: a solid oval base, an airy diamond lattice band, a crown of six pointed fans, and a lower tier of shorter fan petals layered over the outside of the wall.
The pattern uses US crochet terms. The finished holder measures about 7.4 in (18.8 cm) wide and about 26.5 in (67.3 cm) tall when hung, ring included. Each basket stands 4.7 in (11.9 cm) tall at the points.
Construction is simple: crochet three baskets in joined rounds, add the outer petal tier to each, make two straps in rows, sew the straps to the narrow ends of the baskets, loop them through the ring, and finish with a slip-stitch edge along the straps.
Finished Size and Construction
- Finished size: about 7.4 in (18.8 cm) wide × 26.5 in (67.3 cm) tall, hung
- Skill level: Intermediate
- Terminology: US
- Yarn weight: Bulky (#5) cotton or cotton blend
- Hook: 6 mm (J-10)
- Number of pieces: 5 crocheted pieces (3 baskets, 2 straps) + 1 wooden ring
- Layout: 3 baskets stacked vertically in 1 column
- Piece size: basket base 7.4 × 5.6 in (18.8 × 14.2 cm); basket height 4.7 in (11.9 cm) at the points and 3.6 in (9.1 cm) at the valleys; strap 1.2 × 28 in (3.0 × 71.1 cm)
- Size before border: strap 1.2 in (3.0 cm) wide
- Border depth: the slip-stitch strap edging adds less than 0.1 in (0.3 cm)
Materials
Choose a firm bulky cotton or cotton blend. Cotton holds the crown points upright and doesn’t stretch much under the weight of the rolls. Avoid very soft or splitty yarns, because the lattice and fans need crisp stitch definition.
- Lilac: 250 g / about 275 m (about 300 yd), based on yarn of roughly 110 m per 100 g
- each basket: about 60 g / 66 m
- each strap: about 15 g / 17 m
- 6 mm (J-10) crochet hook
- 1 wooden ring, 3 in (7.6 cm) outer diameter
- Tapestry needle
- 6 locking stitch markers
- Scissors, tape measure, pins
- Spray bottle for blocking
The quantities include a margin of about 15% for swatching and sewing tails.
Abbreviations (US Terms)
- ch – chain
- sl st – slip stitch
- sc – single crochet
- hdc – half double crochet
- dc – double crochet
- tr – treble crochet (yarn over twice, insert hook, pull up a loop, [yarn over, pull through 2] 3 times)
- BLO / FLO – back loop only / front loop only
- sk – skip
- sp – space
- st(s) – stitch(es)
Special stitch – Fan: 9 dc worked into the same stitch.
Gauge and Checkpoints
Gauge: 13 sc and 15 rounds/rows = 4 in (10.2 cm) in sc.
Make one full basket first and check it before you start the others. Checkpoints:
- After Rnd 10 (base): 7.4 × 5.6 in (18.8 × 14.2 cm), lying flat
- After Rnd 15 (solid wall): the wall is 1.3 in (3.3 cm) tall
- After Rnd 19 (lattice): the basket is 3.2 in (8.1 cm) tall at the ends
- Finished basket: 4.7 in (11.9 cm) tall at the points
If your base comes out more than 0.25 in (0.6 cm) too large, go down one hook size. If it’s too small, go up one size. A standard roll is about 4.5 in (11.4 cm) across, so the base must be at least 5.6 in (14.2 cm) wide or the roll won’t fit.
Basket (Make 3)
Work in joined rounds with the right side facing out. Do not turn. Join each round with a sl st to the first stitch. The beginning ch 1 never counts as a stitch.
Oval Base
Ch 9.
Rnd 1: 3 sc in 2nd ch from hook, sc in next 6 ch, 3 sc in last ch. Rotate and work along the opposite side of the foundation chain: sc in next 6 ch. Join. (18 sts: 3 end + 6 side + 3 end + 6 side)
Rnd 2: Ch 1, [2 sc in each of next 3 sts, sc in next 6 sts] twice. Join. (24 sts)
Rnd 3: Ch 1, [(2 sc in next st, sc in next st) 3 times, sc in next 6 sts] twice. Join. (30 sts)
Rnds 4–10: Ch 1, [(2 sc in next st, sc in next N–2 sts) 3 times, sc in next 6 sts] twice, where N is the round number. Join. Each round adds 6 sts, 3 at each end.
Totals: Rnd 4: 36 · Rnd 5: 42 · Rnd 6: 48 · Rnd 7: 54 · Rnd 8: 60 · Rnd 9: 66 · Rnd 10: 72 sts
Check: 6 side sts + 30 end sts + 6 side sts + 30 end sts = 72. The base should lie flat and measure 7.4 × 5.6 in (18.8 × 14.2 cm).
Solid Wall
Rnd 11: Ch 1, sc in BLO of each st around. Join. (72 sts) This turns the wall up and leaves a neat ridge at the base edge.
Rnds 12–13: Ch 1, sc in each st around. Join. (72 sts)
Rnd 14: Ch 1, sc in BLO of each st around. Join. (72 sts) This leaves the front loops of Rnd 13 free on the outside for the petal tier.
Rnd 15: Ch 1, sc in each st around. Join. (72 sts)
Lattice Band
Rnd 16: Ch 5 (counts as dc + ch 2), sk 2, dc in next st, ch 2, sk 2; repeat from * around. Join to the 3rd ch of the beginning ch-5. (24 dc, 24 ch-2 sps) That’s 72 sts ÷ 3 = 24 repeats.
Rnd 17: Sl st into first ch-2 sp, ch 1, sc in same sp, ch 4, sc in next ch-2 sp; repeat from * 22 more times, ch 4. Join to first sc. (24 ch-4 loops)
Rnd 18: Sl st into first 2 ch, ch 1, sc in same loop, ch 4, sc in next loop; repeat from * 22 more times, ch 4. Join. (24 ch-4 loops) The offset loops form the X-shaped diamond lattice.
Rnd 19 (conversion): Sl st into first loop, ch 1, 3 sc in each loop around. Join. (24 loops × 3 sc = 72 sts)
Placing the crown: Flatten the basket so the base is horizontal. Place a marker in the Rnd 19 stitch centered over each narrow end. Count the stitches between the markers in both directions. There should be 36 sts each way. Shift one marker by a stitch if needed. These marked stitches become valleys, so the straps will sit flat.
Crown Points
Rnd 20: Sl st across to the first marker (these sl sts don’t count). Ch 1, sc in marked st, sk 5, Fan in next st, sk 5, sc in next st; repeat from * around, ending the last repeat with sk 5 and joining to the first sc. (6 sc + 6 Fans of 9 dc = 60 sts) The sc land on sts 1, 13, 25, 37, 49 and 61, so both markers sit under valleys. Each long side gets three points, with the middle point centered.
Rnd 21 (conversion): Ch 1, sc in sc, sc in dc 1, hdc in dc 2, dc in dc 3, tr in dc 4, (tr, ch 3, tr) in dc 5, tr in dc 6, dc in dc 7, hdc in dc 8, sc in dc 9; repeat from * 5 more times. Join. (60 sts worked 1-per-st + 6 extra tr = 66 sts, plus 6 ch-3 tips)
Rnd 22 (outline trim): Ch 1, sc in each of next 6 sts, (2 sc, ch 2, 2 sc) in ch-3 tip, sc in each of next 5 sts; repeat from * around. Join. (66 sts worked 1-per-st + 6 tips × 4 sc = 90 sc, plus 6 ch-2 tips) Fasten off.
Each repeat now has 15 sc and a sharp ch-2 tip.
Outer Petal Tier
Hold the basket upright with the outside facing you. The free front loops of Rnd 13 sit on the outside of the wall.
Rnd A: Join yarn in the FLO of Rnd 13 directly below one crown valley at a narrow end. Ch 1, sc in same loop, sk 5, Fan in next FLO, sk 5, sc in next FLO; repeat from * around, ending the last repeat with sk 5 and joining to the first sc. (6 sc + 6 Fans of 9 dc = 60 sts)
Rnd B (conversion): Ch 1, sc in sc, sc in dc 1, sc in dc 2, hdc in dc 3, dc in dc 4, (dc, ch 2, dc) in dc 5, dc in dc 6, hdc in dc 7, sc in dc 8, sc in dc 9; repeat from * around. Join. (60 sts worked 1-per-st + 6 extra dc = 66 sts, plus 6 ch-2 tips)
Rnd C (outline trim): Ch 1, sc in each of next 6 sts, (sc, ch 1, sc) in ch-2 tip, sc in each of next 5 sts; repeat from * around. Join. (66 sts worked 1-per-st + 6 tips × 2 sc = 78 sc, plus 6 ch-1 tips) Fasten off and weave in the ends.
The petals sit directly under the crown points and rise about 2.2 in (5.6 cm) above the base, overlapping the bottom of the lattice band.
Strap (Make 2)
Row 1: Ch 5, sc in 2nd ch from hook and in each ch across. (4 sc)
Rows 2–105: Ch 1, turn, sc in each st across. (4 sc)
Fasten off, leaving a 24 in (61.0 cm) tail for sewing. The strap measures 1.2 × 28 in (3.0 × 71.1 cm).
Place markers on both straps at the ends of rows 12, 22, 34, 44, 56 and 90.
Make All Pieces
- Lilac: 3 baskets (about 180 g) and 2 straps (about 30 g)
- Wooden ring: 1
Layout, front view:
          ( RING )
          /      \
   strap A        strap B
        |          |
   [ BASKET 3 – top    ]   strap rows 45–56
        |          |
   [ BASKET 2 – middle ]   strap rows 23–34
        |          |
   [ BASKET 1 – bottom ]   strap rows 1–12
Joining
Method: Backstitch through the strap and the basket wall, using the strap tail or a separate length of yarn.
Strap row map (from the bottom):
- Rows 1–12, 3.2 in (8.1 cm): sewn to the bottom basket
- Rows 13–22, 2.7 in (6.9 cm): free
- Rows 23–34: sewn to the middle basket
- Rows 35–44: free
- Rows 45–56: sewn to the top basket
- Rows 57–90, 9.1 in (23.1 cm): free, running up to the ring
- Rows 91–97, 1.9 in (4.8 cm): wrap over the ring
- Rows 98–105, 2.1 in (5.3 cm): fold-back, sewn over rows 83–90
Stitch-to-stitch logic: Center each strap on the outside of a narrow end, over the marked valley. Line up the bottom edge of the strap row with the base ridge from Rnd 11. Twelve strap rows span the basket end from Rnd 11 to the top of Rnd 19.
Sew two vertical lines of backstitch, one between strap sts 1 and 2 and one between sts 3 and 4, with one backstitch per strap row. Leave the outermost strap edges unsewn so you can work the border later. Whipstitch the bottom of each strap section to the basket so it can’t lift.
Attach strap A to one end of all three baskets, then strap B to the other end. Check that every basket faces the same way, with a centered point at the front.
Tension: Pull each backstitch snug enough to close the gap but not so tight that the wall puckers. The basket wall should stay smooth behind the strap.
Ring: Pass rows 91–97 of each strap over the ring from front to back. Fold rows 98–105 down behind rows 83–90, keeping them on the wall side. Whipstitch the folded section along both sides and across row 105. The two straps sit side by side on the ring.
Size checkpoint: The base-to-base spacing between baskets is 22 rows, or 5.9 in (15.0 cm). Rows 1–90 measure 24 in (61.0 cm). With the ring, the hung height is about 26.5 in (67.3 cm).
Border
The border is a slip-stitch edging along the long edges of each strap. It firms the strap edge, stops it stretching, and locks the folded ring section together.
Border gauge: 15 sl st = 4 in (10.2 cm) along the edge, which matches the row gauge exactly. Work 1 sl st per row end.
Round 1 (per strap): Join at the row 1 corner. Working through the strap only, sl st up the first long edge:
- Rows 1–82: 82 sl st (on the basket sections, catch only the strap edge, never the basket)
- Rows 83–90, through both layers with rows 105–98: 8 sl st
- Rows 91–97, around the ring: 7 sl st
- Side 1 total: 97 sl st
Continue down the second long edge the same way: 7 + 8 + 82 = 97 sl st. Join and fasten off. Strap total: 194 sl st.
Why the math works: One sl st per row matches 15 rows to 15 sl st per 4 in (10.2 cm), so the edge neither ruffles nor pulls in. The 8 doubled rows count once because the two layers line up stitch for stitch. 82 + 8 + 7 = 97 sl st covers all 105 rows exactly, because the 8 folded rows sit under the doubled section (82 + 8 + 7 + 8 = 105).
Final Blocking
- Spray each basket until it’s evenly damp, not soaked.
- Stuff each basket firmly with a rolled towel or a spare toilet roll wrapped in a towel.
- Shape the base flat and oval at 7.4 × 5.6 in (18.8 × 14.2 cm).
- Pinch each crown point and petal tip upward, then pin the tips straight.
- Lay the straps flat and pin them straight without stretching.
- Let everything dry completely, at least 24 hours, before hanging.
Final Quality-Control Checklist
- Each base has 72 sts and lies flat
- Each basket has 6 crown points and 6 petals, with valleys at both ends
- Each lattice band has 24 even diamond loops
- Each Rnd 22 has 90 sc and 6 sharp ch-2 tips
- Both straps have 105 rows and are 4 sts wide
- The strap rows line up at the same height on both ends of each basket
- The baskets hang level, 5.9 in (15.0 cm) base to base
- The ring folds are secure, with no gaps
- All ends are woven in
Troubleshooting
- Base cups or ruffles: Stagger the increases slightly from round to round, or change hook size and recheck the Rnd 10 checkpoint.
- Roll doesn’t fit: The base is less than 5.6 in (14.2 cm) wide. Go up one hook size.
- Crown points flop: Use a firmer cotton, work Rnd 22 more tightly, and re-block over a stuffed form.
- Lattice looks uneven: Keep every ch-4 at the same tension and check for 24 loops in Rnds 17–18.
- Basket tilts: One strap section is sewn higher than the other. Re-sew it to the matching rows.
- Strap stretches: Make sure the border is worked 1 sl st per row, and hang nothing heavier than rolls.
Care
Hand wash in cool water with mild soap, press out the water in a towel, and dry flat over a stuffed form. Don’t tumble dry.

Final Notes
The measurement chain is short and reliable. A gauge of 13 sc × 15 rounds per 4 in (10.2 cm) gives a 72-stitch base of 7.4 × 5.6 in (18.8 × 14.2 cm). Seventy-two stitches divide evenly into 24 lattice repeats and 6 crown points of 12 sts each, with valleys at the ends. Twelve strap rows match each basket end, and 105 rows with 97 border slip stitches per side finish the holder at about 26.5 in (67.3 cm) tall.
Happy crocheting!