

These curtain panels are made entirely of lacy butterflies. Each butterfly has open, airy wings ringed with radiating stitches, a raised rope-textured body, and two knobbed antennae. Because the motifs touch only at their wing tips, light comes through every gap and casts soft butterfly shadows across the room.
The pair is worked in a single lilac shade, which keeps the look calm and cohesive. The style sits between cottage romance and modern boho. It suits a bedroom, nursery, or sunny reading corner. The pattern uses US crochet terms throughout.
Each finished panel measures about 22 in (55.9 cm) wide and 62 in (157.5 cm) long including tabs. The joined butterfly field is 22 in × 58 in (55.9 cm × 147.3 cm). The header band adds 1.5 in (3.8 cm) and the tabs add 2.5 in (6.4 cm).
Construction is simple and modular. You make one butterfly in four rounds, add a separate body with antennae, and then join each new butterfly to its neighbors join-as-you-go on its final round. Each panel is 3 butterflies wide and 9 butterflies tall. A short header band and seven tabs finish the top.
Finished Size and Construction
- Finished panel size: 22 in × 62 in (55.9 cm × 157.5 cm), including tabs
- Skill level: Intermediate
- Terminology: US crochet terms
- Yarn weight: Worsted (#4), cotton or cotton blend
- Hook: US H-8 (5 mm)
- Number of pieces: 54 butterfly motifs and 54 bodies (27 of each per panel)
- Layout: 3 motifs wide × 9 motifs tall per panel; 2 panels
- Single motif size: 7 in wide × 6 in tall (17.8 cm × 15.2 cm)
- Size before border: 22 in × 58 in (55.9 cm × 147.3 cm) per panel
- Border (header) depth: 1.5 in (3.8 cm) band plus 2.5 in (6.4 cm) tabs
Materials
Yarn: Use a smooth worsted-weight cotton or cotton blend. Cotton gives the wings crisp definition and holds its shape when it hangs. Avoid fuzzy or very stretchy acrylic, because the open motifs can sag over 58 in (147.3 cm) of length.
- Lilac: about 600 g, roughly 925 m (1,012 yd), for both panels
- Each butterfly with its body uses about 9 g / 14 m (15 yd)
- Each header band with tabs uses about 15 g / 23 m (25 yd)
These quantities include a margin of about 15% for gauge differences and swatching. Buy all yarn from one dye lot.
Tools:
– US H-8 (5 mm) crochet hook
– Locking stitch markers (at least 8)
– Tapestry needle
– Scissors
– Measuring tape
– Blocking mats and rust-proof pins
– Spray bottle
Abbreviations (US Terms)
- ch – chain
- sl st – slip stitch
- sc – single crochet
- hdc – half double crochet
- dc – double crochet
- tr – treble crochet
- st(s) – stitch(es)
- sk – skip
- BLO – back loop only
- RS – right side
Special stitch – 3-dc bobble: Yarn over, insert hook in the stitch, pull up a loop, yarn over, pull through 2 loops. Repeat 2 more times in the same stitch (4 loops on hook). Yarn over and pull through all 4 loops.
Gauge and Checkpoints
Make one complete butterfly before you buy all your yarn. Your gauge decides whether the panel comes out at 22 in (55.9 cm) wide.
Motif checkpoints (laid flat, lightly pressed):
– After Round 2: 4.5 in wide × 3.5 in tall (11.4 cm × 8.9 cm)
– After Round 3: 6.5 in wide × 5.5 in tall (16.5 cm × 14.0 cm)
– After Round 4: 7 in wide × 6 in tall (17.8 cm × 15.2 cm)
Header gauge: 17 sts = 5 in (12.7 cm) in dc, or about 3.4 sts per inch.
Tab gauge: 4 rows of sc = 1 in (2.5 cm).
A difference of up to 0.25 in (0.6 cm) on the motif is fine. If your butterfly is bigger, go down half a hook size. If it is smaller, go up half a size. Even a small error repeats across 9 rows: a motif that is 0.5 in (1.3 cm) too tall makes the panel 4.5 in (11.4 cm) longer.
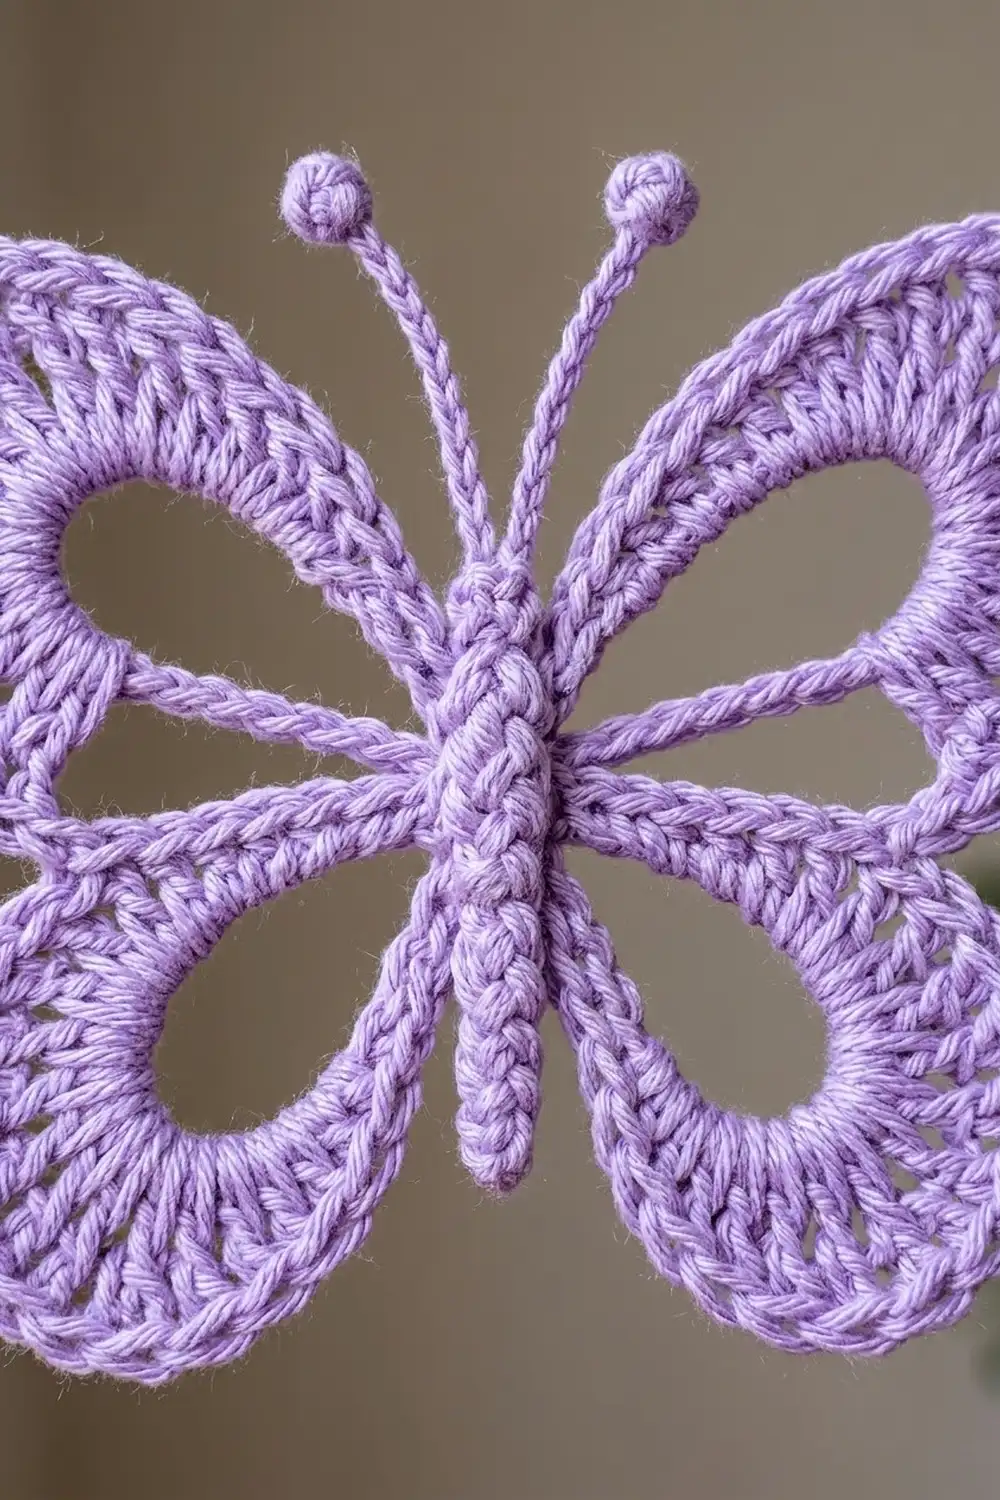
Butterfly Motif (make 54)
Work in joined rounds with RS facing. Do not turn.
Round 1 (wing frames): Make a magic ring. Ch 1, sc in ring, ch 24; sc in ring, ch 18; sc in ring, ch 18; sc in ring, ch 24. Sl st in first sc to join. Pull the ring tight.
(4 sc and 4 chain loops: two ch-24 loops for the upper wings and two ch-18 loops for the lower wings.)
The loops go in this order around the ring: upper wing, lower wing, lower wing, upper wing. So the two upper wings sit next to each other across the top.
Round 2 (wing outline): Work each wing by wrapping stitches into the loop space, not into the individual chains. That keeps the chain loop open as the window in the center of the wing.
- In first ch-24 loop: 30 sc. Sl st in next sc of Round 1.
- In each ch-18 loop: 22 sc, then sl st in next sc of Round 1.
- In last ch-24 loop: 30 sc. Sl st in first sl st to join.
Stitch count: 104 sc (30 + 22 + 22 + 30), plus 4 sl sts.
Round 3 (radiating band): This round adds height in the middle of each wing, so the stitches fan out like spokes.
- Each upper wing (over 30 sc): Sl st in first sc, hdc in next 2 sc, dc in next 3 sc, [2 tr in next sc, tr in next sc] 9 times, dc in next 3 sc, hdc in next 2 sc, sl st in last sc.
That is 37 working sts (2 hdc, 3 dc, 27 tr, 3 dc, 2 hdc) plus 2 sl sts. - Each lower wing (over 22 sc): Sl st in first sc, hdc in next 2 sc, dc in next 2 sc, [2 tr in next sc, tr in next sc] 6 times, dc in next 2 sc, hdc in next 2 sc, sl st in last sc.
That is 26 working sts (2 hdc, 2 dc, 18 tr, 2 dc, 2 hdc) plus 2 sl sts.
Work the wings in order without chaining between them. Join with a sl st to the first sl st.
Stitch count: 126 working sts (37 + 26 + 26 + 37), plus 8 sl sts.
Mark join points: Lay the motif flat with the upper wings at the top. On each upper wing, put a marker in the highest st (top point) and in the st farthest out to the side (side point). On each lower wing, put a marker in the st farthest out to the side (side point) and in the lowest st (bottom point). That makes 8 markers. In Round 4, the sc worked into each marked st becomes a join point.
Round 4 (edging): Sc in each of the 37 or 26 working sts of each wing. Sl st in each of the 2 sl sts between wings. Join with a sl st to the first sc and fasten off (first motif only, see Joining).
Stitch count: 126 sc (37 + 26 + 26 + 37), plus 8 sl sts.
This sc round sits on top of the tr fan and gives the firm, beaded outer rim.
Body and Antennae (make 54)
Round 1: Ch 11. Sc in 2nd ch from hook and in next 8 ch, 3 sc in last ch. Working along the opposite side of the chain, sc in next 8 ch, 2 sc in the same ch as the first sc. Sl st in first sc to join.
(22 sc. The end with the 3-sc group is the head end.)
Round 2: Sl st in BLO of each sc around. (22 sl sts.) This raised ridge gives the body its rope-like texture.
Head: Work a 3-dc bobble in the center sc of the head end.
Antennae (make 2): From the top of the bobble, ch 10, then work a 3-dc bobble in the 4th ch from hook for the knob. Sl st in each of the remaining 6 ch back to the head. Repeat for the second antenna and angle the two apart.
Fasten off, leaving a 12 in (30.5 cm) tail. The body measures about 2.75 in (7.0 cm) long without the antennae.
Attach: Center the body over the magic ring, with the head about 0.5 in (1.3 cm) above the ring between the upper wings and the tail end between the lower wings. Sew it down along both long edges. Do this before joining so that every butterfly is finished when it goes into the panel.
Make All Pieces
Make 54 motifs and 54 bodies, all in Lilac. Each panel needs 27 of each.
Panel layout (repeat for both panels; header on top):
Row 1:  [B] [B] [B]   <- header band attaches here
Row 2:  [B] [B] [B]
Row 3:  [B] [B] [B]
Row 4:  [B] [B] [B]
Row 5:  [B] [B] [B]
Row 6:  [B] [B] [B]
Row 7:  [B] [B] [B]
Row 8:  [B] [B] [B]
Row 9:  [B] [B] [B]
All butterflies face the same way, with antennae pointing up.
Joining
Use join-as-you-go on Round 4. Work the panel row by row, left to right, so each new motif joins only to neighbors that are already finished: the one to its left and the one above it.
Join link: When you reach a marked st that matches a finished neighbor, sc in the marked st, ch 3, sl st in the matching marked sc on the neighbor, ch 3, sl st in the sc you just made. Then continue Round 4 as written.
The link adds only chains and sl sts. Each motif still has exactly 126 sc, and the link makes the 0.5 in (1.3 cm) gap you see between the butterflies.
What joins to what:
– Side neighbors: upper wing side point to upper wing side point, and lower wing side point to lower wing side point (2 links per side seam).
– Neighbor above: each lower wing bottom point of the motif above joins to the upper wing top point directly below it (2 links per seam).
Each panel has 36 side links (9 rows × 2 seams × 2) and 48 vertical links (8 seams × 3 motifs × 2), for 84 in total.
Tension: Keep the ch-3 links the same size as your stitches. If you pull them tight, the wings pucker. If you work them loose, the panel stretches when it hangs.
Size checkpoint: After Row 1 (3 motifs), the strip should measure 22 in (55.9 cm) wide: 3 × 7 in + 2 × 0.5 in. After Row 3, the height should be 19 in (48.3 cm): 3 × 6 in + 2 × 0.5 in. The finished field is 58 in (147.3 cm): 9 × 6 in + 8 × 0.5 in.
Border: Header Band and Tabs
The header goes only across the top edge, as on the finished curtains. The sides and bottom keep their scalloped wing edges.
Border gauge: 17 dc = 5 in (12.7 cm), or about 3.4 sts per inch.
Row 1 (bridging row): With RS facing, join yarn in the upper wing side point of the top-left motif. Then for each of the 3 motifs in Row 1:
sc in left upper wing side point, ch 6, sc in left upper wing top point, ch 9 (over the antennae), sc in right upper wing top point, ch 6, sc in right upper wing side point.
Per motif: 4 sc + 21 ch = 25 sts.
Between motifs, the sc in one motif’s side point is followed directly by the sc in the next motif’s side point, with no added chains.
Row 1 total: 3 × 25 = 75 sts.
Row 2: Ch 3 (counts as dc), turn. Dc in each st across, working into the chains themselves. (75 dc.)
Row 3: Ch 1, turn. Sc in each st across. (75 sc.) Fasten off.
Why the math works: Each motif gives exactly 25 sts, and seams add none, so 3 motifs give 75. At 3.4 sts per inch, 75 sts measure 22 in (55.9 cm), the same as the joined field. The header lies flat without ruffling or pulling in. The band is about 1.5 in (3.8 cm) deep, measured from the upper wing top points.
Tabs (make 7 per panel): Row 3 has 75 sts, laid out as 2 edge sts + 7 tabs of 5 sts + 6 gaps of 6 sts (2 + 35 + 36 + 2 = 75). The tabs sit on sts 3–7, 14–18, 25–29, 36–40, 47–51, 58–62, and 69–73.
- Tab Row 1: With RS facing, join yarn in the first st of a tab position. Ch 1, sc in same st and next 4 sts. (5 sc.)
- Tab Rows 2–20: Ch 1, turn, sc in each sc. (5 sc.)
Fasten off, leaving a 10 in (25.4 cm) tail. Fold the tab to the back and sew the last row to the back of Row 2 of the header. The tab is 5 in (12.7 cm) long before folding and makes a 2.5 in (6.4 cm) loop.
Final Blocking
- Weave in all ends along the sc edges, never across the open wing windows.
- Soak each panel in cool water for 10 minutes. Press out the water; do not wring.
- Roll each panel in a towel to remove extra moisture.
- Lay the panel on mats and pin it to 22 in × 58 in (55.9 cm × 147.3 cm) for the butterfly field.
- Pin each wing tip so the wing windows open into smooth ovals.
- Straighten each body and spread the antennae apart.
- Pin the header straight, 1.5 in (3.8 cm) deep, and leave the tabs flat.
- Let it dry completely, at least 24 hours.
Final Quality-Control Checklist
- Every motif has 126 sc on Round 4.
- Every butterfly measures 7 in × 6 in (17.8 cm × 15.2 cm).
- All antennae point up.
- Each panel has 84 join links, and they are all the same size.
- Header Rows 1–3 each have 75 sts.
- There are 7 tabs, evenly spaced, each 2.5 in (6.4 cm) when folded.
- The panel measures 22 in × 62 in (55.9 cm × 157.5 cm).
- No ends show through the wing windows.
Troubleshooting
- Wing windows close up: You worked into the chains instead of the loop space in Round 2. Rework Round 2 by wrapping the stitches into the loop.
- Wings ruffle: Your tension is loose on Round 3. Go down a hook size for that round only.
- Wings cup: Your tr stitches are too short. Pull the first loop up a little higher.
- Header ruffles: You added stitches at the seams. Recount Row 1 to 25 sts per motif.
- Header pulls in: Your ch-6 and ch-9 bridges are too tight. Chain more loosely or use a hook half a size larger for Row 1.
- Panel too long after hanging: Re-block it, and next time use firmer cotton or a smaller hook.
Care
Hand wash in cool water with a mild detergent and dry flat, reshaping the wings. Do not hang the panels wet, because the weight will stretch the links.

Final Notes
Everything depends on one measurement chain. Each butterfly measures 7 in × 6 in (17.8 cm × 15.2 cm). Three butterflies plus two 0.5 in (1.3 cm) links give a width of 22 in (55.9 cm). Nine butterflies plus eight links give a length of 58 in (147.3 cm). The 75-st header matches that 22 in (55.9 cm) width exactly, and the band and tabs bring each panel to 62 in (157.5 cm). Check the first motif against these numbers and the rest will follow.
Happy crocheting!