

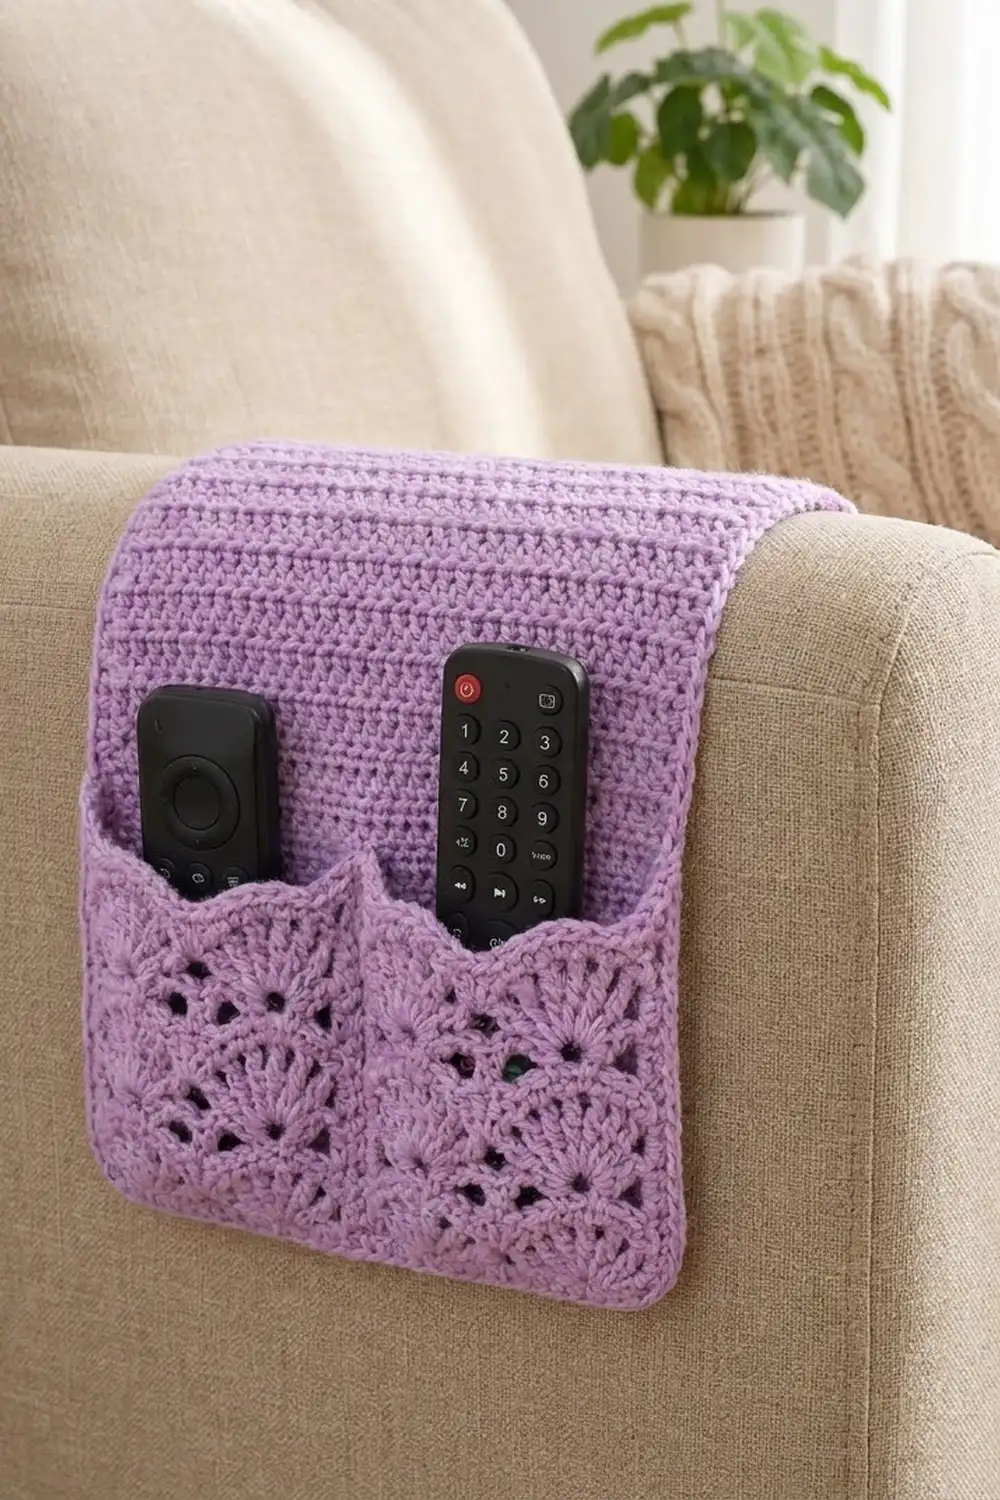
The Lavender Fanfare Armrest Caddy keeps your remotes, glasses, or phone right where your hand rests. It drapes over a sofa arm. A plain double crochet back panel holds it in place, and a lacy fan-stitch pocket sits across the lower part.
The whole piece is one soft lavender shade. The back panel is quiet and solid. The pocket has two tiers of open fans with small solid fans between them, and it ends in a row of rounded scallops. A center seam turns the pocket into two equal compartments.
This pattern uses US crochet terms. The finished caddy measures 10.4 in (26.4 cm) wide by 13 in (33.0 cm) long. The pocket is 5.5 in (14.0 cm) tall at the scallop peaks.
Construction is simple. You crochet the back panel in rows and the pocket panel in rows. Then you lay the pocket on the back panel and join the two pieces through both layers while you work the border. Last, you sew a center divider line.
Finished Size and Construction
- Finished size: 10.4 in × 13 in (26.4 cm × 33.0 cm)
- Skill level: Easy+ (basic stitches plus a simple fan repeat)
- Terminology: US crochet terms
- Yarn weight: Worsted (#4)
- Hook: 5.0 mm (US H-8)
- Number of pieces: 2 (1 back panel, 1 pocket panel)
- Layout: Pocket panel laid on the lower part of the back panel, bottom edges aligned, divided into 2 pockets
- Back panel size: 9.4 in × 12 in (23.9 cm × 30.5 cm)
- Pocket panel size: 9.4 in × 5.5 in (23.9 cm × 14.0 cm) at the peaks
- Size before border: 9.4 in × 12 in (23.9 cm × 30.5 cm)
- Border depth: 0.5 in (1.3 cm) on every side
Materials
Yarn: Use a smooth worsted-weight cotton or cotton blend. Cotton holds its shape on a sofa arm and shows the fan texture clearly. Acrylic also works but stretches more.
- Lavender: 120 g, about 240 m (262 yd)
Tools:
- 5.0 mm (US H-8) crochet hook
- Yarn needle
- 4 locking stitch markers
- Rustproof pins and a blocking mat
- Measuring tape
- Spray bottle
The quantity includes a margin of about 20 percent for your gauge swatch and weaving in ends.
Abbreviations (US Terms)
- ch – chain
- sc – single crochet
- dc – double crochet
- sl st – slip stitch
- st(s) – stitch(es)
- sp – space
- RS / WS – right side / wrong side
- rep – repeat
Special stitches
- Large fan: In the stitch indicated, work (dc, ch 1) 4 times, then dc. That is 5 dc and 4 ch-1 sps.
- Small fan: 5 dc in the stitch indicated.
- Half fan: 3 dc in the stitch indicated. The turning ch-3 counts as the first dc at the start of a row.
Gauge and Checkpoints
Gauge: 14 dc and 7 dc rows = 4 in (10.2 cm), unblocked.
Make the back panel first, since it works as your gauge piece.
- After Row 7, the panel should be 4 in (10.2 cm) tall and 9.4 in (23.9 cm) wide.
- After Row 21, the panel should be 12 in (30.5 cm) tall.
- After pocket Row 1, the strip should be 9.4 in (23.9 cm) wide, the same as the back panel.
- The finished pocket should be 5.5 in (14.0 cm) tall at the peaks.
If your piece is too big, go down 0.5 mm in hook size. If it is too small, go up 0.5 mm. Don’t add or remove stitches. The fan repeat and the border counts depend on 33 stitches across.
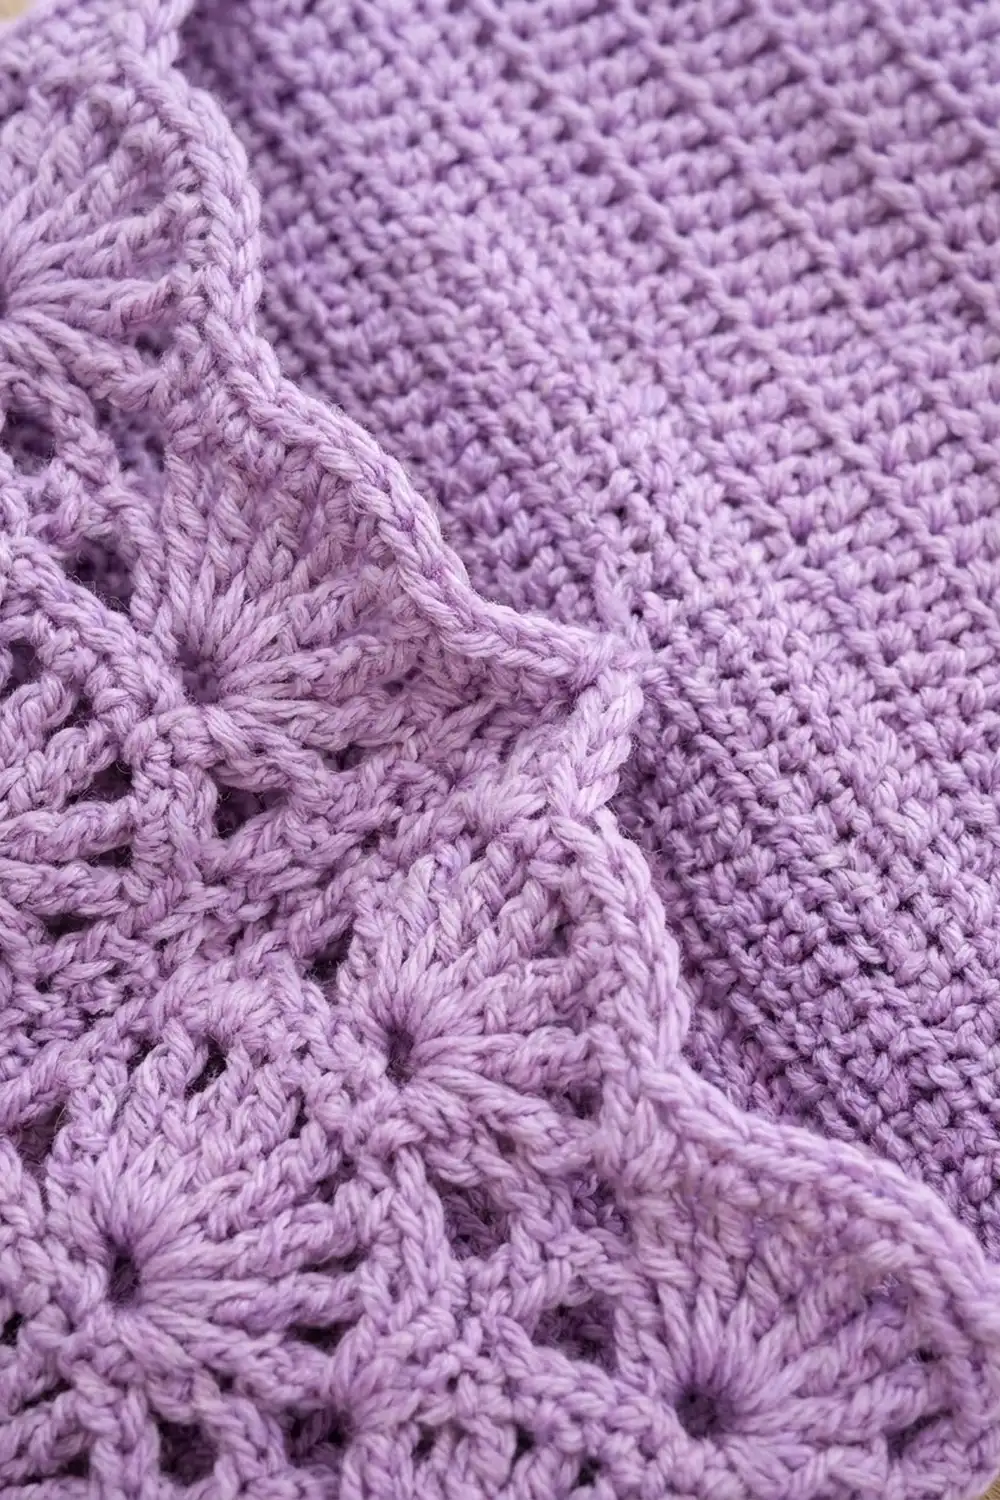
Back Panel
Work in rows. The ch-3 at the start of each row counts as a dc.
Row 1 (RS): Ch 35. Dc in the 4th ch from the hook and in each ch across. Turn. (33 dc)
Row 2: Ch 3, skip the first st, dc in each st across, working the last dc into the top of the turning ch. Turn. (33 dc)
Rows 3–21: Rep Row 2. (33 dc in every row)
Fasten off after Row 21 and weave in the ends.
Checkpoint: The panel measures 9.4 in × 12 in (23.9 cm × 30.5 cm) and has 21 rows.
Pocket Panel
The fan pattern is a multiple of 8 sts + 1. With 33 sts you get exactly 4 repeats. The center stitch (st 17) always falls between fan 2 and fan 3, which is where the divider seam will go.
Row 1 (WS): Ch 34. Sc in the 2nd ch from the hook and in each ch across. Turn. (33 sc)
Row 2 (RS): Ch 1, sc in the first st. Skip 3 sts, large fan in the next st, skip 3 sts, sc in the next st. Rep from * 3 more times. Turn. (4 large fans, 5 sc)
The fans sit in sts 5, 13, 21, and 29. The sc sit in sts 1, 9, 17, 25, and 33.
Row 3 (WS): Ch 3, 2 dc in the first sc (half fan). Ch 1, sc in the center dc of the next large fan, ch 1, small fan in the next sc. Rep from * 2 more times. Ch 1, sc in the center dc of the last large fan, ch 1, 3 dc in the last sc. Turn. (2 half fans, 3 small fans, 4 sc)
Row 4 (RS): Ch 1, sc in the first dc. Large fan in the next sc, sc in the center (3rd) dc of the next small fan. Rep from * 2 more times. Large fan in the last sc, then sc in the top of the turning ch. Turn. (4 large fans, 5 sc)
This stacks the new large fans directly over the Row 2 fans, with the small fans tucked between them.
Row 5 (WS): Rep Row 3. (2 half fans, 3 small fans, 4 sc)
Row 6 (RS): Rep Row 4. (4 large fans, 5 sc)
Row 7 (WS), scallop edge: Ch 1, sc in the first sc. Sc in the next dc, (sc in the next ch-1 sp, sc in the next dc) 4 times, sc in the next sc. Rep from * 3 more times. (41 sc)
Count it this way: 1 + 4 × (9 + 1) = 41. The sc follow the curve of each fan, so the top edge forms 4 rounded scallops. The 21st sc is the exact center.
Fasten off and weave in the ends.
Checkpoints:
- After Row 2: about 1.25 in (3.2 cm) tall.
- After Row 4: about 3 in (7.6 cm) tall.
- After Row 6: about 4.75 in (12.1 cm) tall.
- After Row 7: 5.5 in (14.0 cm) tall at the peaks.
Pin and lightly steam the pocket to 9.4 in (23.9 cm) wide before joining. Fan rows tend to flare, and the width has to match the back panel.
Make All Pieces
All pieces are lavender:
- 1 back panel (33 dc × 21 rows)
- 1 pocket panel (33 sts wide, 7 rows)
Layout (RS facing, top of caddy at the top):
+-----------------------------+
|                             |
|        BACK PANEL           |
|     (solid dc, 21 rows)     |
|                             |
|~~~~~~~~~~~~~~|~~~~~~~~~~~~~~|  <- scallop edge
|   POCKET A   |   POCKET B   |
|   2 fans     |   2 fans     |
+-----------------------------+  <- bottom edges aligned
Joining
Method: Join the pocket’s sides and bottom to the back panel with single crochet through both layers. You do this as part of Border Round 1. Then backstitch the center divider.
- Lay the back panel RS up with Row 1 at the bottom.
- Lay the pocket on top, RS up, with its foundation chain on the back panel’s foundation chain.
- Line up stitch for stitch: 33 pocket foundation sts over 33 back panel foundation sts.
- Pin the pocket’s side edges to the panel’s side edges. The pocket covers about the lower 9 to 10 rows of the back panel.
- Place a locking marker at each top corner of the pocket.
Stitch-to-stitch logic: Along the bottom, each border sc goes through 1 pocket foundation st and 1 back panel foundation st, so 33 sts match 33 sts. Along the sides, the border is counted by back panel row ends only. Catch the pocket’s edge evenly in those same stitches. No extra stitches are added for the pocket.
Tension: Work the two-layer stitches at the same tension as the rest of the border. If they are too tight, the bottom will cup. If they are too loose, the pocket will gape.
Center divider:
- Thread a 24 in (61.0 cm) length of yarn on a yarn needle.
- Backstitch through both layers from pocket foundation st 17 straight up the column of stacked sc and small-fan centers.
- Finish at the 21st sc of Row 7.
- Secure the yarn on the WS.
Size checkpoint: Each pocket opening measures about 4.7 in (11.9 cm) across.
Border
Border gauge: 2 rounds of sc = 0.5 in (1.3 cm). Sc are worked at 14 sts per 4 in (10.2 cm), the same width as the dc.
Round 1 (joining round):
- With the RS facing, join yarn in the top right corner st (the last dc of Row 21).
- Ch 1, then work 3 sc in that corner st.
- Sc in each of the next 31 sts across the top. Work 3 sc in the last st.
- Down the left side, work 2 sc in each of the 21 row ends. Catch the pocket edge through both layers along the lower rows.
- Work 3 sc in the bottom corner st.
- Across the bottom, sc in each of the next 31 sts through both layers. Work 3 sc in the last st.
- Up the right side, work 2 sc in each of the 21 row ends, again through both layers along the pocket.
- Sl st to the first sc. (158 sc)
Per-side count, Round 1. Each count includes both corner-center sts:
- Top: 1 + 1 + 31 + 1 + 1 = 35
- Bottom: 35
- Each side: 1 + 1 + 42 + 1 + 1 = 46
The 4 corner centers are shared between two sides, so the total is 35 + 35 + 46 + 46 − 4 = 158. You can also count it as 12 corner sts + 62 top/bottom sts + 84 side sts = 158.
Place a marker in each corner-center sc.
Round 2:
- Ch 1. Sc in each sc around, working 3 sc in each marked corner-center sc. Move the markers up as you go.
- Sl st to the first sc. (166 sc)
Fasten off.
Per-side count, Round 2. Each count includes both corner-center sts:
- Top and bottom: 37 each
- Each side: 48 each
Total: 37 + 37 + 48 + 48 − 4 = 166, which is 158 + 8.
Why the math works:
- Across the top and bottom, 1 sc per dc at 14 sts per 4 in (10.2 cm) keeps the width at 9.4 in (23.9 cm).
- On the sides, each dc row is 4/7 in tall, and 2 sc per row gives 3.5 sc per inch. That matches the sc gauge, so the edges lie flat.
- Two rounds add 0.5 in (1.3 cm) per side:
- Width: 9.4 + 1 = 10.4 in (26.4 cm)
- Length: 12 + 1 = 13 in (33.0 cm)
- Blocking eases the 3-sc corners into the soft curve shown in the photo.
Final Blocking
- Lightly mist the caddy until it is evenly damp, not soaked.
- Lay it RS up on the blocking mat.
- Pin the outer edge to 10.4 in × 13 in (26.4 cm × 33.0 cm).
- Round each corner gently with 2 or 3 pins.
- Pin the top of each scallop so the 4 arches are even. Open each large fan so the ch-1 spaces show.
- Make sure the divider seam runs straight and vertical.
- Let it dry completely, at least 12 hours, before unpinning.
Final Quality-Control Checklist
- Back panel: 33 dc × 21 rows.
- Pocket: 4 large fans in each of Rows 2, 4, and 6. Row 7 has 41 sc.
- The pocket’s bottom edge is caught in every bottom border st.
- Round 1 has 158 sc. Round 2 has 166 sc.
- The divider runs from st 17 to the 21st sc of Row 7.
- The finished size is 10.4 in × 13 in (26.4 cm × 33.0 cm).
- All ends are woven in on the WS.
Troubleshooting
The fans lean or drift sideways. In Rows 3 and 5, put each sc in the center dc of the fan below. Count to the 3rd dc.
The pocket is wider than the back panel. Your fans are too loose. Steam-block the pocket to 9.4 in (23.9 cm), or remake it with a hook 0.5 mm smaller.
The side border ripples. Your row ends are taller than gauge. Change to 3 sc in every 2 row ends, then adjust the Round 2 counts to match your new Round 1.
The bottom edge puckers. You are pulling the two-layer stitches tight. Loosen up and keep the 1-to-1 match.
The pockets sag open. Tighten the backstitch on the divider and check that the pocket’s side edges are caught all the way up.
Care
Hand wash in cool water, roll in a towel to remove excess water, and dry flat to the blocked size. Don’t wring or tumble-dry.
Final Notes
The measurement chain runs like this:
- Gauge: 14 dc × 7 rows = 4 in (10.2 cm).
- Back panel: 33 dc × 21 rows = 9.4 in × 12 in (23.9 cm × 30.5 cm).
- Pocket: 33 sts, 4 fan repeats, 5.5 in (14.0 cm) tall, matched stitch for stitch along the bottom.
- Border: 2 rounds of sc, 158 then 166 sts, adding 0.5 in (1.3 cm) per side.
- Finished caddy: 10.4 in × 13 in (26.4 cm × 33.0 cm).
If each checkpoint matches, the caddy will sit flat on the sofa arm with two even pockets.
Happy crocheting!