

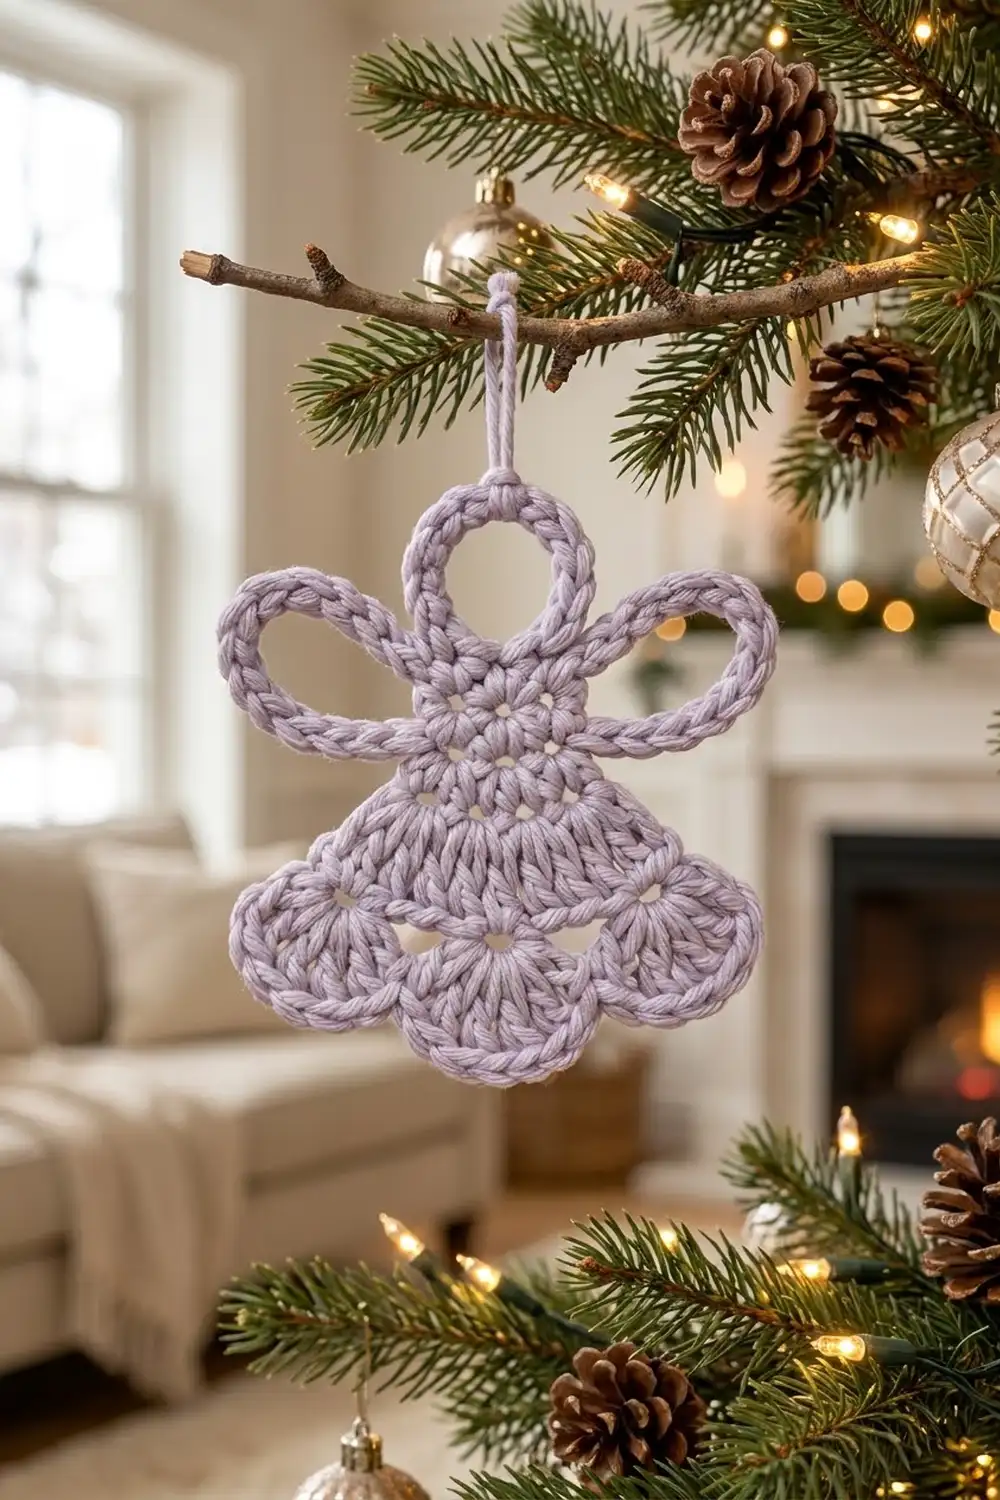
The Lilac Halo Angel is a small, flat angel motif with a soft, vintage feel. A round head sits under a looped halo, two rope-like wing loops sweep out from the shoulders, and a flared bell skirt ends in four plump shell scallops.
The whole angel is worked in one color, a gentle lilac lavender. The single color lets the texture do the talking: smooth double crochet rows in the skirt, a row of open V-stitch eyelets, and a raised single crochet outline around the scallops.
This pattern uses US crochet terms. The finished motif measures 4.5 in (11.4 cm) wide across the wings and 5 in (12.7 cm) tall from the top of the halo to the tip of the scallops.
Construction is simple. You crochet a 12-stitch head in a magic ring, work the skirt in five turned rows from the bottom of the head, add the halo and wings as chain loops covered in single crochet, then finish with a one-row border around the skirt.
Finished Size and Construction
- Finished size: 4.5 in (11.4 cm) wide x 5 in (12.7 cm) tall
- Skill level: Easy / advanced beginner
- Terminology: US crochet terms
- Yarn weight: Worsted (#4)
- Hook: 4.5 mm (US 7)
- Number of pieces: 1 single motif, no joining
- Layout: One flat angel: halo on top, head, wings at each side, skirt below
- Piece size: 4.5 in (11.4 cm) x 5 in (12.7 cm)
- Size before border: 4.5 in (11.4 cm) wingspan x 4.75 in (12.1 cm) tall; skirt 4 in (10.2 cm) wide
- Border depth: 0.25 in (0.6 cm) on the skirt sides and scallops
Materials
Choose a smooth worsted-weight yarn with clear stitch definition. Cotton or a cotton blend gives the crisp, rope-like loops you see on the halo and wings. Soft acrylic also works, but it may need a light stiffener to hold the wing shape.
Yarn:
– Lilac / lavender worsted (#4): 15 g, about 30 m (33 yd)
Quantities include a margin of roughly 25% for tails and any frogging.
Tools:
– 4.5 mm (US 7) crochet hook
– Tapestry needle
– Scissors
– 2 locking stitch markers
– Ruler or tape measure
– Blocking mat, rust-proof pins and spray bottle
– Optional: fabric stiffener or diluted craft glue
Abbreviations (US Terms)
- ch – chain
- sl st – slip stitch
- sc – single crochet
- dc – double crochet
- st(s) – stitch(es)
- sp – space
- MR – magic ring
- RS / WS – right side / wrong side
Special stitches:
– V-st (V-stitch): (dc, ch 2, dc) in the same stitch.
– Shell: 7 dc worked in the same ch-2 space.
– Covered loop: a chain loop anchored with a sl st, then completely filled by working sc into the loop (around the chains, not into them). This gives the thick, rope-like edge on the halo and wings.
Gauge and Checkpoints
Gauge: 16 dc and 8 rows = 4 in (10.2 cm) square with a 4.5 mm hook. That means 4 dc = 1 in (2.5 cm) and one dc row = 0.5 in (1.3 cm).
Because this is a single small motif, the motif itself is your test piece. Measure at each checkpoint below before moving on.
Checkpoints:
– Head (Rnd 1): 1.25 in (3.2 cm) across.
– Skirt Row 1: 2 in (5.1 cm) wide at the lower edge.
– Skirt Row 2: 3 in (7.6 cm) wide.
– Skirt Row 3: 4 in (10.2 cm) wide; skirt height 1.5 in (3.8 cm) below the head.
– Skirt Row 4: still 4 in (10.2 cm) wide; skirt height 2 in (5.1 cm).
– Skirt Row 5: skirt height 2.5 in (6.4 cm), including scallops.
– Halo: sits 1 in (2.5 cm) above the head.
– Before border: 4.5 in (11.4 cm) x 4.75 in (12.1 cm).
– After border: 4.5 in (11.4 cm) x 5 in (12.7 cm).
If your motif is too big: go down to a 4 mm (US G-6) hook, or check that you aren’t pulling your dc too tall.
If your motif is too small: go up to a 5 mm (US H-8) hook. Tight dc rows make the skirt cup instead of flaring.
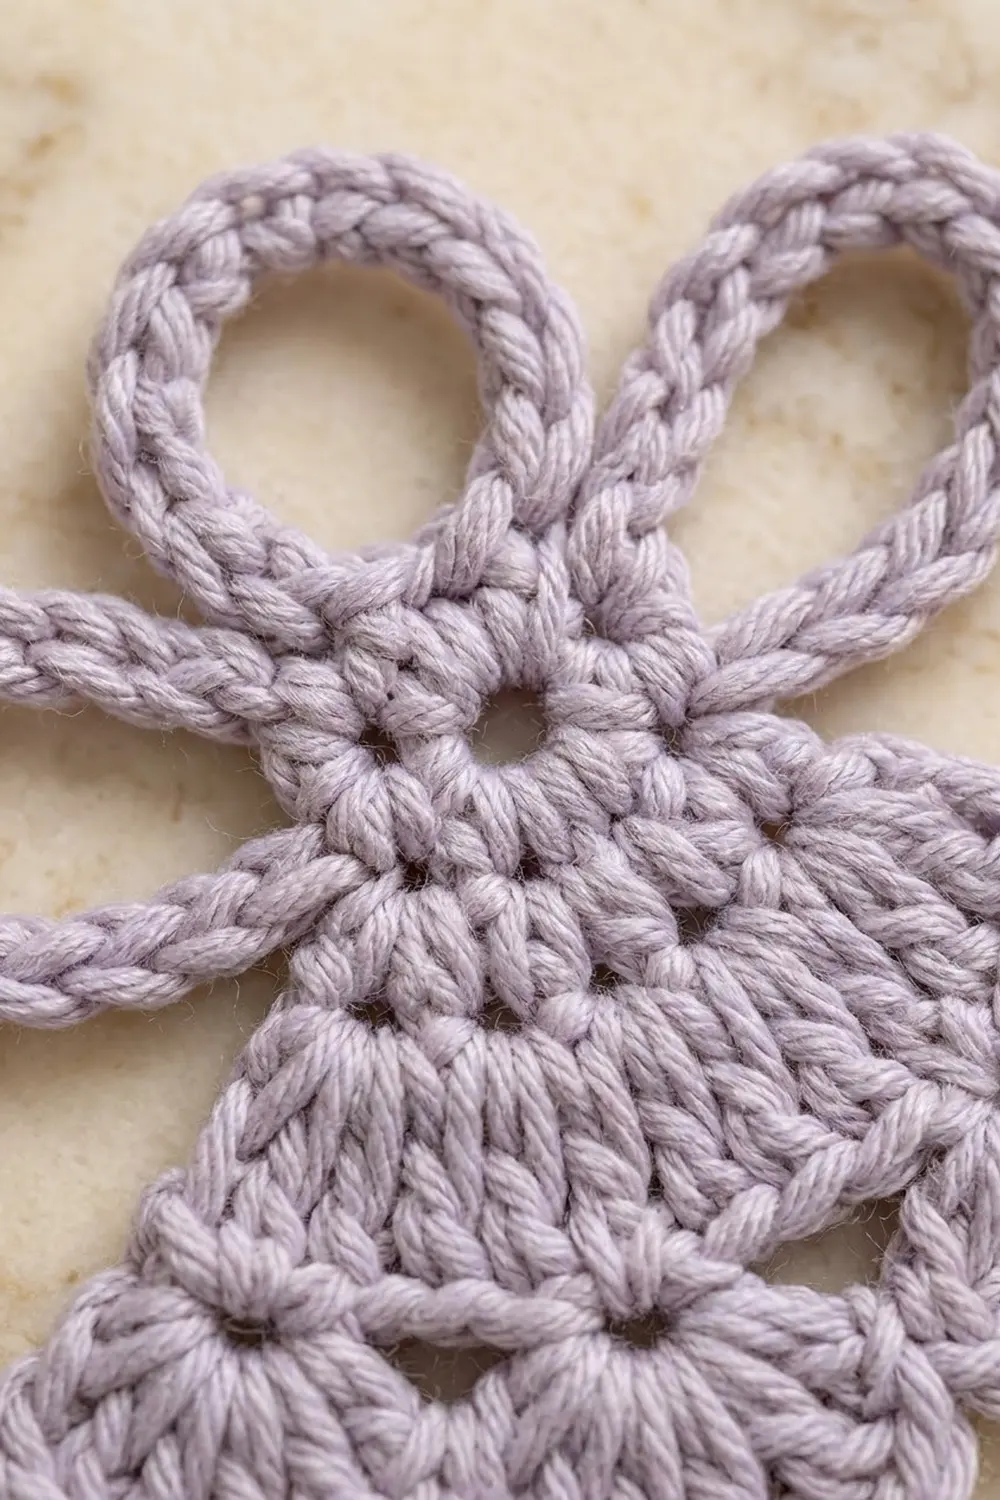
Part 1: Head
Rnd 1 (RS): Make a MR. Ch 3 (counts as dc), work 11 dc in the ring. Pull the ring closed and sl st in the top of the beginning ch-3 to join. (12 dc)
Fasten off and weave in the ring tail securely.
Numbering the head: Call the beginning ch-3 st 1. Count the following dc as sts 2–12 in the order you worked them. St 7 sits directly opposite st 1. Place a marker in st 5 and another in st 9. Hold the head with st 1 at the top.
Checkpoint: the head measures 1.25 in (3.2 cm) across and lies flat.
Part 2: Skirt
The skirt is worked in turned rows across the lower five stitches of the head (sts 5–9), centered on st 7.
Row 1 (RS): Join yarn with a sl st in st 5. Ch 3 (counts as dc), dc in the same st, dc in st 6, 2 dc in st 7, dc in st 8, 2 dc in st 9. Turn. (8 dc)
Row 2 (WS): Ch 3 (counts as dc here and throughout), dc in the same st, dc in next st, 2 dc in next st, dc in next 2 sts, 2 dc in next st, dc in next st, 2 dc in last st (top of ch-3). Turn. (12 dc)
Row 3 (RS): Ch 3, dc in the same st, dc in next 3 sts, 2 dc in next st, dc in next 2 sts, 2 dc in next st, dc in next 3 sts, 2 dc in last st. Turn. (16 dc)
The increases sit in mirrored positions in each row (Row 2: sts 1, 3, 6 and 8; Row 3: sts 1, 5, 8 and 12), so the bell flares evenly on both sides.
Checkpoint: Row 3 measures 4 in (10.2 cm) wide and the skirt is 1.5 in (3.8 cm) tall below the head.
Row 4 (WS, eyelet row): Ch 3, skip next 2 sts, V-st in next st, skip next 2 sts, V-st in next st 3 times, skip next 2 sts, dc in last st. Turn. (4 V-sts + 2 edge dc = 10 dc and 4 ch-2 sps)
Stitch check: 1 edge st + 4 x (2 skipped + 1 V-st) + 2 skipped + 1 edge st = 16 sts used, matching Row 3 exactly.
Row 5 (RS, scallop row): Ch 1, sc in first dc, shell in next ch-2 sp, sc in the sp between this V-st and the next V-st, shell in next ch-2 sp 3 times, sc in top of turning ch-3. (4 shells + 5 sc = 33 sts)
Count: 4 shells x 7 dc = 28 dc, plus 5 sc = 33 sts.
Fasten off. The top of each ch-2 space stays open just above the shell base, giving the small eyelet at the base of each scallop.
Checkpoint: the skirt is 2.5 in (6.4 cm) tall below the head and 4 in (10.2 cm) wide across the scallops.
Part 3: Halo and Wings
The halo and wings are covered chain loops worked along the top of the head. Work with the RS facing, following the head numbering from Part 1.
First wing: Join yarn with a sl st in st 10 (next to the skirt). Ch 16, sl st in the same st to form a loop. Work 22 sc into the ch-16 loop, covering the chains completely. Sl st in st 10. (22 sc)
Travel: Sl st in st 11, sl st in st 12, sl st in st 1.
Halo: Ch 14, sl st in the same st (st 1). Work 20 sc into the ch-14 loop. Sl st in st 1. (20 sc)
Travel: Sl st in st 2, sl st in st 3, sl st in st 4.
Second wing: Ch 16, sl st in the same st (st 4). Work 22 sc into the ch-16 loop. Sl st in st 4. (22 sc) Fasten off.
The wings sit at st 4 and st 10, both three stitches away from st 1 and one stitch from the skirt edge. This keeps them mirrored. The travel sl sts add a neat outline to the top of the head.
Checkpoint: each wing loop is about 2 in (5.1 cm) long when flattened, and the halo rises 1 in (2.5 cm) above the head. Measured before the border, the motif is 4.5 in (11.4 cm) across the wings and 4.75 in (12.1 cm) tall.
Border
The border is a single row of sc worked around the skirt only: down one side, around the scallops and up the other side. It firms the edges and gives the scallops their raised outline.
Border gauge: 2 sc per dc row-end on the sides; 1 sc per stitch across the scallops, with 3 sc in each shell’s center stitch. The border adds 0.25 in (0.6 cm) on each side and at the bottom.
Border Row (RS): With RS facing, join yarn with a standing sc in the side of Row 1 at the top corner of the skirt, next to the head.
- First side: Work 1 more sc in the same row-end, then 2 sc in each of the row-ends of Rows 2, 3 and 4. (8 sc)
- Scallop edge: Sc in the edge sc of Row 5, sc in each of the next 3 dc, 3 sc in the 4th (center) dc, sc in each of the next 3 dc, sc in the next sc 4 times. (33 sc + 8 extra = 41 sc)
- Second side: 2 sc in each of the row-ends of Rows 4, 3, 2 and 1. (8 sc)
Sl st in the adjacent head st to anchor. Fasten off. (Total: 8 + 41 + 8 = 57 sc)
Why the math works:
– Each dc row-end is about the height of 2 sc, so 4 rows x 2 sc = 8 sc per side. The sides stay flat, with no ruffling or pulling.
– Row 5 has 33 sts. Working 1 sc in each gives 33 sc. Each shell has 7 dc, an odd number, so there is a true center dc. The 2 extra sc in each center dc round out the scallop tip: 4 shells x 2 = 8 extra, so 33 + 8 = 41.
– The 5 sc that sit between and outside the shells get 1 sc each, keeping the valleys crisp.
– Both sides are 8 sc and every shell gets the same treatment, so the border is perfectly symmetrical.
Final Blocking
- Weave in all ends along the back of the stitches, matching their color, before blocking.
- Lightly mist the motif with water until it is damp, not soaking.
- Lay it RS up on the blocking mat.
- Pin the head into a circle 1.25 in (3.2 cm) across.
- Pin the halo into a round loop centered above st 1, rising 1 in (2.5 cm) above the head.
- Pin each wing as an oval loop, angled slightly upward, so the total span measures 4.5 in (11.4 cm).
- Pin the skirt to 4.5 in (11.4 cm) wide at the scallops, with one pin at each scallop tip and one in each valley.
- Check the total height: 5 in (12.7 cm) from halo top to scallop tips.
- Optional: brush on a light coat of stiffener for an ornament that holds its shape.
- Let it dry completely before unpinning.
Final Quality-Control Checklist
- Head has 12 dc and lies flat.
- Skirt counts: Row 1 = 8, Row 2 = 12, Row 3 = 16, Row 4 = 4 V-sts, Row 5 = 33 sts.
- Four even shell scallops, each with a small eyelet at its base.
- Halo is centered above st 1 and fully covered with 20 sc.
- Both wings have 22 sc and sit at matching heights (sts 4 and 10).
- Border has 8 sc on each side and 41 sc across the scallops.
- Finished size is 4.5 in (11.4 cm) x 5 in (12.7 cm).
- All ends woven in and invisible from the front.
Troubleshooting
Skirt cups or curls forward: Your dc rows are too tight. Go up a hook size, or loosen the yarn as you pull up each loop.
Skirt ruffles: Recount Rows 2 and 3. An extra increase is the usual cause. Each row should add exactly 4 sts.
Scallops look uneven: Make sure each shell has exactly 7 dc and that each in-between sc sits in the gap between V-sts, not in a dc.
Chains show through the halo or wings: Add 1–2 sc to the loop, pushing the stitches together as you go.
Wings are lopsided: Recheck the head numbering. The wings must be in sts 4 and 10, three stitches from the halo on each side.
Border sides ripple: Use 2 sc per dc row-end, no more. If they still ripple, work the border with a 4 mm (US G-6) hook.
Care
Hand wash in cool water with mild soap, press out the water in a towel and dry flat, re-pinning if needed. If you used stiffener, spot clean only.
Final Notes
The measurement chain for the Lilac Halo Angel is short and easy to check. Your head ring measures 1.25 in (3.2 cm). The skirt grows from 8 to 12 to 16 dc, reaching 4 in (10.2 cm) wide. The eyelet row and shells bring the skirt to 2.5 in (6.4 cm) tall. With the halo and wings, the motif measures 4.5 in (11.4 cm) x 4.75 in (12.1 cm). The 0.25 in (0.6 cm) border brings it to the final 4.5 in (11.4 cm) x 5 in (12.7 cm).
If every checkpoint matches, your angel will block flat and even, ready to display on its own, use as a gift tag or hang as a small ornament.
Happy crocheting!