

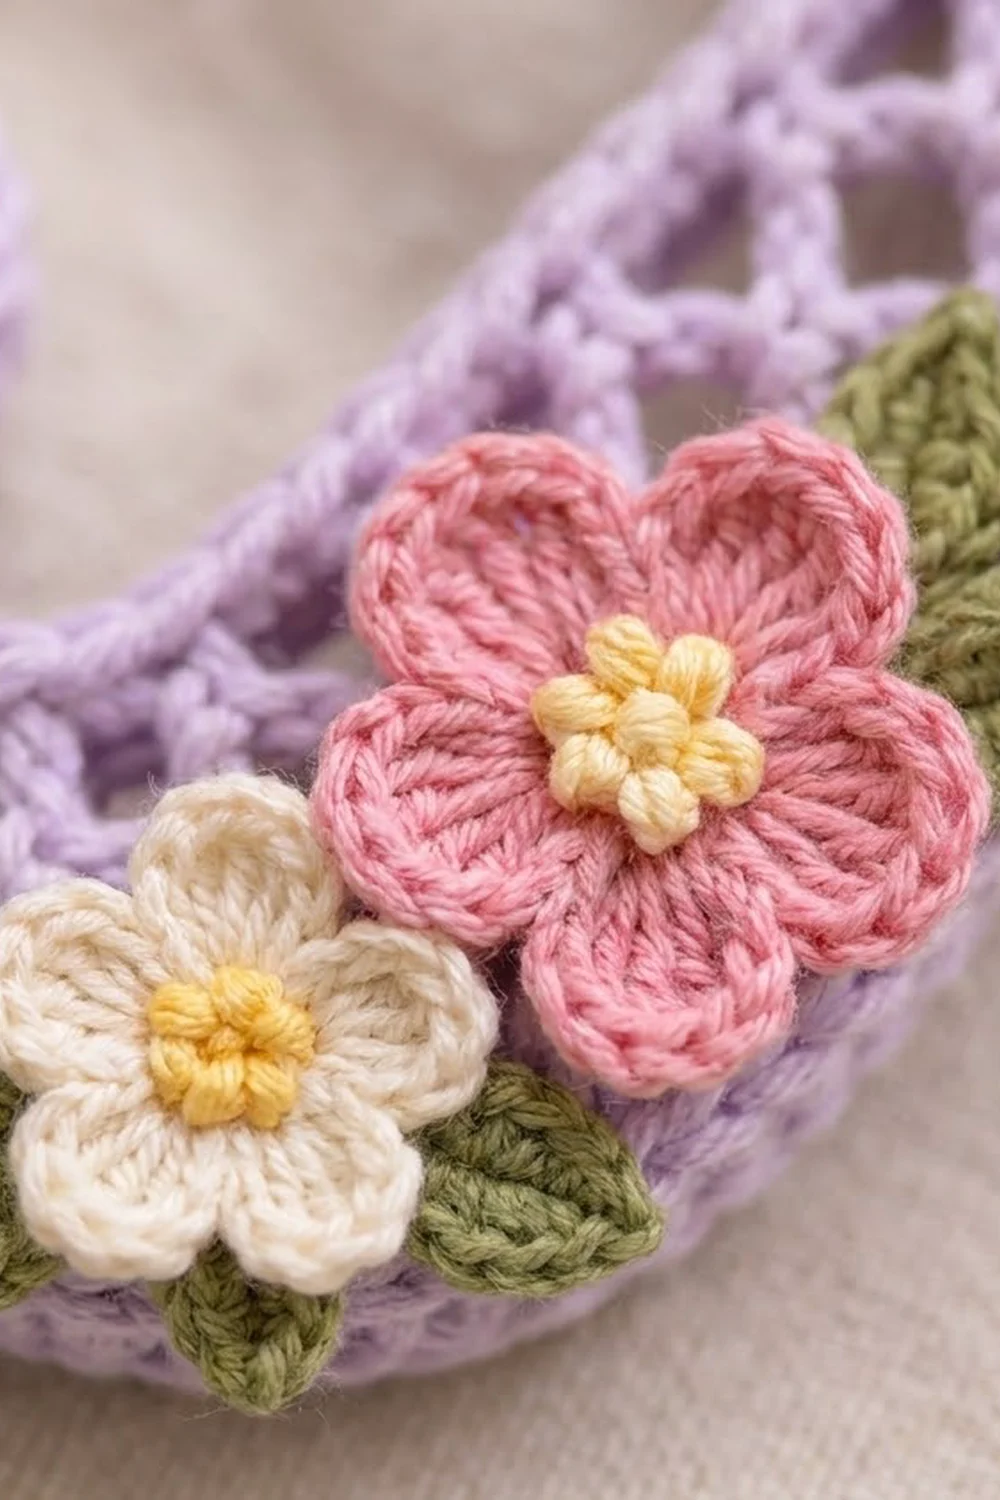
This letter J bag charm combines an airy lattice with a small spray of flowers. The lavender mesh forms open diamonds, and a corded edge keeps the letter shape crisp. A pink blossom, a cream blossom, two pink buds and green leaves sit along the lower right of the stem.
The colors are soft lilac, rose pink, cream, butter yellow and olive green. The style is romantic and light, and the charm works well on a handbag, tote or key ring.
The pattern uses US crochet terms. The finished charm measures 3.5 in (8.9 cm) wide and 4.5 in (11.4 cm) tall, not counting the hardware.
You crochet the letter as one flat piece in rows of net mesh. You start at the crossbar, travel inward to work the stem, add a chain extension for the bowl, and then work a short curl tip upward. Two border rounds outline the whole letter. The flowers and leaves are made separately and sewn on.
Finished Size and Construction
- Finished size: 3.5 in (8.9 cm) wide × 4.5 in (11.4 cm) tall
- Skill level: Intermediate
- Terminology: US
- Yarn weight: Super fine / fingering (#1) cotton
- Hook: 2.25 mm (B-1)
- Number of pieces: 1 letter body, plus 7 small appliqués
- Layout: Single letter, no joining
- Letter size before border: 3 in (7.6 cm) wide × 4 in (10.2 cm) tall
- Border depth: 0.25 in (0.6 cm) on every edge
- Stem width after border: 1.5 in (3.8 cm)
- Inner gap between curl tip and stem after border: 0.5 in (1.3 cm)
Materials
Use a smooth mercerized cotton. It gives clear stitch definition and the mesh holds its shape well after blocking. Avoid fuzzy yarns, because they blur the diamonds.
- Lavender: 8 g, about 28 m (letter and border)
- Pink: 3 g, about 10 m (large flower and 2 buds)
- Cream: 2 g, about 7 m (small flower)
- Olive green: 2 g, about 7 m (leaves and bud bases)
- Yellow: 1 g, about 3 m (flower centers)
These quantities include a small safety margin.
Tools:
– 2.25 mm (B-1) crochet hook
– Tapestry needle and a sharp embroidery needle
– 1 in (2.5 cm) gold split ring with a 1 in (2.5 cm) gold chain
– 1 small gold jump ring (6 mm) and 2 pairs of flat-nose pliers
– Rust-proof pins, a blocking mat and a spray bottle
– Stitch marker and scissors
Abbreviations (US Terms)
- ch – chain
- sl st – slip stitch
- sc – single crochet
- hdc – half double crochet
- dc – double crochet
- sc2tog – single crochet 2 together
- rev sc – reverse single crochet (crab stitch)
- MR – magic ring
- sk – skip
- sp – space
- tch – turning chain
- st(s) – stitch(es)
Special stitch – rev sc: Work from left to right. Insert the hook into the next stitch to the right, yarn over, pull up a loop, then yarn over and pull through both loops. This makes the twisted, corded edge.
Mesh terms: A loop is a ch-5 arch. A half loop is the ch-2 at each end of an even row.
Gauge and Checkpoints
Mesh gauge: 2 loops = 1 in (2.5 cm) wide, and 8 rows = 2 in (5.1 cm) tall. This means 1 loop = 0.5 in (1.3 cm) and 1 row = 0.25 in (0.6 cm).
Border gauge: 6 sc = 1 in (2.5 cm).
Swatch first: chain 22 and work Rows 1–4 of the crossbar pattern below. The swatch should measure 2.5 in (6.4 cm) wide and 1 in (2.5 cm) tall.
Checkpoints:
– After Row 2: crossbar is 2.5 in (6.4 cm) wide × 0.5 in (1.3 cm) tall.
– After Row 12: piece is 3 in (7.6 cm) tall, and the stem is 1 in (2.5 cm) wide.
– After Row 16: piece is 4 in (10.2 cm) tall, and the bowl is 2.5 in (6.4 cm) wide.
– After the curl tip: total width is 3 in (7.6 cm).
– After the border: 3.5 in (8.9 cm) × 4.5 in (11.4 cm).
If your piece is too big, go down to a 2.0 mm hook or tighten your chains. If it is too small, go up to a 2.5 mm hook. Change the hook rather than the chain counts, because the letter shape depends on the loop counts.
The Letter J
Crossbar
Foundation: With lavender, ch 22.
Row 1 (RS): Sc in 2nd ch from hook, ch 5, sk 3 ch, sc in next ch; rep from * 4 more times. Turn. (5 loops, 6 sc)*
Row 2: Ch 5 (counts as dc + ch 2), sc in first loop, ch 5, sc in next loop; rep from * 3 more times, ch 2, dc in last sc. (4 full loops + 2 half loops)*
Checkpoint: 2.5 in (6.4 cm) × 0.5 in (1.3 cm).
Stem
Row 3 (travel row): Ch 1, turn. Sl st in dc, 2 sl st in ch-2 sp, sl st in next sc, 3 sl st in next loop, sl st in next sc, sl st in next loop. Ch 1, sc in same loop, ch 5, sc in next loop; rep from * once. Leave the rest unworked. Turn. (2 loops)*
Your crossbar now overhangs the stem by 2 loops, 1 in (2.5 cm), on the left and by 1 loop, 0.5 in (1.3 cm), on the right.
Row 4: Ch 5, sc in first loop, ch 5, sc in next loop, ch 2, dc in last sc. Turn. (1 full loop + 2 half loops)
Row 5: Ch 1, sc in dc, ch 5, sc in next loop, ch 5, sc in 3rd ch of tch. Turn. (2 loops)
Rows 6–12: Repeat Rows 4–5 three more times, then work Row 4 once. Do not turn after Row 12. You now have 10 stem rows.
Checkpoint: the piece is 3 in (7.6 cm) tall, with a 1 in (2.5 cm) stem.
Bowl
Row 13 (extension row): Ch 13. Sc in 2nd ch from hook, ch 5, sk 3 ch, sc in next ch; rep from * once. Ch 5, sk last 3 ch, sc in top of dc. Ch 5, sc in next loop, ch 5, sc in 3rd ch of tch. Turn. (5 loops, 6 sc)*
Row 14: Ch 5, sc in first loop, ch 5, sc in next loop; rep from * 3 more times, ch 2, dc in last sc. Turn. (4 full loops + 2 half loops)*
Row 15: Ch 1, sc in dc, ch 5, sc in next loop; rep from * 3 more times, ch 5, sc in 3rd ch of tch. Turn. (5 loops)*
Row 16: Repeat Row 14. Fasten off. (4 full loops + 2 half loops)
Checkpoint: the piece is 4 in (10.2 cm) tall, and the bowl is 2.5 in (6.4 cm) wide.
Curl Tip
Work this into the free loops on the top side of the Row 13 extension chain.
Row C1: With RS facing, join lavender with a sl st in the free loop at the base of the second sc of Row 13. Ch 1, sc in the same st, ch 5, sc in the free loop at the base of the first sc of Row 13. Turn. (1 loop)
Row C2: Ch 5, sc in loop, ch 2, dc in last sc. Turn. (2 half loops)
Row C3: Ch 1, sc in dc, ch 5, sc in 3rd ch of tch. Fasten off. (1 loop)
The tip stands 0.75 in (1.9 cm) tall and leaves a 1 in (2.5 cm) gap before the stem.
Checkpoint: the total width is 3 in (7.6 cm).
Border
The border uses a gauge of 6 sc per 1 in (2.5 cm). Along mesh edges, that is 3 sc per loop. Along row ends, work 1 sc per sc-row end and 2 sc per dc-row end.
The side counts below do not include corners. At each of the 8 outer (convex) corners, work 3 sc in the corner point. At each of the 4 inner (concave) corners, work 1 sc2tog across the corner.
Rnd 1: With RS facing, join lavender at the top-left corner of the crossbar. Work clockwise:
| Edge | Length | Sc |
|---|---|---|
| Crossbar top (foundation) | 2.5 in (6.4 cm) | 15 |
| Crossbar right side | 0.5 in (1.3 cm) | 3 |
| Crossbar underside, right | 0.5 in (1.3 cm) | 3 |
| Stem right side, Rows 3–16 | 3.5 in (8.9 cm) | 21 |
| Bowl bottom | 2.5 in (6.4 cm) | 15 |
| Bowl and tip, left side | 1.75 in (4.4 cm) | 10 |
| Tip top | 0.5 in (1.3 cm) | 3 |
| Tip, inner side | 0.75 in (1.9 cm) | 4 |
| Bowl top, inner | 1 in (2.5 cm) | 6 |
| Stem left side, Rows 3–12 | 2.5 in (6.4 cm) | 15 |
| Crossbar underside, left | 1 in (2.5 cm) | 6 |
| Crossbar left side | 0.5 in (1.3 cm) | 3 |
The sides total 104 sc. Add 8 corners × 3 sc = 24 and 4 sc2tog = 4, for 132 sts. Join with a sl st to the first sc.
Rnd 2: Ch 1, rev sc in each st around. (132 sts) Join and fasten off.
Why the math works: At 3 sc per 0.5 in (1.3 cm) loop, the border matches the mesh width. Two rows are 0.5 in (1.3 cm) tall and take 3 row-end sc, so the sides match too. The 3-sc corners turn the 90° outer corners without cupping. The sc2tog at inner corners stops the edge from ruffling. Rnd 2 works 1:1, so the edge stays flat. The two rounds add 0.25 in (0.6 cm) per side, which takes the letter from 3 × 4 in (7.6 × 10.2 cm) to 3.5 × 4.5 in (8.9 × 11.4 cm).
Appliqués
Large pink flower (make 1): With pink, MR.
– Rnd 1: 10 sc in ring. Join. (10 sts)
– Rnd 2: (hdc, 2 dc, hdc) in next st, sl st in next st; rep from * 4 more times. (5 petals, 25 sts)*
Fasten off. It measures about 1 in (2.5 cm) across. With yellow, work 5 French knots in the center.
Small cream flower (make 1): With cream, MR.
– Rnd 1: 5 sc in ring. Join. (5 sts)
– Rnd 2: (ch 2, 2 dc, ch 2, sl st) in next st; rep from * 4 more times. (5 petals)*
It measures about 0.75 in (1.9 cm) across. Work 3 yellow French knots in the center.
Pink bud (make 2): With pink, MR. Ch 2, then work 4 dc in the ring. Pull the ring closed tight and sl st to the top of the ch-2. Each bud is about 0.3 in (0.8 cm) across. With green, work 3 straight stitches at the base to form the bud’s green base.
Leaf (make 2): With green, ch 7. Sc in 2nd ch from hook, hdc in next ch, dc in next 2 ch, hdc in next ch, 3 sc in last ch. Working along the free loops: hdc, dc, dc, hdc, then sc in the last ch. In the tip, work (sl st, ch 2, sl st). Each leaf is about 0.8 in (2.0 cm) long.
Small leaf (make 1): Ch 5. Sc in 2nd ch, dc in next 2 ch, 3 sc in last ch, then dc, dc, sc along the other side and sl st to join. It is about 0.5 in (1.3 cm) long.
Placement: Lay the letter RS up and work from the bottom of the stem upward, all along the right edge:
1. Pin a leaf diagonally at the lower right of the stem, near where it meets the bowl.
2. Place the cream flower over the base of that leaf.
3. Place the pink flower just above it, overlapping the cream petals slightly. Let both flowers extend about 0.25 in (0.6 cm) past the border.
4. Tuck the second leaf behind the right side of the pink flower.
5. Place the two buds above the pink flower, then add the small leaf beside them.
Sew each piece on through the border and mesh using small hidden stitches.
Hardware: Open the jump ring with pliers. Pass it through the center of the top border, about the 8th st of the 15 sc across the crossbar top. Add the chain, then close the ring.
Final Blocking
- Weave in all ends before blocking.
- Spray the letter until it is damp. Keep the flowers as dry as you can.
- Pin it to 3.5 in (8.9 cm) × 4.5 in (11.4 cm) on the mat.
- Pin each crossbar corner square and keep the edges straight.
- Open the diamonds by pinning each side of the stem out to 1.5 in (3.8 cm).
- Shape the curl into a smooth round, and keep the 0.5 in (1.3 cm) gap between the tip and the stem.
- Leave it to dry fully, at least 6 hours.
Final Quality-Control Checklist
- The letter measures 3.5 × 4.5 in (8.9 × 11.4 cm).
- The crossbar overhangs the stem by about 1 in (2.5 cm) on the left and 0.5 in (1.3 cm) on the right, before the border.
- All diamonds are open and even.
- Border Rnd 1 has 132 sts, with no ruffles at inner corners.
- The rev sc cord is even all the way around.
- The flowers are secure and no stitches show on the back.
- The jump ring is fully closed and centered.
Troubleshooting
- The stem leans or twists: Your chain tension is uneven. Chain a little looser, and pin the stem straight when blocking.
- The border ruffles: You have too many sc. Count each edge against the table.
- The border cups inward: You have too few sts, or the corner 3-sc groups are missing.
- The curl gap closes up: Check that the Row 13 extension chain had exactly 13 ch.
- The rev sc edge is tight: Use a 2.5 mm hook for Rnd 2 only.
- The flowers droop: Add a tack stitch under each petal tip.
Care
Hand wash in cool water and lay flat to dry. Reshape the curl while the charm is damp.

Final Notes
The measurement chain works like this: each 0.5 in (1.3 cm) loop and 0.25 in (0.6 cm) row builds a 3 × 4 in (7.6 × 10.2 cm) letter. The 132-st border adds 0.25 in (0.6 cm) on every edge. Blocking sets the final 3.5 × 4.5 in (8.9 × 11.4 cm) charm. If you check each stage against its checkpoint, the finished charm will match.
Happy crocheting!