

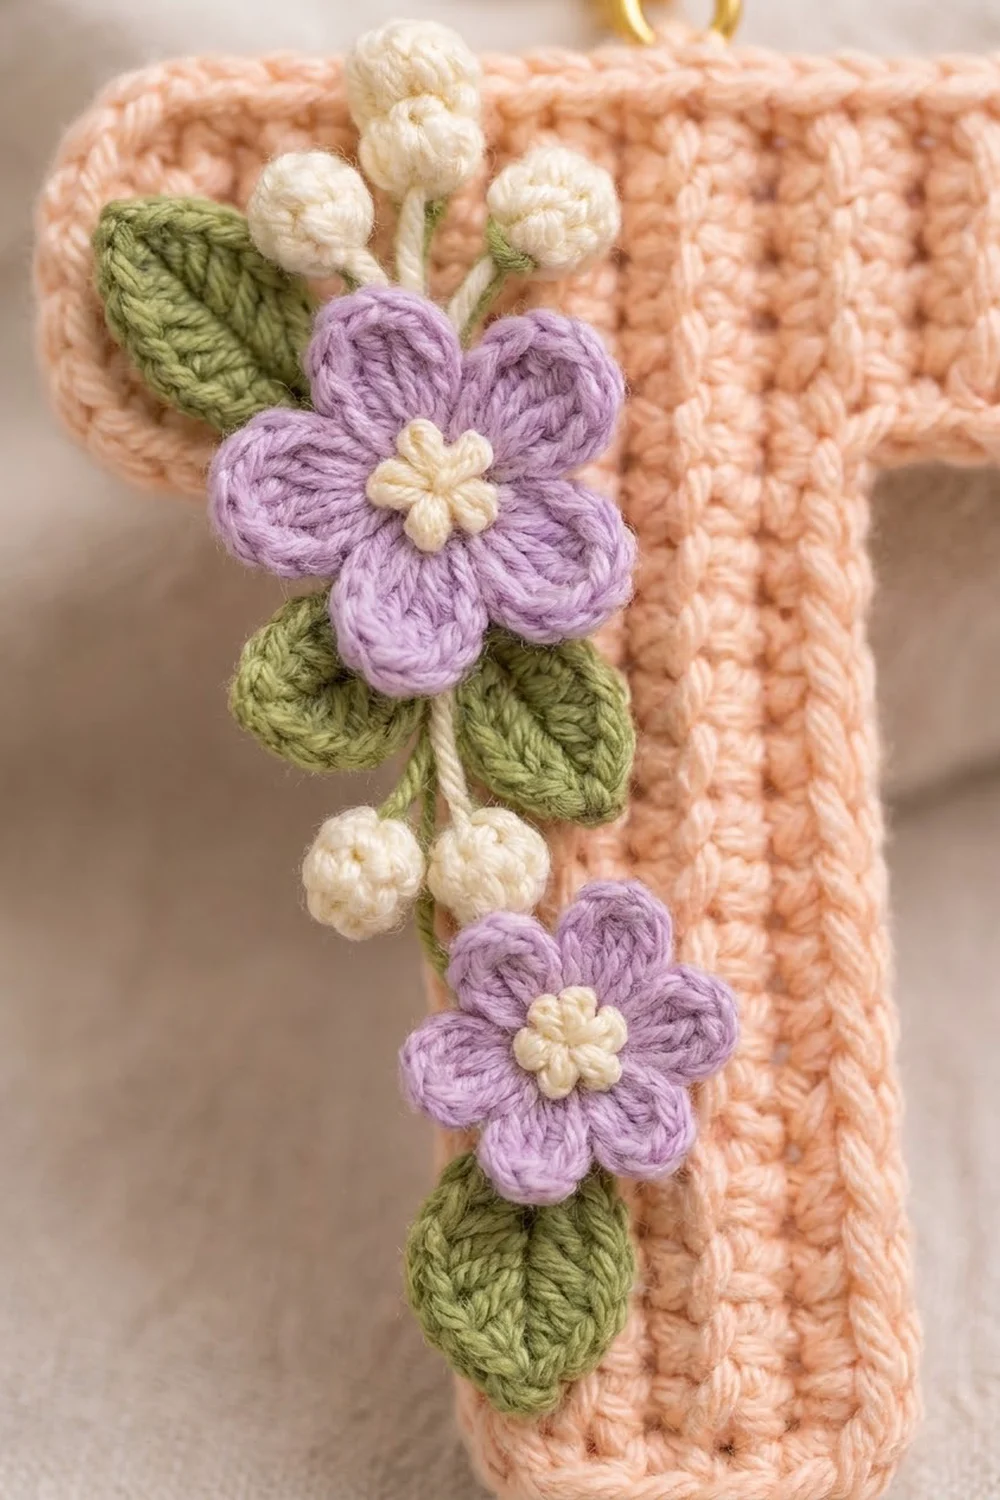
This Blossom Initial keychain is one flat capital letter T in soft peach. Fine vertical ribs run from top to bottom across the whole letter. Down the left side there is a small spray of flowers: a large and a small lavender five-petal flower, both with cream centers, plus green leaves and little cream berries on fine green stems.
The colors are warm peach, lavender, sage green and cream. It has a sweet, cottage-garden look that works as a bag charm, a gift tag or a personalized key ring. The letter hangs from a gold split ring on a short chain.
This pattern uses US crochet terms. The finished letter measures 3.4 in (8.6 cm) wide across the crossbar and 4.0 in (10.2 cm) tall, not counting the hardware.
You work the T sideways in rows of single crochet through the back loop only, so each row becomes one vertical column. Extra stitches are added to make the stem, then dropped again for the right arm. One sc round and one slip-stitch round give the letter a neat, raised outline. Last, you sew on the appliqués and attach the ring.
Finished Size and Construction
- Finished size: 3.4 in (8.6 cm) wide x 4.0 in (10.2 cm) tall
- Skill level: Easy / advanced beginner
- Terminology: US crochet terms
- Yarn weight: #3 light (DK) cotton
- Hook: 3.0 mm
- Number of pieces: 1 letter body, plus small sewn-on appliqués (2 flowers, 5 leaves, 7 berries)
- Layout: Single T shape, worked sideways in columns; appliqué spray along the left side
- Crossbar: 3.0 in (7.6 cm) wide x 1.2 in (3.0 cm) tall before the border
- Stem: 1.4 in (3.6 cm) wide; full height 3.6 in (9.1 cm) before the border
- Size before border: 3.0 in x 3.6 in (7.6 cm x 9.1 cm)
- Border depth: about 0.2 in (0.5 cm) per side
Materials
Choose a smooth mercerized or combed cotton in DK weight. Cotton gives crisp ribs and holds its shape on a keychain that gets handled every day. Avoid fuzzy or very stretchy yarns, which blur the ribs.
- Peach (main color): 8 g / about 19 m
- Lavender (flowers): 3 g / about 7 m
- Sage green (leaves and stems): 2 g / about 5 m
- Cream (centers and berries): 2 g / about 5 m
These quantities include a margin for checking gauge and for tails.
Tools:
- 3.0 mm crochet hook
- Tapestry needle and a sharp embroidery needle
- Gold split key ring, 1 in (2.5 cm)
- Short gold chain, about 0.75 in (1.9 cm), with 2 jump rings
- 2 pairs of flat-nose pliers
- Stitch marker
- Pins, blocking mat and a ruler
Abbreviations (US Terms)
- ch – chain
- sl st – slip stitch
- sc – single crochet
- hdc – half double crochet
- dc – double crochet
- sc2tog – single crochet 2 together
- BLO – back loop only
- st(s) – stitch(es)
- MR – magic ring
- rep – repeat
Special stitch – sc2tog across a corner: Insert the hook in the first stitch or row end, yarn over and pull up a loop. Insert the hook in the second stitch or row end, yarn over and pull up a loop. Yarn over and pull through all 3 loops.
Gauge and Checkpoints
Gauge: 20 sc x 20 rows in sc BLO = 4 in (10.2 cm). That is 5 sts and 5 rows per inch.
At this gauge, rows and stitches measure the same, and the border math depends on that. The letter is small, so it can be your swatch. Work Rows 1–4 and measure before you continue.
Checkpoints:
- After Row 4 (left arm): 0.8 in (2.0 cm) wide x 1.2 in (3.0 cm) tall
- After Row 11 (left arm + stem): 2.2 in (5.6 cm) wide; stem 3.6 in (9.1 cm) tall
- After Row 15 (body complete): 3.0 in (7.6 cm) wide x 3.6 in (9.1 cm) tall
- After the border: 3.4 in (8.6 cm) wide x 4.0 in (10.2 cm) tall
Too big? Change to a 2.75 mm hook.
Too small? Change to a 3.25 mm hook.
Check both directions. If your stitches measure correctly but your rows come out short, pull each loop up to full height before you yarn over.
Letter Body
Each row runs vertically, either bottom to top or top to bottom. Working in BLO leaves a ridge on alternating faces, which creates the vertical ribs. The side facing you after Row 1 is the front.
Use peach.
Left Arm
Row 1: Ch 7. Sc in 2nd ch from hook and in each ch across, working from the bottom of the arm to the top edge. (6 sc)
Row 2: Ch 1, turn. Sc BLO in each st across, working top to bottom. (6 sc)
Row 3: Ch 1, turn. Sc BLO in each st across, working bottom to top. (6 sc)
Row 4: Ch 1, turn. Sc BLO in each st across, working top to bottom. (6 sc)
You are now at the bottom of the arm, where the stem begins.
Checkpoint: 0.8 in (2.0 cm) wide x 1.2 in (3.0 cm) tall.
Stem
Row 5 (growth row): Ch 13. Sc in 2nd ch from hook and in each of the next 11 ch (12 sc). Then sc BLO in each of the 6 sts of Row 4 (6 sc). This row runs bottom to top. (18 sc)
Rows 6–11: Ch 1, turn. Sc BLO in each st across. (18 sc in each row)
Row 11 ends at the top edge.
Checkpoint: 2.2 in (5.6 cm) wide. The stem is 1.4 in (3.6 cm) wide and 3.6 in (9.1 cm) tall, and the part below the crossbar is 2.4 in (6.1 cm).
Right Arm
Row 12 (step-down row): Ch 1, turn. Sc BLO in the first 6 sts only, working top to bottom. Leave the remaining 12 sts unworked. (6 sc)
Rows 13–15: Ch 1, turn. Sc BLO in each st across. (6 sc in each row)
Row 15 ends at the top-right corner. Do not fasten off.
Body total: 8 arm rows x 6 sts + 7 stem rows x 18 sts = 48 + 126 = 174 sts.
Checkpoint: 3.0 in (7.6 cm) wide x 3.6 in (9.1 cm) tall.
Border
Border gauge: 5 sc per inch along every edge, matching the body.
Keep working with peach from the end of Row 15. Work each row-end sc under 2 strands of the edge stitch.
The T has 6 outer corners and 2 inner corners. Each outer corner falls on the end stitch of an edge made of stitches or chains, and you work 3 sc into it.
Rnd 1: Ch 1, then work around the letter as follows:
- Right edge of crossbar (Row 15, 6 sts): 3 sc in first st (corner), sc in next 4 sts, 3 sc in last st (corner). (10 sc)
- Bottom of right arm (4 row ends): Sc in each of the first 3 row ends. Sc2tog over the last row end and the first exposed st of Row 11 (inner corner). (4 sts)
- Right side of stem (remaining 11 exposed sts of Row 11): Sc in next 10 sts, 3 sc in last st (corner). (13 sc)
- Bottom of stem (7 row ends): Sc in each row end. (7 sc)
- Left side of stem (12 foundation ch of Row 5): 3 sc in first ch (corner), sc in next 10 ch. Sc2tog over the 12th ch and the Row 4 row end (inner corner). (14 sts)
- Bottom of left arm (remaining 3 row ends): Sc in each. (3 sc)
- Left edge of crossbar (6 foundation ch of Row 1): 3 sc in first ch (corner), sc in next 4 ch, 3 sc in last ch (corner). (10 sc)
- Top edge (15 row ends): Sc in each row end. (15 sc)
- Sl st to first sc.
Count for Rnd 1: 66 edge sts and row ends worked 1 per st + 12 corner extras (2 at each of 6 outer corners) − 2 (from the 2 sc2tog) = 76 sts.
The 66 is the sum of the edges: 6 + 4 + 12 + 7 + 12 + 4 + 6 + 15. The section totals check out the same way: 10 + 4 + 13 + 7 + 14 + 3 + 10 + 15 = 76.
Rnd 2: Sl st loosely in BLO of each st around. Fasten off with an invisible join. (76 sl st)
This round makes the raised outline.
Why the math works: Because rows and stitches both measure 5 per inch, 1 sc per row end matches 1 sc per stitch, so the edges neither ruffle nor pull in. The 3-sc outer corners turn flat, and the sc2tog removes the extra fabric that would bunch at the inner corners. The border adds 0.2 in (0.5 cm) per side: 3.0 + 0.4 = 3.4 in (8.6 cm) wide, and 3.6 + 0.4 = 4.0 in (10.2 cm) tall.
Flower Spray Appliqués
Leave a 6 in (15.2 cm) tail on each piece for sewing.
Large Flower (make 1)
Rnd 1 (cream): MR, 5 sc in ring, pull it tight, sl st to first sc. Fasten off. (5 sc)
Rnd 2 (lavender): Join in any sc, ch 1. *(Sc, hdc, dc, hdc, sc) in next sc; rep from * 4 more times. Sl st to first sc. (25 sts, 5 petals)
The large flower is about 1.0 in (2.5 cm) across.
Small Flower (make 1)
Rnd 1 (cream): Work as for the large flower. (5 sc)
Rnd 2 (lavender): Join in any sc, ch 1. *(Sc, dc, sc) in next sc; rep from * 4 more times. Sl st to first sc. (15 sts, 5 petals)
The small flower is about 0.7 in (1.8 cm) across. On both flowers, add one cream French knot in the center.
Leaf (make 5, green)
Ch 6. Sl st in 2nd ch from hook, sc in next ch, hdc in next ch, dc in next ch, 3 hdc in last ch for the tip. Then work along the other side of the chain: dc, hdc and sc in the next 3 ch, and sl st in the same ch as the first sl st. (11 sts)
Each leaf is about 0.6 in (1.5 cm) long, with a pointed tip.
Berry (make 7, cream)
MR, 6 sc in ring, pull the ring fully closed, sl st to first sc. (6 sc)
Fasten off. Use the tail to gather the edge so the berry cups into a ball about 0.25 in (0.6 cm) wide.
Assembly
Stems: With green, backstitch a gently wavy line about 3.0 in (7.6 cm) long. Start just inside the top-left corner of the crossbar and follow the left edge of the stem down. Add 3 short branches for the berries, each about 0.3 in (0.8 cm) long.
Flowers: Sew the large flower where the crossbar meets the stem, about 1.25 in (3.2 cm) down from the top. Sew the small flower about 1.5 in (3.8 cm) below it.
Leaves: Place the leaves with their points facing outward:
- 1 at the top left
- 2 under the large flower
- 1 between the two flowers
- 1 below the small flower
Berries: Sew 3 berries in a cluster at the top. Sew 2 between the flowers and 2 beside the small flower.
Hardware: Put a jump ring through the top-left corner of the border, add the chain, then add the second jump ring and the split ring. Close all rings fully.
Final Blocking
- Before sewing on any appliqués, mist the letter until it is just damp.
- Pin it to the mat at 3.4 in x 4.0 in (8.6 cm x 10.2 cm).
- Pin all 6 outer corners and both inner corners.
- Use the grid on the mat to straighten the ribs so they run vertically.
- Let it dry completely, about 6–8 hours.
- Unpin it, then sew on the appliqués and attach the hardware.
Final Quality-Control Checklist
- Body measures 3.0 in x 3.6 in (7.6 cm x 9.1 cm) before the border
- Arm rows have 6 sts and stem rows have 18 sts
- Rnd 1 has 76 sc and Rnd 2 has 76 sl st
- 6 crisp outer corners and 2 smooth inner corners
- Finished size is 3.4 in x 4.0 in (8.6 cm x 10.2 cm)
- 2 flowers, 5 leaves and 7 berries are sewn on securely
- All rings are closed and all tails are woven in
Troubleshooting
Edges ruffle: Your rows are taller than your stitches. Skip 1 row end in every 5 along the long edges.
Border pulls in: Use a 0.25 mm larger hook for Rnd 2 and keep the slip stitches loose.
Inner corners pucker: Check that you worked sc2tog at both inner corners, not 2 separate sc.
Stem leans: Block it square and recount your stem rows (18 sts each).
Petals lie too flat: Pull the magic ring tighter.
Letter is floppy: Go down a hook size, or sew a peach felt backing on.
Care
Hand wash in cool water with mild soap. Roll it in a towel to remove water, then lay flat to dry. Take off the metal hardware first.

Final Notes
The whole pattern follows from one gauge: 5 sts and 5 rows per inch. At that gauge, 15 rows make a 3.0 in (7.6 cm) crossbar and the 18-st stem is 3.6 in (9.1 cm) tall. The 76-st border adds 0.2 in (0.5 cm) per side, for a finished size of 3.4 in x 4.0 in (8.6 cm x 10.2 cm). Check your measurements after Row 4, and the rest of the letter will come out right.
Happy crocheting!