

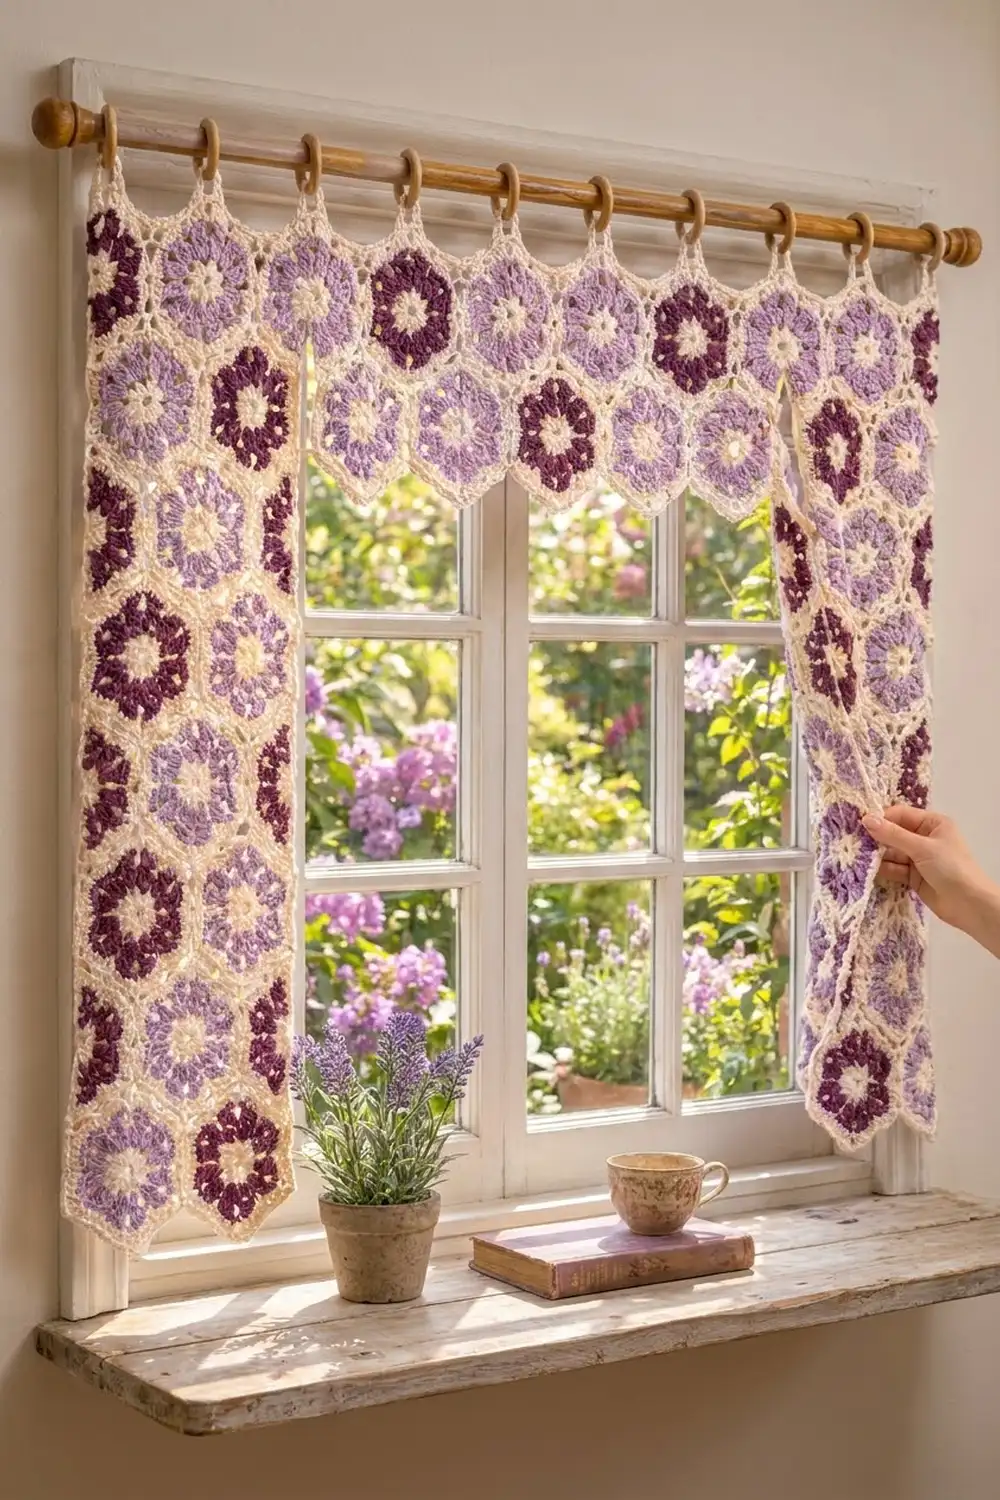
The Lilac Lattice Hexagon Curtain is a light, airy window curtain built from small honeycomb motifs. A two-row hexagon valance runs across the top, and two narrow side panels frame the window, leaving the center open for light.
Each motif has a cream center, two rounds of lavender or deep plum, and a crisp cream outline. The two purple shades alternate across the curtain, so the finished piece looks like a garden trellis. The cream joins and border tie it all together.
This pattern uses US crochet terms. The finished curtain measures 39 in (99.1 cm) wide by 31.5 in (80.0 cm) long. The hanging loops add about 1.5 in (3.8 cm) above that.
You make 53 identical hexagons, sew them together in a honeycomb layout, and then work one round of single crochet around the whole outline. That round forms the hanging loops on the top peaks.
Finished Size and Construction
- Finished size: 39 in (99.1 cm) wide × 31.5 in (80.0 cm) long, plus loops
- Skill level: Easy-intermediate
- Terminology: US crochet terms
- Yarn weight: DK (light, #3) cotton or cotton blend
- Hook: 4.0 mm (G-6)
- Number of pieces: 53 hexagon motifs, joined into one curtain
- Layout: Valance row 1 has 11 motifs and row 2 has 10. Each side panel is 8 rows of 2 motifs (rows 3–10).
- Motif size: 3.5 in (8.9 cm) flat-to-flat, 4 in (10.2 cm) point-to-point, 2 in (5.1 cm) per side
- Size before border: 38.5 in (97.8 cm) × 31 in (78.7 cm)
- Border depth: 1/4 in (0.6 cm) on every edge
- Valance depth: 7 in (17.8 cm) before border
- Side panel width: 8.75 in (22.2 cm) at the widest point
Materials
Choose a smooth DK cotton or cotton blend about 120 m per 50 g. Cotton keeps the hexagon points sharp and the curtain hangs well without stretching. Avoid fuzzy yarns, because they blur the lattice.
- Color A, cream: 150 g (360 m), for centers, outlines, joining, and border
- Color B, lavender: 100 g (240 m), for 27 motifs
- Color C, plum: 100 g (240 m), for 26 motifs
These quantities include a margin of roughly 30–40% for gauge differences, swatching, and weaving in.
Tools:
– 4.0 mm (G-6) crochet hook
– Tapestry needle
– Stitch markers
– Rust-proof pins and a blocking surface
– Spray bottle
– Measuring tape
– Curtain rod, up to 3/4 in (1.9 cm) in diameter
Abbreviations (US Terms)
- ch: chain
- sl st: slip stitch
- sc: single crochet
- dc: double crochet
- sc2tog: single crochet 2 together
- sp: space
- st(s): stitch(es)
- MR: magic ring
Special stitch: valley sc2tog (border only). Insert your hook in the corner ch-2 sp of the first motif, yarn over and pull up a loop. Insert your hook in the corner ch-2 sp of the next motif, yarn over and pull up a loop. Yarn over and pull through all 3 loops. This makes 1 stitch.
Gauge and Checkpoints
The finished motif is your gauge. Make one complete hexagon, block it lightly, and measure it before you make the rest.
- After Round 1: circle 1.25 in (3.2 cm) across
- After Round 2: circle 2.25 in (5.7 cm) across
- After Round 3: hexagon 3 in (7.6 cm) flat-to-flat
- After Round 4: hexagon 3.5 in (8.9 cm) flat-to-flat, 4 in (10.2 cm) point-to-point, each side 2 in (5.1 cm)
If your motif is too big, go down to a 3.5 mm hook. If it is too small, go up to a 4.5 mm hook. A difference of only 1/8 in (0.3 cm) per motif adds up to 1.4 in (3.6 cm) across the 11-motif valance, so get this right before you continue.
The motif must also lie flat. A cupped motif means your Round 2 is too tight. A ruffled one means your Round 3 corners are too loose.
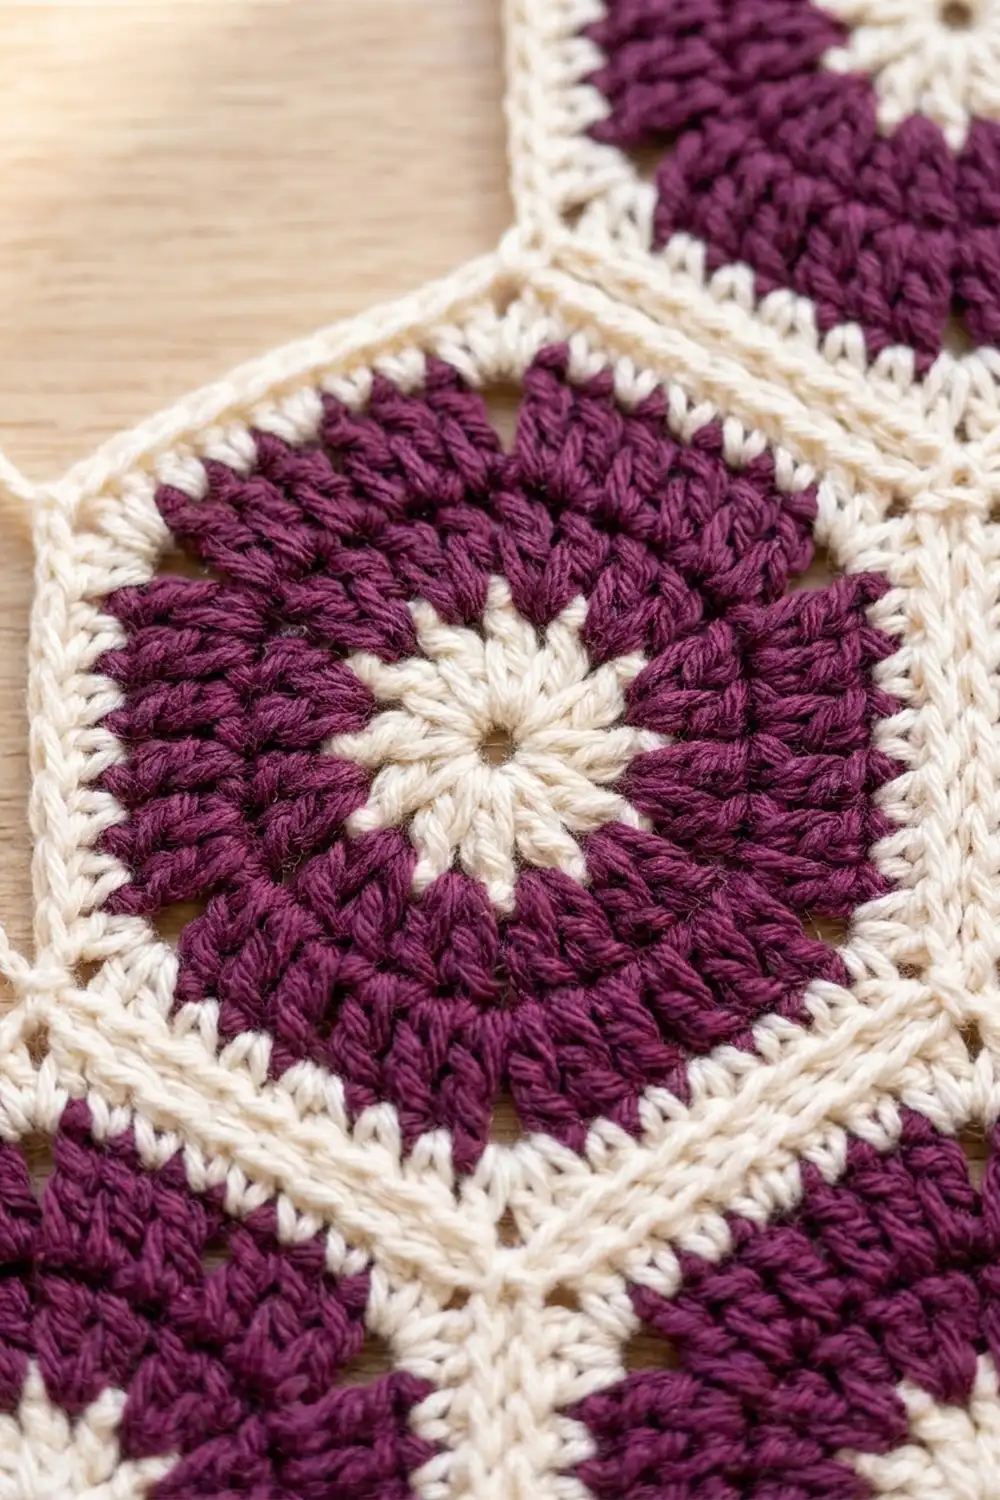
Hexagon Motif (Make 53)
Each motif has 6 sides. In Round 4, each side has 7 sc between the corner ch-2 spaces. The ch-2 spaces are counted separately as corners.
Round 1 (Color A, cream): Make a MR. Ch 3 (counts as dc), work 11 dc in the ring. Join with a sl st to the top of the beginning ch-3. (12 dc) Pull the ring closed and fasten off.
Round 2 (Color B or C): Join the new color in any st. Ch 3 (counts as dc), dc in the same st. Work 2 dc in each remaining st around. Join with a sl st to the top of the ch-3. (24 dc)
Round 2 is a growth round with 24 dc in total. Mentally divide it into 6 groups of 4 sts.
Round 3 (same color): Ch 3 (counts as dc), dc in the next 2 sts, (dc, ch 2, dc) in the next st. Dc in the next 3 sts, (dc, ch 2, dc) in the next st; repeat from * 4 more times. Join with a sl st to the top of the ch-3. (30 dc and 6 ch-2 corner sps)*
The corners appear here. Each side now has 5 dc between corners: the second dc of one corner, 3 plain dc, and the first dc of the next corner. Fasten off.
Round 4 (Color A, cream): Join cream in any ch-2 corner sp. Ch 1, (sc, ch 2, sc) in the same sp. Sc in each of the next 5 dc, (sc, ch 2, sc) in the next ch-2 sp; repeat from * 4 more times. Sc in each of the last 5 dc. Join with a sl st to the first sc. (42 sc and 6 ch-2 corner sps)*
This is a trim round. Its count is 30 sc (1 in each existing dc) plus 12 sc (2 added at each of 6 corners), for 42 sc. That gives 7 sc per side: 1 corner sc + 5 sc + 1 corner sc.
Fasten off and leave a 6 in (15.2 cm) tail. Weave in the other ends now. It is much easier than doing it after joining.
Make All Pieces
- Lavender motifs (Color B in Rounds 2–3): 27
- Plum motifs (Color C in Rounds 2–3): 26
- Total: 53 motifs. All centers and outlines are cream.
Layout grid (L = lavender, P = plum). The motifs are pointy-top, and every second row sits half a motif to the right, nested into the valleys of the row above. The . marks show that the open window area is empty.
Row 1:   L  P  L  P  L  P  L  P  L  P  L
Row 2:     P  L  P  L  P  L  P  L  P  L
Row 3:   L  P  .  .  .  .  .  .  .  L  P
Row 4:     P  L  .  .  .  .  .  .  P  L
Row 5:   L  P  .  .  .  .  .  .  .  L  P
Row 6:     P  L  .  .  .  .  .  .  P  L
Row 7:   L  P  .  .  .  .  .  .  .  L  P
Row 8:     P  L  .  .  .  .  .  .  P  L
Row 9:   L  P  .  .  .  .  .  .  .  L  P
Row 10:    P  L  .  .  .  .  .  .  P  L
Rows 1 and 2 form the valance and hold 21 motifs: 11 + 10. In Rows 3–10, the left panel uses positions 1–2 of each row and the right panel uses the last 2 positions. That is 8 rows × 2 motifs × 2 panels = 32 motifs.
The count checks out: 21 + 32 = 53 (27 lavender, 26 plum).
Joining
Method: Cream whipstitch through the back loops only, with the right sides facing up. This leaves a neat raised cream ridge on the front.
Stitch-to-stitch logic: Each shared side matches stitch for stitch: 7 sc to 7 sc. At each end of a side, take one extra stitch through both corner ch-2 spaces. When 3 motifs meet at one point, pass the needle through all 3 corner spaces once so the junction does not leave a hole.
The layout has 103 shared sides in total:
– 10 in Row 1
– 9 in Row 2
– 20 between Rows 1 and 2
– 6 between Row 2 and Row 3
– 42 between the panel rows
– 16 side-by-side seams within the panel rows
Order:
1. Join Row 1 side by side into a strip.
2. Sew each Row 2 motif into a valley. Each one touches 2 motifs above it and its neighbor in Row 2.
3. Build each side panel downward, one row at a time.
Tension: Keep the stitches snug but not tight. The seam should be as wide as the motif sides, with no puckering. Check every few seams by laying the work flat.
Size checkpoint: The valance should measure 38.5 in (97.8 cm) from the left point to the right point of Row 1 (11 motifs × 3.5 in). It should be 7 in (17.8 cm) deep: a 4 in (10.2 cm) motif plus 3 in (7.6 cm) for the offset row. The full length to the bottom points of Row 10 should be 31 in (78.7 cm): 4 in + 9 rows × 3 in.
Border
Border gauge: One sc round adds 1/8 in (0.3 cm) on each edge. Tension and blocking bring the visible border band to about 1/4 in (0.6 cm). Each border sc sits on top of one motif sc, so the border runs at exactly the same gauge as the motifs.
The outline is one continuous zigzag around the whole curtain. It has three kinds of position:
- Exposed sides: 112 in total. Each has 7 sc.
- Outer points: 59 in total. These are corners that belong to only one motif. 11 of them are the top peaks of Row 1.
- Valleys: 53 in total. These are points where two motifs meet at the edge.
Round 1 (Color A, cream): Join cream in the top peak ch-2 sp of the far-left Row 1 motif. Work around the curtain as follows:
– Each exposed side: sc in each of the 7 sc.
– Each top peak of Row 1 (11 peaks): (sc, ch 12, sc) in the ch-2 sp. This forms a hanging loop.
– Each other outer point (48 points): (sc, ch 2, sc) in the ch-2 sp.
– Each valley (53 valleys): valley sc2tog through the two neighboring corner sps.
Join with a sl st to the first sc and fasten off.
Counts per section:
– Top edge: 11 motifs × 2 upper sides × 7 sc = 154 sc along the sides, plus 11 hanging loops and 10 valley sc2tog.
– Bottom of each side panel: 2 motifs × 2 lower sides × 7 sc = 28 sc, plus 2 points and 1 valley.
– Whole round: 112 sides × 7 = 784 sc. Add 59 points × 2 sc = 118 sc, plus 53 sc2tog. The total is 955 sts, 48 ch-2 sps, and 11 ch-12 loops.
Why the math works: Each side of a motif has 7 sc and each side of the border has 7 sc, so the edges neither stretch nor ruffle. The 2 sc and ch 2 at each outer point keep it sharp. A single sc2tog at each valley pulls the inner corner in instead of bulging. The sides and corners are counted separately, so no stitch is counted twice.
A cross-check: on a closed outline of hexagon sides, the outer points must outnumber the valleys by exactly 6. Here 59 − 53 = 6.
Final Blocking
- Lay a towel or blocking mats on a flat surface large enough for 39 in × 31.5 in (99.1 cm × 80.0 cm).
- Mist the curtain evenly with water until it is damp, not soaked.
- Pin the top edge straight first. Place one pin in each loop and make the row of peaks 39 in (99.1 cm) wide.
- Pin the outer edge of each side panel straight down to 31.5 in (80.0 cm). Pin every outer point.
- Pin the bottom points and inner points of the panels, then the bottom points of the valance.
- Check that each motif is still about 3.5 in (8.9 cm) flat-to-flat and that the window opening looks even.
- Leave it to dry completely before unpinning, usually 12–24 hours.
Final Quality-Control Checklist
- [ ] There are 53 motifs: 27 lavender and 26 plum, alternating as shown in the grid.
- [ ] Every motif has 42 sc and 6 ch-2 corners in Round 4.
- [ ] Every seam matches 7 sts to 7 sts, with closed 3-way junctions.
- [ ] The valance is 38.5 in (97.8 cm) wide before the border and 39 in (99.1 cm) after.
- [ ] Both side panels are the same length, 31.5 in (80.0 cm) after the border.
- [ ] There are 11 even hanging loops, one on each Row 1 peak.
- [ ] All points are sharp, all valleys lie flat, and all ends are woven in securely.
Troubleshooting
- Motifs cup: Round 2 is too tight. Loosen your dc or go up a hook size for Round 2 only.
- Motifs ruffle at the corners: Tighten the ch-2 corners or change them to ch 1 in Round 3.
- Sides don’t line up when joining: Recount Round 4. Every side must have exactly 7 sc between the corners.
- Holes at junctions: Pass through all 3 corner spaces with one extra stitch.
- Border ripples along the sides: You added stitches. Work exactly 1 sc per motif sc.
- Valleys bulge: You worked 2 separate sc instead of the valley sc2tog.
- Loops are uneven: Recount the chains. All 11 loops must be ch 12.
Care
Hand wash in cool water with mild detergent, roll in a towel to remove water, and dry flat by re-pinning lightly to shape. Avoid direct hot sun while the curtain is damp so the plum doesn’t bleed into the cream.
Final Notes
The measurements build on each other:
– One motif: 3.5 in (8.9 cm) flat-to-flat and 4 in (10.2 cm) point-to-point, with 7 sc per side.
– Valance: 11 motifs across give 38.5 in (97.8 cm).
– Length: 10 rows give 31 in (78.7 cm).
– Border: one round of 955 sts adds 1/4 in (0.6 cm) all around, for a finished size of 39 in × 31.5 in (99.1 cm × 80.0 cm).
If your first motif is right, everything after it will fit. Take your time on that test hexagon, keep your seams even, and the lattice will come together neatly.
Happy crocheting!