

This strand curtain brings a winter garden to your window. Twelve moss-green cords hang from a rod. Each one carries deep burgundy roses, pointed holly leaves and soft cream popcorn balls. When the light comes through the gaps, the window looks like it’s framed by climbing roses in the snow.
The colours are classic holiday colours: burgundy, holly green and warm cream. The style is cosy and a little old-fashioned. It works with evergreen garlands and fairy lights, but it also looks good on its own all winter.
This pattern uses US crochet terms. Each strand hangs 48 in (121.9 cm) below its loop. The finished curtain is about 36 in (91.4 cm) wide when the strands hang 3 in (7.6 cm) apart. You can also gather a few strands to one side with a matching burgundy tieback.
The construction is simple and modular. You work each cord as a slip-stitch cord with a chain ring at the top. You make the roses, leaves and balls separately, sew them to the cord at set stitch positions, and then reinforce the hanging loop.
Finished Size and Construction
- Finished size: about 36 in (91.4 cm) wide × 48 in (121.9 cm) drop, plus a 3 in (7.6 cm) loop
- Skill level: Easy–Intermediate
- Terminology: US
- Yarn weight: Worsted (#4)
- Hooks: 5.0 mm (H/8) for the cords and tieback; 4.0 mm (G/6) for the motifs
- Number of pieces: 12 strands, plus 1 optional tieback
- Layout: 12 strands in a row, alternating Strand A and Strand B
- Piece size: one strand is 48 in (121.9 cm) of cord plus a ring that hangs 3 in (7.6 cm)
- Size before border: 192 cord stitches = 48 in (121.9 cm)
- Border depth: 1 round of sc in the loop, about 0.25 in (0.6 cm)
Materials
Use a smooth worsted-weight acrylic or cotton blend at about 190 m per 100 g. Smooth yarn shows the rose petals and leaf points clearly. Avoid fuzzy yarn, because it blurs the popcorn texture.
- Green: 225 g / 428 m (cords and leaves)
- Burgundy: 260 g / 494 m (roses and tieback)
- Cream: 320 g / 608 m (popcorn balls)
All quantities include a margin of about 15–20%.
Tools:
– 5.0 mm (H/8) and 4.0 mm (G/6) crochet hooks
– Tapestry needle
– Polyester fiberfill (a small handful for every 6 balls)
– Locking stitch markers (at least 16)
– Measuring tape
– Scissors
– Blocking mat and pins
– Steam iron or steamer
Abbreviations (US Terms)
- ch: chain
- sl st: slip stitch
- sc: single crochet
- hdc: half double crochet
- dc: double crochet
- sc2tog: single crochet 2 together
- MR: magic ring
- sk: skip
- st(s): stitch(es)
- rep: repeat
- Rnd: round
Special stitches:
- Popcorn: Work 4 dc in the same st. Drop the loop from your hook. Insert the hook from front to back into the top of the first dc, pick up the dropped loop and pull it through. Ch 1 is not worked after it. A popcorn counts as 1 st.
- Picot: Ch 2, then sl st in the 2nd ch from the hook. A picot does not count as a stitch.
- Back-bump sl st: Insert the hook under the back bump (the ridge on the back of the chain) only, and sl st.
Gauge and Checkpoints
- Cord gauge (5.0 mm): 16 back-bump sl sts = 4 in (10.2 cm), so 4 sts = 1 in (2.5 cm).
- Motif gauge (4.0 mm): 20 sc = 4 in (10.2 cm), so 5 sc = 1 in (2.5 cm).
- Tieback gauge (5.0 mm): 16 sc = 4 in (10.2 cm).
Make one complete strand before you start the rest. Use these checkpoints:
- Rose Row 1: the strip of 41 sc measures 8.2 in (20.8 cm).
- Finished rose: about 3 in (7.6 cm) across.
- Leaf: about 2.25 in (5.7 cm) long and 1.25 in (3.2 cm) wide.
- Ball: after Rnd 3 the flat circle is 1.25 in (3.2 cm) across. The finished ball is about 1.25 in (3.2 cm).
- Cord: the first 48 sl sts measure 12 in (30.5 cm). The full 192 sts measure 48 in (121.9 cm).
If your cord is too long, go down half a hook size or tighten your slip stitches. If it’s too short, go up half a size. For motifs, change hook size rather than changing the stitch counts. The placement math depends on exact counts.
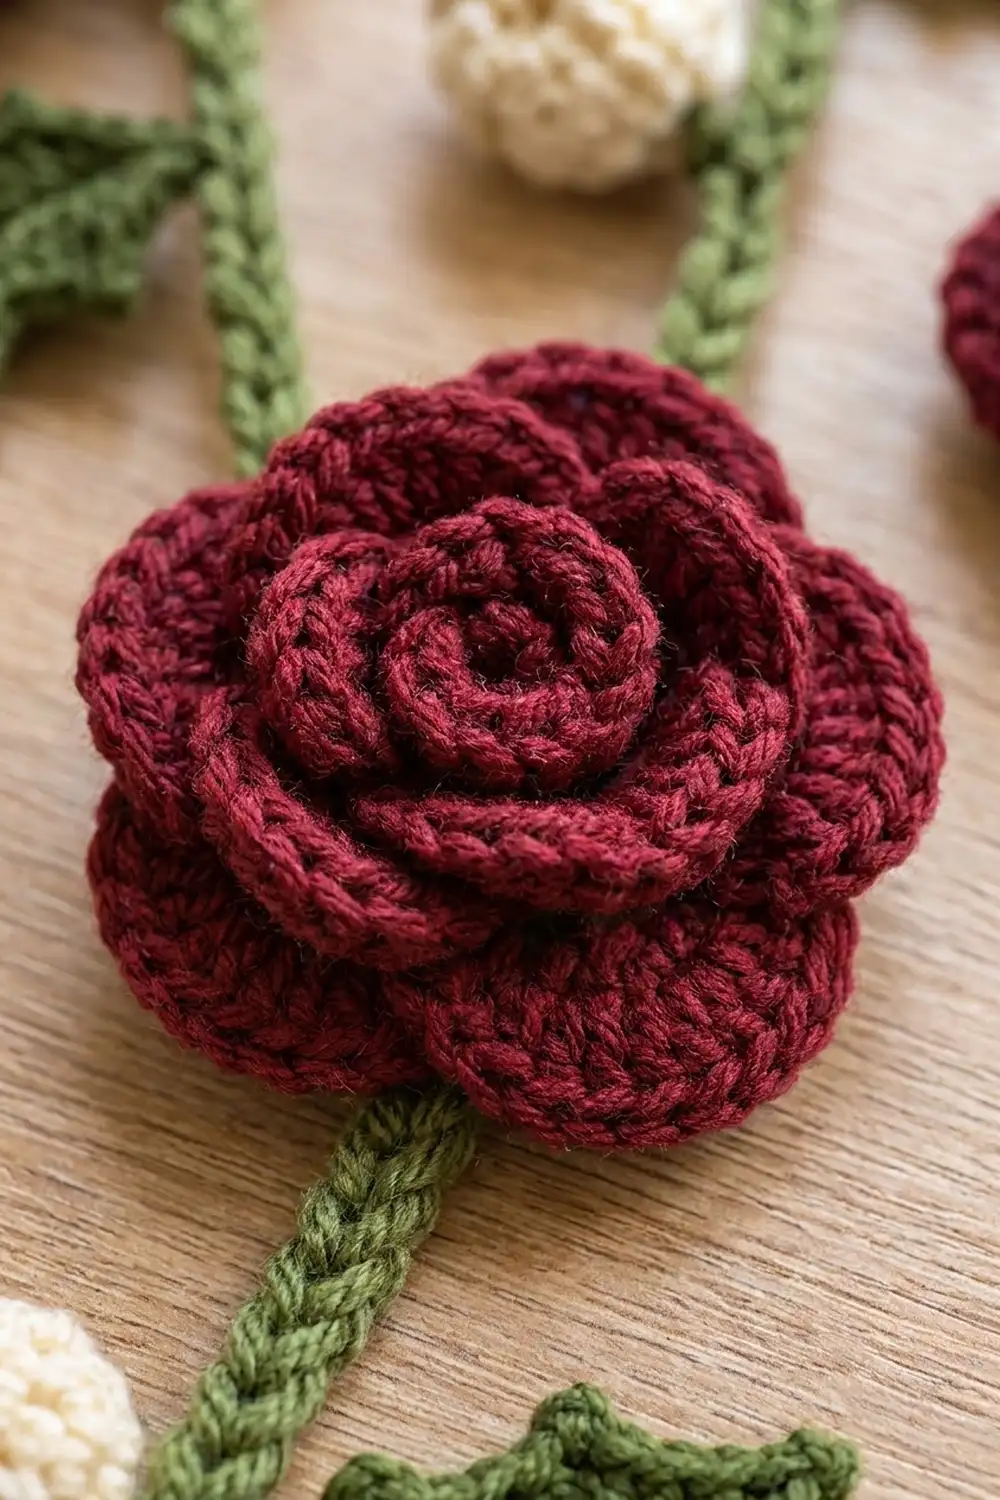
Part 1: Cord (make 12, green, 5.0 mm hook)
Hanging ring: Ch 24 and sl st in the first ch to form a ring. The ring is 6 in (15.2 cm) around, so it hangs 3 in (7.6 cm) deep.
Foundation: Ch 193 from the ring.
Cord row: Sl st in the back bump of the 2nd ch from the hook and in each ch across, back up to the ring. (192 sl sts)
Sl st into the base of the ring and fasten off, leaving a 6 in (15.2 cm) tail.
The back-bump slip stitches make the twisted, braided-looking ridge you see in the photo.
Placing markers: Count from the top down. Stitch 1 is the first stitch directly below the ring, and stitch 192 is the bottom tip. Place markers at stitches 12, 24, 36, 48 and so on, every 12 stitches (3 in / 7.6 cm), ending at 192. That gives 16 markers.
Part 2: Rolled Rose (make 48, burgundy, 4.0 mm hook)
Ch 42.
Row 1: Sc in the 2nd ch from the hook and in each ch across. (41 sc)
Row 2: Ch 1, turn. Sl st in the first sc. Then work 10 petals. Each petal uses 4 sts:
- Petals 1–3: Sk 1, 5 hdc in the next st, sk 1, sl st in the next st.
- Petals 4–7: Sk 1, 5 dc in the next st, sk 1, sl st in the next st.
- Petals 8–10: Sk 1, 7 dc in the next st, sk 1, sl st in the next st.
Row 2 count: 1 sl st + (10 petals × 4 sts) = 41 sts used. That’s 15 hdc, 41 dc and 11 sl sts.
Fasten off, leaving a 16 in (40.6 cm) tail.
Shaping: Start at the hdc end (Petal 1) and roll the strip into a spiral, with the sc edge at the bottom. Keep the small petals snug in the centre and let the 7-dc petals flare outward. Sew through all the layers at the base, going back and forth 4–5 times. Keep the tail for attaching the rose to the cord.
Part 3: Holly Leaf (make 84, green, 4.0 mm hook)
Ch 11.
Side 1: Starting in the 2nd ch from the hook, work: sl st, sc, hdc, picot, dc, dc, picot, dc, dc, picot, hdc, sc. You have now used 9 ch.
Tip: Work (sc, picot, sc) in the last ch.
Side 2: Rotate the leaf and work along the free loops of the foundation chain: sc, hdc, picot, dc, dc, picot, dc, dc, picot, hdc, sc. Finish with a sl st in the same ch as the first sl st.
Count: 9 + 2 + 9 = 20 sts, plus 7 picots (3 per side and 1 at the tip).
Fasten off, leaving a 10 in (25.4 cm) tail at the base. The foundation chain forms the raised centre vein, and the picots make the sharp holly points.
Part 4: Popcorn Ball (make 60, cream, 4.0 mm hook)
Work in continuous rounds with the right side facing out.
- Rnd 1: 6 sc in MR. (6)
- Rnd 2: 2 sc in each st. (12)
- Rnd 3: Sc in the next st, 2 sc in the next st; rep 6 times. (18)
- Rnd 4: Sc in the next st, popcorn in the next st; rep 9 times. (18: 9 sc + 9 popcorns)
- Rnd 5: Sc in each st. (18)
- Rnd 6: Popcorn in the next st, sc in the next st; rep 9 times. (18: 9 popcorns + 9 sc)
- Rnd 7: Sc in the next st, sc2tog; rep 6 times. (12)
Stuff the ball firmly.
- Rnd 8: Sc2tog 6 times. (6)
Fasten off. Thread the tail through the front loops of the last round, pull it closed, and keep the tail for sewing.
The popcorns pop toward you, so they sit on the outside of the ball. The popcorns in Rnd 6 are offset from those in Rnd 4, which gives the all-over bumpy texture.
Part 5: Optional Tieback (make 1, burgundy, 5.0 mm hook)
Ch 61.
Row 1: Sc in the 2nd ch from the hook and in each ch across. (60 sc)
Rows 2–6: Ch 1, turn, sc in each st. (60 sc)
The band measures 15 in (38.1 cm) by about 1.5 in (3.8 cm).
At one short end, ch 12 and sl st to the same corner to make a button loop. Fasten off. Sew one rose to the opposite end so it works as a toggle.
Make All Pieces
| Colour | Pieces |
|---|---|
| Green | 12 cords + 84 leaves |
| Burgundy | 48 roses + 1 tieback |
| Cream | 60 balls |
Each strand gets 4 roses, 7 leaves and 5 balls. Across 12 strands, that’s 48 roses, 84 leaves and 60 balls.
Strand layout. “St” is the cord stitch number counted from the top. “L” and “R” show which side the leaf points to.
St    Strand A     Strand B
12    Rose         Ball
24    Leaf L       Leaf R
36    Ball         Rose
48    Leaf R       Leaf L
60    Rose         Ball
72    Leaf L       Leaf R
84    Ball         Rose
96    Leaf R       Leaf L
108   Rose         Ball
120   Leaf L       Leaf R
132   Ball         Rose
144   Leaf R       Leaf L
156   Rose         Ball
168   Leaf L       Leaf R
180   Ball         Rose
192   Ball (end)   Ball (end)
Curtain order, left to right: A B A B A B A B A B A B (6 A strands and 6 B strands).
Each pattern repeat is 48 sts, which equals 12 in (30.5 cm). The A and B strands are offset by 24 sts, or 6 in (15.2 cm). This is what gives the staggered, scattered look in the photo.
Joining
“Joining” here means sewing the motifs to the cords and then spacing the cords on the rod.
Roses. Centre the base of the rose on the marked stitch. Sew it to the cord with 6–8 stitches through the cord’s back ridge. Keep the stitches hidden under the outer petals.
Leaves. Sew the base of the leaf to the marked stitch. Then tack the leaf about 0.5 in (1.3 cm) up the vein so it sits at roughly a 45° angle, pointing to the side shown in the grid.
Balls. Sew the closed end of the ball to the marked stitch. For the stitch 192 ball, sew it directly over the bottom tip of the cord so it hides the cord end.
Tension advice. Sew snugly, but don’t pull the cord into puckers. After each motif, lay the cord straight and measure. The distance between markers must still be 3 in (7.6 cm). If a section has shrunk, loosen those sewing stitches and redo them.
Size checkpoint. Hang one finished strand from its loop. The distance from the base of the ring to the bottom of the cord should be 48 in (121.9 cm). Including the ring and the end ball, the total length is about 52.25 in (132.7 cm).
Border
The only edge finish on this curtain is the reinforced hanging loop.
Border gauge: the sc round is worked at 5 sc = 1 in (2.5 cm), measured on the inner edge of the ring.
Loop round: Use the 5.0 mm hook and green yarn. Join with a sl st at the base of the ring. Work sc around the chain ring:
24 sc (1 per ring ch) + 6 extra sc (1 extra in every 4th ch) = 30 sc. Sl st to the first sc and fasten off.
Why the math works. On its own, 1 sc per chain would squeeze the ring and make it smaller. The 6 extra stitches keep the inner circumference at about 6 in (15.2 cm). That’s enough to slide over a rod up to 1.75 in (4.4 cm) in diameter, which is 5.5 in (14.0 cm) around. The loop is thicker after this round, but it still lies flat.
Hanging spacing. Hang the strands 3 in (7.6 cm) apart, centre to centre. There are 11 gaps × 3 in (7.6 cm) = 33 in (83.8 cm) between the outer cords. Adding about 1.5 in (3.8 cm) of motif width on each side gives 36 in (91.4 cm) overall.
Final Blocking
- Lightly mist the roses. Shape the petals open with your fingers and let them dry face-up.
- Pin each leaf flat, pinning every picot to a point. Hover steam over it without touching, then let it dry completely.
- Don’t press the balls. Just roll them between your palms to even out the shape.
- Hang all the cords on the rod. If any cord curls, hang a small clip on the bottom ball overnight.
- The next day, measure each strand. All strands should be 48 in (121.9 cm), give or take 0.5 in (1.3 cm).
Final Quality-Control Checklist
- Each cord has exactly 192 sl sts, and its loop has 30 sc.
- Each strand has 4 roses, 7 leaves and 5 balls, in the right A or B order.
- Leaves alternate left and right as shown in the grid.
- Motifs are spaced 3 in (7.6 cm) apart.
- No visible sewing stitches or loose yarn tails.
- The balls are firm, and no stuffing shows through.
- The strands alternate A, B across the rod, 3 in (7.6 cm) apart.
Troubleshooting
- The cord twists or spirals. You’re working into both chain loops. Work into the back bump only, and block the cord by hanging it.
- The rose looks flat. Your outer petals are too short. Check that Petals 8–10 have 7 dc each, and roll the strip more tightly at the centre.
- The leaf curls. Your foundation chain is too tight. Chain with the 5.0 mm hook, then work the leaf with the 4.0 mm hook.
- The popcorns sink inward. You’re working with the wrong side out. Turn the ball so the outside faces you.
- The strands hang at different lengths. Re-count the cord stitches. Heavy rose sections can also stretch the cord, so give those strands extra hanging time when blocking.
- The loop won’t fit over the rod. Redo the loop round with 2 extra sc. That’s 32 sc in total.
Care
Spot clean or hand wash cold, roll the piece in a towel, and let it dry hanging. Store it rolled loosely around tissue so the roses keep their shape.

Final Notes
Here is the measurement chain for this curtain:
- 4 sl sts = 1 in (2.5 cm)
- 12 sts = 3 in (7.6 cm) between motifs
- 48 sts = 12 in (30.5 cm) per repeat
- 192 sts = 48 in (121.9 cm) per strand
- 12 strands, 3 in (7.6 cm) apart = 36 in (91.4 cm) wide
If you check the first strand against these numbers, the other eleven will match.
Happy crocheting!