

The Lilac Lattice Curtain is a soft lavender lace panel built from two kinds of columns. Columns of spoked diamond motifs alternate with narrow, solid double crochet strips. Light comes through the lace, and the solid strips keep the panel straight and give it structure.
Each square motif has a 16-spoke treble “wheel” in the center, framed by a chain-loop diamond. The diamond’s points touch the middle of each side, and the corners fill in with an open lattice. When you stack the squares, the diamonds meet point to point, so each column reads as a continuous chain of diamonds. A scalloped hem runs along the bottom, and five tabs at the top continue the solid strips up over the rod.
The whole panel is worked in one color, lavender, and the pattern uses US crochet terms. The finished panel measures 28.5 in (72.4 cm) wide by 61.5 in (156.2 cm) long, not counting the tabs. With the tabs it is 64.5 in (163.8 cm) long.
Construction is modular. You make 48 motifs and join them into 4 columns. You also make 5 long strips, seam all 9 columns together, and then add a two-round border, the scalloped hem and the tabs. This pattern makes one panel. Make two for a pair.
Finished Size and Construction
- Finished size: 28.5 in x 61.5 in (72.4 cm x 156.2 cm) without tabs; 64.5 in (163.8 cm) long with tabs
- Skill level: Intermediate
- Terminology: US crochet terms
- Yarn weight: DK (#3), cotton or cotton blend
- Hook: 3.5 mm (E/4)
- Number of pieces: 53 (48 square motifs + 5 solid strips)
- Layout: 9 columns: strip, motif column, strip, motif column, strip, motif column, strip, motif column, strip; each motif column is 12 motifs tall
- Motif size: 5 in (12.7 cm) square, 26 sc per side including both corner stitches
- Strip size: 1.5 in x 60 in (3.8 cm x 152.4 cm)
- Size before border: 27.5 in x 60 in (69.9 cm x 152.4 cm)
- Border depth: 0.5 in (1.3 cm) on the sides and top; 1 in (2.5 cm) at the scalloped bottom
Materials
Yarn: Use a smooth DK cotton or cotton blend with good stitch definition. Mercerized cotton shows the spokes and lattice clearly and holds its shape when it hangs. Steer clear of fuzzy or very stretchy yarns, because a long panel will drop over time.
- Lavender: 550 g, approximately 1,320 m (1,444 yd), based on 50 g / 120 m balls
This quantity is for one panel and includes a margin of about 15% for gauge swatches and differences between dye lots. Buy all of it from the same dye lot. A pair needs double.
Tools:
- 3.5 mm (E/4) crochet hook
- Tapestry needle
- Stitch markers
- Measuring tape
- Blocking mats and rust-proof pins
- Spray bottle
Abbreviations (US Terms)
- ch – chain
- sl st – slip stitch
- sc – single crochet
- dc – double crochet
- tr – treble crochet
- sp – space
- st(s) – stitch(es)
- sk – skip
- RS / WS – right side / wrong side
Special stitch – Foundation double crochet (fdc): Ch 3, yarn over, insert the hook in the 3rd ch from the hook, yarn over and pull up a loop, yarn over and pull through 1 loop (this is the “chain”), [yarn over and pull through 2 loops] twice. That is the first fdc. For each following fdc: yarn over, insert the hook into the “chain” of the previous st, pull up a loop, yarn over and pull through 1 loop, [yarn over and pull through 2 loops] twice. Use fdc for the 312-stitch strips so you don’t have to work into a very long chain.
Gauge and Checkpoints
Gauge: 26 sc or dc = 5 in (12.7 cm); 8 dc rows = 4 in (10.2 cm).
Make one complete motif before you start the rest, then block it and measure it. Every measurement after this depends on that one square.
Motif checkpoints:
- After Rnd 2: spoked wheel 2.75 in (7.0 cm) across
- After Rnd 4: lattice about 4.5 in (11.4 cm) across, measured from corner tr to corner tr along one side
- After Rnd 6: 5 in (12.7 cm) square, with exactly 26 sts on each side
Strip checkpoint: 3 rows = 1.5 in (3.8 cm) tall.
If your motif comes out bigger than 5 in (12.7 cm), go down 0.25 mm in hook size. If it comes out smaller, go up 0.25 mm. Keep your stitch counts as written and change only the hook. If the motif’s chain loops look slack but the size is right, tighten your chains and leave the hook as it is.
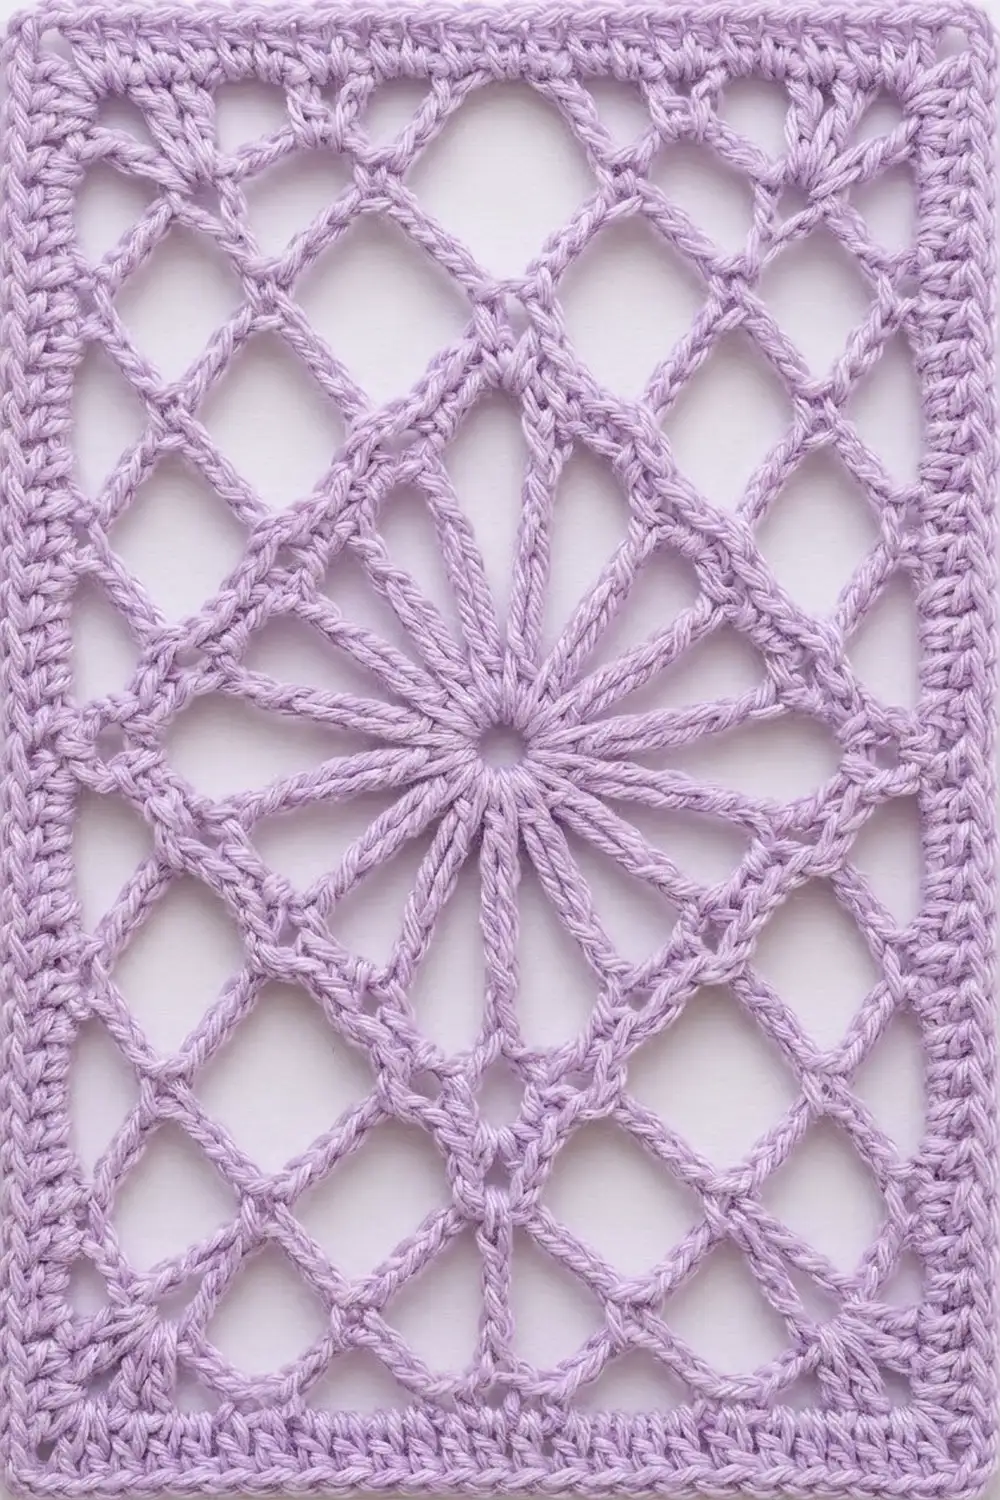
Motif (Make 48)
Rnd 1 (RS): Make a magic ring. Ch 3 (counts as dc) and work 15 dc in the ring. Sl st to the top of the ch-3. (16 dc)
Rnd 2: Ch 4 (counts as tr) and ch 2. Tr in the next dc, ch 2, repeat from * 15 times. Sl st to the 4th ch of the beginning ch. (16 tr, 16 ch-2 sps) These are the spokes.
Rnd 3: Sl st into the first ch-2 sp. Ch 1, then (sc, ch 3, sc) in the same sp to make the first diamond tip. [Ch 3, sc in the next ch-2 sp] 3 times, ch 3, (sc, ch 3, sc) in the next ch-2 sp for the next tip, repeat from * 2 more times. [Ch 3, sc in the next ch-2 sp] 3 times, ch 3, then sl st to the first sc. (20 sc, 20 ch-3 loops: 4 tip loops plus 4 loops between each pair of tips)
Rnd 4: Sl st into the first tip loop. Ch 1 and sc in the same loop. [Ch 5, sc in the next loop] 2 times, ch 5, then (tr, ch 5, tr) in the next sc for the corner. [Ch 5, sc in the next loop] 2 times, ch 5, sc in the next tip loop, repeat from * 3 more times. On the last repeat, leave out the final “sc in the next tip loop” and sl st to the first sc instead. (20 sc, 8 tr, 28 ch-5 loops: 24 side loops and 4 corner loops)
The corner tr stitches give the corners the extra height they need to turn the round into a square. The diamond tips now sit at the middle of each side.
Rnd 5: Sl st into the next ch-5 loop. Ch 3 (counts as dc) and work 2 dc in the same loop. Work 3 dc in each of the next 2 loops. (2 dc, ch 2, 2 dc) in the corner loop, then 3 dc in each of the next 6 loops, repeat from * 3 more times. On the final repeat, work 3 dc in only the next 3 loops, then sl st to the top of the ch-3. (88 dc: 22 dc per side between corner ch-2 sps, which is 6 loops x 3 dc + 2 + 2; 4 ch-2 sps)
Rnd 6: Ch 1. Sc in each dc around, and work 3 sc in each corner ch-2 sp. Sl st to the first sc and fasten off. (100 sc)
Count each side of the motif from the center sc of one corner group to the center sc of the next: 1 + 1 + 22 + 1 + 1 = 26 sts. The corner sts are shared between sides, so 4 x 26 − 4 = 100. ✓
Weave in the ends on the WS. Block every motif to 5 in (12.7 cm) square before joining.
Solid Strip (Make 5)
Row 1 (RS): Work 312 fdc. Turn. (312 dc)
Row 2: Ch 2 (does not count as a st). Dc in each st across. Turn. (312 dc)
Row 3: Repeat Row 2. Fasten off. (312 dc)
The strip should be 1.5 in x 60 in (3.8 cm x 152.4 cm). Each long edge has 312 sts, which matches the edge of a 12-motif column: 12 x 26 = 312.
Make All Pieces
Make 48 motifs and 5 strips, all in lavender. Lay them out as follows, with S = strip and M = motif:
S  M  S  M  S  M  S  M  S     <- top (row 1)
S  M  S  M  S  M  S  M  S
S  M  S  M  S  M  S  M  S
... (12 motif rows in total)
S  M  S  M  S  M  S  M  S     <- bottom (row 12)
There are 4 motif columns of 12 motifs each. All 5 strips run the full length of the panel.
Joining
Method: Flat whipstitch through the back loops only. Hold the pieces RS up and side by side, and sew from the WS loops. The seam doesn’t add any width, so the stitch counts stay exactly as written.
Step 1 – Motif columns: Place two motifs edge to edge. Whipstitch the 26 sts of one side to the 26 sts of the matching side, one stitch to one stitch, corner to corner. Keep adding motifs until each column is 12 motifs long. Each long edge of a column now has 12 x 26 = 312 sts.
Step 2 – Strips to columns: Place stitch markers every 26 sts along each strip edge so they line up with the motif seams. Whipstitch the strip’s 312 sts to the column’s 312 sts, one to one. Join the columns in layout order, from left to right.
Tension: Keep each stitch snug enough that the loops close up, but loose enough that the seam lies flat. Check every 26-stitch section against its marker. If you are one stitch off at a marker, unpick that section rather than easing it in.
Checkpoint: The joined panel measures 27.5 in x 60 in (69.9 cm x 152.4 cm). The top and bottom edges each have 4 x 26 + 5 x 8 = 144 sts. The sides each have 312 sts.
Border
Border gauge: Same as the motif gauge, 26 sc = 5 in (12.7 cm).
Along the top and bottom edges, each motif gives 26 sts (its own top or bottom side, including the corners). Each strip gives 8 sc worked into its row ends: 3 in Row 1, 2 in Row 2 and 3 in Row 3.
Rnd 1 (RS): Join the yarn in the top-right corner. Working around the panel, sc in each edge slot and ch 2 at each of the 4 panel corners:
- Top: 144 sc (26 + 26 + 26 + 26 from motifs, plus 8 x 5 from strips)
- Left side: 312 sc (1 sc in each st of the free strip edge)
- Bottom: 144 sc
- Right side: 312 sc
- Corners: 4 ch-2 sps
Sl st to the first sc. (912 sc, 4 ch-2 sps)
Rnd 2: Fasten off and rejoin with a sc in the bottom-left corner ch-2 sp, RS facing.
- Bottom (scallops): Sk 2 sc, 7 dc in the next sc, sk 2 sc, sc in the next sc, repeat from * 24 times. Each repeat uses 6 sts, and 24 x 6 = 144, so the last sc lands exactly in the last sc of the bottom edge. (24 scallops, 168 dc, 25 sc including the corner sc)
- Bottom-right corner: Sc in the ch-2 sp.
- Right side: Sc in each of the 312 sc.
- Top-right corner: (Sc, ch 2, sc) in the ch-2 sp.
- Top: Sc in each of the 144 sc.
- Top-left corner: (Sc, ch 2, sc) in the ch-2 sp.
- Left side: Sc in each of the 312 sc. Sl st to the first sc and fasten off.
Why the math works: The bottom edge has 144 sts, and 144 divides evenly into 6-stitch scallop repeats, so you don’t have to fudge anything at the ends. The sides and top are worked one stitch per stitch, so they stay the same length as the joined panel.
Tabs (Make 5): With RS facing, join the yarn in the first of the 8 top-edge sts directly above a strip. Strip 1 uses top sts 1–8, and Strip 5 uses top sts 137–144.
- Row 1: Ch 2 (does not count as a st). Dc in the same st and in the next 7 sts. Turn. (8 dc)
- Rows 2–12: Ch 2, dc in each st across. Turn. (8 dc)
The tab should be 6 in (15.2 cm) long. Fold it to the WS and whipstitch the 8 sts of Row 12 to the base of Border Rnd 1, behind the same 8 sts. This makes a loop that drops 3 in (7.6 cm). The tab is 1.5 in (3.8 cm) wide and lines up with the strip below it.
Final Blocking
- Soak the panel in cool water for 15 minutes, then press the water out gently. Don’t wring it.
- Roll it in towels to soak up the extra water.
- Lay it flat on mats that cover the full 28.5 in x 61.5 in (72.4 cm x 156.2 cm).
- Pin the outer edges straight first, then pin each strip seam in a straight vertical line.
- Pin the tip of each scallop so the hem curves evenly.
- Open up the spokes and lattice by pinning the center of each diamond lightly where needed.
- Let it dry completely before you unpin it. Then hang it and let it settle for one day.
Final Quality-Control Checklist
- Every motif has 100 sc in Rnd 6, with 26 per side
- Every strip has 312 dc per row
- The diamond tips meet point to point down every column
- All seams lie flat with no puckering
- The panel measures 27.5 in x 60 in (69.9 cm x 152.4 cm) before the border
- There are 24 even scallops along the bottom
- There are 5 tabs, each centered over a strip
- All ends are woven in securely on the WS
Troubleshooting
- The motif cups: Your Rnd 4 chains are too short or too tight. Work them looser, or go up 0.25 mm in hook size.
- The motif ruffles: The chains are too loose. Tighten them, or go down 0.25 mm.
- The corners are rounded: Block them harder, and make sure each corner has (tr, ch 5, tr) in Rnd 4.
- A strip is longer than its column: Count again. Each row must have exactly 312 sts.
- The hem waves: Check that you skipped exactly 2 sts on each side of every shell.
- The tabs twist: Line up Row 12 with the same 8 sts before you sew it down.
Care
Hand wash in cool water with a mild detergent and dry flat, pinning it back to size. Don’t hang the panel while it’s wet, because the weight will stretch it.
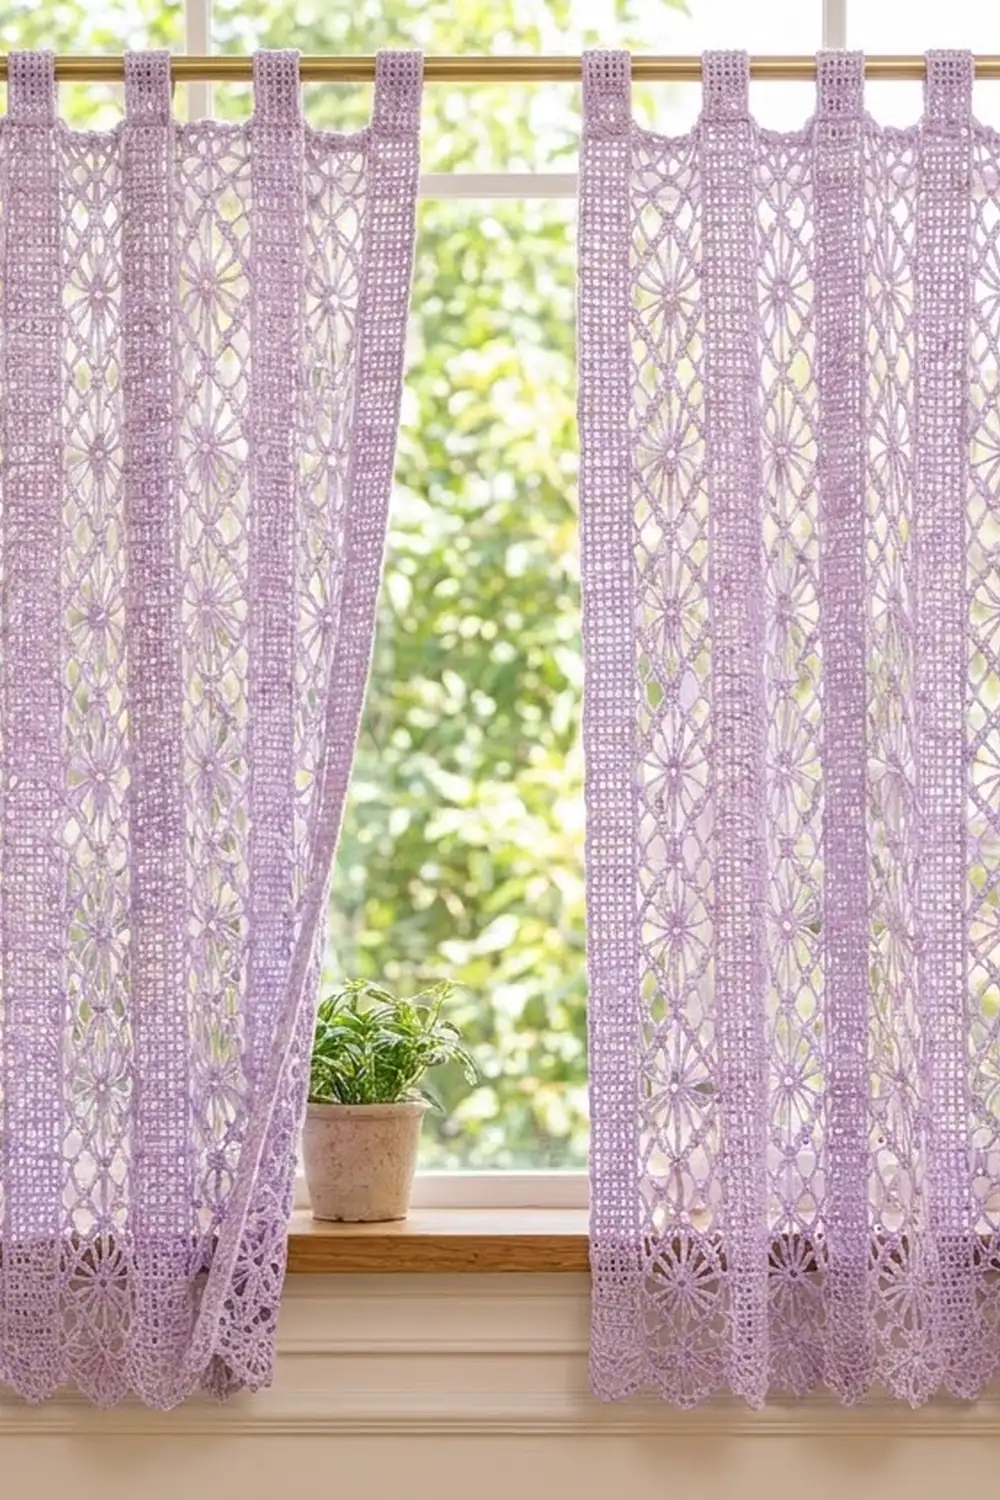
Final Notes
The measurement chain is simple. Each motif is 5 in (12.7 cm) with 26 sts per side. Twelve motifs make a 60 in (152.4 cm) column with 312 sts per edge, which matches the 312-stitch strips. Four columns and five strips make 27.5 in (69.9 cm) and 144 sts across. The border takes the panel to 28.5 in x 61.5 in (72.4 cm x 156.2 cm). If your first motif is accurate, everything after it follows.
Happy crocheting!