

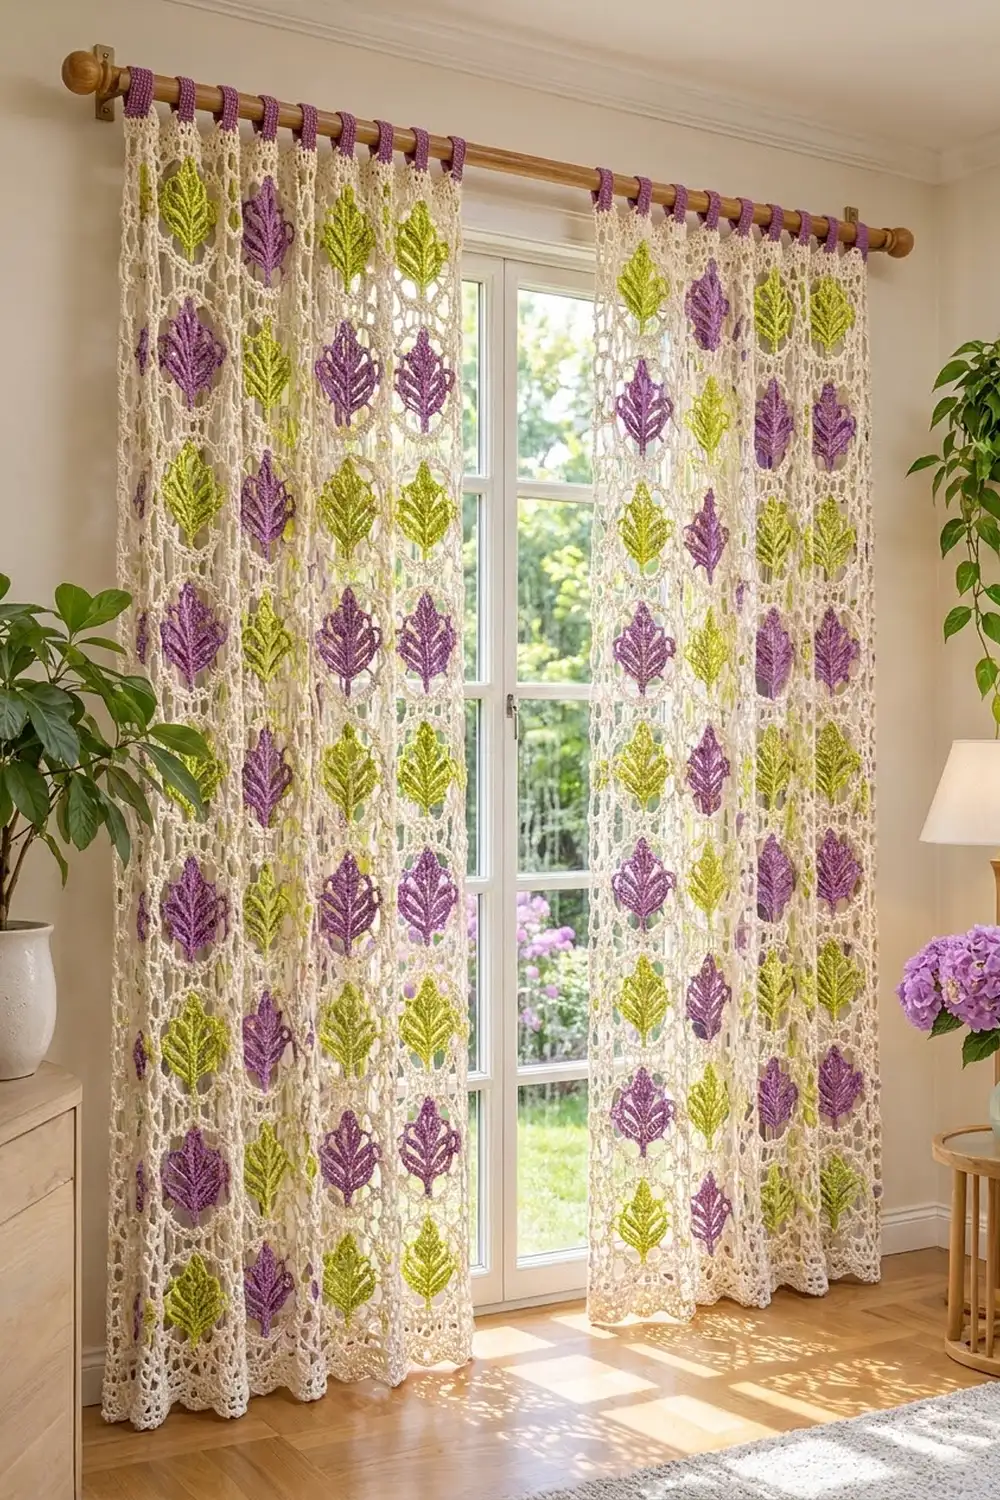
These lace curtains filter light softly while still showing plenty of color. Each panel is a cream lace mesh built from square blocks. Every block has a raised leaf in purple or lime green, and the colors form a checkerboard. Purple tab loops along the top slide straight onto a curtain rod.
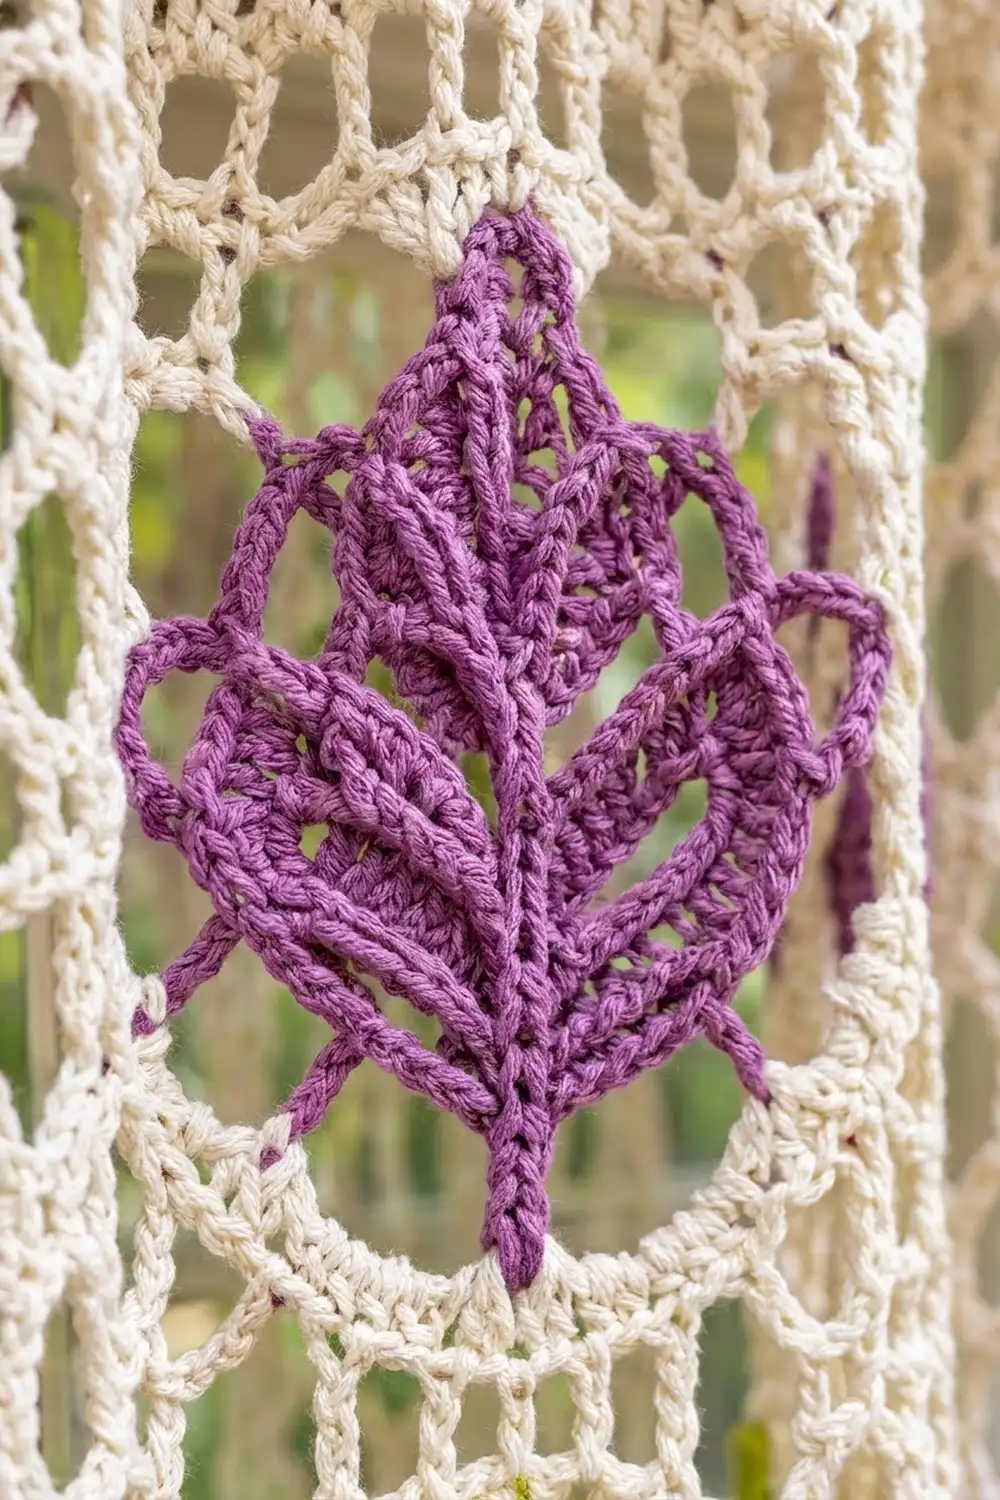
The style is botanical and cottage-garden. Each leaf has a serrated picot edge, a short stem, and raised veins made with surface slip stitches, so it stands out against the open netting. The sides and bottom finish with small shells.
This pattern uses US crochet terms. Each finished panel measures about 34.5 in (87.6 cm) wide and 74 in (188.0 cm) long without the tabs. It hangs about 76.5 in (194.3 cm) from the rod.
Here is the construction in order. Make 72 cream lace squares and 72 leaves, and sew a leaf to each square. Join the squares into two panels of 4 × 9 squares and add a three-round border. Finally, work 9 purple tabs across the top edge of each panel.
Finished Size and Construction
- Finished panel size: 34.5 in × 74 in (87.6 cm × 188.0 cm), plus tab loops
- Skill level: Intermediate
- Terminology: US
- Yarn weight: Worsted (#4) cotton
- Hook: 5.0 mm (H-8)
- Number of pieces: 2 panels; each has 36 squares and 36 leaf appliqués
- Layout: 4 squares wide × 9 squares tall per panel
- Square size: 8 in × 8 in (20.3 cm × 20.3 cm)
- Leaf size: about 5 in × 3 in (12.7 cm × 7.6 cm)
- Panel size before border: 32 in × 72 in (81.3 cm × 182.9 cm)
- Border depth: about 1.25 in (3.2 cm) on the sides and bottom, 0.75 in (1.9 cm) at the top
Materials
Mercerized or combed cotton works best for curtains. It holds the lace shape, resists fuzzing in the sun, and blocks crisply. Choose a worsted weight with about 100 yd (90 m) per 50 g, which is about 1.8 m per gram.
- Cream (squares, joining, border): 1,700 g, about 3,060 m
- Purple (leaves and tabs): 300 g, about 540 m
- Lime green (leaves): 250 g, about 450 m
These amounts cover both panels and include a margin of roughly 10–15%. Buy all the cream from one dye lot.
Tools: 5.0 mm (H-8) hook, tapestry needle, locking stitch markers, tape measure, blocking mats or a clean carpet, rust-proof pins, spray bottle, scissors.
Abbreviations (US Terms)
- ch: chain
- sl st: slip stitch
- sc: single crochet
- hdc: half double crochet
- dc: double crochet
- tr: treble crochet
- st(s): stitch(es)
- sp: space
- sk: skip
- rnd: round
- RS / WS: right side / wrong side
Picot: Ch 2, then sl st in the top of the stitch you just made.
Surface slip stitch: Hold the yarn behind the work. Insert the hook from front to back, pull up a loop, and draw it through the loop on the hook. This makes a raised chain line on the surface.
Gauge and Checkpoints
Gauge: 14 sc and 16 rows = 4 in (10.2 cm) in sc, blocked.
Before you make all 72 squares, make one square and one leaf and block both. Check these sizes:
- After Rnd 2: a solid circle about 2.75 in (7.0 cm) across
- After Rnd 5: a solid square about 5.5 in (14.0 cm) per side
- After Rnd 8, blocked: 8 in (20.3 cm) per side, with 28 sc per side
- Leaf, blocked: about 5 in × 3 in (12.7 cm × 7.6 cm)
If the square is larger than 8 in (20.3 cm), go down half a hook size. If it is smaller, go up half a size. An error of 0.25 in (0.6 cm) per square adds up to 2.25 in (5.7 cm) over the 9 squares of a panel’s length.
Lace Square (make 72, cream)
Rnd 1: Make a magic ring. Ch 3 (counts as dc), work 15 dc in the ring, and join with a sl st to the top of the ch-3. (16 dc)
Rnd 2: Ch 3 (counts as dc), dc in the same st, then 2 dc in each st around. Join. (32 dc)
Rnd 3: Ch 1, sc in the same st, ch 3, sk 1. Sc in the next st, ch 3, sk 1; repeat from * around. Join to the first sc. (16 sc, 16 ch-3 sps)*
Rnd 4: Sl st into the first ch-3 sp. Ch 1, sc in the same sp, ch 5. Sc in the next sp, ch 5; repeat from * around. Join. (16 ch-5 sps)*
Rnd 5 (conversion to square): Sl st into the first ch-5 sp. Ch 3 (counts as dc), then work (2 dc, ch 2, 3 dc) in the same sp. 4 dc in each of the next 3 sps, then (3 dc, ch 2, 3 dc) in the next sp; repeat from * 2 more times. Work 4 dc in each of the last 3 sps and join.
Count: (4 corner sps × 6 dc) + (12 side sps × 4 dc) = 72 dc, plus 4 corner ch-2 sps. Each side has 3 + 12 + 3 = 18 dc.*
Rnd 6 (net): Sl st in the next 2 dc and into the corner ch-2 sp. Ch 1, then (sc, ch 4, sc) in the same sp. Ch 3, sk 1 dc, sc in the next dc. [Ch 4, sk 2 dc, sc in the next dc] 5 times. Ch 3, sk 1 dc, then (sc, ch 4, sc) in the corner sp. Repeat from * around, leaving out the last corner, and join.
Count: each side’s 18 dc are used as 1 + 1 + (5 × 3) + 1 = 18. That gives 7 loops per side plus 4 corner loops, for 32 loops.*
Rnd 7 (net): Sl st into the corner ch-4 sp. Ch 1, then (sc, ch 4, sc) in the same sp. [Ch 4, sc in the next loop] 7 times, ch 4, then (sc, ch 4, sc) in the corner sp. Repeat from * around, leaving out the last corner, and join. (8 ch-4 loops per side plus 4 corner loops, for 36 loops)*
Rnd 8 (edge): Sl st into the corner sp. Ch 1, then (2 sc, ch 2, 2 sc) in the same sp. 3 sc in each of the next 8 loops, then (2 sc, ch 2, 2 sc) in the corner sp. Repeat from * around, leaving out the last corner. Join and fasten off.
Count: 2 + 24 + 2 = 28 sc per side, 112 sc total, plus 4 corner ch-2 sps.*
The 28 sc per side include the sc on each side of the corner sps. The ch-2 sps do not count as stitches.
Leaf Appliqué (make 36 purple, 36 lime)
Rnd 1: Ch 17. Start at the tip end and work into the 2nd ch from the hook:
– Side A: sc, hdc in the next ch, dc in the next 3 ch, tr in the next 6 ch, dc in the next 3 ch, hdc in the next ch. (15 sts)
– Base: 5 hdc in the last ch.
– Side B: Rotate and work along the other side of the chain: hdc in the next ch, dc in the next 3 ch, tr in the next 6 ch, dc in the next 3 ch, hdc in the next ch, sc in the next ch. (15 sts)
– Tip: (sc, ch 2, sc) in the skipped first ch. Join to the first sc.
(37 sts: 15 + 5 + 15 + 2, plus the tip ch-2 sp)
Rnd 2 (serrated edge): Ch 1.
– Side A: [Sc in the next st, hdc in the next st, (dc, picot) in the next st] 5 times. Work the first sc into the joining st. (15 sts, 5 points)
– Base: Sc in the next 2 sts, then sc in the center hdc. For the stem, ch 6, then sl st in the 2nd ch from the hook and in the next 4 ch. Sc again in the same center hdc, then sc in the next 2 sts. (6 sc)
– Side B: [(dc, picot) in the next st, hdc in the next st, sc in the next st] 5 times. (15 sts, 5 points, mirroring Side A)
– Tip: Sc in the next sc, (sc, ch 3, sc) in the ch-2 sp, sc in the last sc, and join. Fasten off, leaving a 20 in (50.8 cm) tail.
(40 sts: 15 + 6 + 15 + 4, not counting picots, the tip ch-3, or the stem)
Veins: Use a 24 in (61.0 cm) length of matching yarn and work on the RS. Surface slip stitch a center vein along the foundation chain, from the tip into the stem. Then add 4 side veins on each half, about 1 in (2.5 cm) apart. Angle them up and out from the center and stop 0.25 in (0.6 cm) from the edge. Weave in the ends on the WS.
Attach the Leaves
Steam-block the squares and leaves flat. Center a leaf on the RS of a square with the tip up and the stem down. The leaf covers the solid center and the frame, and its points reach into the Rnd 6 loops.
Using the leaf tail, whipstitch through the backs of the Rnd 2 sts all the way around and into the square. Leave the picots free. Tack down the end of the stem.
Make All Pieces
For both panels you need 72 cream squares, 36 purple leaves, and 36 lime leaves. Each panel uses 18 purple-leaf squares and 18 lime-leaf squares.
Panel layout (P = purple, L = lime), top row first:
Row 1:  P  L  P  L
Row 2:  L  P  L  P
Row 3:  P  L  P  L
Row 4:  L  P  L  P
Row 5:  P  L  P  L
Row 6:  L  P  L  P
Row 7:  P  L  P  L
Row 8:  L  P  L  P
Row 9:  P  L  P  L
Lay out the second panel the same way. You can also start it with L so the two panels mirror each other at the center of the window.
Joining
Method: Use a flat slip stitch join, worked in cream from the RS through the inner (back) loops of Rnd 8.
Stitch-to-stitch logic: Place two squares side by side, RS up. Sl st through both corner ch-2 sps. Then work 1 sl st through each matching pair of sc (28 sl sts), ending in the next pair of corner sps. Each sc meets exactly one sc, so no stitches are added or lost.
Order: Join each row of 4 squares into a strip. Then join the 9 strips along their long edges, lining up the seams. Where 4 corners meet, work 1 sl st through all the corner sps so the intersection lies flat.
Tension: Keep the sl sts as loose as the sc. Tight seams make the curtain pucker and shorten it. If you need to, use a 5.5 mm (I-9) hook for the joining only.
Size checkpoint: Each joined panel measures 32 in × 72 in (81.3 cm × 182.9 cm).
Border
Border gauge: 3.5 sts per in, the same as Rnd 8 of the squares.
– Top and bottom start with 4 × 28 = 112 sts (32 in / 81.3 cm).
– Each side starts with 9 × 28 = 252 sts (72 in / 182.9 cm).
Don’t work into the joined corner sps at the seams. The join already bridges them, so no stitches are added there.
Rnd 1: Join cream in an outer corner sp. Ch 1, then work (sc, ch 2, sc) in each outer corner sp and sc in each sc along the edges. Join.
Per side between corner sps: top and bottom have 112 + 2 = 114 sc; the sides have 252 + 2 = 254 sc. 736 sc total.
Rnd 2: Sl st into the corner sp and ch 2 (does not count as a st). Work (hdc, ch 2, hdc) in each corner sp and hdc in each sc. Join.
Per side: top and bottom have 116 hdc; the sides have 256 hdc. 744 hdc total.
Rnd 3: Start at a top corner and work around:
– Top edge: (sc, ch 2, sc) in the corner sp, then sc in each of the 116 hdc.
– Each side: Sc in the first hdc, then [sk 1, 3 dc in each of the next 2 hdc, sk 1, sc in the next hdc] 51 times. (1 + 51 × 5 = 256)
– Bottom corners: (3 dc, ch 2, 3 dc) in the corner sp.
– Bottom edge: Sc in the first hdc, then work the bracketed repeat 23 times. (1 + 23 × 5 = 116)
Join and fasten off.
Why the math works: The shell repeat uses 5 sts and each edge starts and ends on an sc. That means each edge needs a multiple of 5, plus 1. Since 256 = 51 × 5 + 1 and 116 = 23 × 5 + 1, every edge starts and ends on an sc, and each bottom corner shell sits evenly between two sides.
Tab Tops (9 per panel, purple)
Work across the 116 top sc with the RS facing:
– Leave 3 sts.
– [Work a tab over 6 sts, then leave 7 sts] 8 times.
– Work a tab over 6 sts, then leave the last 3 sts.
Check: 3 + (8 × 13) + 6 + 3 = 116.
Tab, Row 1: Join purple, ch 1, then sc in the same st and the next 5 sts. (6 sc)
Rows 2–20: Ch 1, turn, sc in each st. (6 sc)
Each strip is about 1.75 in (4.4 cm) wide and 5 in (12.7 cm) long. Fold it to the WS and sew the last row behind border Rnds 1–2. This forms a loop about 2.5 in (6.4 cm) tall that fits rods up to 1.5 in (3.8 cm) across.
Final Blocking
- Weave in all ends along the stitches, not across the open mesh.
- Soak the panel in cool water for 15 minutes. Press the water out without wringing.
- Roll the panel in towels to remove more moisture.
- Lay it flat and pin it to 34.5 in × 74 in (87.6 cm × 188.0 cm).
- Pin out each shell point and open every net loop evenly.
- Lift each leaf slightly so the veins and picots stand up.
- Let it dry completely, for at least 24 hours, before unpinning.
Final Quality-Control Checklist
- All 72 squares measure 8 in (20.3 cm), with 28 sc per side.
- Leaf colors follow the checkerboard, and every tip points up.
- Every leaf is sewn down all the way around, with the picots free.
- Seams lie flat and line up at every 4-way corner.
- Border Rnd 2 has 116 hdc on the top and bottom and 256 hdc on each side.
- Shells are evenly spaced, with a full shell at each bottom corner.
- Each panel has 9 evenly spaced tabs.
- Both panels block to the same size.
Troubleshooting
- The square cups: The Rnd 4 chains are too tight. Loosen them or add 1 ch to each loop.
- The square ruffles: The Rnd 5 dc are too loose. Crochet more tightly or go down a hook size.
- The leaf curls: Steam it flat before sewing, and keep the surface veins loose.
- The seams pucker: The joining sl sts are too tight. Redo the join with a larger hook.
- The border counts are off: Recount the 28 sc on each square edge. Make sure you skipped the corner sps at the seams.
- The panel stretches when hung: Cotton drops under its own weight. Hang it for a day, then re-block it to 74 in (188.0 cm).
Care
Hand wash in cool water with mild detergent, then dry flat and re-pin to size; do not tumble dry. Strong sun can fade the colors, so swap the panels’ positions now and then.
Final Notes
The measurements build on each other:
– 14 sc = 4 in (10.2 cm), so 28 sc make an 8 in (20.3 cm) square.
– 4 × 9 squares make a 32 in × 72 in (81.3 cm × 182.9 cm) panel.
– The three-round border brings each panel to 34.5 in × 74 in (87.6 cm × 188.0 cm).
Get the first square right and everything after it falls into place.
Happy crocheting!