

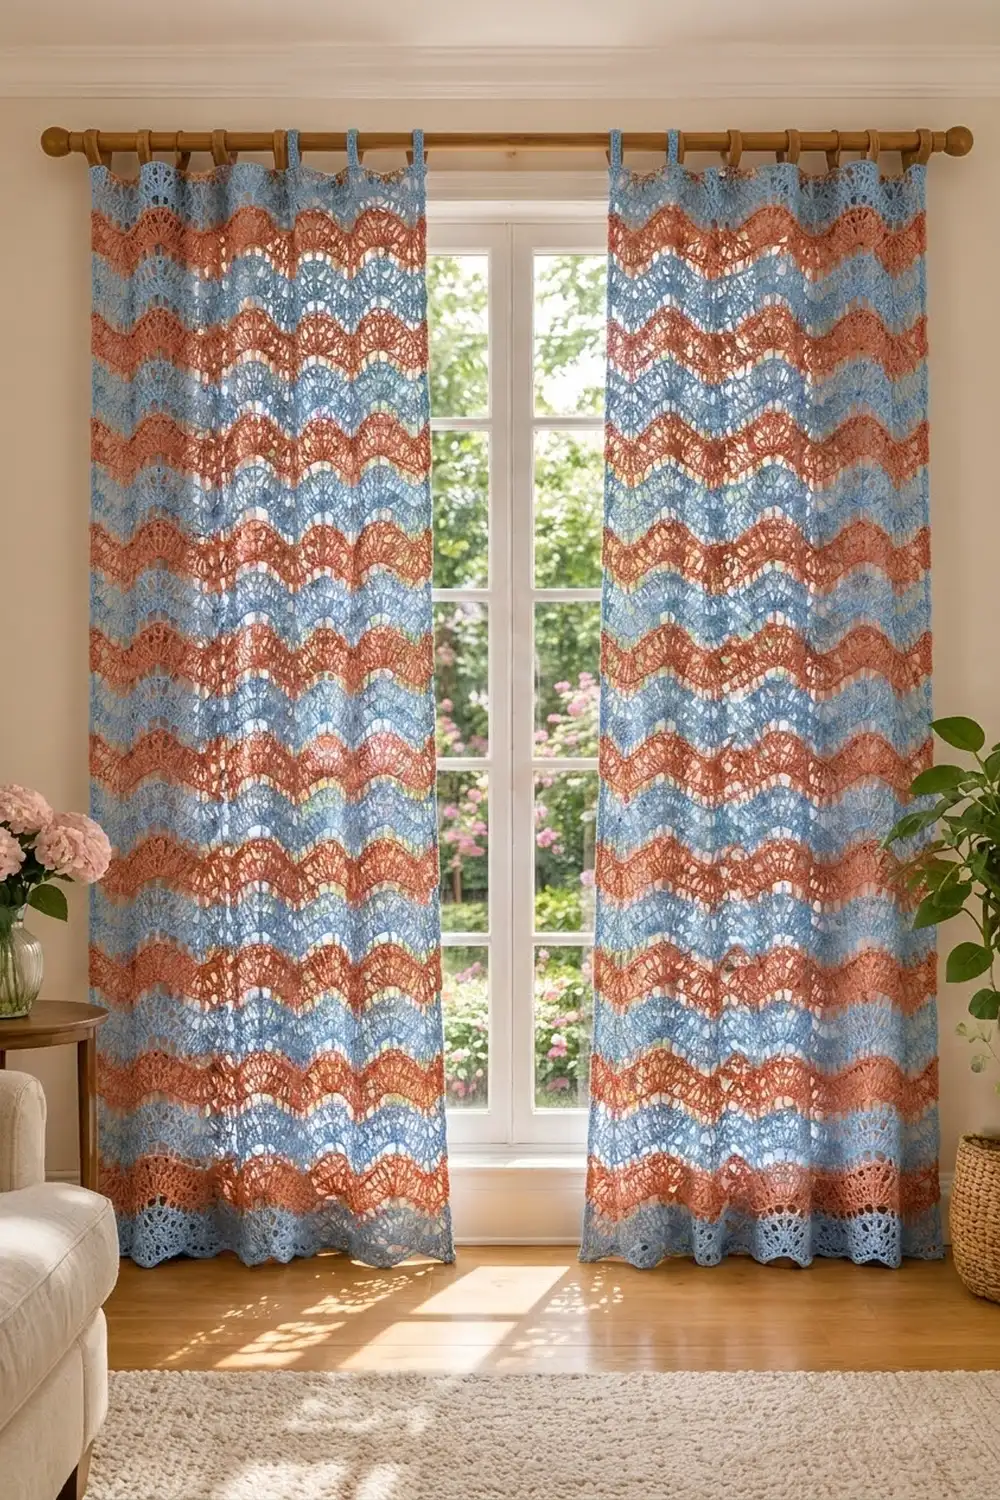
These curtains combine a gentle wave pattern with airy lace. Fan shells open at each crest, clusters pull the fabric down into each trough, and open mesh between them lets daylight through. The result is a soft, coastal look that filters light without blocking the view.
The palette alternates sky blue and terracotta in 4-row stripes. Blue stripes start and end each panel, and blue also frames the top band, the hanging tabs and the side edging. The pattern uses US crochet terms throughout.
Each finished panel measures 30.5 in (77.5 cm) wide by 78.75 in (200.0 cm) long, not counting the tabs. The tab loops add 2 in (5.1 cm) above the top edge, so the total hanging length is 80.75 in (205.1 cm).
Each panel is worked in one piece from the bottom up. You work 124 ripple rows, then 2 leveling rows that straighten the top edge. Next, 9 tabs are worked directly off the top band and folded into loops. Finally, a single-crochet edging goes down one side, across the bottom and up the other side. Make two panels.
Finished Size and Construction
- Finished size (per panel): 30.5 in x 78.75 in (77.5 cm x 200.0 cm), plus 2 in (5.1 cm) of tab loops
- Skill level: Intermediate
- Terminology: US
- Yarn weight: Worsted (#4) cotton or cotton blend
- Hook: 5.0 mm (H-8)
- Number of pieces: 2 identical panels, not joined to each other
- Layout: one panel on each side of the window
- Panel size before border: 30 in x 78.5 in (76.2 cm x 199.4 cm)
- Border depth: 0.25 in (0.6 cm) on each side and along the bottom; no border along the top
Materials
Use a smooth, mercerized or combed worsted-weight cotton. Cotton holds the lace open, drapes well and doesn’t stretch out of shape on the rod the way acrylic can. Avoid fuzzy yarns, because they blur the fans and fill in the mesh.
The amounts below are for both panels and assume about 200 m per 100 g:
- Color A, Sky Blue: 1,520 m (760 g)
- Color B, Terracotta: 1,220 m (610 g)
These quantities include a margin of about 10% for the gauge swatch and small tension differences.
Tools:
– 5.0 mm (H-8) crochet hook
– Tapestry needle
– Stitch markers (at least 12)
– Measuring tape
– Rust-proof pins and a blocking surface at least 32 in x 80 in (81.3 cm x 203.2 cm); a clean floor with towels works
– Spray bottle
– Scissors
Abbreviations (US Terms)
- ch: chain
- sk: skip
- st(s): stitch(es)
- sc: single crochet
- hdc: half double crochet
- dc: double crochet
- tr: treble crochet
- sp: space
- RS / WS: right side / wrong side
- rep: repeat
Special stitches:
– dc3tog (double crochet 3 together): [Yarn over, insert hook in next st, pull up a loop, yarn over, draw through 2 loops] 3 times, then yarn over and draw through all 4 loops on the hook.
– dc5tog (double crochet 5 together): Work as dc3tog, but repeat the bracketed steps 5 times, then yarn over and draw through all 6 loops on the hook.
– Fan: (dc, ch 1, dc, ch 1, dc) all in the same st. One fan makes 5 sts.
Counting rule: Each dc, each ch-1 sp and each cluster top counts as 1 st. In the ripple rows, work into a ch-1 sp exactly as if it were a stitch.
Gauge and Checkpoints
Gauge in pattern, after blocking:
– One 18-st ripple repeat measures 5 in (12.7 cm) wide, from fan center to fan center.
– 8 ripple rows measure 5 in (12.7 cm) tall, so each row is 0.625 in (1.6 cm).
– 4 sc measure 1 in (2.5 cm) when worked into row-ends (the border gauge).
Test piece first. Ch 39 and work Rows 1–8 below over 37 sts. Each row has 1 fan and the cluster at its center becomes dc3tog; rows still begin and end with dc3tog. This gives 2 repeats, about 10 in (25.4 cm) wide. Block it, let it dry and measure the center repeat.
- If your repeat is wider than 5 in (12.7 cm) or 8 rows are taller than 5 in, go down one hook size.
- If your repeat is narrower or the rows are shorter, go up one hook size.
Width matters most. An error of 0.25 in (0.6 cm) per repeat adds up to 1.5 in (3.8 cm) across the panel.
Checkpoints, measured flat at the edge:
– Row 8: 5 in (12.7 cm)
– Row 40: 25 in (63.5 cm)
– Row 80: 50 in (127.0 cm)
– Row 120: 75 in (190.5 cm)
– Row 124: 77.5 in (196.9 cm)
– Width throughout: 30 in (76.2 cm)

Panel Pattern
Color sequence: Work Rows 1–4 in A, Rows 5–8 in B, and keep alternating every 4 rows. Rows 121–124 are worked in A, which gives 16 blue stripes and 15 terracotta stripes.
To change color, complete the final yarn-over of the last stitch of the previous row with the new color.
Every color change happens at the start of a RS row, on the same edge of the panel. Carry the unused color loosely up that edge, catching it under the working yarn every 2 rows. The border will enclose these carried strands later.
Foundation and Ripple Rows
With A, ch 111.
Row 1 (RS): Dc3tog over the 3rd, 4th and 5th ch from the hook. The 2 skipped ch do not count; this makes the half valley at the edge.
[Ch 1, sk next ch, dc in next ch] 3 times, fan in next ch, [ch 1, sk next ch, dc in next ch] 3 times, dc5tog over next 5 ch.
Rep from * 4 more times, then rep from * to ** once. Dc3tog over the last 3 ch. Turn.
(109 sts: 2 dc3tog + 6 fans x 5 sts + 5 dc5tog + 12 mesh sections x 6 sts = 2 + 30 + 5 + 72 = 109)*
Row 2: Ch 2 (does not count). Dc3tog over the first 3 sts.
[Ch 1, sk next st, dc in next st] 3 times, fan in next st, [ch 1, sk next st, dc in next st] 3 times, dc5tog over next 5 sts.
Rep from * 4 more times, then rep from * to ** once. Dc3tog over the last 3 sts. Turn. (109 sts)*
Check the alignment: Each fan should land in the center dc of the fan below. Each dc5tog should be centered on the cluster below.
The row uses 3 + (5 x 18) + 13 + 3 = 109 sts and makes 109 sts. The stitch count never changes: each fan adds 4 sts, each dc5tog removes 4, and the two edge dc3tog remove the last 4.
Rows 3–124: Rep Row 2, changing color every 4 rows. (109 sts in every row)
At the end of Row 124 the panel measures 30 in x 77.5 in (76.2 cm x 196.9 cm) at the edges.
Leveling Rows
These rows fill the wave troughs with tall stitches and keep the stitches over the crests short, so the top edge comes out straight.
Row 125 (RS, A): Ch 4 (does not count). Tr in the first 3 sts.
Dc in next 2 sts, hdc in next 2 sts, sc in next 5 sts, hdc in next 2 sts, dc in next 2 sts, tr in next 5 sts.
Rep from * 4 more times, then rep from * to ** once. Tr in the last 3 sts. Turn.
(109 sts: 3 + 5 x 18 + 13 + 3)*
The 5 sc should sit over the fan, and each group of 5 tr should sit over a dc5tog.
Row 126 (WS, A): Ch 1, sc in each st across. Turn. (109 sc)
Checkpoint: The top edge should now be nearly straight, and the panel should measure 30 in x 78.5 in (76.2 cm x 199.4 cm). Do not fasten off yet.
Tabs
There are 9 tabs, each 5 sts wide, with gaps of 8 sts between them: 9 x 5 + 8 x 8 = 45 + 64 = 109 sts. Each tab is about 1.4 in (3.6 cm) wide, and each gap is about 2.2 in (5.6 cm).
Tab 1, Row 1: Ch 1, sc in the first 5 sts of Row 126. Turn. (5 sc)
Rows 2–18: Ch 1, sc in each st across. Turn. (5 sc)
The tab measures about 4 in (10.2 cm) long. Fasten off, leaving a 12 in (30.5 cm) tail.
Tabs 2–9: Sk the next 8 sts of Row 126 and join A in the next st. Work Rows 1–18 as for Tab 1. Tab 9 should end exactly in the last st of Row 126.
Form the loops: Fold each tab toward the WS. With the tail, whipstitch Row 18 of the tab to the WS of the panel, along the base of Row 126 directly behind the tab. Each loop stands 2 in (5.1 cm) tall and fits a rod up to 1.25 in (3.2 cm) in diameter.
Make Both Panels
Make 2 identical panels. Per panel:
- Color A: Rows 1–4, 9–12 … 121–124 (64 rows), plus the leveling rows, 9 tabs and the border
- Color B: Rows 5–8, 13–16 … 117–120 (60 rows)
Window layout (panels hang separately and are not joined):
[ROD ===========================================]
 [Panel 1]        [ window ]        [Panel 2]
 A  ~~~~~                            A  ~~~~~
 B  ~~~~~                            B  ~~~~~
 A  ~~~~~      (16 A + 15 B          A  ~~~~~
 ...            stripes each)        ...
 A  ~~~~~                            A  ~~~~~
Keep the stripe order the same on both panels so the waves line up across the window.
Border
Border gauge: 4 sc = 1 in (2.5 cm) along a row-end edge.
The border is one row of sc in A, worked down the first side, across the bottom and up the second side. The top band and tabs are not bordered.
Border row: With the RS facing, join A in the row-end of Row 126 at the top of the edge where the carried yarns sit. Ch 1.
First side, working down (314 sc):
– 1 sc in the end of Row 126
– 3 sc in the end of Row 125
– 2 sc in the end of the next row, 3 sc in the end of the following row; rep from * to * 61 more times (62 times in all) to cover Rows 124 to 1. That is 310 sc.
Total: 1 + 3 + 310 = 314 sc. Work over the carried strands as you go so they are enclosed.
Corner: Ch 1 (not counted).
Bottom edge (109 sc): Working in the free loops of the foundation chain, sc in each of the 109 ch. Follow the scallops; do not add or skip any stitches.
Corner: Ch 1 (not counted).
Second side, working up (314 sc):
– 3 sc in the end of the next row, 2 sc in the end of the following row; rep from * to * 61 more times (62 times in all). That is 310 sc.
– 3 sc in the end of Row 125
– 1 sc in the end of Row 126
Total: 314 sc. Fasten off.
Total for the border: 314 + 109 + 314 = 737 sc, plus 2 corner ch.
Why the math works:
– Sides: Each ripple row is 0.625 in (1.6 cm) tall. At 4 sc per inch, that equals 2.5 sc, which is why you alternate 2 and 3 sc per row-end.
– Top band: The tr row and the sc row are 1 in (2.5 cm) tall together, which matches their 3 + 1 = 4 sc.
– Side length: 314 sc ÷ 4 = 78.5 in (199.4 cm), which equals the panel’s side length before the border, so the edge neither flares nor pulls in.
– Bottom: One sc per chain matches the foundation exactly and keeps the scallops intact.
– Final size: The border adds 0.25 in (0.6 cm) to each side and to the bottom, giving 30.5 in x 78.75 in (77.5 cm x 200.0 cm).
Final Blocking
- Weave in all ends along the stripe lines or inside the border, never across the open mesh.
- Soak the panel in cool water for 15 minutes, then press out the water. Do not wring it.
- Roll it in towels to remove excess moisture.
- Lay the panel flat, RS up, on the blocking surface.
- Pin the side edges straight to a width of 30.5 in (77.5 cm).
- Pin the length to 78.75 in (200.0 cm), excluding the tabs.
- Pin each bottom scallop at its lowest point so the waves are even.
- Open each fan with your fingers and pin the crests if needed.
- Straighten the tabs and smooth the top band.
- Let the panel dry completely, usually 24–48 hours, then remove the pins.
Final Quality-Control Checklist
- [ ] Every row has 109 sts, with 6 fans and 5 dc5tog clusters.
- [ ] The fans stack in straight vertical columns.
- [ ] There are 16 blue and 15 terracotta stripes, with blue at the top and bottom.
- [ ] The top band is straight and has 109 sc.
- [ ] There are 9 tabs, evenly spaced and all folded to the WS.
- [ ] The border has 314 sc on each side and 109 sc along the bottom.
- [ ] No carried strands show on the RS.
- [ ] Each panel measures 30.5 in x 78.75 in (77.5 cm x 200.0 cm).
- [ ] Both panels match in length to within 0.5 in (1.3 cm).
Troubleshooting
- The fans drift sideways: You missed or added a stitch. Count the stitches between clusters; there should be 6 mesh sts on each side of every fan.
- The panel narrows or widens: Check that both edges use dc3tog. Recount to 109.
- The side edges ruffle: Your border tension is loose. Work 2 sc into every row-end for a few rows, then return to the 2/3 rhythm.
- The side edges pull in: Work the border more loosely, or go up one hook size for the border only.
- The top is still wavy: Make sure the 5 tr sit over the clusters and the 5 sc sit over the fans in Row 125.
- The two panels differ in length: Block the shorter panel to match. If the difference is more than 1 in (2.5 cm), add or remove one 4-row stripe pair on that panel.
- The tabs twist: Whipstitch each tab’s last row square to its own base, not off to one side.
Care
Hand wash or machine wash cold on a gentle cycle inside a mesh bag, then lay flat to dry. Reshape and pin the scallops if needed. Do not hang the panels wet, because the weight will stretch the lace.
Final Notes
The measurement chain is the key to this pattern. Each 18-st repeat is 5 in (12.7 cm) wide, so 6 repeats make 30 in (76.2 cm). Each row is 0.625 in (1.6 cm) tall, so 124 rows make 77.5 in (196.9 cm), and the 2 leveling rows bring the panel to 78.5 in (199.4 cm). The 314-sc side border matches that length exactly, and the border brings each panel to 30.5 in x 78.75 in (77.5 cm x 200.0 cm). The tab loops add 2 in (5.1 cm) above the top. Check your swatch first, then check the panel at each checkpoint, and your two panels will hang straight and match.
Happy crocheting!