
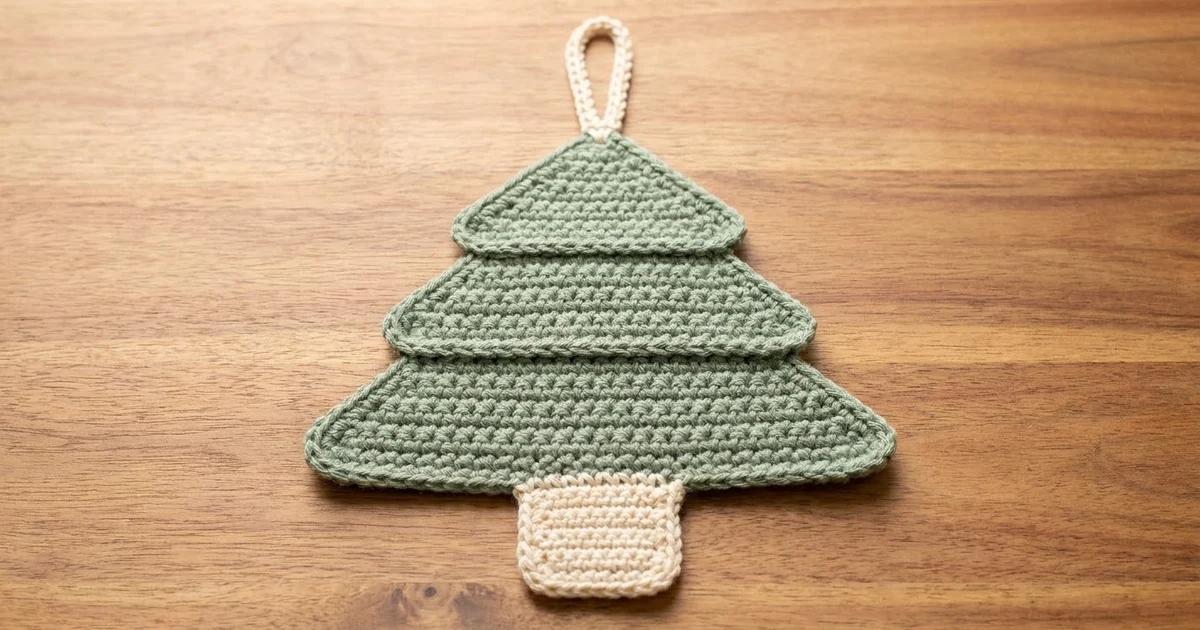
This little evergreen is a flat Christmas tree ornament with three tiers, a cream trunk and a cream chain hanging loop. Each green tier flares out past the one above it, which gives the tree a classic stepped shape. A fine horizontal ridge marks the line where each upper tier sits over the one below.
The colors are calm: a soft sage green for the branches and a warm cream for the trunk and loop. Dense single crochet gives the surface a pebbly texture. It looks crisp on a branch and holds its shape without stiffener.
The pattern uses US crochet terms. The finished tree measures about 3.6 in (9.1 cm) wide and 4.1 in (10.4 cm) tall, not counting the loop. The loop adds about 2.5 in (6.4 cm) above the top.
The ornament is one piece worked flat in rows from the bottom up. You start with the cream trunk, switch to green and build three tiers. Each tier starts with a widening row that adds stitches at both ends, then narrows with even decreases. A green single crochet edging finishes the outline, and you add the loop last. There is no sewing and nothing to join.
Finished Size and Construction
- Finished size: 3.6 in (9.1 cm) wide x 4.1 in (10.4 cm) tall, plus a 2.5 in (6.4 cm) loop
- Skill level: Easy / advanced beginner
- Terminology: US crochet terms
- Yarn weight: Worsted (#4)
- Hook: 4.0 mm (US G-6)
- Number of pieces: 1 (the loop is worked on directly)
- Layout: One flat tree, worked bottom-up in rows
- Piece size before edging: 3.4 in (8.6 cm) wide x 4.0 in (10.2 cm) tall
- Edging depth: 1 round of sc, about 0.1 in (0.3 cm) on each edged side
Materials
Use a smooth worsted weight yarn with good stitch definition. Cotton or a cotton blend gives the crispest edges, but a soft acrylic also works. Avoid fuzzy or very splitty yarn, because it blurs the ridges between the tiers.
- Sage green: 10 g (about 20 m), for the tiers and edging
- Cream: 4 g (about 8 m), for the trunk and hanging loop
Both amounts include extra for your test piece and tails.
Tools:
- 4.0 mm (US G-6) crochet hook
- Tapestry needle
- Scissors
- 2 stitch markers
- Rustproof pins and a blocking mat or folded towel
- Spray bottle with water
Abbreviations (US Terms)
- ch – chain
- sc – single crochet
- sc2tog – single crochet 2 together (decrease)
- fsc – foundation single crochet
- BLO – back loop only
- FLO – front loop only
- sl st – slip stitch
- st(s) – stitch(es)
- RS / WS – right side / wrong side
Special stitch – fsc (used to extend a row):
- Insert your hook into the base of the last stitch made (the “chain” part at the bottom of the stitch).
- Yarn over and pull up a loop (2 loops on hook).
- Yarn over and pull through 1 loop. This forms the new base chain.
- Yarn over and pull through both loops.
For each following fsc, insert your hook into the base chain of the fsc you just made.
Gauge and Checkpoints
Gauge: 20 sc and 20 rows = 4 in (10.2 cm), which is 5 sts and 5 rows per 1 in (2.5 cm).
Your stitch gauge and row gauge need to match. When they do, each edging stitch fits exactly 1 stitch or 1 row end, and the outline lies flat. If only one of them matches, the slopes will ripple or pucker.
Make the trunk first and use it as your test piece. Then check your measurements at each stage:
- After Row 6 (trunk): 1.0 in (2.5 cm) wide x 1.2 in (3.0 cm) tall.
- After Row 7 (widest row): 3.4 in (8.6 cm) across.
- After Row 11 (top of tier 1): total height 2.2 in (5.6 cm).
- After Row 16 (top of tier 2): total height 3.2 in (8.1 cm).
- After Row 20 (top of tier 3): total height 4.0 in (10.2 cm).
- After the edging: 3.6 in (9.1 cm) x 4.1 in (10.4 cm).
If your trunk is too big, go down one hook size (3.75 mm). If it is too small, go up one size (4.5 mm). A slightly different size still makes a lovely ornament. Loose stitches make the tier edges curl, though, so if you’re between sizes, choose the tighter one.
Pattern
Row 1 is a RS row, so every odd row is RS and every even row is WS. Place a marker on the RS of Row 1 so you can tell the sides apart. The turning ch 1 never counts as a stitch.
Trunk (Cream)
With cream, ch 6.
Row 1 (RS): Sc in 2nd ch from hook and in each ch across. (5 sts)
Rows 2–5: Ch 1, turn, sc in each st across. (5 sts)
Row 6 (WS): Ch 1, turn, sc in each of the first 4 sts. Sc in the last st, changing to green on the final yarn over. Cut cream, leaving a 4 in (10.2 cm) tail. (5 sts)
With green, ch 7. These chains will become the right-hand extension of tier 1.
Checkpoint: the trunk is 1.0 in (2.5 cm) wide x 1.2 in (3.0 cm) tall.
Tier 1 (Green)
Row 7 (RS, widening row): Turn. Sc in 2nd ch from hook and in each of the next 5 ch (6 sts). Sc in each of the 5 trunk sts. Work 6 fsc, starting the first fsc in the base of the last sc made. (6 + 5 + 6 = 17 sts)
This is a conversion row. You work 5 sts into the 5 existing sts and add 12 new sts, 6 at each end. The 6 sts at each end stick out past the trunk and form the wide, flat underside of the bottom tier.
Row 8: Ch 1, turn, sc2tog, sc in each of the next 13 sts, sc2tog. (15 sts)
Row 9: Ch 1, turn, sc2tog, sc in each of the next 11 sts, sc2tog. (13 sts)
Row 10: Ch 1, turn, sc2tog, sc in each of the next 9 sts, sc2tog. (11 sts)
Row 11: Ch 1, turn, sc2tog, sc in each of the next 7 sts, sc2tog. (9 sts)
At the end of Row 11, ch 3 for the tier 2 extension.
Checkpoint: tier 1 is a trapezoid, 3.4 in (8.6 cm) wide at the bottom and 1.8 in (4.6 cm) at the top. Total height is 2.2 in (5.6 cm).
Tier 2 (Green)
Row 12 (WS, widening row): Turn. Sc in 2nd ch from hook and in the next ch (2 sts). Sc in FLO of each of the 9 sts. Work 2 fsc, starting in the base of the last sc made. (2 + 9 + 2 = 13 sts)
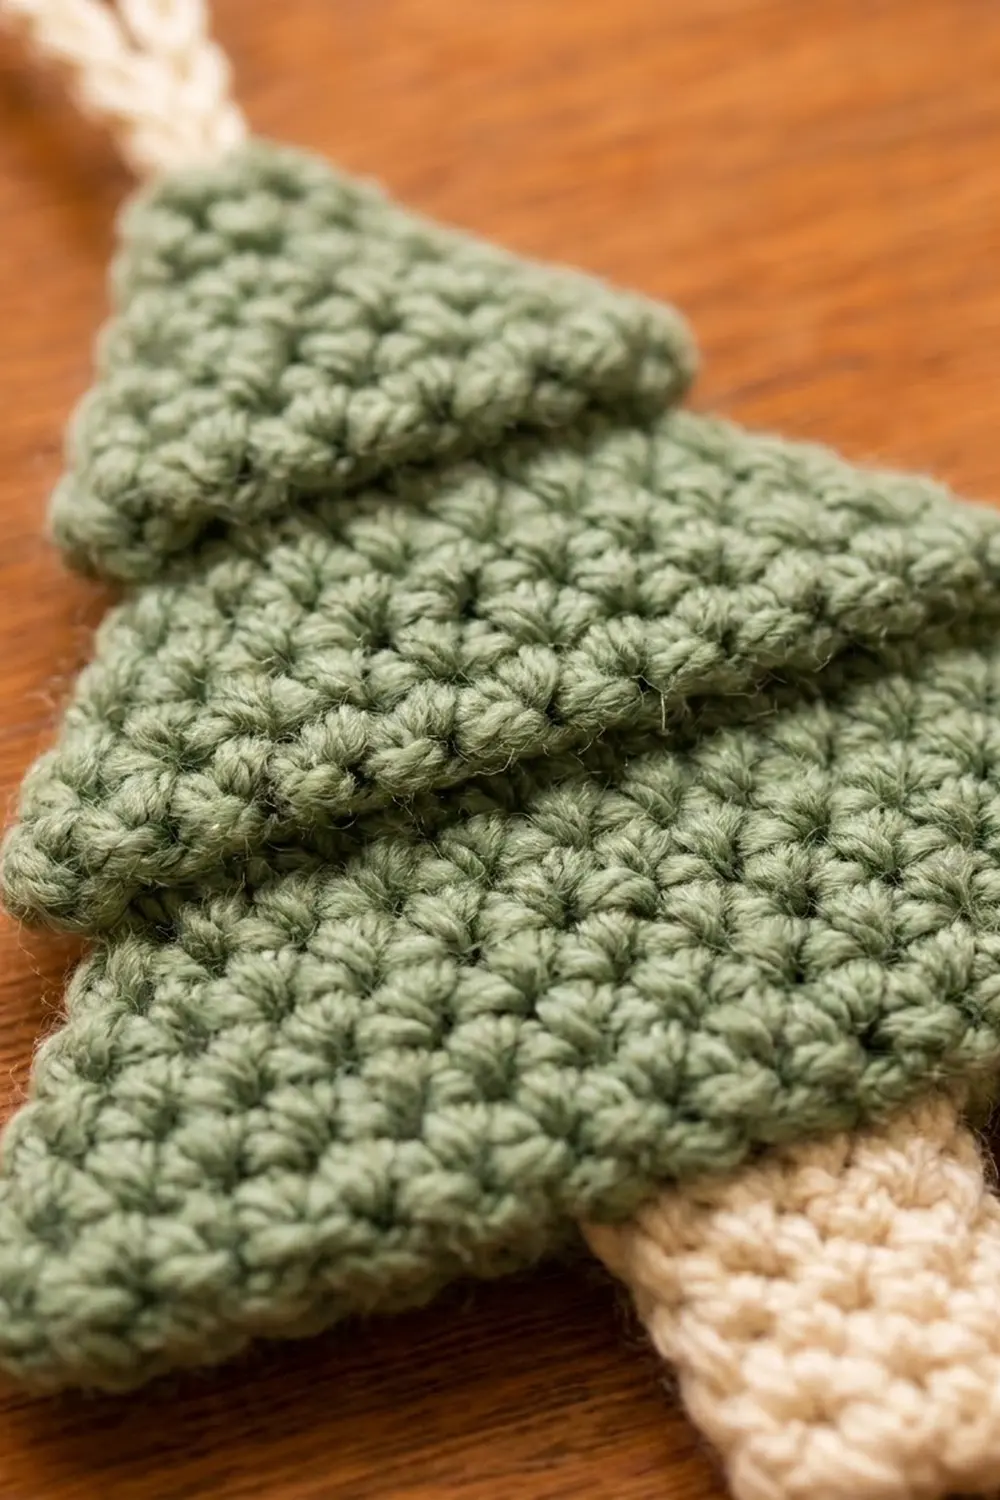
This is a conversion row. You work 9 sts into the 9 existing sts and add 4 new sts, 2 at each end. Because the WS is facing, the unworked back loops of Row 11 end up on the RS and form the ridge under tier 2. Each 2-stitch extension forms a 0.4 in (1.0 cm) ledge that hangs over tier 1.
Row 13: Ch 1, turn, sc2tog, sc in each of the next 9 sts, sc2tog. (11 sts)
Row 14: Ch 1, turn, sc2tog, sc in each of the next 7 sts, sc2tog. (9 sts)
Row 15: Ch 1, turn, sc2tog, sc in each of the next 5 sts, sc2tog. (7 sts)
Row 16: Ch 1, turn, sc2tog, sc in each of the next 3 sts, sc2tog. (5 sts)
At the end of Row 16, ch 3.
Checkpoint: tier 2 is 2.6 in (6.6 cm) wide at the bottom and 1.0 in (2.5 cm) at the top. Total height is 3.2 in (8.1 cm).
Tier 3 (Green)
Row 17 (RS, widening row): Turn. Sc in 2nd ch from hook and in the next ch (2 sts). Sc in BLO of each of the 5 sts. Work 2 fsc, starting in the base of the last sc made. (2 + 5 + 2 = 9 sts)
This is a conversion row. You work 5 sts into the 5 existing sts and add 4 new sts. On this RS row, the unworked front loops of Row 16 face you and form the ridge under tier 3.
Row 18: Ch 1, turn, sc2tog, sc in each of the next 5 sts, sc2tog. (7 sts)
Row 19: Ch 1, turn, sc2tog, sc in each of the next 3 sts, sc2tog. (5 sts)
Row 20: Ch 1, turn, sc2tog, sc in the next st, sc2tog. (3 sts)
Fasten off green, leaving a 4 in (10.2 cm) tail.
Checkpoint: tier 3 is 1.8 in (4.6 cm) wide at the bottom and 0.6 in (1.5 cm) across the flat top. The whole tree now measures 3.4 in (8.6 cm) x 4.0 in (10.2 cm).
The height adds up like this: trunk 1.2 in (3.0 cm) + tier 1 1.0 in (2.5 cm) + tier 2 1.0 in (2.5 cm) + tier 3 0.8 in (2.0 cm) = 4.0 in (10.2 cm).
Edging
Edging gauge: Work 1 sc in each stitch base or row end, and 3 sc in each outer corner. At 5 sts and 5 rows per inch, 1 sc per row end matches the fabric exactly, so the slopes stay flat.
Hold the tree with the RS facing you. You will work counterclockwise, starting on the underside of tier 1 just to the right of the trunk. Leave the trunk unedged so it stays a crisp cream rectangle.
Edging round (RS): Join green with a sc in the base of the first extension st on the right side of Row 7, next to the trunk. Then work as follows.
Right side, going up:
- Tier 1 underside: Sc in the bases of the next 4 extension sts, then 3 sc in the base of the outermost st. (5 + 3 = 8 sts, including the joining sc)
- Tier 1 slope: 1 sc in each row end of Rows 8–11. (4 sts)
- Tier 2 ledge: Sc in the base of the inner extension st of Row 12, then 3 sc in the base of the outer st. (1 + 3 = 4 sts)
- Tier 2 slope: 1 sc in each row end of Rows 13–16. (4 sts)
- Tier 3 ledge: Sc in the base of the inner extension st of Row 17, then 3 sc in the base of the outer st. (1 + 3 = 4 sts)
- Tier 3 slope: 1 sc in each row end of Rows 18–19. (2 sts)
Right side total: 8 + 4 + 4 + 4 + 4 + 2 = 26 sts.
Top: 3 sc in the first st of Row 20, sc in the middle st, 3 sc in the last st. (3 + 1 + 3 = 7 sts)
Left side, going down:
- Tier 3 slope: 1 sc in each row end of Rows 19–18. (2 sts)
- Tier 3 ledge: 3 sc in the base of the outer extension st of Row 17, then sc in the base of the inner st. (3 + 1 = 4 sts)
- Tier 2 slope: 1 sc in each row end of Rows 16–13. (4 sts)
- Tier 2 ledge: 3 sc in the base of the outer extension st of Row 12, then sc in the base of the inner st. (3 + 1 = 4 sts)
- Tier 1 slope: 1 sc in each row end of Rows 11–8. (4 sts)
- Tier 1 underside: 3 sc in the base of the outermost extension st of Row 7, then sc in the bases of the other 5 extension sts. (3 + 5 = 8 sts)
Left side total: 2 + 4 + 4 + 4 + 4 + 8 = 26 sts.
Edging total: 26 + 7 + 26 = 59 sts. Sl st into the side of the trunk at Row 6 and fasten off.
Why the math works:
- The end stitch of each widening row sits at a corner. Its row end is covered by the 3-sc corner, so it is not counted a second time.
- The two sides mirror each other at 26 sts each.
- The 3-sc corners keep all 8 outer corners sharp without flaring.
- Each ledge gets only 1 sc in its inner stitch. This keeps the inner corners tucked against the tier above, so each step reads cleanly.
Hanging Loop (Cream)
Join cream with a sl st in the middle sc of the top edge, between the two top corners. Ch 30, then sl st into the same st. Fasten off. Bring both tails to the WS and knot them together firmly.
The loop hangs about 2.5 in (6.4 cm) above the tree. For a sturdier loop, hold 2 strands of cream together.
Final Blocking
- Weave in all tails on the WS. Keep cream tails in the trunk and green tails in the tiers.
- Lay the tree RS up on a blocking mat or folded towel.
- Mist it lightly with water until damp, not soaked.
- Pin the trunk to 1.0 in (2.5 cm) wide, keeping its sides straight.
- Pin the bottom tier to 3.6 in (9.1 cm) across, including the edging, with a pin at each outer corner.
- Pin the tier 2 and tier 3 corners so each ledge is level and the tree is 4.1 in (10.4 cm) tall from the trunk base to the top edge.
- Lay the loop straight above the top center.
- Let it dry completely, for at least 4 hours, before you unpin it.
Final Quality-Control Checklist
- The trunk is 5 sts wide and 6 rows tall, in cream only.
- Tiers 1, 2 and 3 end with 9, 5 and 3 sts.
- A visible ridge runs under tier 2 and under tier 3 on the RS.
- Each side of the edging has 26 sts, and the top has 7.
- All 8 outer corners are sharp and lie flat.
- The finished size is 3.6 in (9.1 cm) x 4.1 in (10.4 cm).
- The loop is centered and about 2.5 in (6.4 cm) tall.
- No tails show on the RS.
Troubleshooting
The tiers curl upward. Your tension is too loose or your decreases are too tight. Go down a hook size, or work each sc2tog a little more loosely.
A ridge shows on the wrong side. Check that Row 12 (WS) uses FLO and Row 17 (RS) uses BLO. If both rows use the same loop, one ridge ends up on the back.
One side of the tree is longer. Count the extension stitches. Row 7 needs 6 at each end, and Rows 12 and 17 need 2 at each end.
The edging ripples on the slopes. Your rows are taller than your stitches are wide. Skip 1 row end per slope, or use a hook one size smaller for the edging only.
The edging pulls in. Make sure you work 3 sc in every outer corner and 1 sc in the inner stitch of each ledge.
The fsc look loose. Pull the first loop up snugly before the chain step. Each fsc should be the same height as the sc beside it.
Care
Hand wash in cool water with mild soap. Press the water out in a towel and lay the ornament flat to dry, pinning it again if needed. Store it flat between seasons so the ledges stay crisp.

Final Notes
Every measurement grows from the small trunk:
- At 5 sts and 5 rows per inch, the 5-stitch trunk is 1.0 in (2.5 cm) wide.
- Row 7 widens to 17 sts, or 3.4 in (8.6 cm).
- Rows 12 and 17 each add 4 sts to start the 13-st and 9-st tiers.
- Twenty rows give 4.0 in (10.2 cm) of height.
- The 59-st edging brings the tree to 3.6 in (9.1 cm) x 4.1 in (10.4 cm).
Check your trunk first, and the rest of the tree will come out the right size.
Happy crocheting!